
Picture a snowman made of two circles, then stick a rainbow of feathers behind it. That is honestly most of a cartoon turkey. In this lesson I'll show you how to draw a turkey step by step, starting with light guide circles and ending with a smiling bird and a tail fan in red, orange and yellow. Lots of families draw one before Thanksgiving, but a turkey works as a farm picture any time of year.
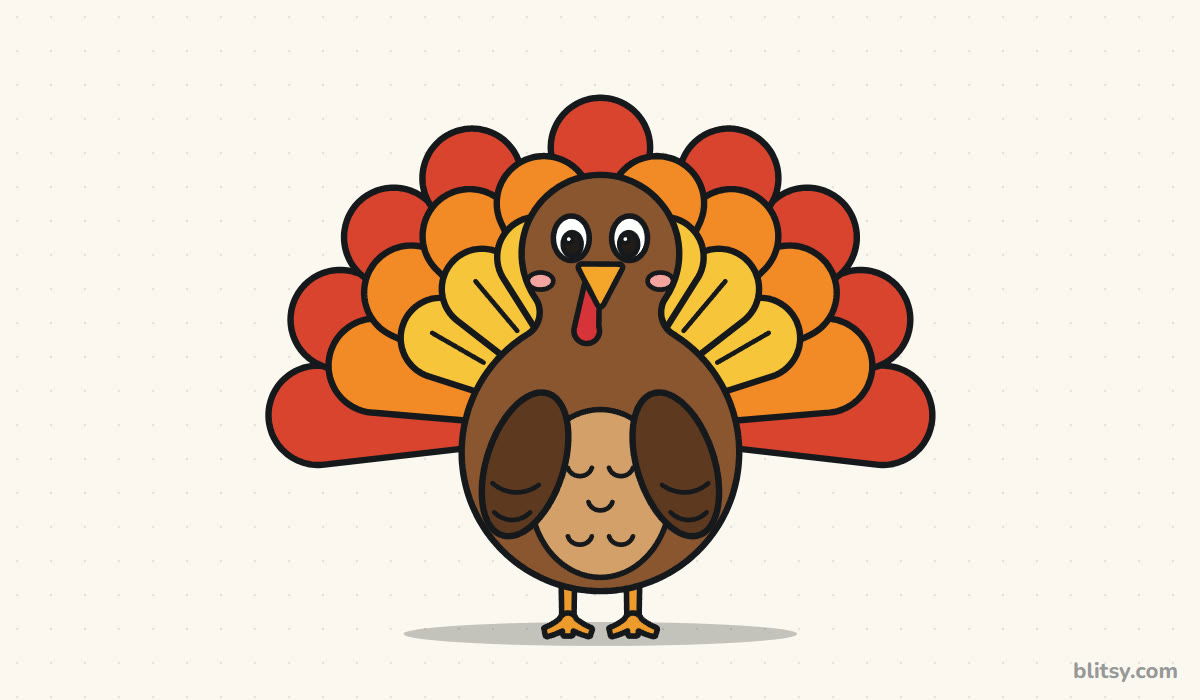
Every step image shows its new lines in blue. Gray is your earlier work. Pale blue circles are helpers you erase before coloring.
Quick overview
⏱️ Time: about 30 to 40 minutes with coloring
🎯 Level: easy, good for kids from about 6 up
✏️ Steps: 12
🦃 You'll draw: a front-facing cartoon turkey with three rows of tail feathers
Supplies for a Feathery Turkey
- A pencil you can press softly (HB works well)
- An eraser that doesn't smudge
- A black marker or fineliner
- Crayons or colored pencils in warm colors, two browns and pink
- Plain paper, turned sideways
The tail is wider than it is tall, so give it room by turning the page sideways.
How to Draw a Turkey Step by Step
Step 1: Sketch the body, head and fan guides
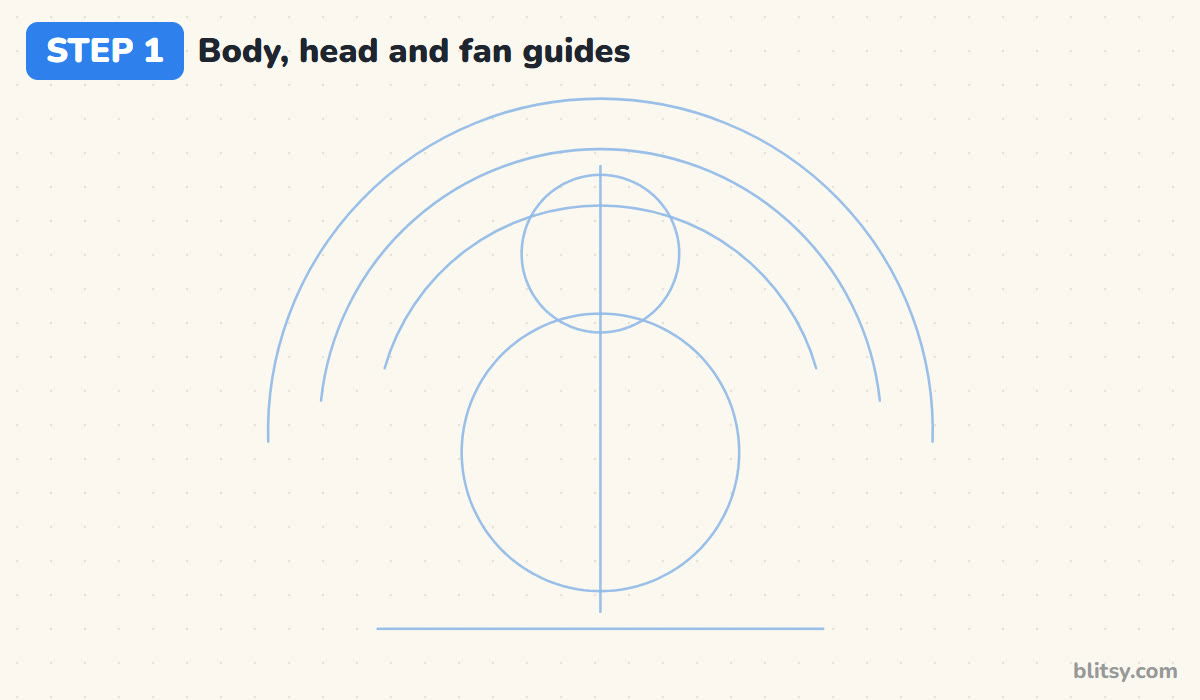
Draw a ground line near the bottom of the page. Sit a big circle on top of it, almost touching, and a smaller circle on top of that for the head, overlapping a little like a snowman. Add a line down the middle, then three curved arcs around them like a rainbow. Each arc marks where one row of feathers ends.
💡 Tip: Make the head circle a bit more than half as wide as the body. A tiny head turns the turkey into a bowling pin.
Step 2: Join head and body into a pear shape
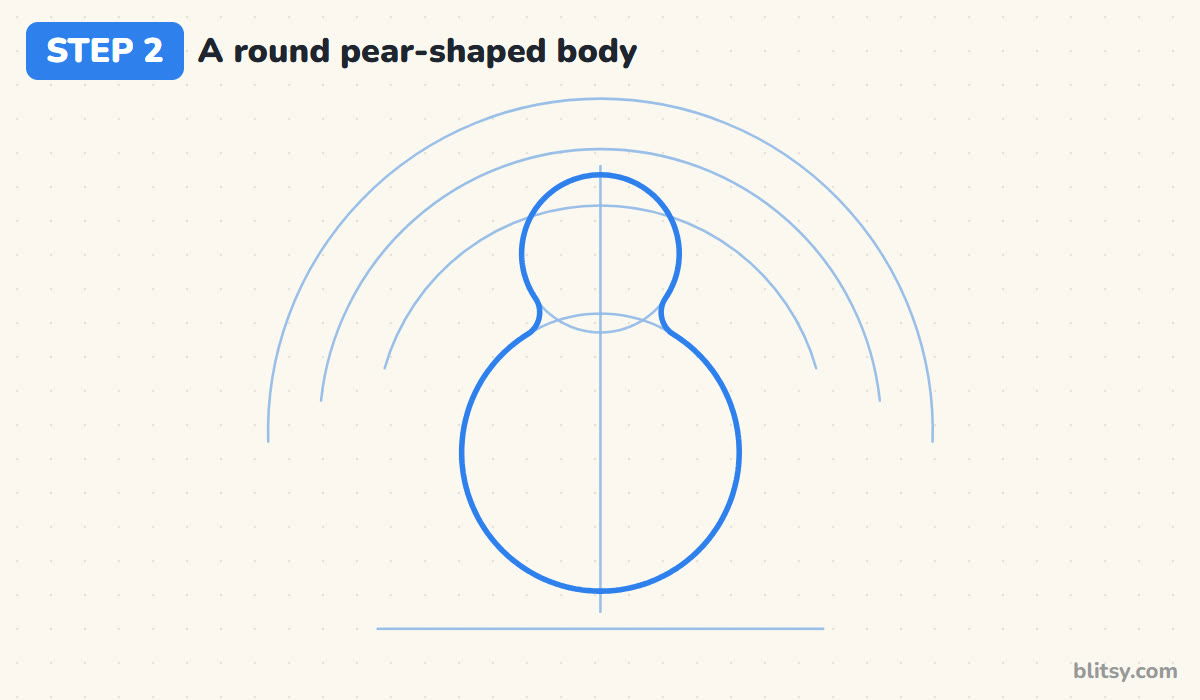
Trace around both circles in one firm line, but skip the pinch where they meet. Instead, let the line curve smoothly inward and out again, so the head flows into the body through a short, soft neck.
💡 Tip: If the neck comes out too thin, move the line outward a little. Turkeys are chunky birds.
Step 3: Draw the front row of feathers
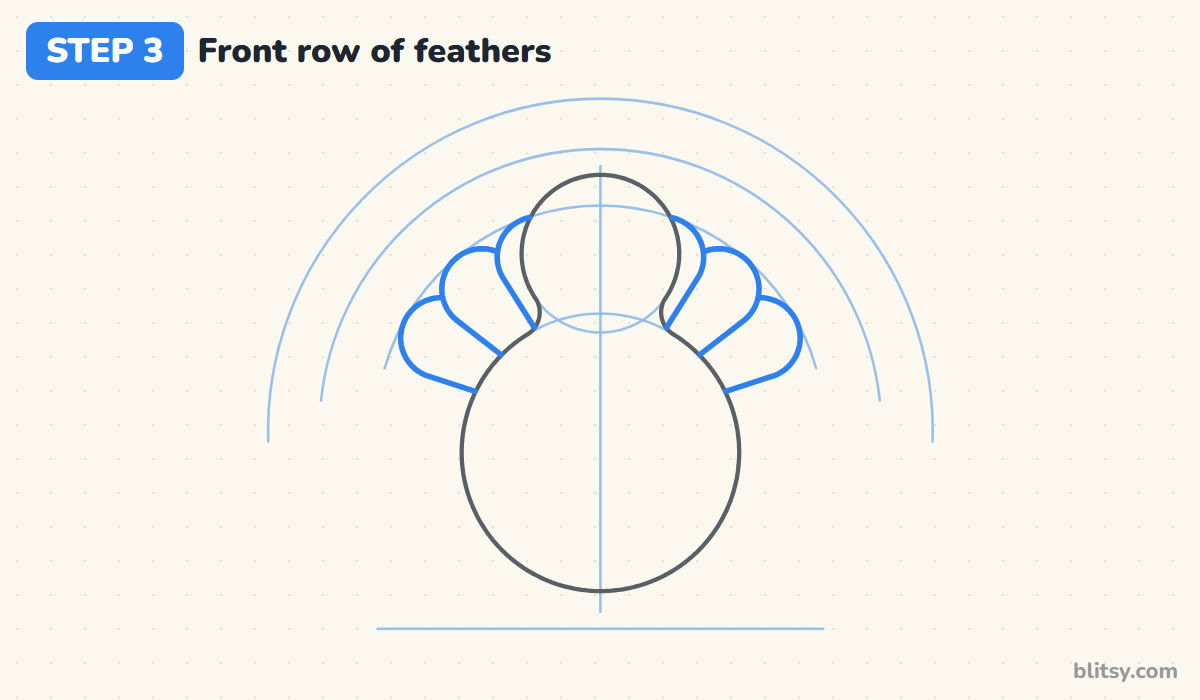
Now for the tail. I always start with the row closest to the body, because those feathers sit in front and are drawn whole. Draw six long, rounded petals that reach out to the smallest arc, three on each side of the head. Their narrow ends tuck behind the body, so stop at the outline.
💡 Tip: Draw the two feathers beside the head first, then work outward in pairs. The fan stays even on both sides.




Step 4: Add the middle row behind them
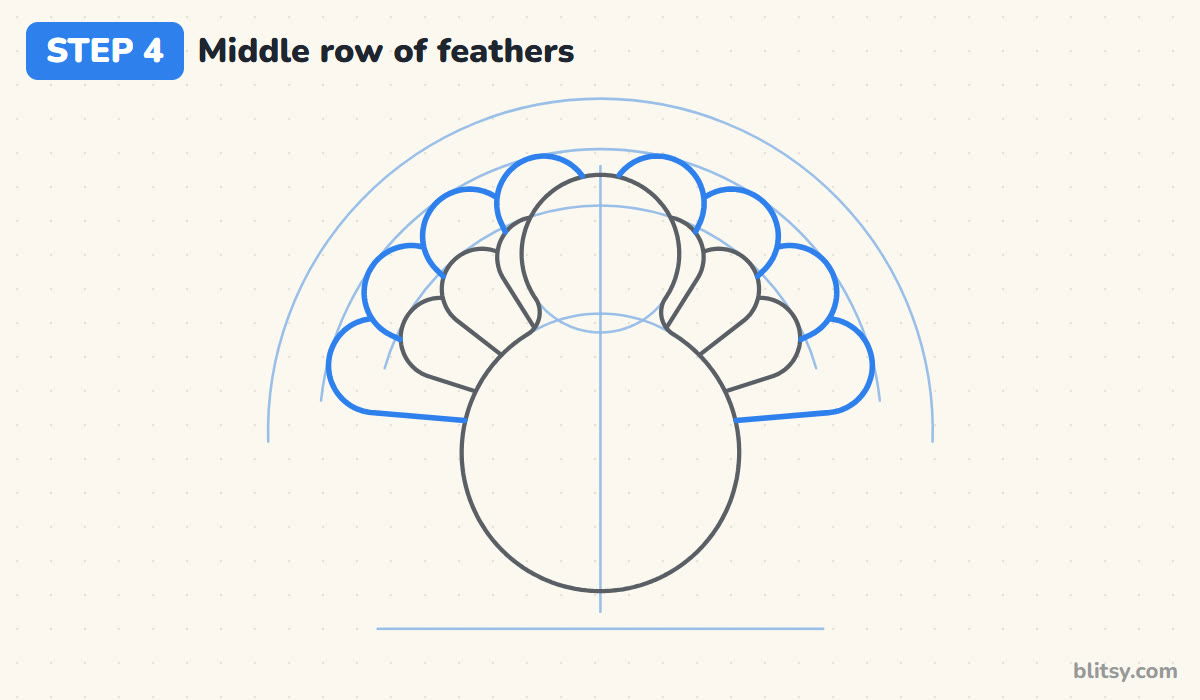
The second row peeks out from behind the first. Draw eight slightly bigger petals that reach the middle arc, placed in the gaps between the front feathers, with the two middle ones peeking up beside the head. Draw only the rounded tops you can see, stopping wherever a line touches a front feather.
💡 Tip: Lift your pencil when a line bumps into a front feather. Drawing through it is the most common slip here.
Step 5: Finish with the back row
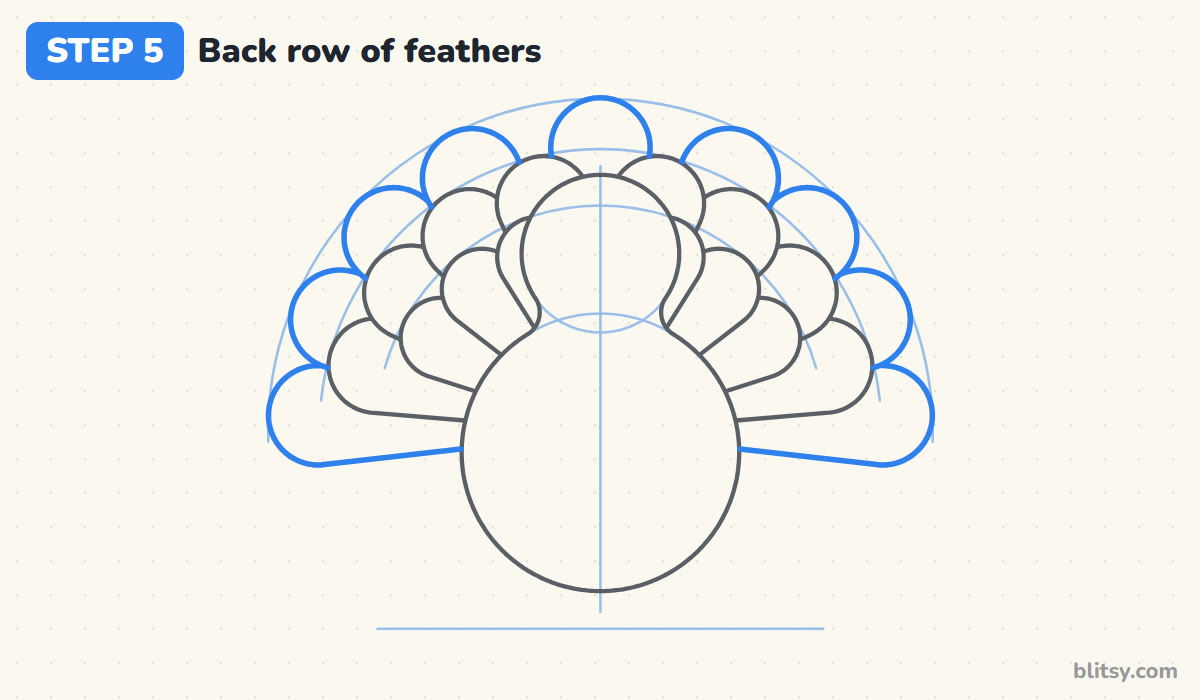
The back row is the biggest, with nine feathers reaching the outer arc. Put one straight above the head and spread the rest down to just above the ground on each side. Again, draw only the round tips that show between the middle feathers. When this row is done, the fan should look like a scalloped half circle.
💡 Tip: The lowest feathers on each side lie almost flat. That wide, low spread is what makes the tail look fanned out.
Step 6: Draw a line down each front feather
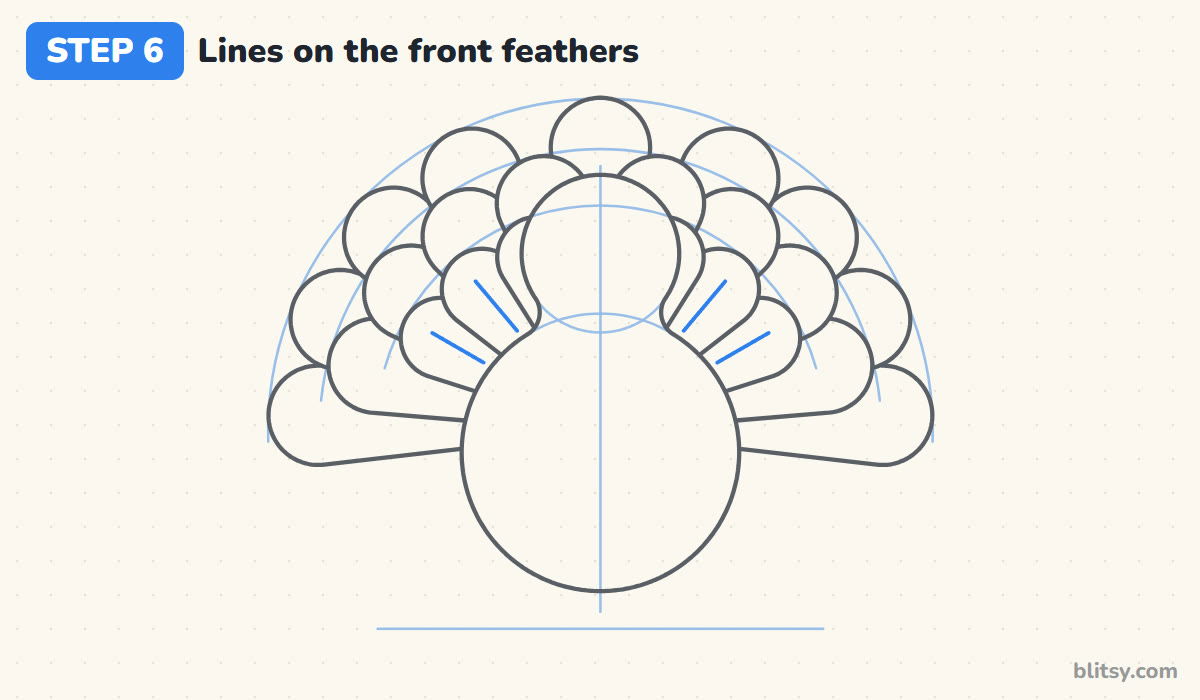
Give every front feather a single straight line through its middle, pointing back toward the body. This is the quill, and it makes the petals read as feathers instead of flower petals. Stop before the tip.
💡 Tip: Keep these lines thinner and shorter than the outlines so they look like detail, not like extra shapes.
Step 7: Add the belly and two wings
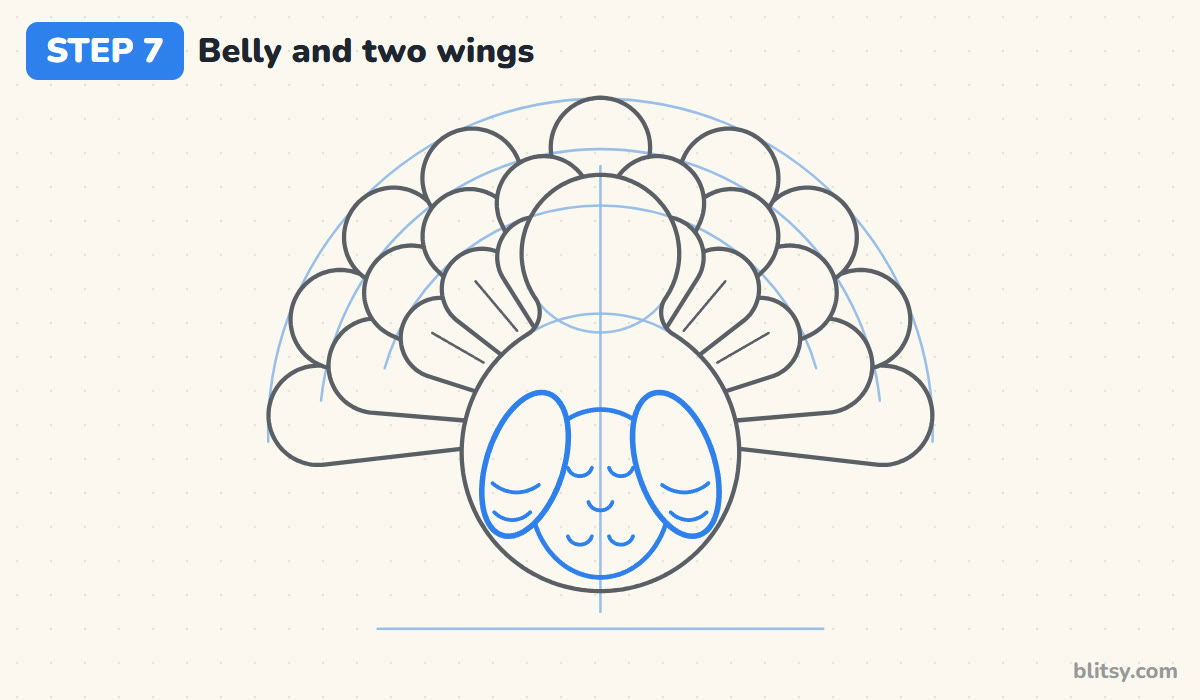
Draw a tall oval in the lower middle of the body for the lighter belly, with a few small U-shaped curves inside it for chest feathers. On each side, add a long wing shaped like a leaf that leans in at the top and hangs down at the bottom. Two short curved lines near the bottom of each wing hint at the wing feathers.
💡 Tip: Keep each wing just inside the body outline, so the round shape of the turkey stays unbroken.


Step 8: Give it short legs and feet
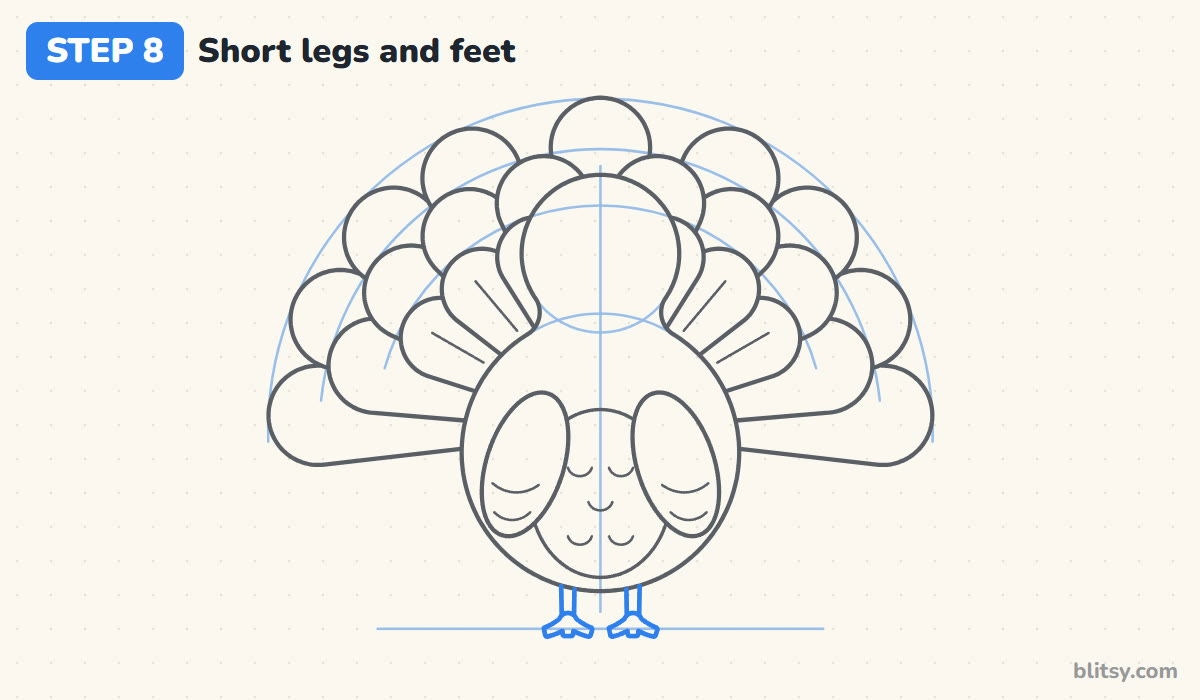
Under the body, draw two short legs a little apart, each a narrow band only as long as a finger tip. At the bottom of each leg, add three toes that spread like a bird track: one forward and one out to each side. Rest them on the ground line.
💡 Tip: Keep the legs short. Long legs make a cartoon turkey look like a chicken on stilts.
Step 9: Draw big eyes and pink cheeks
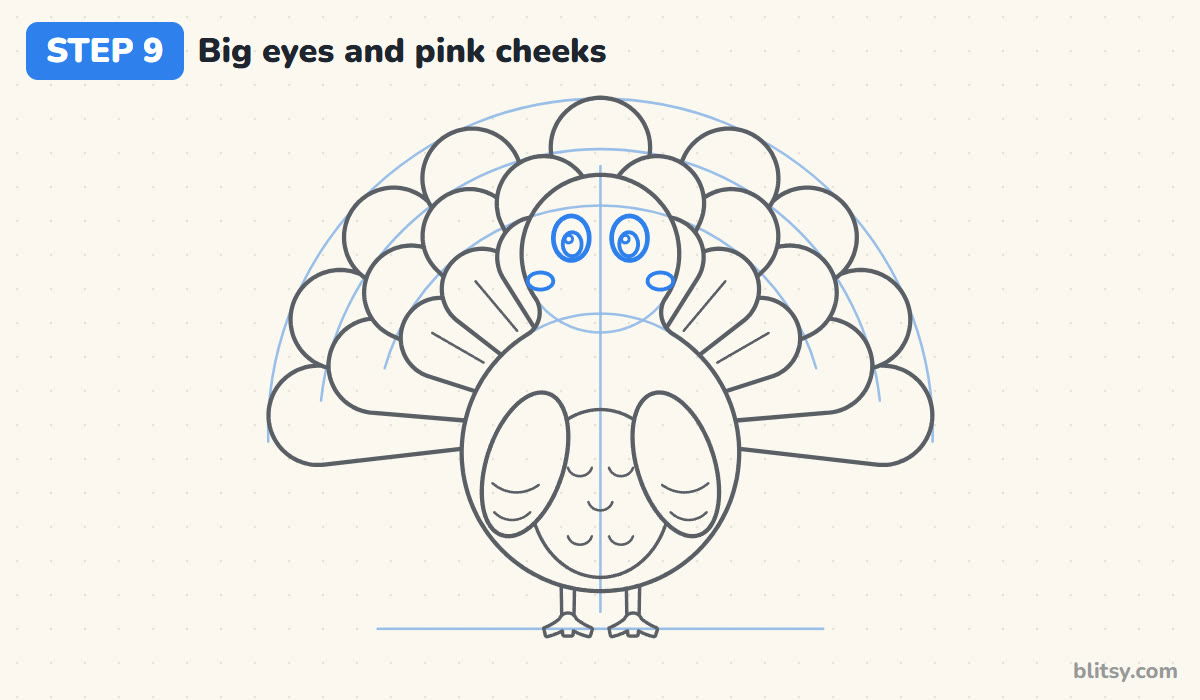
Place two tall oval eyes on the head, close together and a little above the middle. Inside each one, draw a round pupil and a tiny shine circle near the top. Then add a small flat oval on each cheek, just below the eyes.
💡 Tip: Put the shine dot in the same spot in both eyes, or the turkey will look cross-eyed.
Step 10: Add the beak and the red wattle
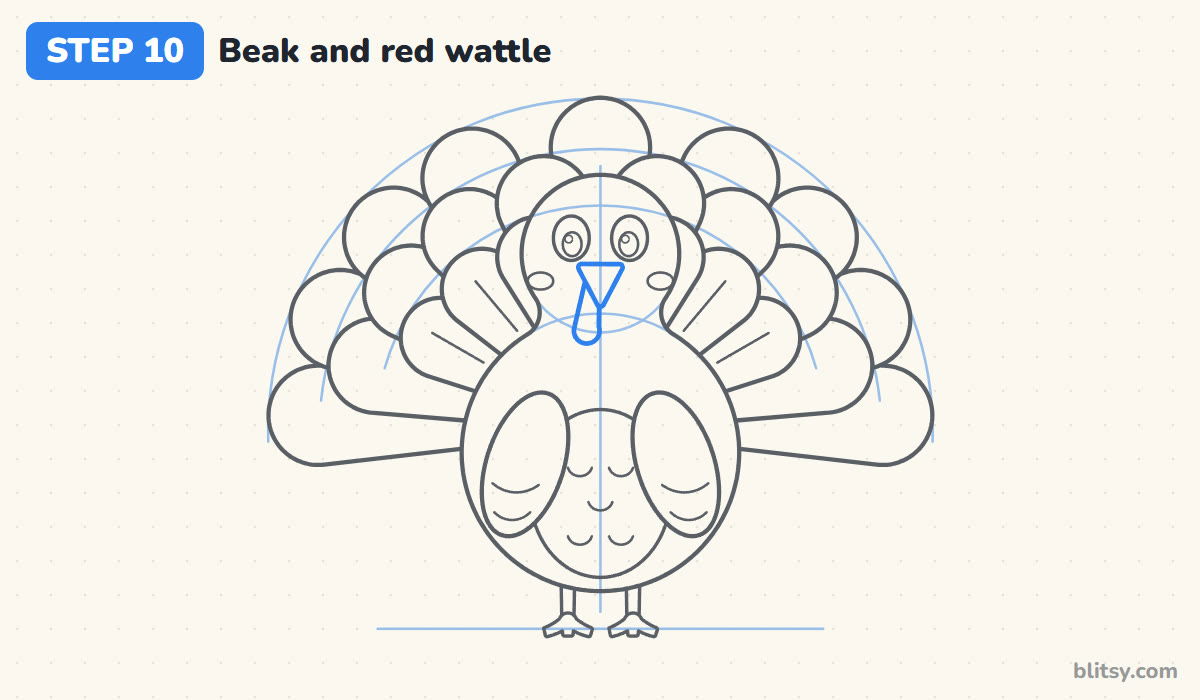
Right between the eyes and a bit lower, draw a small triangle pointing down for the beak, with softly rounded corners. Then hang the wattle from under it: a narrow red drop that dangles down the front of the neck, slightly to one side. That floppy skin is the detail that tells everyone this bird is a turkey.
💡 Tip: Keep the beak small. A large beak takes over the face and hides the wattle.
Step 11: Ink the turkey and erase the guides
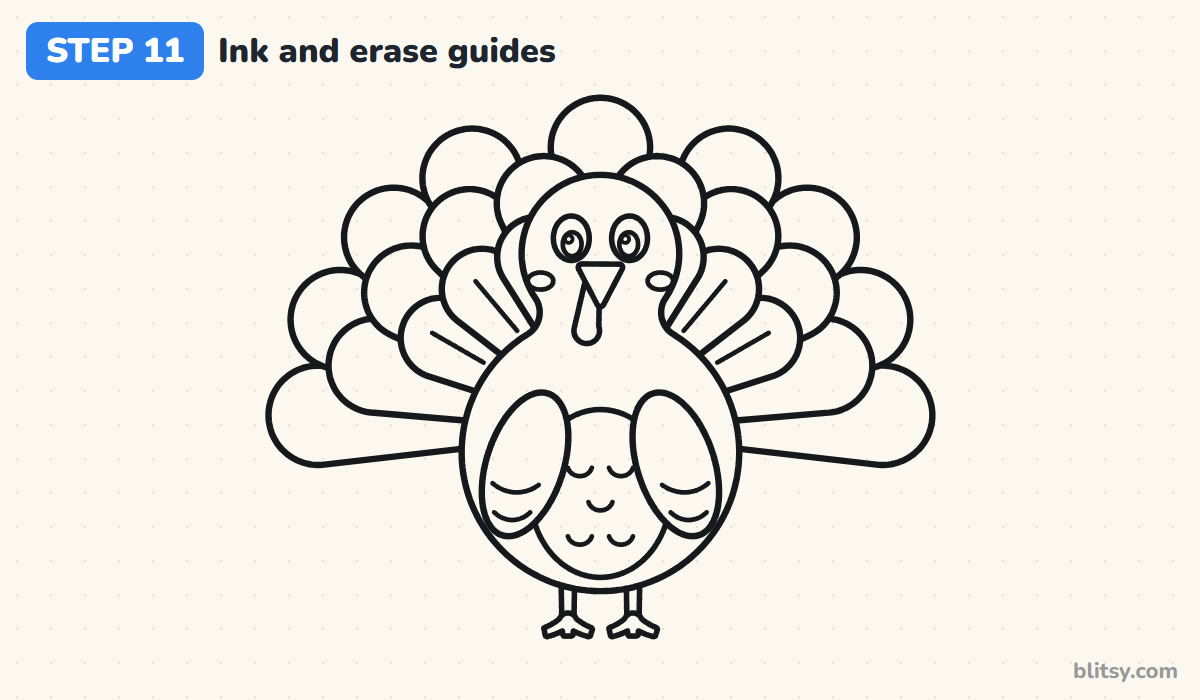
Trace every keeper line with your black marker. I like to do the face first while my hand is steady, then the body, then the feathers row by row. Skip the guides. Wait for the ink to dry before you erase, or it will smear across the page.
💡 Tip: Turn the paper as you ink the feathers so you always pull the marker toward yourself.


Step 12: Color your turkey
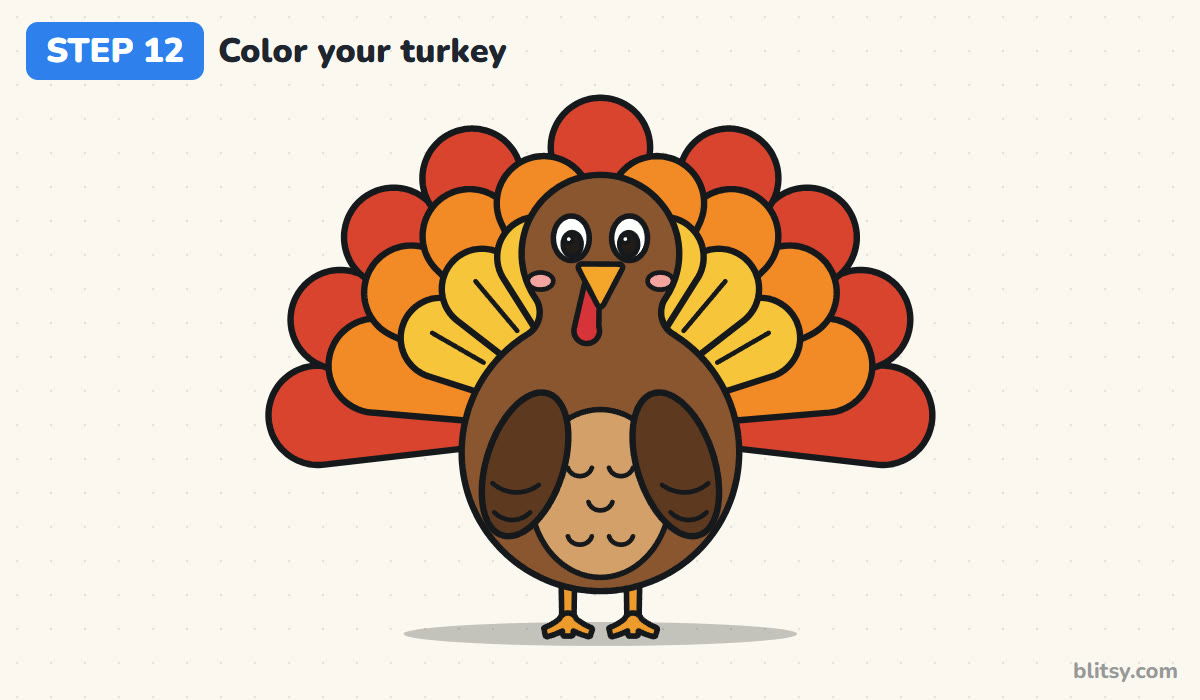
Color the back row of feathers red, the middle row orange and the front row yellow. Head and body are brown, with darker brown wings and a tan belly. Use orange for the beak and feet, red for the wattle, pink for the cheeks. Leave the eyes white with black pupils, and add a soft gray shadow on the ground.
💡 Tip: Press harder near the body on each feather and lighter at the tips. It gives the tail a soft glow.
Where Turkey Drawings Tend to Wobble
- Feathers drawn as one wavy cloud. Without separate rows the tail looks like a bush. Keep three clear rows, each peeking out behind the one in front.
- Drawing hidden lines. Feathers behind the body or behind another feather don't show. Stop every line where it touches something in front.
- A lopsided fan. Five feathers on one side and two on the other tips the bird over. Start in the middle and add feathers in matching pairs.
- Forgetting the wattle. With no red wattle, the bird can pass for an owl or a chicken. It's small, but it does a lot of work.
- Too many colors in one row. Mixing every color in every feather gets busy fast. One color per row stays bright and easy to read.
Dressing Up Your Turkey for the Holidays
Once the basic bird feels easy, have some fun with it. Put a tall black pilgrim hat on its head, or add a fourth row of green feathers for a rainbow tail. Little kids can skip the feather lines and wing curves and it still reads as a turkey. If you'd like more farm birds, the chicken drawing tutorial uses the same round-body idea in side view, and a turkey looks right at home beside the pumpkins from this pumpkin drawing step by step lesson. For a whole autumn scene, scatter a few leaves from the fall leaves drawing tutorial around its feet.
Free Turkey Coloring Page and Printable Steps
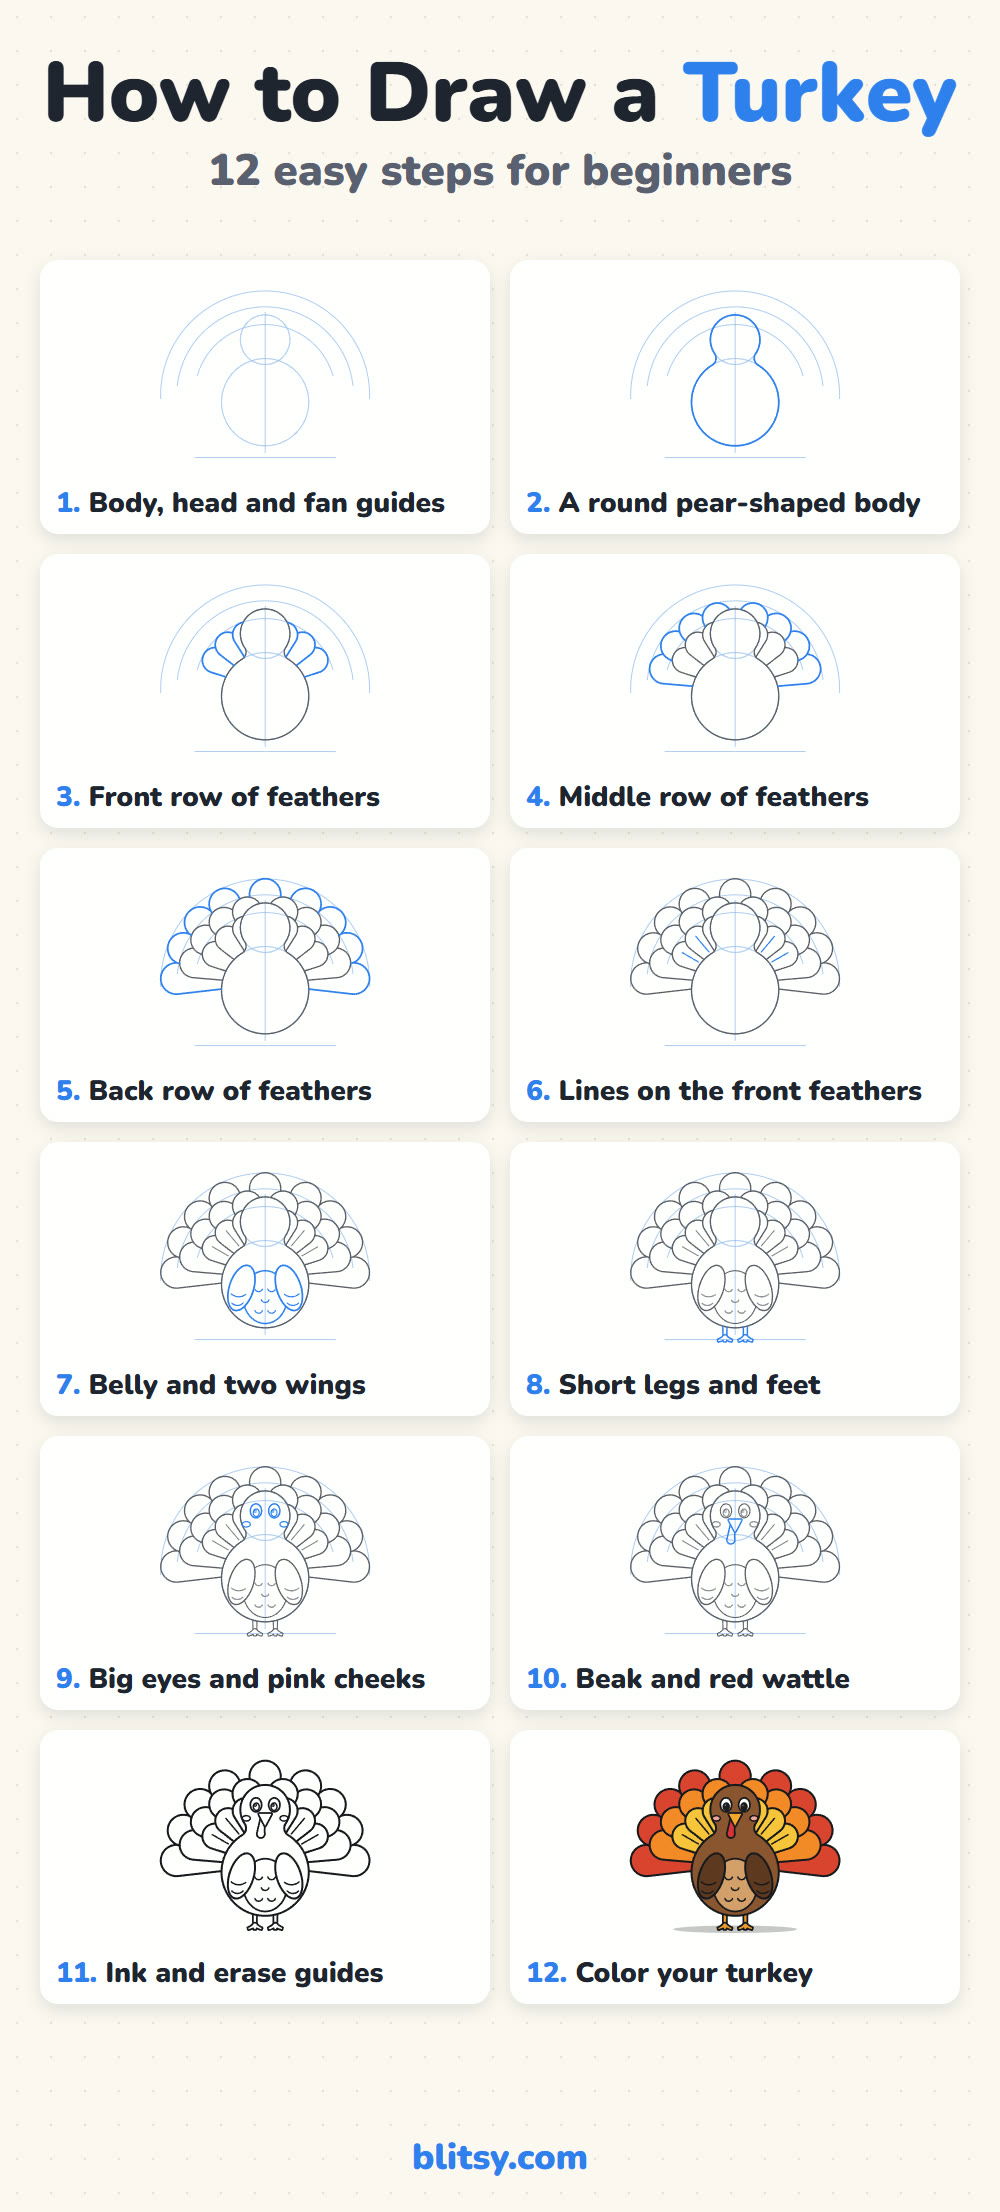
The free turkey coloring page shows a colored turkey to copy from, a color key for each part and a large outline to color. The step-by-step PDF guide holds all 12 steps with pictures and tips, which makes it handy for a classroom table or a Thanksgiving kids' corner. Both print on Letter or A4 paper.
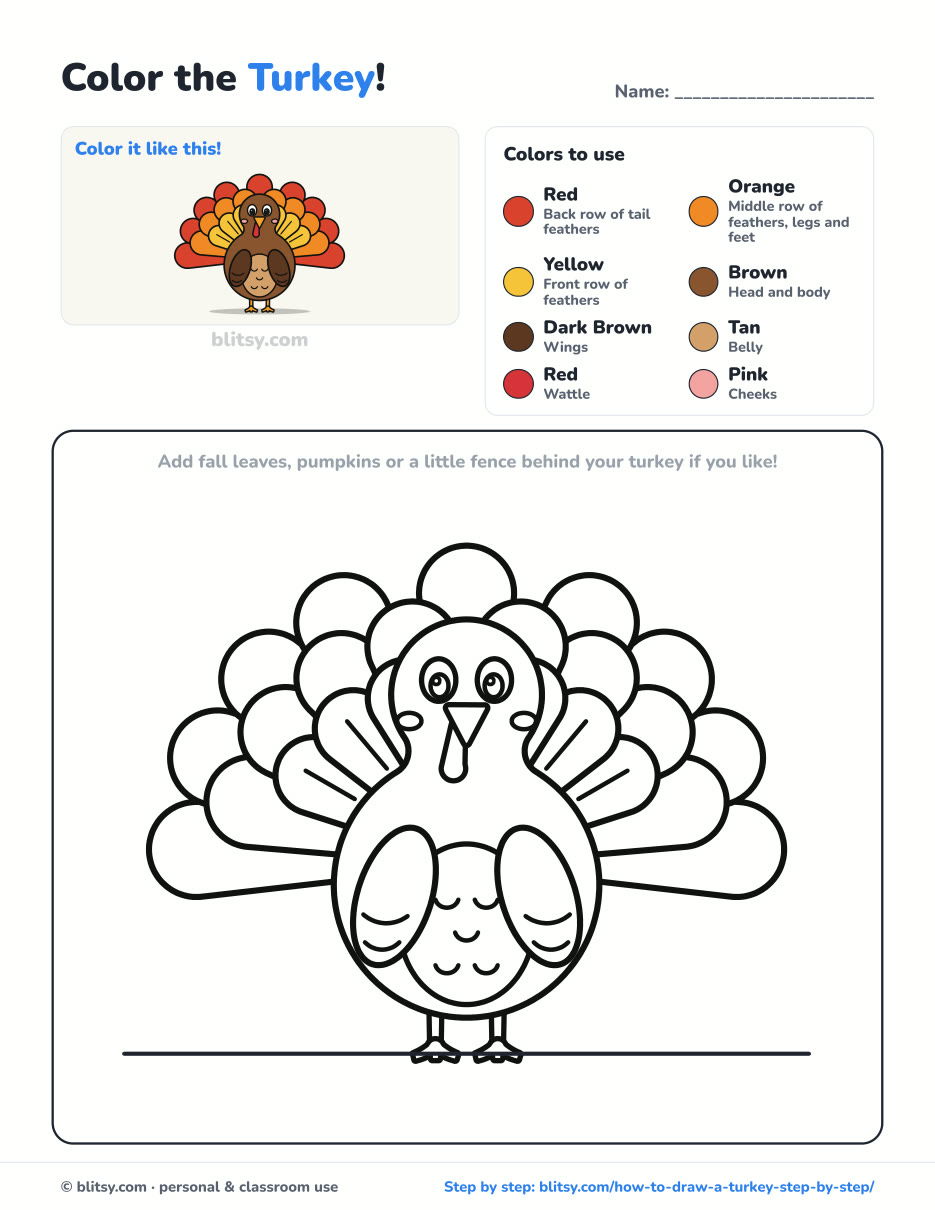
Black outlines with a colored example and the color names at the top. Ready to print and color.
⬇️ Download Coloring PageEvery step picture with its instructions and tips, to keep beside your paper while you draw.
⬇️ Download Drawing Guide📱 On a phone? Tap a download button, then open the file and choose Share → Save to Files or Print. On a computer, the PDF opens or saves straight to your Downloads folder.
Keep the Turkey Steps Handy
More Birds and Autumn Drawings to Try
Every tutorial below works like this one, with a picture for each step and a free coloring page at the end.
- Peacock Drawing: Another bird with a giant fan tail, this time full of eye feathers, in this how to draw a peacock step by step lesson.
- Chicken Drawing: Draw a brown hen and her little yellow chick on a strip of grass with this chicken drawing tutorial.
- Pumpkin Drawing: Three round pumpkins sit on a line of hay in this pumpkin drawing tutorial.
- Owl Drawing: A round-eyed owl perches on a branch under the moon in this owl drawing step by step guide a good next bird.
- Fall Leaves Drawing: A red and gold maple leaf drifts down with an acorn and two smaller leaves in this fall leaves drawing tutorial.
Turkey Drawing Questions From Kids and Parents
What is the easiest way to draw a turkey for kids?
Draw two stacked circles for the head and body, then add a fan of rounded feathers behind them. A small beak, a red wattle and two eyes finish it. Very young kids can also trace their hand and turn the fingers into feathers.
How many feathers should a cartoon turkey have?
There's no fixed number. I use three rows, six in front, eight in the middle and nine at the back, but five to seven feathers in a single row looks fine for younger kids.
What colors do you use for a turkey drawing?
Brown for the body, warm reds and yellows for the tail, orange for the beak and feet. Real turkeys are mostly brown and bronze, so the bright tail is a fun cartoon choice.
What is the red thing on a turkey called?
The red skin that hangs from the beak and neck is called the wattle, and the part draping over the beak is the snood. In a simple drawing, one red drop covers both.
Grab your crayons, give that tail its three bright rows, and your turkey will be ready to strut onto the fridge. 🦃✏️
Related posts:
 How to Draw a Car Step by Step (Easy Drawing for Beginners)
 How to Draw a Whale Step by Step (Easy for Beginners)
 How to Draw a Rat Step by Step (Easy for Beginners)
 How to Draw an Arctic Fox Step by Step (Easy for Beginners)
 How to Draw a Shark Step by Step (Easy for Beginners)
 How to Draw a Chicken Step by Step (Easy for Beginners)
 How to Draw a Fish Step by Step (Easy Goldfish for Beginners)
 How to Draw a Snowman Step by Step (Easy for Beginners)
 How to Draw Hands Step by Step (Easy Palm View for Beginners)
 How to Draw an Airplane Step by Step (Easy Jet for Beginners)
 How to Draw a Mouse Step by Step (Easy for Beginners)
 How to Draw the Joker Step by Step (Easy Chibi for Beginners)

