
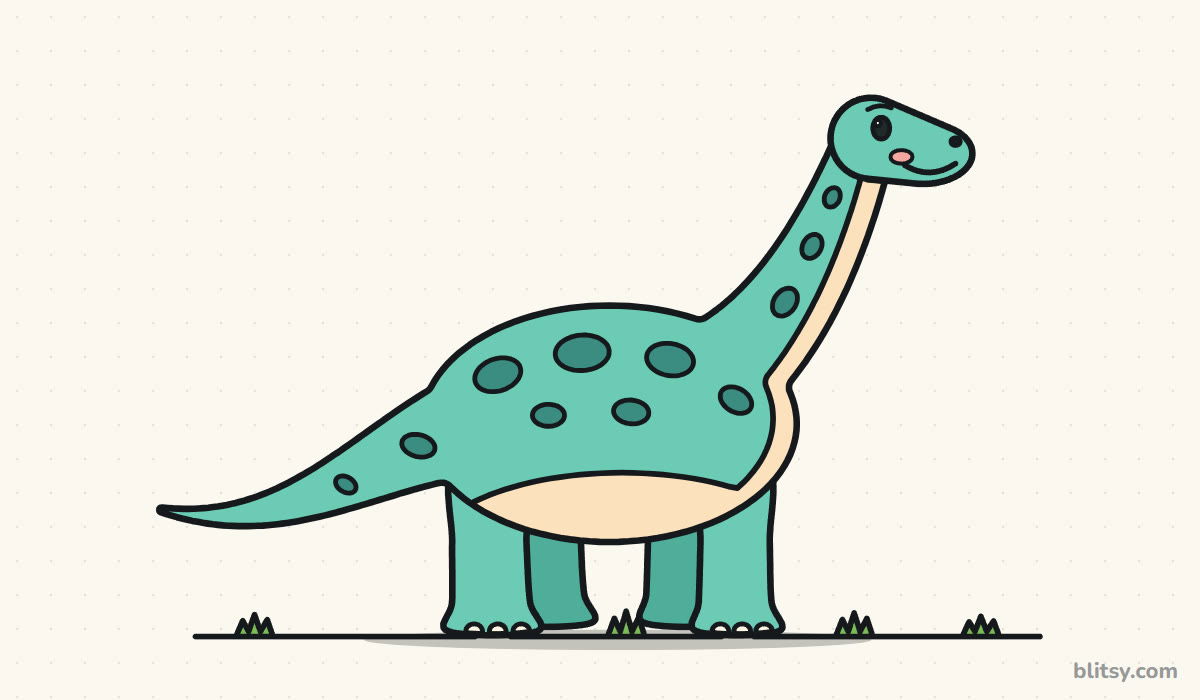
Kids who say "draw me a dinosaur" very often mean the gentle giant with the long neck, the one that eats leaves from the tops of trees. It's also one of the friendliest shapes you can put on paper. Here I'll show you how to draw a dinosaur step by step in the style of a brachiosaurus or apatosaurus: a big round body, a neck that curves up to a tiny smiling head, and a tail that tapers to a point. One oval and two curved lines carry the whole drawing, so even a first try comes out looking like a dinosaur.
Think of the blue as this step's homework: those are the new lines, while gray marks what's already on your paper. Copy the blue, compare, then move along.
Quick overview
⏱️ Time: about 30 minutes, plus 10 to 15 for coloring
🎯 Level: easy, fine for kids from about 6
✏️ Steps: 12
🦕 You'll draw: a friendly long-neck dinosaur in side view
Stocking Up for a Sauropod Sketch
- A pencil you can press lightly (HB works well)
- A soft eraser
- A black marker or fineliner for the final lines
- Crayons or colored pencils in teal or green, a darker green and peach
- Plain white paper, turned sideways
Sideways paper matters here, because the neck and tail together stretch almost from edge to edge.
How to Draw a Dinosaur Step by Step
Step 1: Sketch a big body oval and two head circles
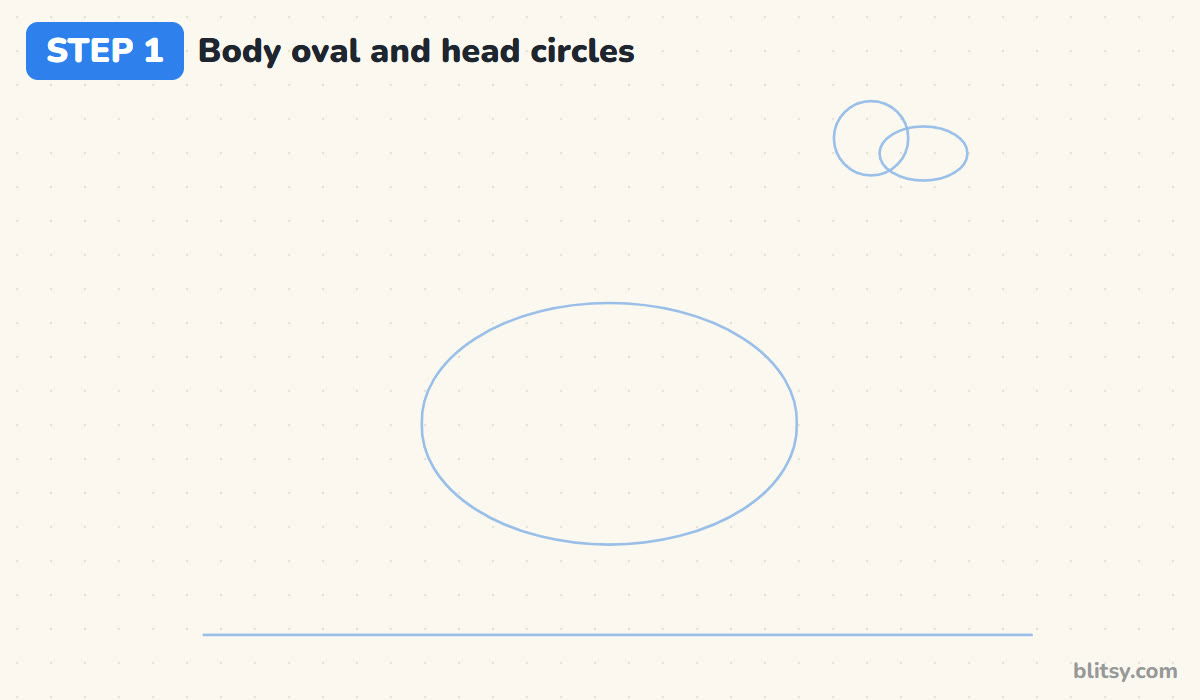
Draw a light ground line low on the page. Just above it, a little left of center, sketch a wide oval for the body. It should be clearly wider than it is tall. Up in the top right corner, far from the body, draw a small circle with a flatter oval overlapping its right side. That pair becomes the head and the snout.
💡 Tip: Leave a big gap between the head circles and the body. That empty space is where the long neck goes.
Step 2: Add guide lines for the neck, the tail and the legs
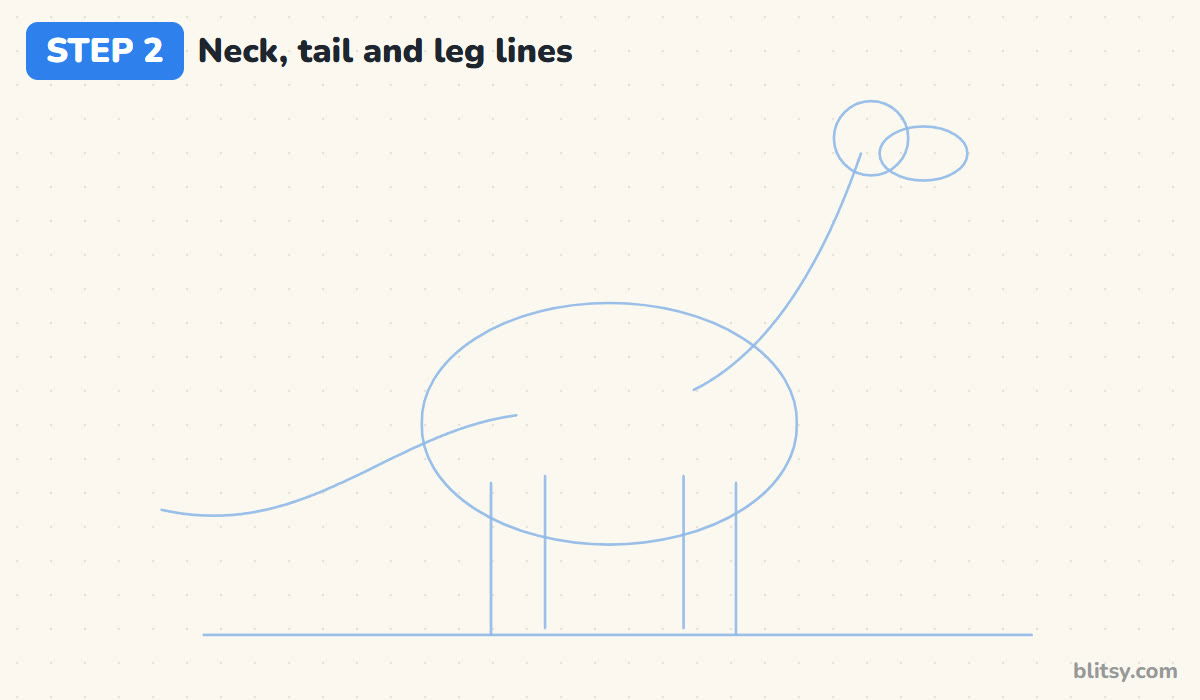
From the top right of the body, draw one curved line up to the head circle. Then sweep a second line out of the left side of the body, dipping down and ending in a long point near the ground. Finish with four short vertical lines under the body, two near the front and two near the back.
💡 Tip: Make the neck line bend like a gentle letter C. A perfectly straight neck looks stiff.
Step 3: Outline the body, the long neck and the tail
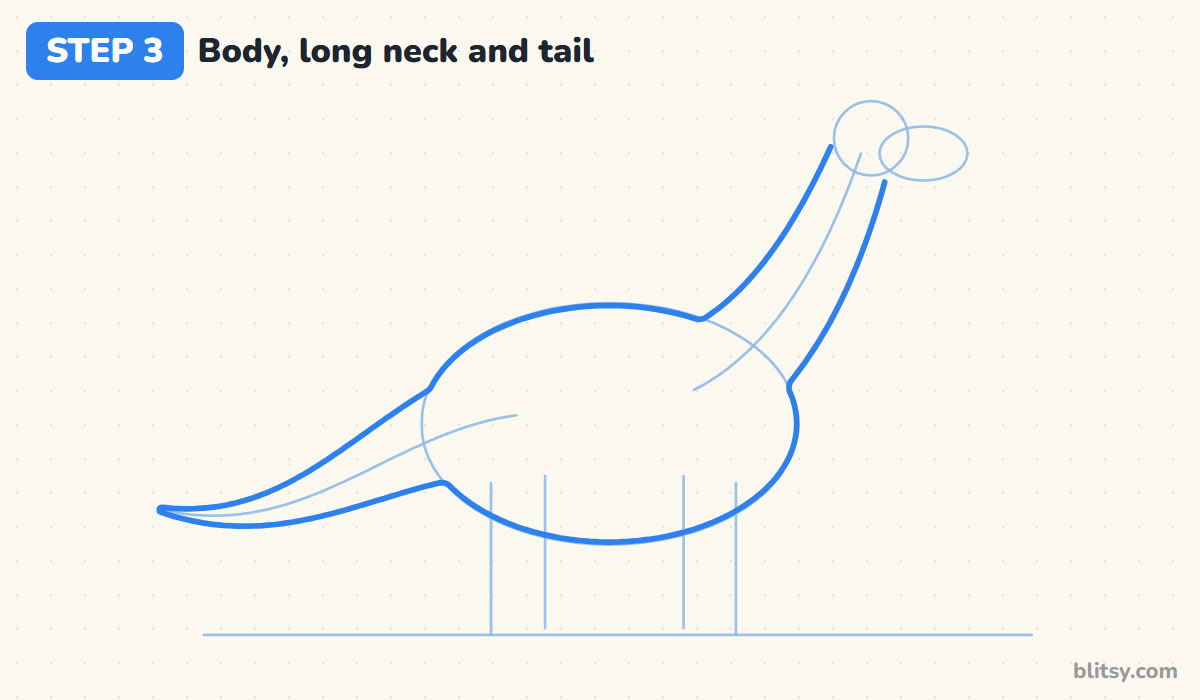
Now trace one smooth outline around everything. Follow the top of the oval, then run up both sides of the neck guide, wide at the shoulders and narrow near the head. On the left, draw the tail as two lines that meet in a sharp point. I stop the neck lines just short of the head, since the head outline will close them off in the next step.
💡 Tip: Let the bottom of the tail line drop below the oval a little. It makes the tail look heavy and real.




Step 4: Draw a small round head
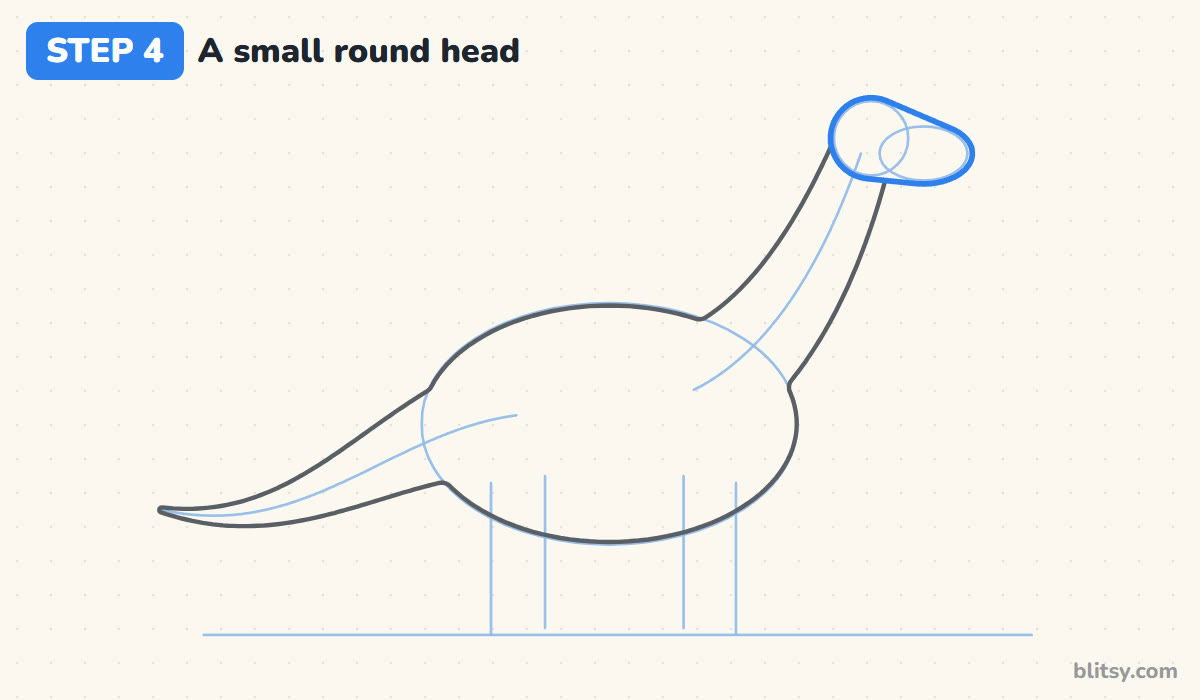
Wrap a single outline around both head circles, round at the back and a bit flatter at the snout. Keep it small. Long-neck dinosaurs have tiny heads compared with their huge bodies, and that contrast is exactly what makes them read as dinosaurs and not as some odd horse.
💡 Tip: If the head looks bigger than one of the back spots will be, shrink it.
Step 5: Draw the two legs on the near side
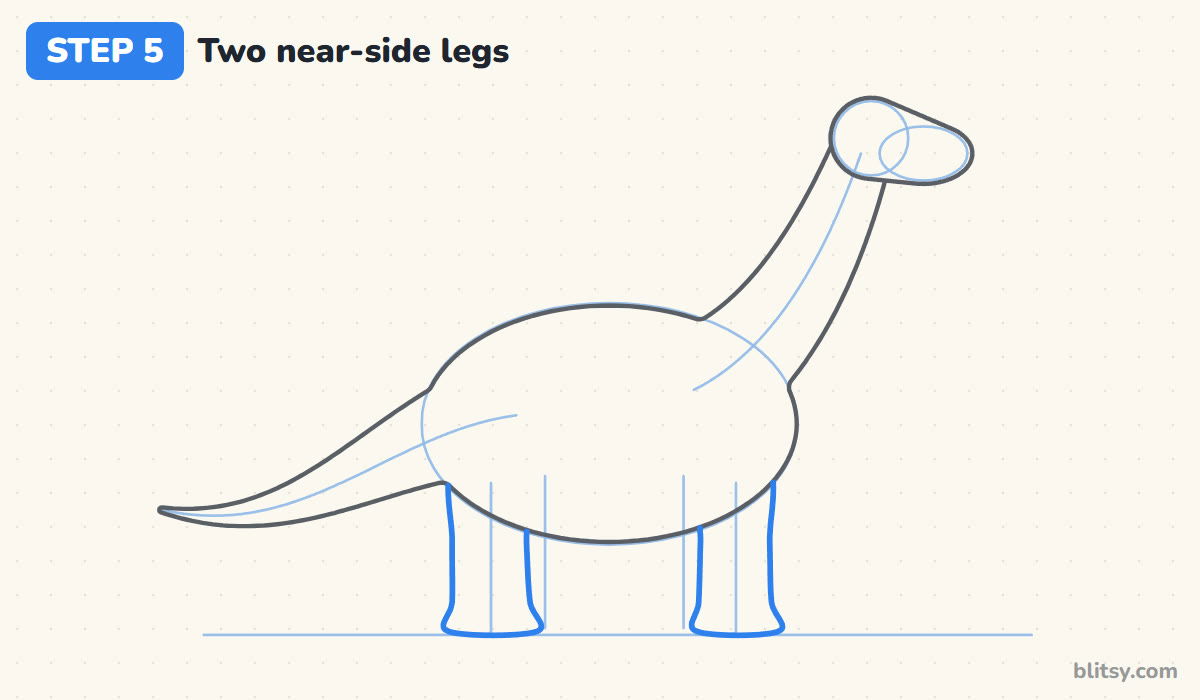
Over the front and back pairs of guide lines, draw one leg each: thick, straight columns that come down from the belly to the ground. Make the bottoms flare out a touch so the feet look flat and heavy. These are the legs closest to us, so I draw their full outline first.
💡 Tip: Think tree trunks, not sticks. A dinosaur this size needs legs as wide as your thumb on the paper.
Step 6: Add the far legs and round toenails
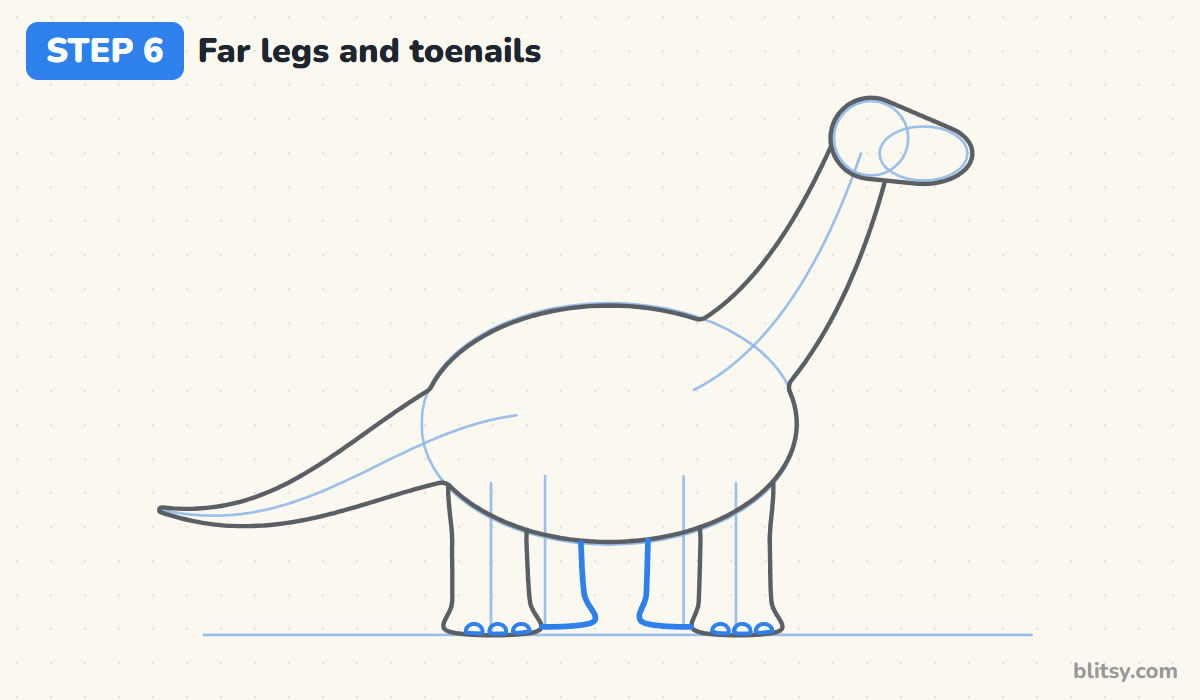
The other two legs peek out from behind. Draw only the part you can see between and beside the near legs, slightly higher so they look farther away. Then add three small half circles along the bottom of each near foot for the toenails.
💡 Tip: Don't draw the far legs where the near legs cover them. Overlap is what gives the dinosaur its depth.
Step 7: Give it an eye, a nostril and a smile
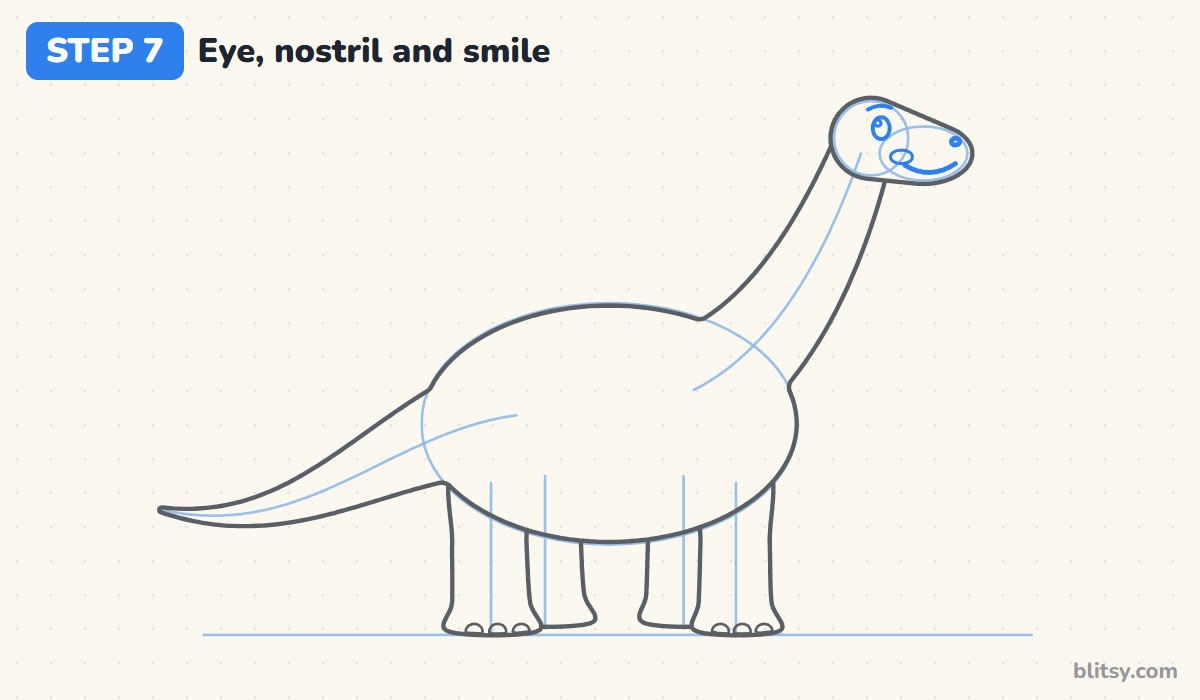
Place one oval eye near the top of the round part of the head, with a little shine circle inside and a short brow above. Put a dot for the nostril at the tip of the snout. A long, gentle curve under the snout is the smile, and a small oval on the cheek adds a happy blush.
💡 Tip: A smile that turns up at the end looks friendlier than one that just runs flat.




Step 8: Draw the belly line up the throat
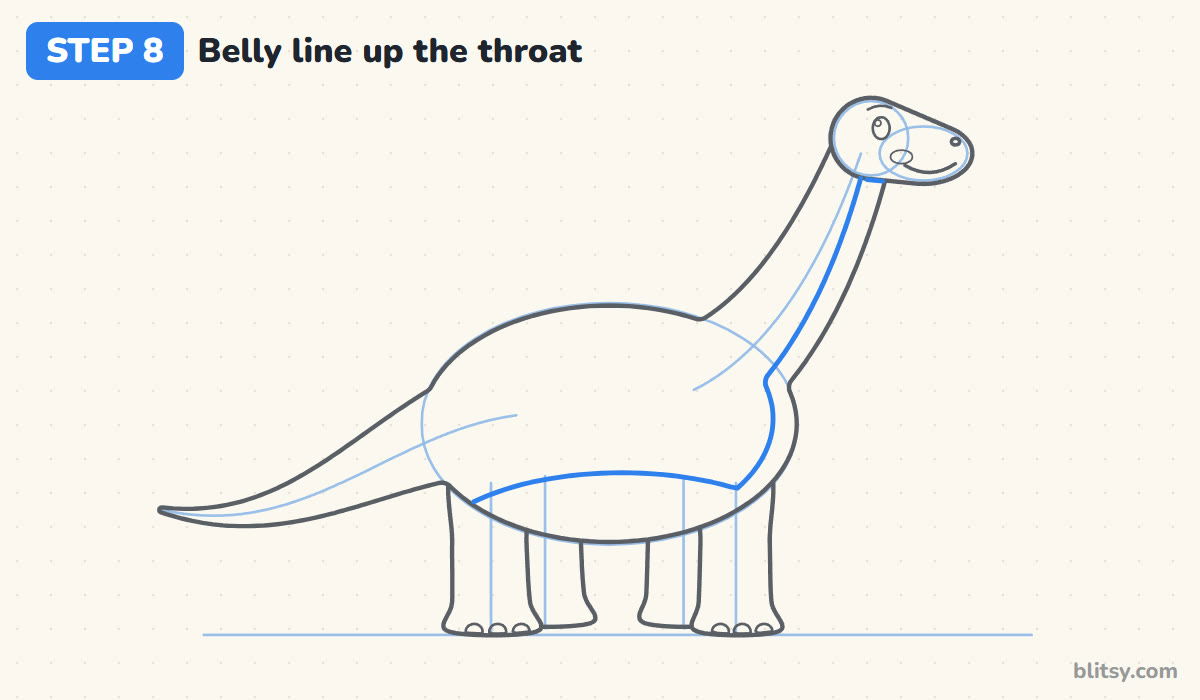
Draw a curve across the bottom of the body, about a quarter of the way up, from the back leg to the front. At the chest, turn the line upward and follow the front of the neck, staying close to its edge, until it reaches the head. This band gets a lighter color later.
💡 Tip: Keep the throat band narrow. I've found a wide stripe makes the neck look flat.
Step 9: Add spots along the back
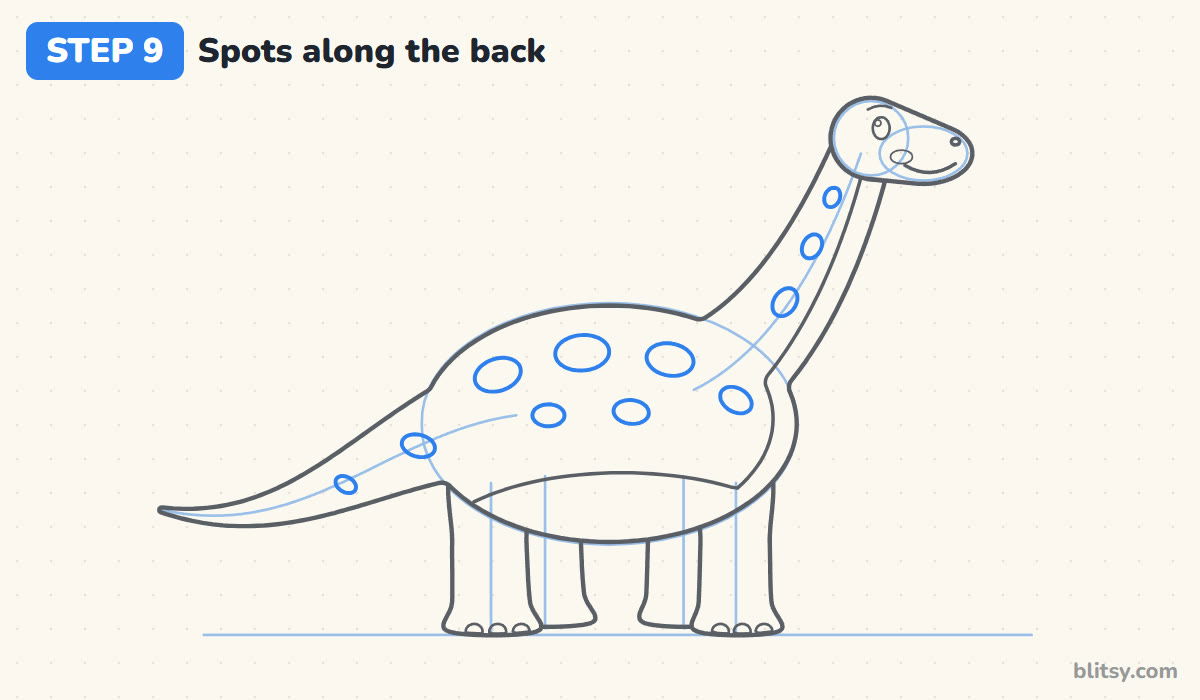
Scatter round spots over the back, bigger on the body and smaller as they climb the neck and slide down the tail. I tilt each one a little to follow the curve under it. Keep every spot away from the outline and the belly line so it doesn't touch either.
💡 Tip: Odd numbers look more natural. Try five big spots on the body instead of four or six.
Step 10: Draw grass and a ground line
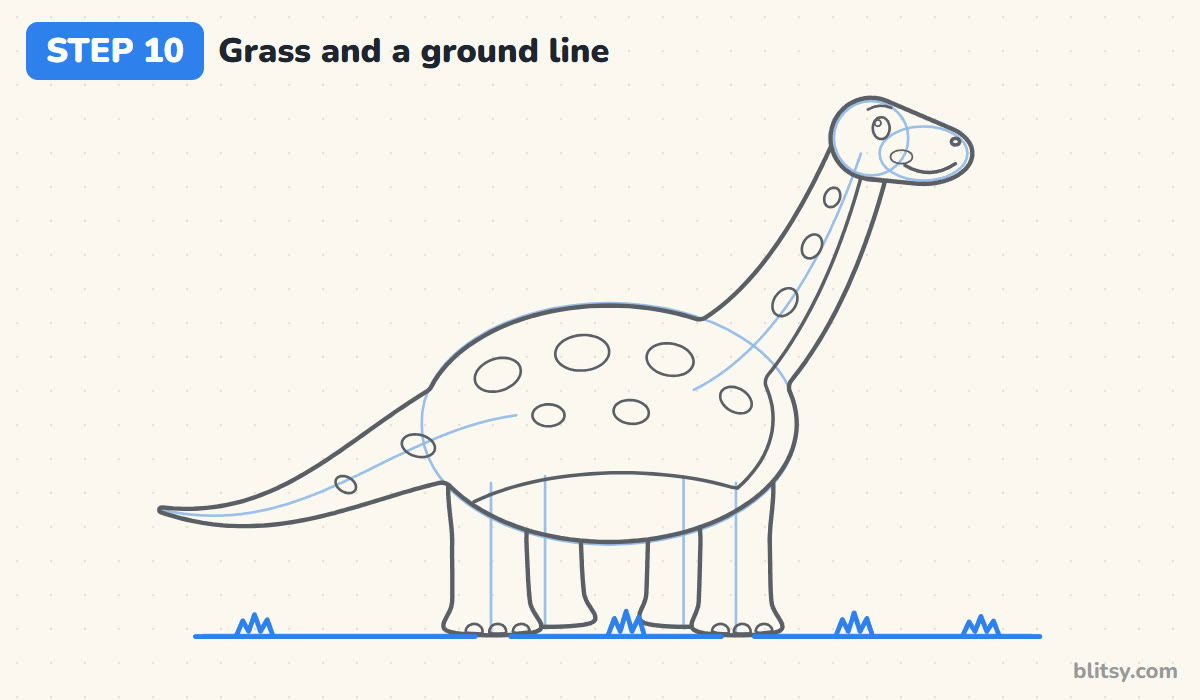
Go over the ground line firmly, stopping wherever a foot stands on it. Add a few small grass tufts, each just three pointy blades, spread out along the line. They keep the dinosaur from floating and only take a minute.
💡 Tip: Space the tufts unevenly. A neat row of grass looks like a fence.
Step 11: Ink the outline and erase the guides
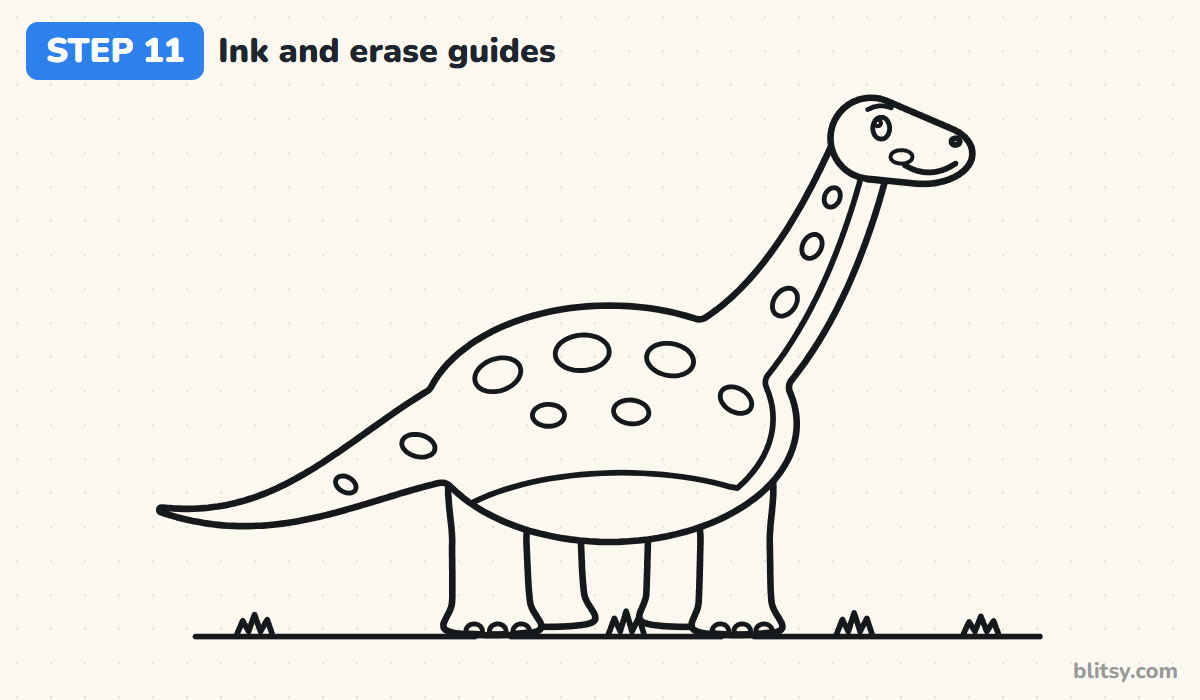
Trace every keeper line with the black marker, starting with the head and neck while your hand is steady. Skip the faint oval and the guide lines. Once the ink is fully dry, erase the pencil so only the clean dinosaur is left.
💡 Tip: Ink the long neck in one slow stroke if you can. Stopping halfway leaves a little bump.




Step 12: Color your dinosaur
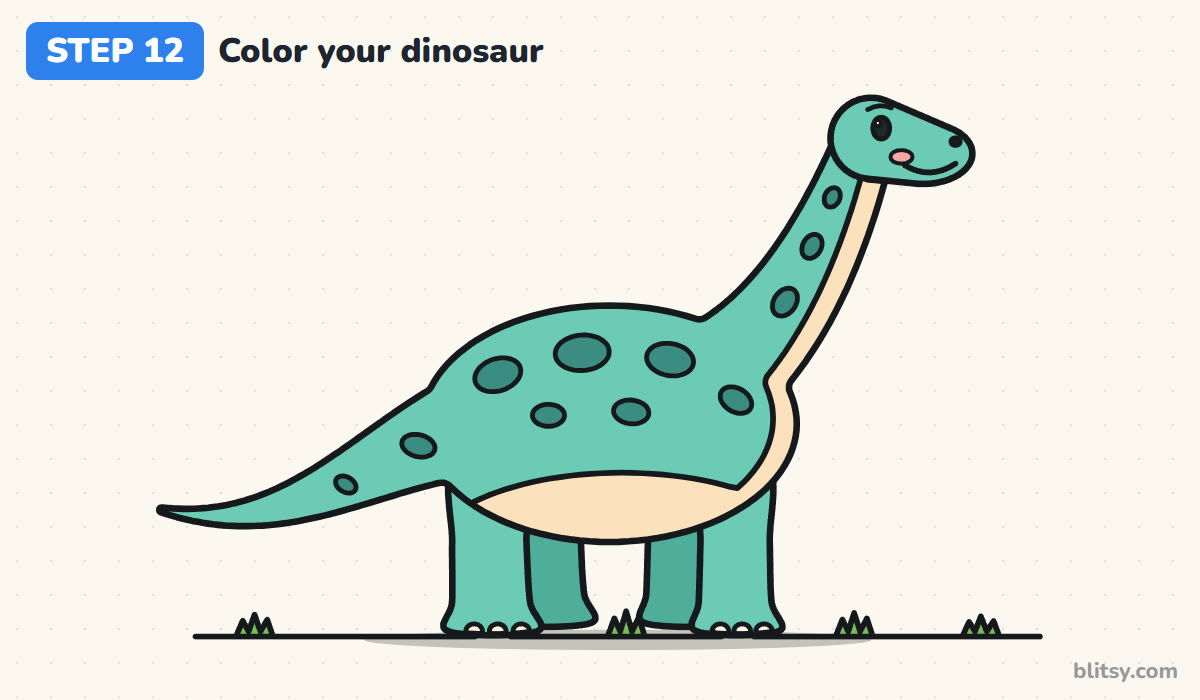
Teal covers the body, the neck and the head, plus the tail and the two near legs. I give the far legs a darker teal so they sit back. Color the belly and throat peach, the spots deep green, and leave the toenails cream. Finish with pink on the cheek and a soft gray shadow under the feet.
💡 Tip: Press harder near the bottom of the body and lighter on top. It gives the belly a round, solid look.
Long-Neck Slipups That Turn Dinos into Llamas
- A head that's too big. Keep it about the size of the shoulder. A large head turns the dinosaur into a horse or a llama.
- A neck that starts too high. Let the neck grow out of the front of the body, wide at the base, instead of perching it on top like a pole.
- Thin, bendy legs. These animals were enormous. Straight, thick legs with flat feet make the weight believable.
- A short, stubby tail. The tail should be almost as long as the neck. It balances the drawing.
- Spots touching the outline. Spots that hit the edge look cut off. Keep a small gap all round each one.
Ideas for a Whole Herd of Long-Necks
Color it purple with yellow spots and you have a storybook dinosaur, or swap the spots for stripes. Lower the head to the ground and it's grazing; draw a tiny copy beside it and you have a baby. Younger kids can skip the throat band and the toenails. If your kid loves big scaly creatures, the dragon drawing tutorial uses the same oval-and-tail start on four legs, and the Godzilla drawing step by step lesson is a fun next challenge with spiky back plates. My own favorite version is a long-neck with its head poking out of a palm tree.
Free Dinosaur Coloring Page and PDF Drawing Guide
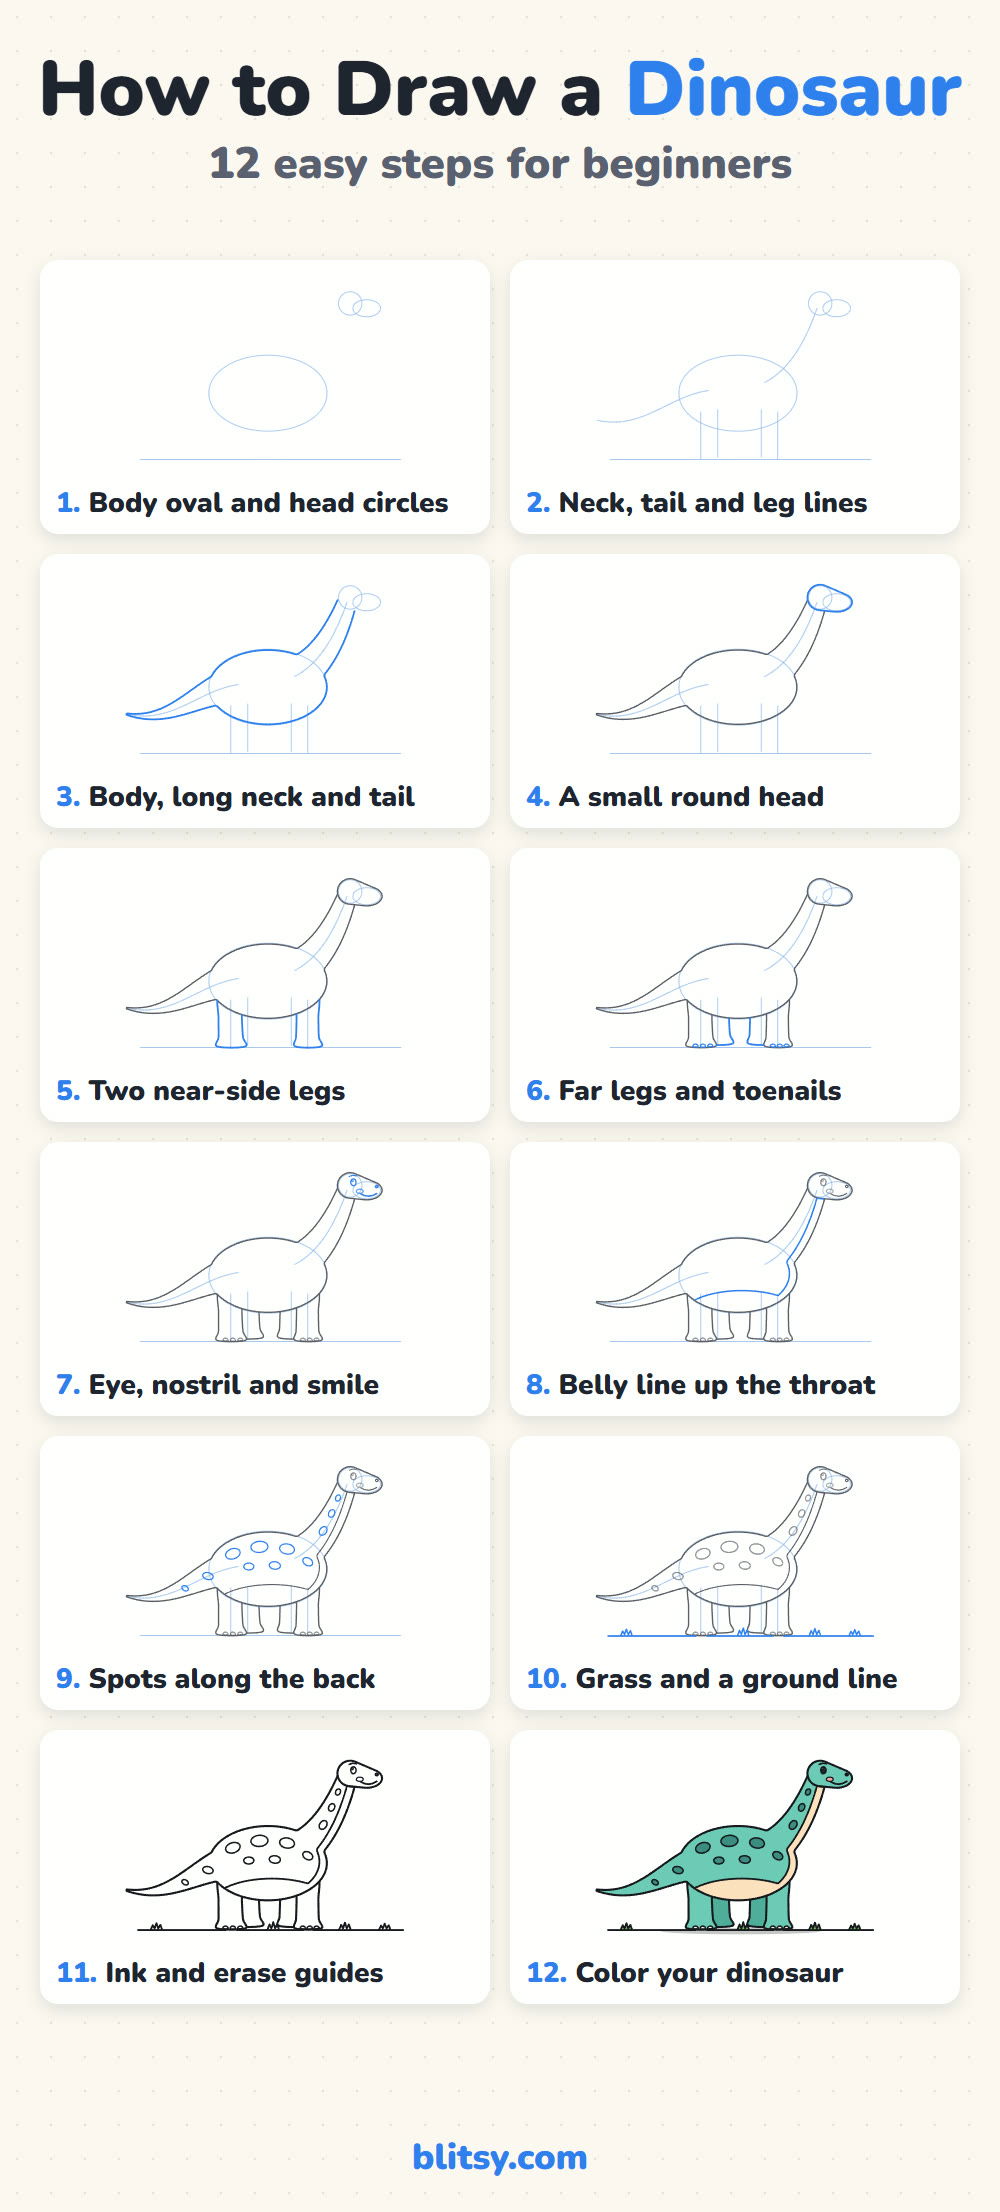
The free dinosaur coloring page has a colored example at the top with a key that says which color goes where, and a big outline below for coloring. The step-by-step PDF guide holds all 12 steps with pictures and tips, handy for a rainy afternoon away from the screen. Both print on Letter or A4 paper.
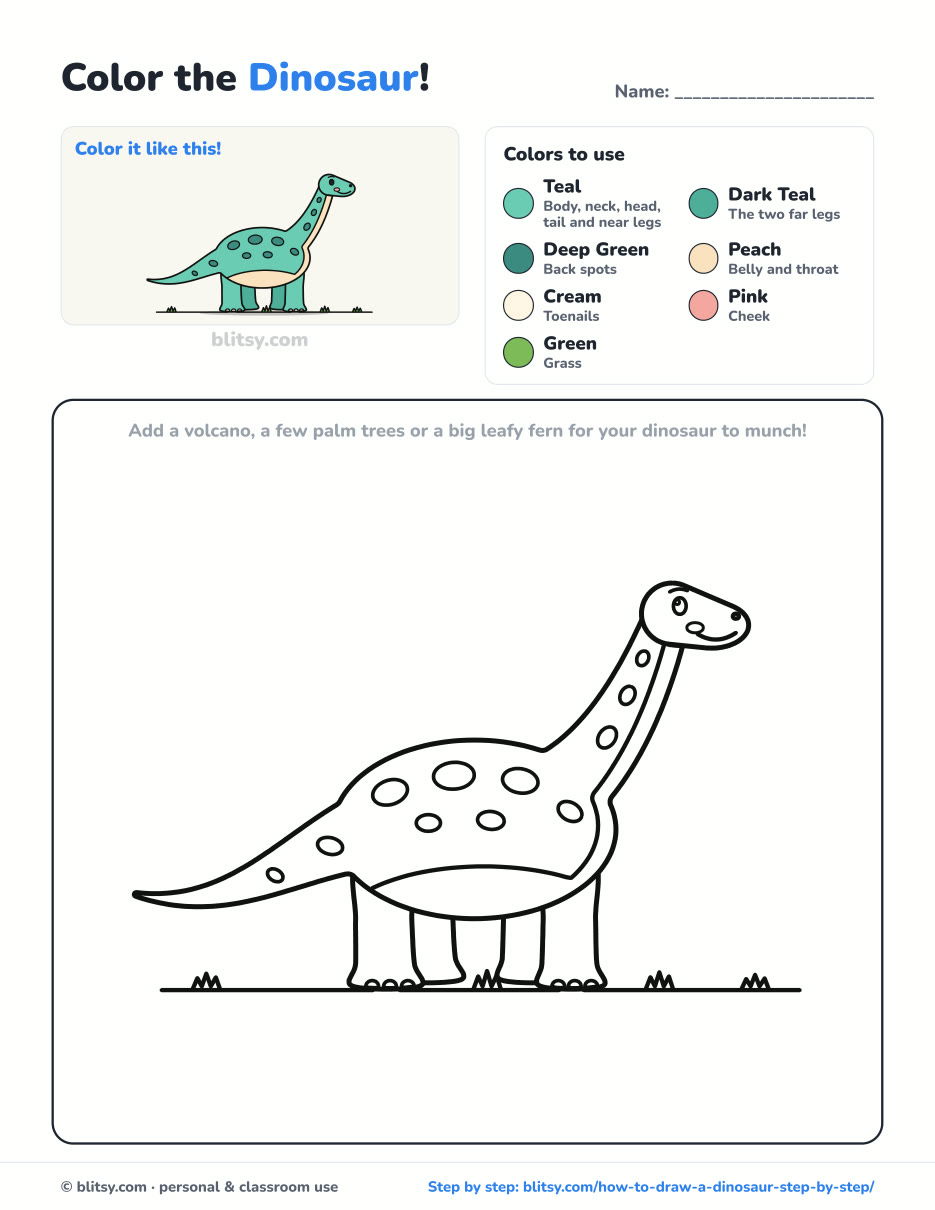
Black outlines with a colored example and the color names at the top. Ready to print and color.
⬇️ Download Coloring PageEvery step picture with its instructions and tips, to keep beside your paper while you draw.
⬇️ Download Drawing Guide📱 On a phone? Tap a download button, then open the file and choose Share → Save to Files or Print. On a computer, the PDF opens or saves straight to your Downloads folder.
Pinning the Dino Steps for Later
More Scaly Friends to Draw Next
Every tutorial below breaks one animal into small steps with a picture for each, just like this dinosaur.
- Alligator Drawing: A smiling cartoon alligator walks along in side view in this how to draw an alligator step by step lesson.
- Turtle Drawing: Draw a sea turtle with a hexagon shell pattern and spotted flippers in this turtle drawing tutorial.
- Elephant Drawing: Another gentle giant, a gray-blue elephant spraying water from its trunk, fills this elephant drawing step by step guide.
- Snake Drawing: A friendly green snake with a loop in its body grows from one flowing line in this how to draw a snake tutorial.
Dinosaur Drawing Questions from Young Artists
What is the easiest dinosaur to draw?
A long-neck dinosaur like this one is the easiest for most beginners. It's mostly one big oval with a curved neck and tail, and there are no claws or teeth to fuss over.
How do you draw a dinosaur for kids?
Start with an oval body and a small circle for the head, connect them with a curved neck, add a pointed tail and four thick legs. Kids can add spots and color in their own way.
What kind of dinosaur has a long neck?
Long-neck dinosaurs are called sauropods. Brachiosaurus and apatosaurus are two of the best known, along with diplodocus. This drawing is a friendly cartoon mix of them.
How long does it take to draw a dinosaur?
About 30 minutes for the drawing and another 10 to 15 for coloring. The neck and the spots take the most care.
Somewhere in your sketchbook there's room for a gentle giant, so start with that big oval and see how tall yours can stretch. 🦕✏️
Related posts:
 How to Draw a Whale Step by Step (Easy for Beginners)
 How to Draw Lungs Step by Step (Easy Science Diagram)
 How to Draw a Pineapple Step by Step (Easy Crown and Slice)
 How to Draw Iron Man Step by Step (Easy Chibi for Kids)
 How to Draw a Dress Step by Step (Easy Party Dress)
 How to Draw a Chicken Step by Step (Easy for Beginners)
 How to Draw a UFO Step by Step (Cute Alien Saucer)
 How to Draw Flames Step by Step (Easy Campfire Drawing)
 How to Draw a Moon Step by Step (Sleepy Crescent + Phases)
 How to Draw a Sunflower Step by Step (Big and Bright)
 How to Draw a Fall Leaf Step by Step (Maple, Oak and Birch)
 How to Draw a Mushroom Step by Step (Easy Storybook Toadstool)

