
Koalas are mostly head. Give one a huge round face, two fuzzy ears and a big dark nose shaped like a jellybean, and people know what it is before you add anything else. This lesson shows you how to draw a koala step by step, from three light guide shapes to a smiling gray koala sitting on a eucalyptus branch with its paws hooked over the bark. The only tricky part is the bumpy ear edge.
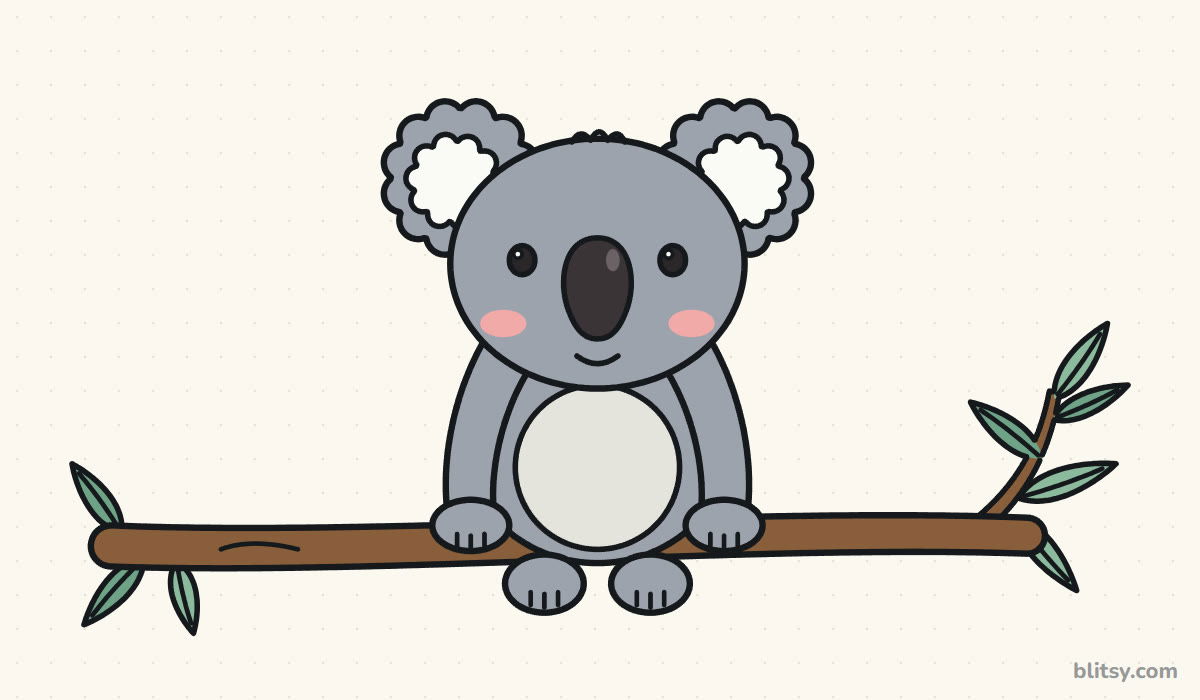
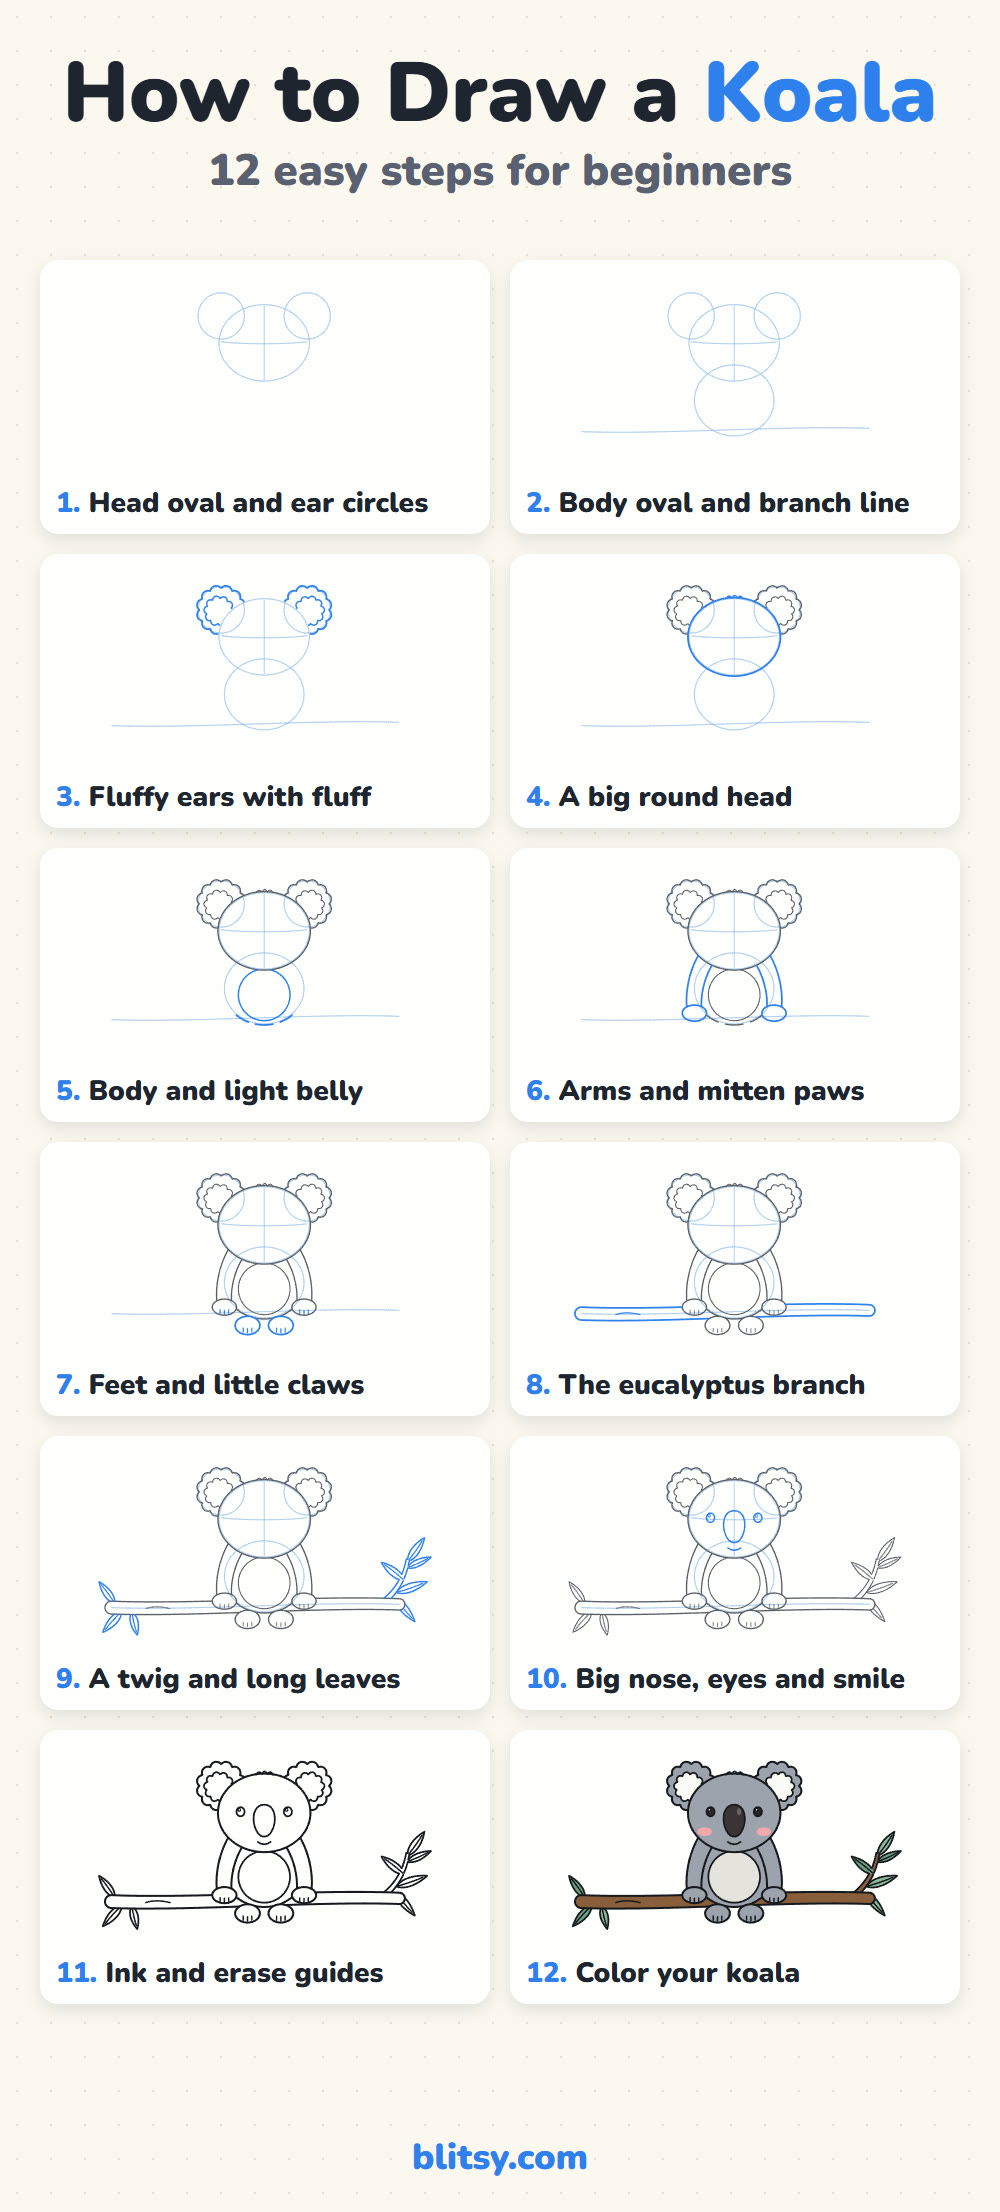
Each picture adds the new lines in blue. Lines from earlier steps turn gray, so you always know which part to copy next.
Quick overview
⏱️ Time: about 30 to 35 minutes with coloring
🎯 Level: easy, fine for kids from around 6
✏️ Steps: 12
🐨 You'll draw: a cartoon koala sitting on a eucalyptus branch
Supplies for a Fuzzy Koala Sketch
- A pencil you can keep light (HB works)
- A soft eraser
- A black marker or fineliner for the final outline
- Colored pencils or crayons: gray, light gray, black, pink, brown and green
- Plain white paper, turned sideways
The branch runs almost the full width of the page, so landscape paper gives it room.
How to Draw a Koala Step by Step
Step 1: Sketch the head oval and two ear circles
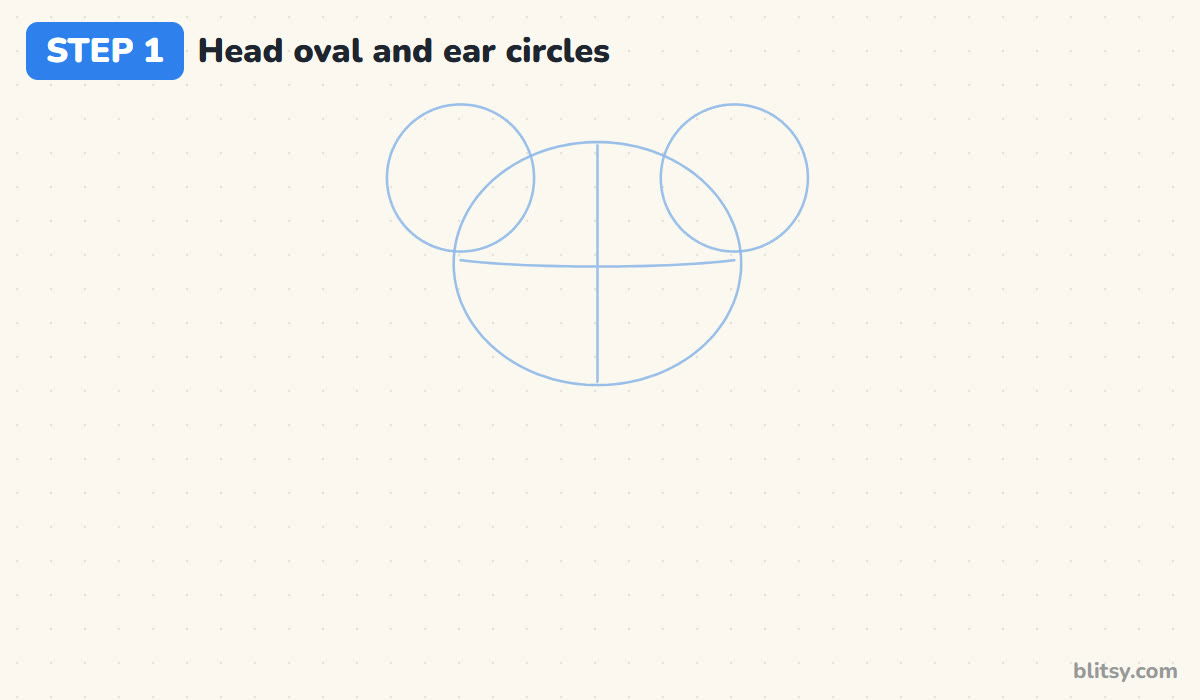
Draw a wide oval in the upper middle of the page for the head. It should be a little wider than it is tall. Put a circle on each top corner, half on the oval and half outside it, for the ears. Then add a line down the middle of the face and a gentle curve across, a bit above halfway. The eyes sit on that curve later.
💡 Tip: Keep the pressure feather light. Every line in this step gets erased.
Step 2: Add a body oval and a branch line
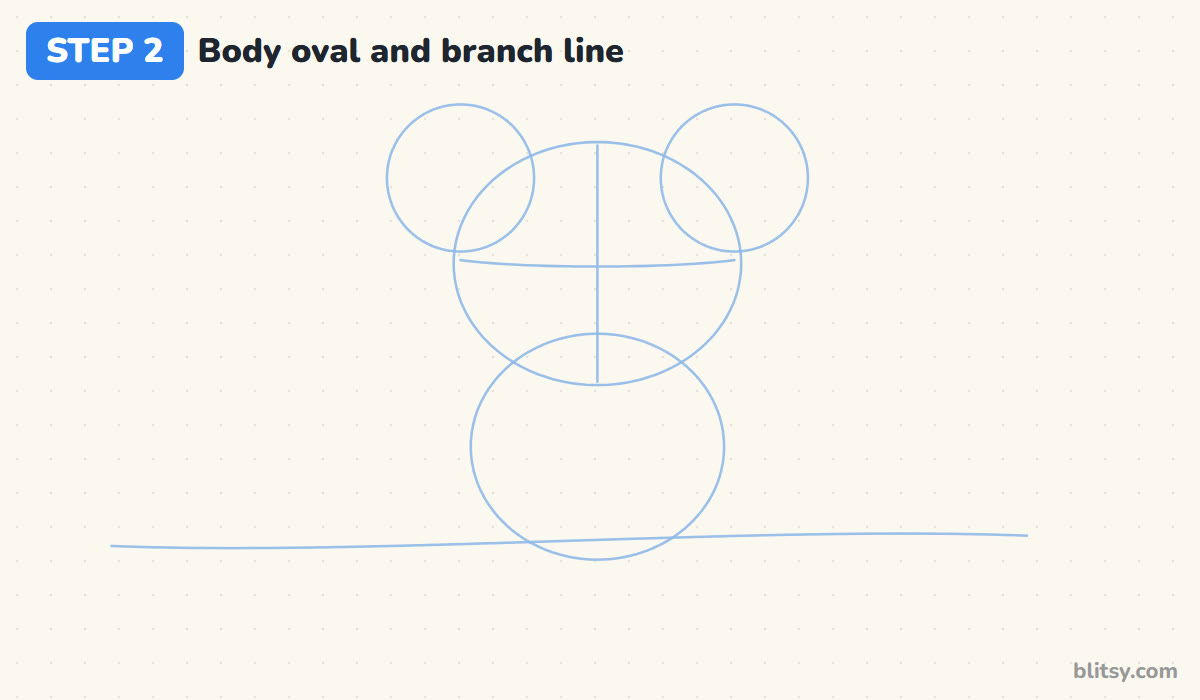
Below the head, draw a rounder oval for the body that tucks up under the chin. I make it narrower than the head, because a big head on a small body is what makes a koala look cute. Then run one long, slightly wavy line across the whole page right under the body. That's the middle of the branch.
💡 Tip: If the body comes out wider than the head, shrink it now. It's much harder to fix later.
Step 3: Draw the fluffy ears with white fluff
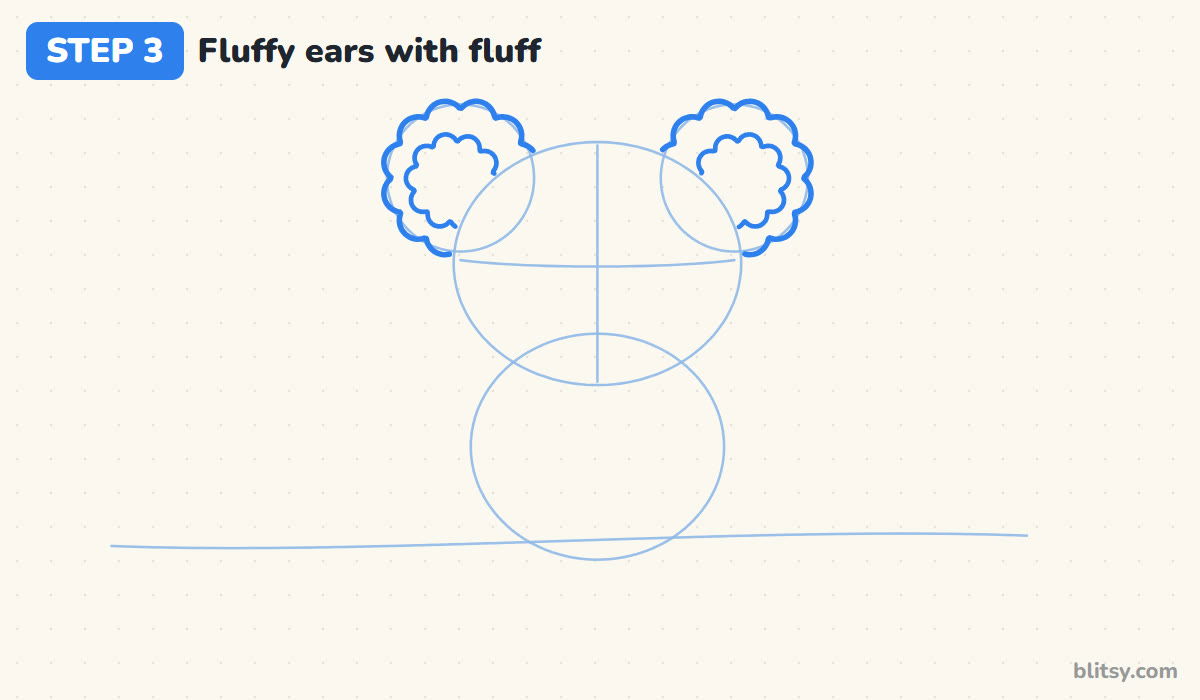
I go around each ear circle with a ring of small rounded bumps, like a little cloud. Inside, I draw a second, smaller bumpy shape for the white fluff, sitting a touch toward the outside of the ear. Stop both shapes where they meet the head oval, since the head covers that part.
💡 Tip: Aim for about a dozen bumps on each ear. Tiny bumps look scratchy and big ones look like petals.




Step 4: Outline the big round head
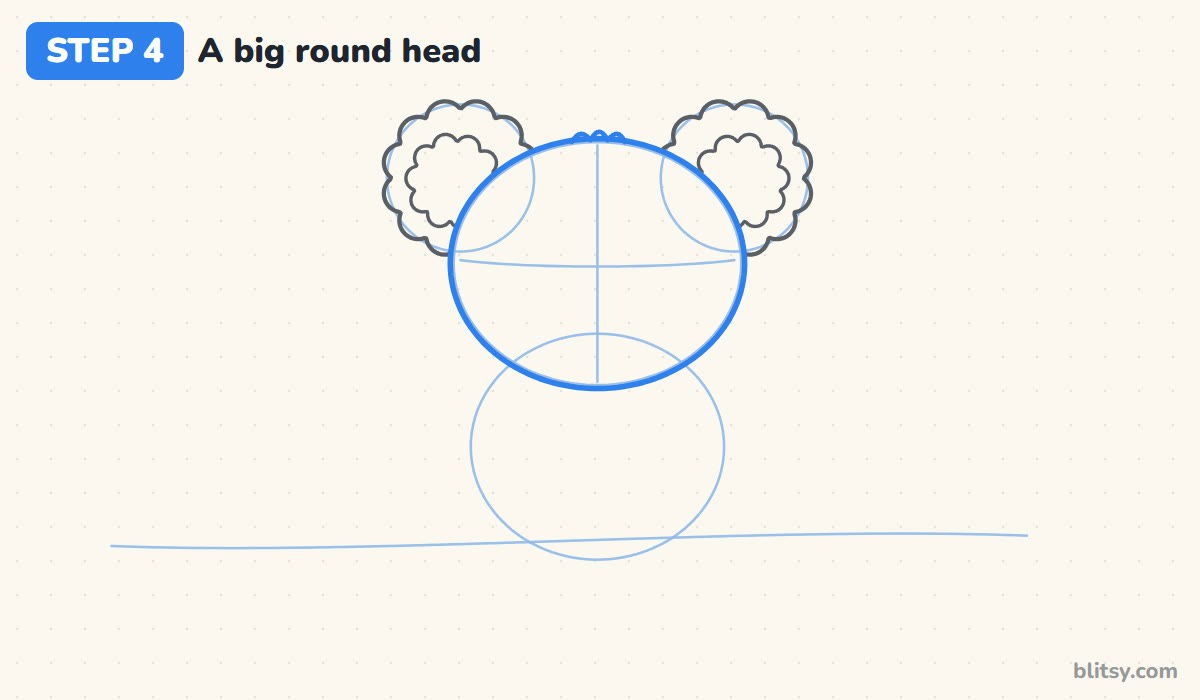
Trace over the head oval with a firm line. I let the sides bulge out just a little at the cheeks, which makes the face look soft and chubby. On top, add three tiny bumps in a row for a tuft of fur.
💡 Tip: Don't worry about the guide lines inside the face yet. They help you place the nose and eyes later.
Step 5: Draw the body and the light belly
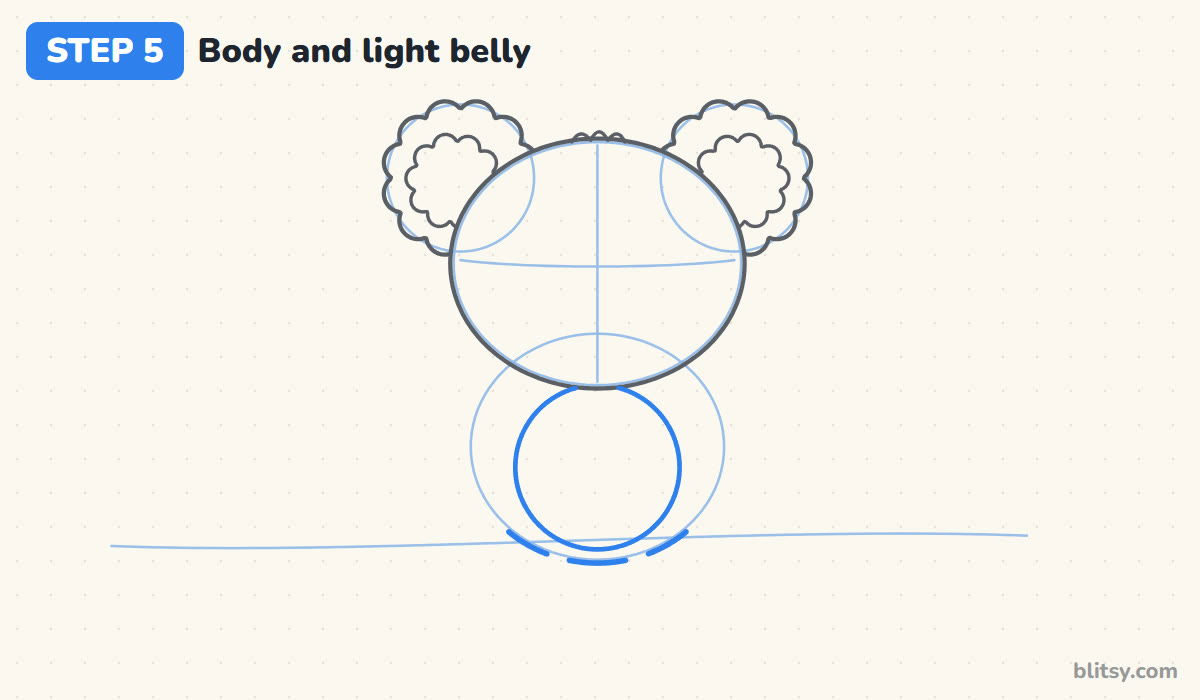
Draw the curve along the bottom of the body oval, where it will rest on the branch. The sides of the body will be hidden by the arms, so you only need the bottom part for now. In the middle, draw a round belly circle, starting just under the chin and ending above the bottom curve.
💡 Tip: Center the belly on the middle guide line. An off-center belly makes the koala look like it's leaning.
Step 6: Add the arms and mitten paws
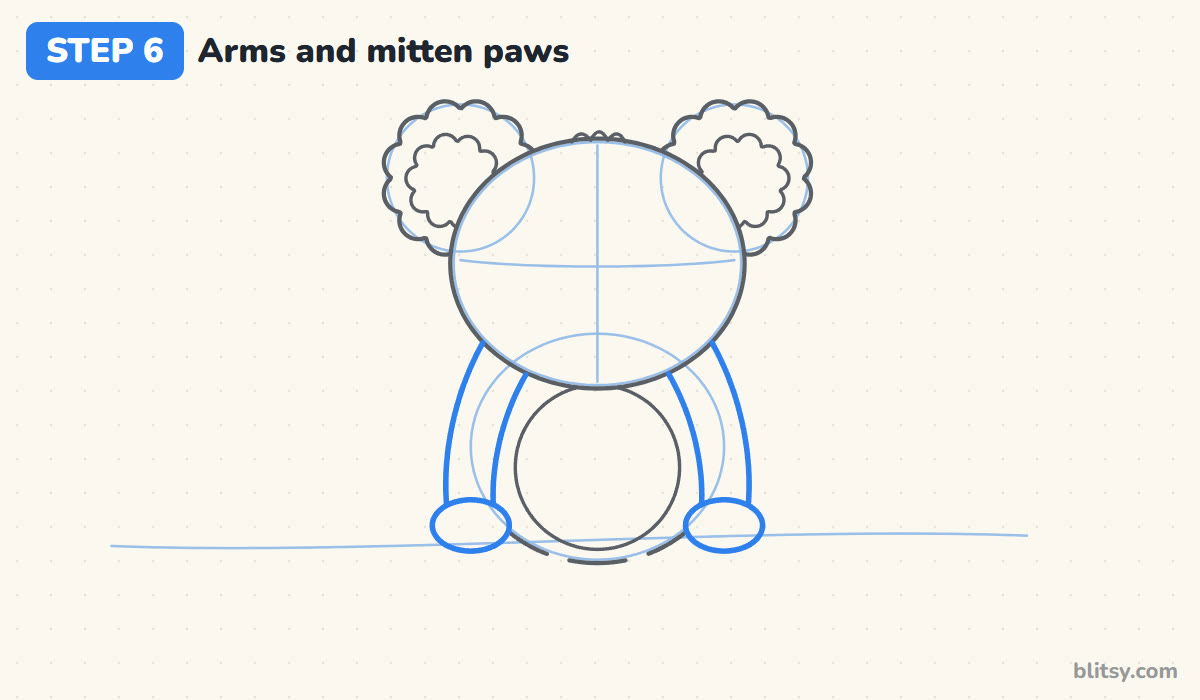
Each arm starts under the head, at the side of the body, and comes down in a soft curve to the branch line. Give the arms real width, about as wide as an ear circle, with rounded edges. At the bottom of each arm, draw a flat oval paw that rests on top of the branch. Add three short lines on each paw for the claws. I like to curve the arms in slightly at the bottom, so the paws look like they're really holding on.
💡 Tip: Draw the outside edge of both arms first, then the inside edges. It helps you keep them the same thickness.
Step 7: Draw the feet and little claws
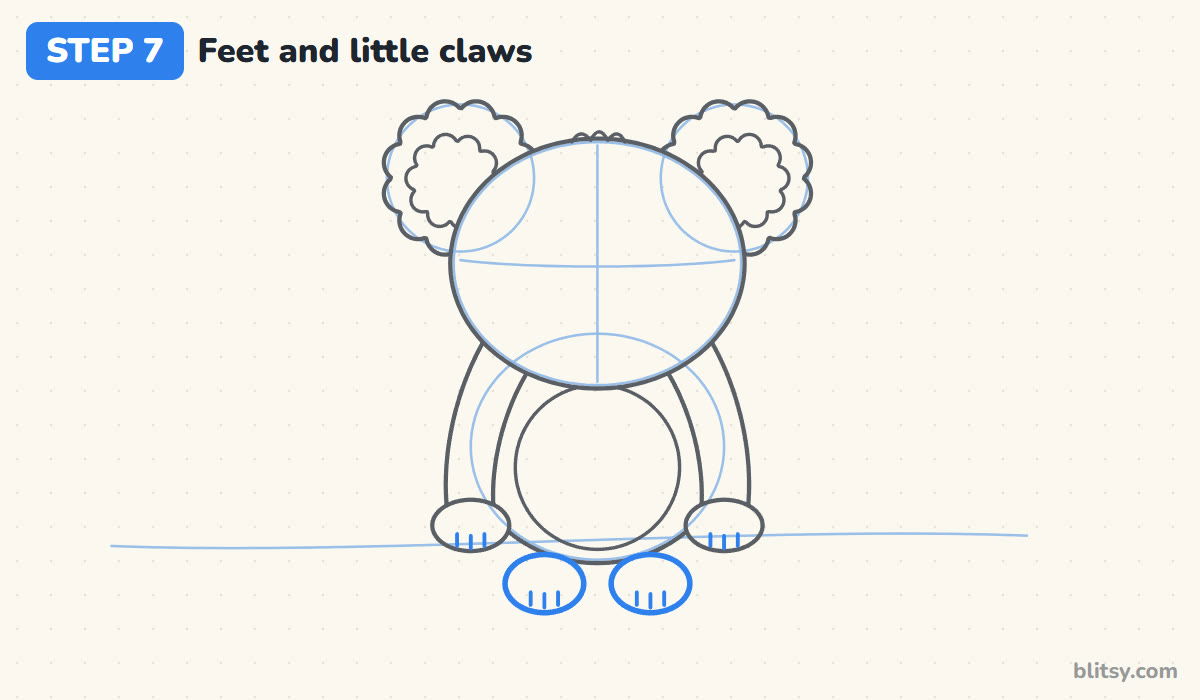
Under the body, draw two round feet side by side, close together. They hang down in front of where the branch will be, as if the koala is dangling its legs. When I teach this, kids love the next bit: add three short claw lines at the bottom of each foot, like the ones on the paws.
💡 Tip: Leave a small gap between the feet. If they touch, they blur into one blob.


Step 8: Draw the eucalyptus branch
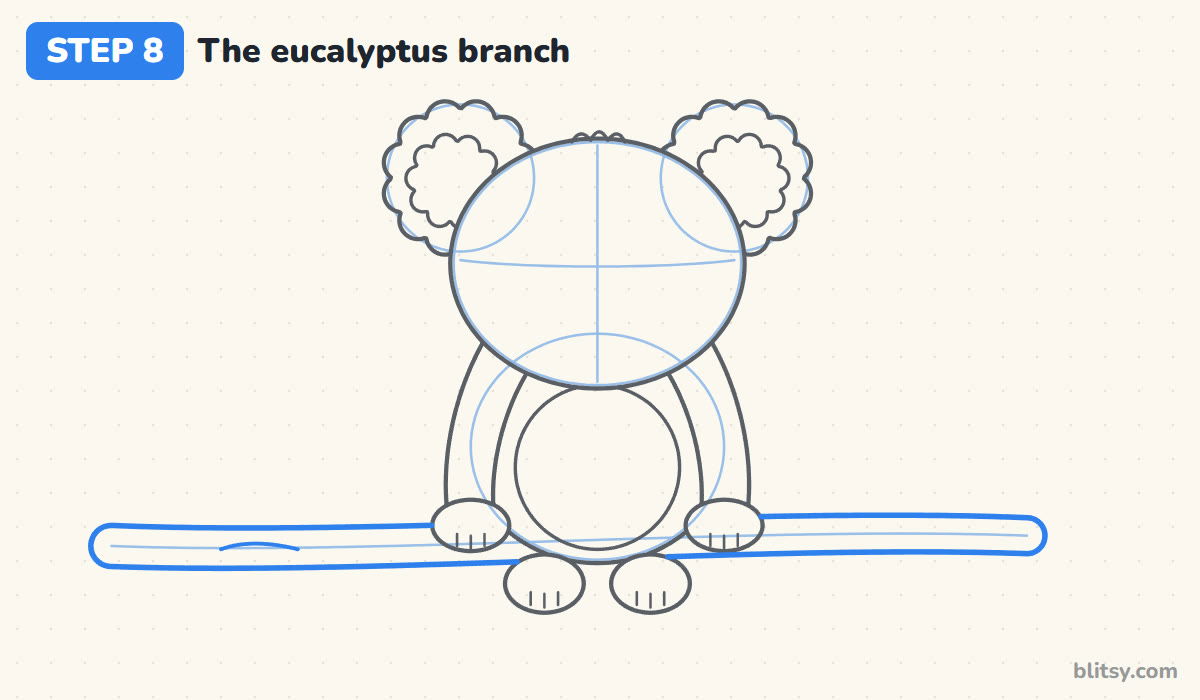
Follow the branch guide with two lines about a paw's height apart and round off both ends. The branch goes behind the body and the feet, so stop your lines where they meet the koala and pick them up again on the other side. One short curve on the left adds bark texture.
💡 Tip: A slightly wavy branch looks more natural than a ruler-straight one, so let your hand wobble a little.
Step 9: Add a twig and long eucalyptus leaves
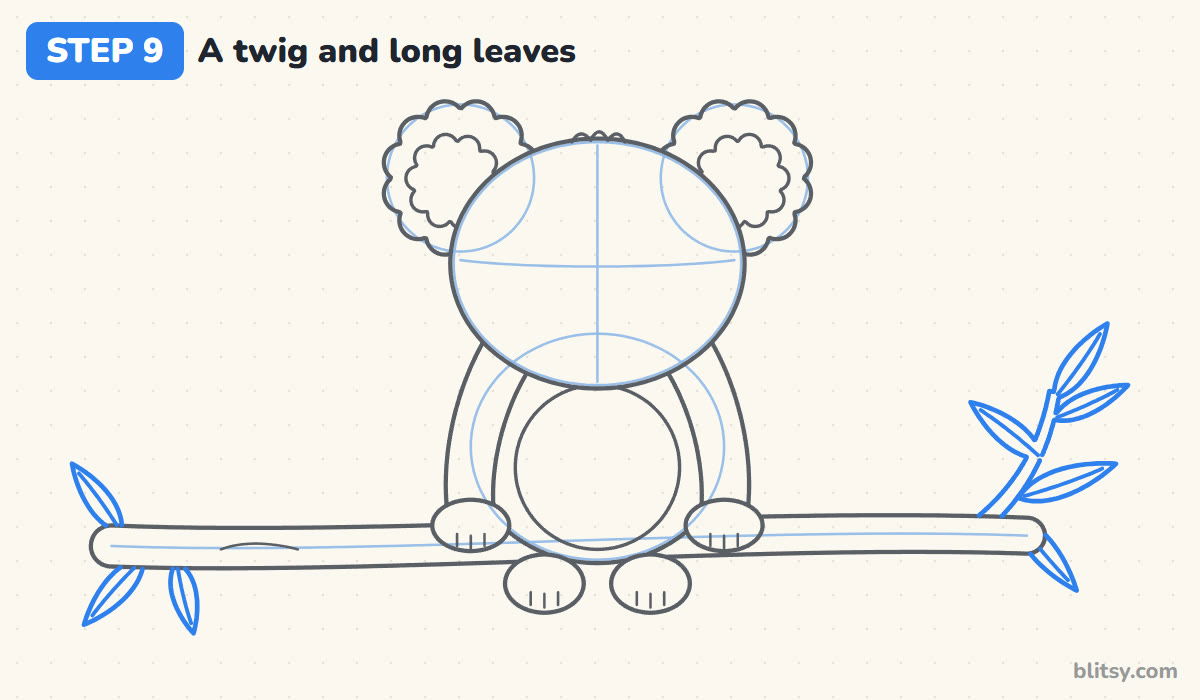
From the right end of the branch, draw a thin twig curving up. Eucalyptus leaves are long and narrow with pointed tips, so I draw them like stretched-out teardrops along the twig and a few more hanging from the left end. A line down the middle of each leaf makes the vein.
💡 Tip: Point the leaves in different directions. If they all lean the same way, they look stiff.
Step 10: Draw the big nose, small eyes and a smile
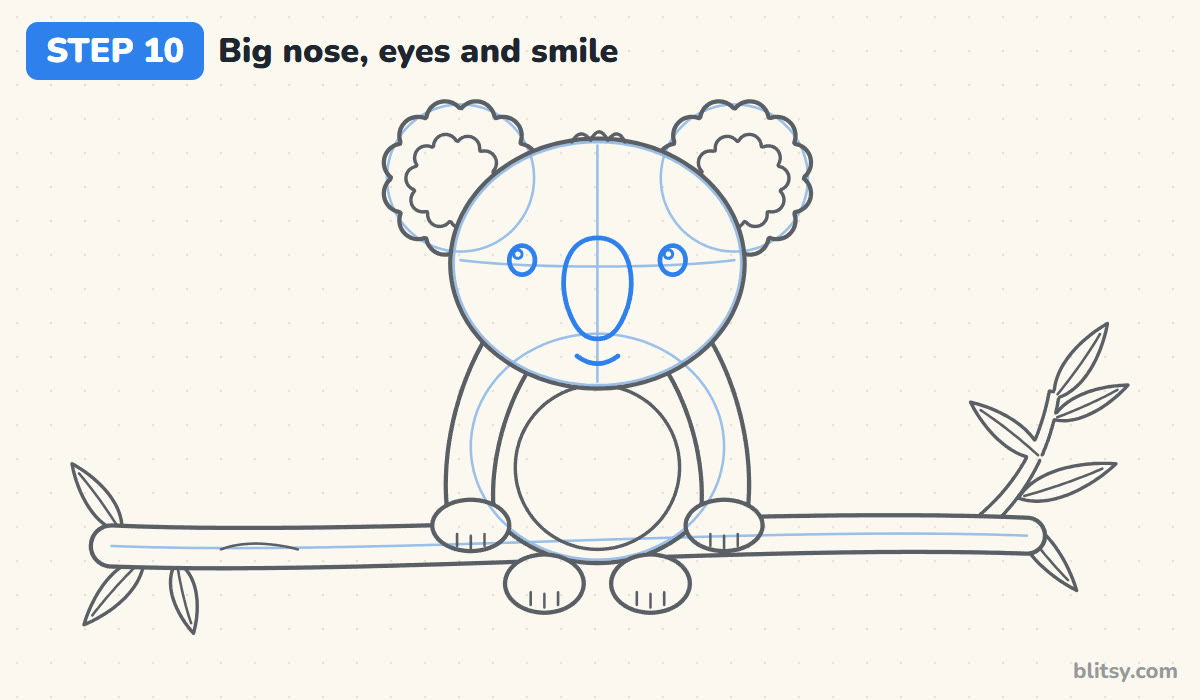
The nose is the koala's best feature, so I'm always generous with it. Draw a tall oval in the middle of the face, a little wider at the top, starting just at the eye line. Put two small round eyes on the cross curve, well apart from the nose, each with a little shine circle. A short, gentle smile under the nose finishes the face.
💡 Tip: Keep the eyes small next to the nose. Big eyes make it look more like a bear or a mouse.
Step 11: Ink the koala and erase the guides
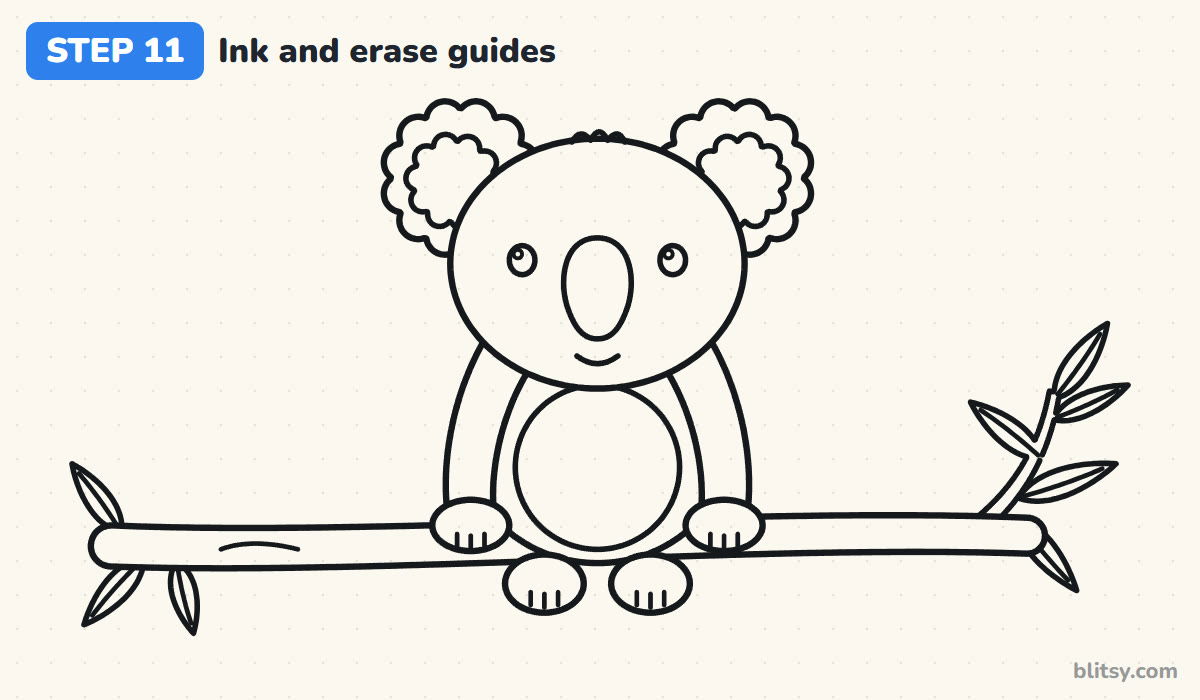
Trace all the keeper lines with your black marker. I do the face first, while my hand is steady, then the ears, body, branch and leaves. Let the ink dry for a minute and then erase every pencil guide.
💡 Tip: Ink the bumpy ear edge in short strokes, lifting the pen at each dip.


Step 12: Color your koala
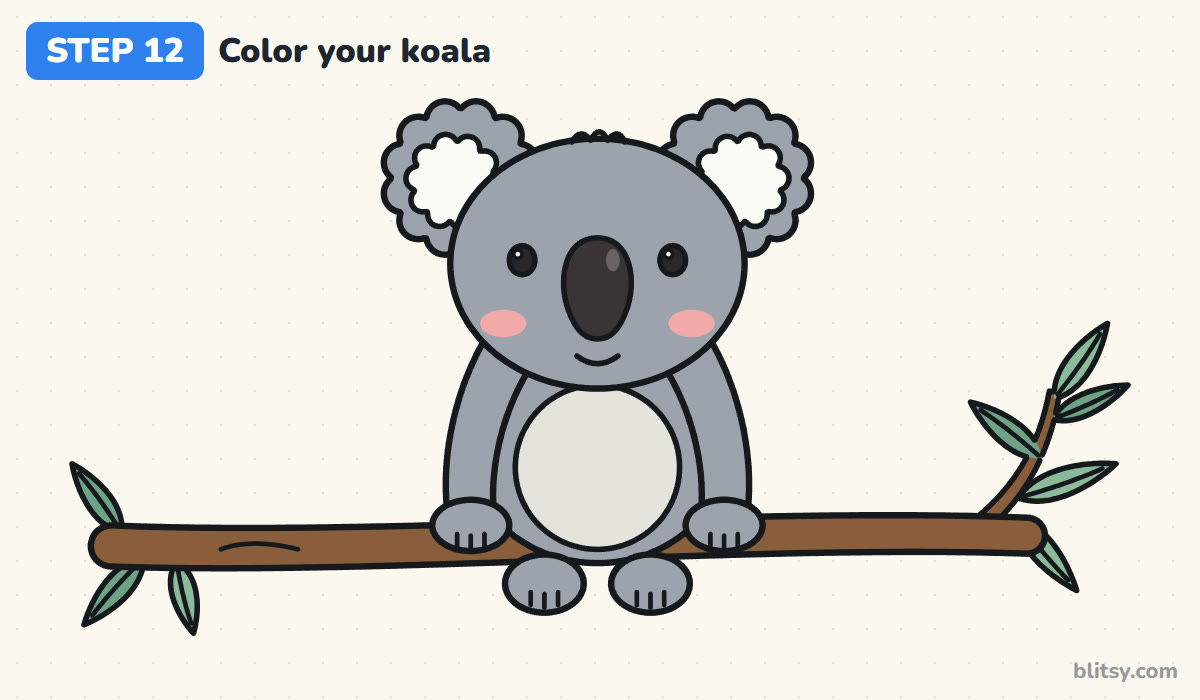
Color the head, ears, arms, paws and feet gray. The belly is a lighter gray and the ear fluff stays white. Fill the nose and eyes with black but leave the shine dots white. Add two pink cheeks, a brown branch and twig, and green leaves to finish.
💡 Tip: Press lightly with the gray first and add a second layer near the edges. It gives the fur a soft, round look.
Where Koala Sketches Usually Slip
- A small nose. A button nose turns the koala into a bear. Most beginners draw it too small. Make it a tall dark oval that fills the middle of the face.
- Smooth, plain ears. Round ears without bumps look like a mouse. The fluffy edge and the white fluff inside are what say koala.
- A body bigger than the head. Cartoon koalas need a big head. Keep the body oval narrower than the head oval.
- Stick arms. Thin arms look weak and odd. Give them soft width and finish them with round mitten paws.
- Leaves shaped like circles. Eucalyptus leaves are long and narrow. Round leaves make it look like any tree.
Giving Your Koala a Little Personality
Once the basic koala feels easy, I'd change one thing at a time. Put a baby koala on its back, swap the branch for a tree trunk it hugs, or give it a tiny leaf to munch on. Small kids can skip the claws and the leaf veins and it still reads as a koala. If you enjoyed drawing an animal on a branch, the sloth drawing tutorial is a great next step, since that sloth hangs from a leafy branch too. For a bear with a more realistic shape, try the bear drawing step by step lesson, and if you'd rather just color, the koala coloring pages have plenty more poses.
Free Koala Coloring Page and Printable Steps
The free koala coloring page shows a colored koala at the top as a guide, a color key for each part, and a big outline to color underneath. The step-by-step PDF guide has all 12 steps with pictures and tips, so you can draw without a screen. Both print well on Letter or A4 paper.
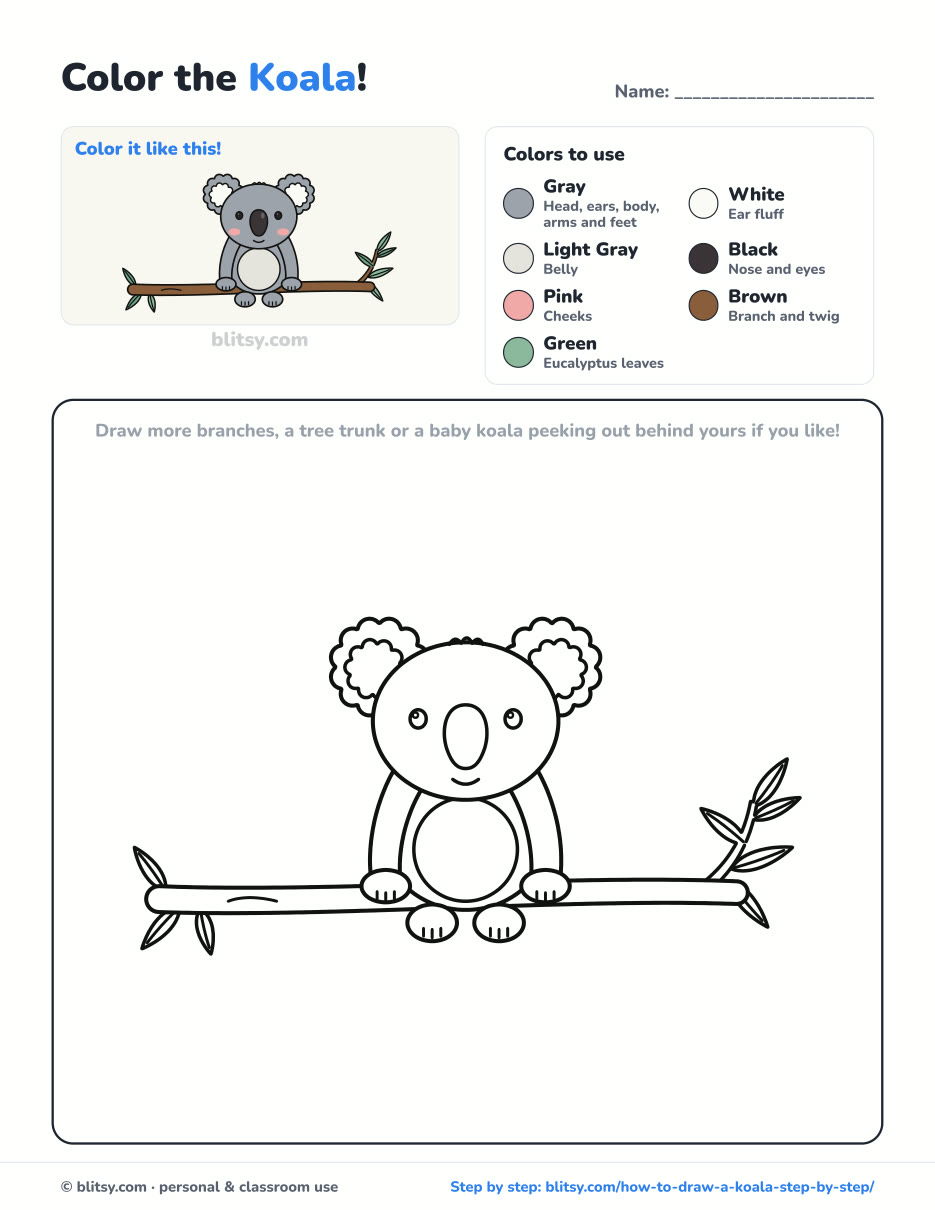
Black outlines with a colored example and the color names at the top. Ready to print and color.
⬇️ Download Coloring PageEvery step picture with its instructions and tips, to keep beside your paper while you draw.
⬇️ Download Drawing Guide📱 On a phone? Tap a download button, then open the file and choose Share → Save to Files or Print. On a computer, the PDF opens or saves straight to your Downloads folder.
Save the Koala Steps as a Tall Pin
More Animals That Love Branches and Trees
Each of these is a full step-by-step tutorial with a picture for every stage and a free coloring page at the end.
- Sloth Drawing: A smiling sloth hangs from a leafy branch, built from two simple ovals and long arms, in this sloth drawing tutorial.
- Bear Drawing: A friendly brown bear walks through the grass in this how to draw a bear step by step guide.
- Polar Bear Drawing: A chubby polar bear sits on a cracked ice floe in this polar bear drawing tutorial.
- Raccoon Drawing: Another gray animal, this one with a masked face and a striped tail, in this raccoon drawing step by step lesson.
- Owl Drawing: A round-eyed owl perches on a branch under the moon in this owl drawing tutorial.
Koala Drawing Questions Kids Often Ask
What is the easiest way to draw a koala?
Start with a wide oval for the head and two circles for the ears. Make the ears bumpy, add a big oval nose and small eyes, then a small body underneath.
How do you draw koala ears?
Draw a circle on each side of the head, then go around it with small rounded bumps. A smaller bumpy shape inside shows the white fluff.
What colors is a koala?
Koalas are gray with a lighter belly, white fluff in the ears and a dark nose. Many artists add pink cheeks for a cartoon look.
Is a koala a bear?
No. People often call it a koala bear, but it's a marsupial that carries its baby in a pouch. It eats eucalyptus leaves, which is why we draw it on a branch.
Grab a gray pencil and give your koala its big fuzzy ears. It might just become your favorite animal to draw. 🐨✏️
Related posts:
 How to Draw a Car Step by Step (Easy Drawing for Beginners)
 How to Draw a Whale Step by Step (Easy for Beginners)
 How to Draw an Arctic Fox Step by Step (Easy for Beginners)
 How to Draw a Shark Step by Step (Easy for Beginners)
 How to Draw a Chicken Step by Step (Easy for Beginners)
 How to Draw a Fish Step by Step (Easy Goldfish for Beginners)
 How to Draw a Snowman Step by Step (Easy for Beginners)
 How to Draw Hands Step by Step (Easy Palm View for Beginners)
 How to Draw an Airplane Step by Step (Easy Jet for Beginners)
 How to Draw a Mouse Step by Step (Easy for Beginners)
 How to Draw the Joker Step by Step (Easy Chibi for Beginners)
 How to Draw a T-Rex Step by Step (Easy for Beginners)

