
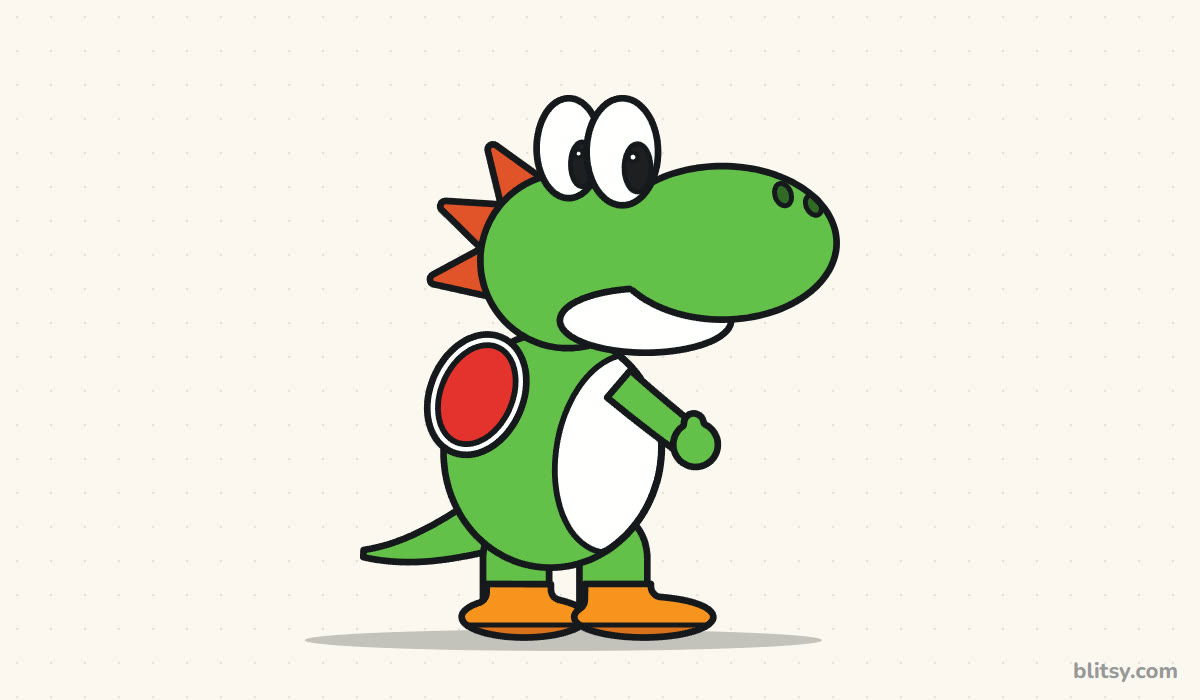
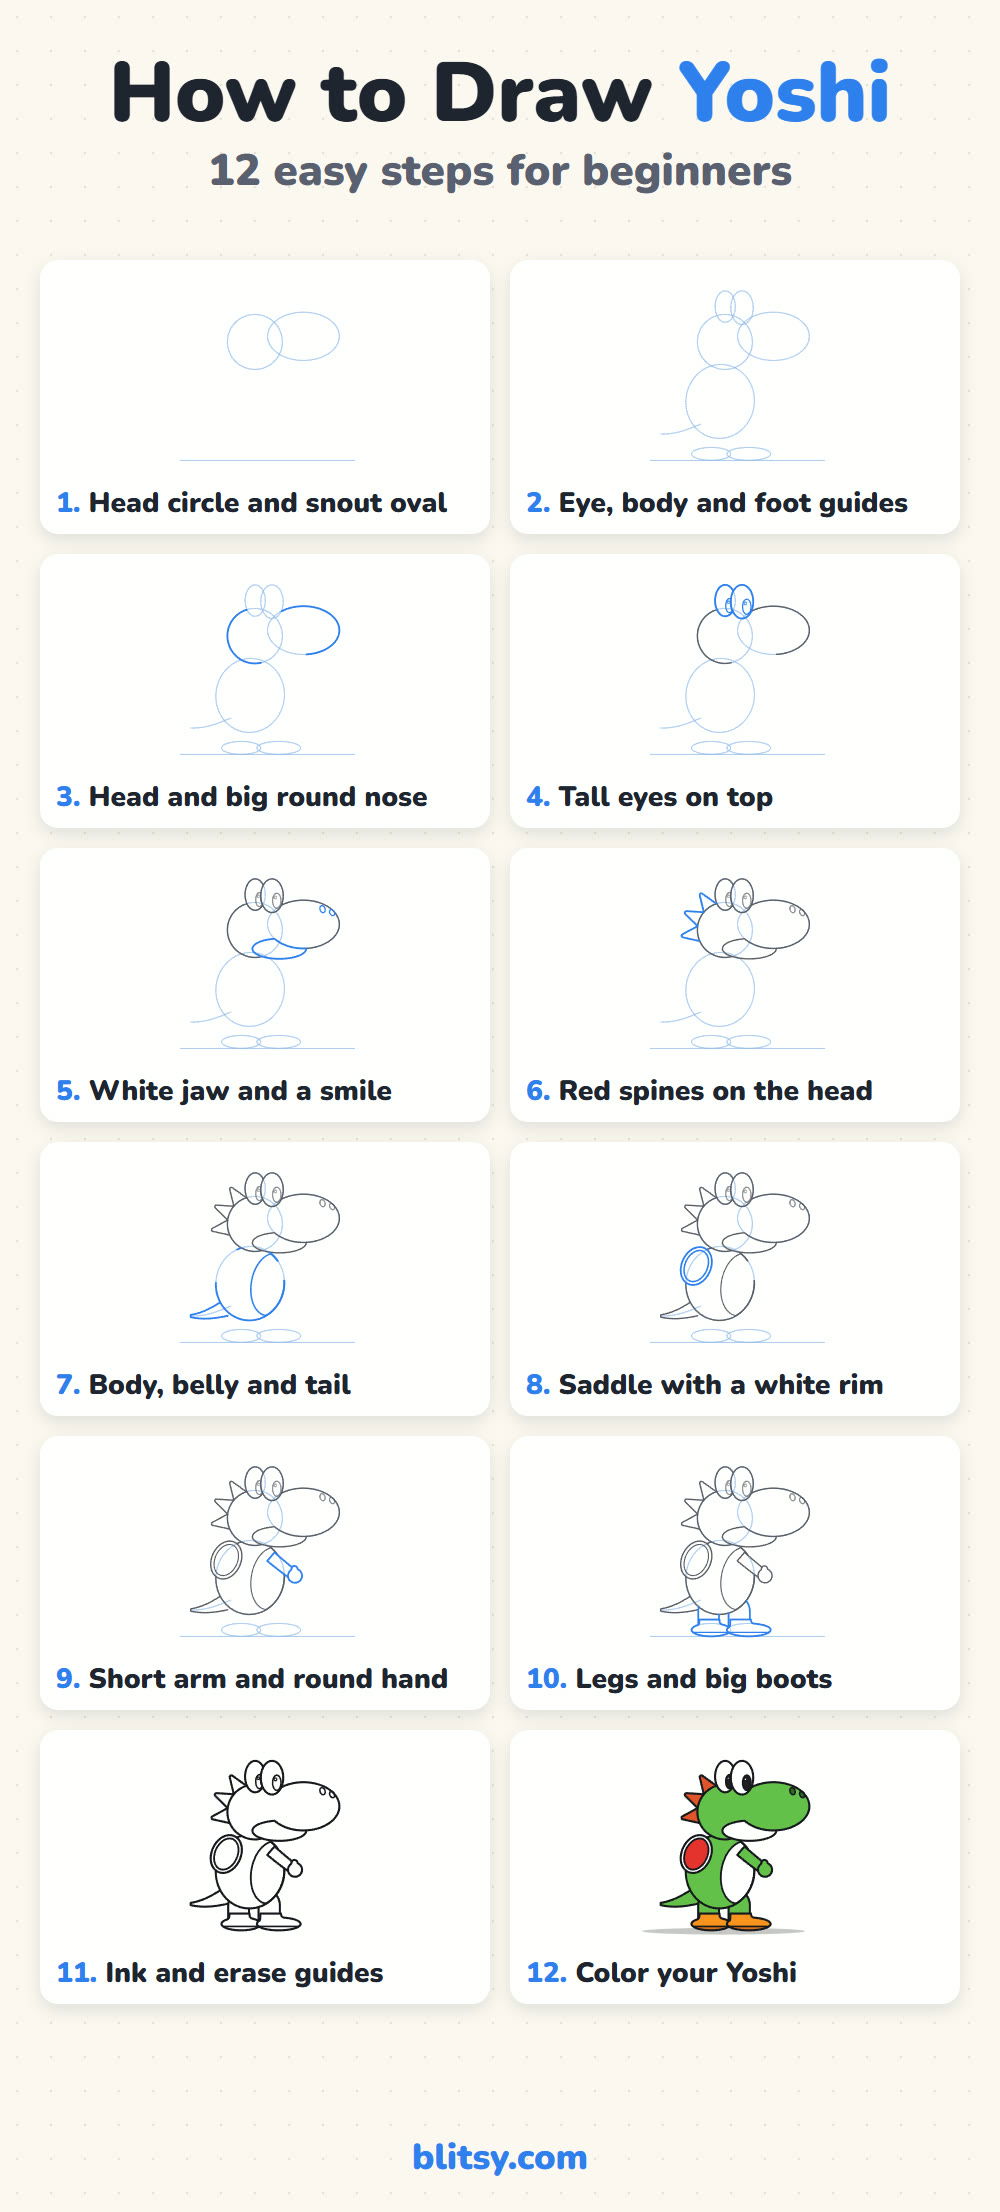
Yoshi is really a nose with a dinosaur attached. Get that big round snout right and the rest follows from simple circles and ovals. In this lesson I'll show you how to draw Yoshi step by step, from two light guide shapes to a smiling green dino in his red saddle and orange boots. It's my own simple fan-art version for practice, not official Nintendo artwork, so relax and enjoy the shapes.
Copy only the bright blue lines in every picture; gray shows the work already done. The pale helper shapes stay faint, because they disappear after inking.
Quick overview
⏱️ Time: about 30 to 35 minutes with coloring
🎯 Level: easy, good for kids from about 6 up
✏️ Steps: 12
🦖 You'll draw: Yoshi standing in side view, facing right
Supplies for a Green Dino Sketch
- A pencil you can press softly (HB works well)
- An eraser that doesn't smudge
- A black marker or fineliner for the final outline
- Crayons, markers or colored pencils in green and red, plus orange and black
- Plain white paper, turned sideways
Leave white crayon out of it; the paper itself gives you the white belly, the jaw and the eyes.
How to Draw Yoshi Step by Step
Step 1: Draw a head circle and a snout oval
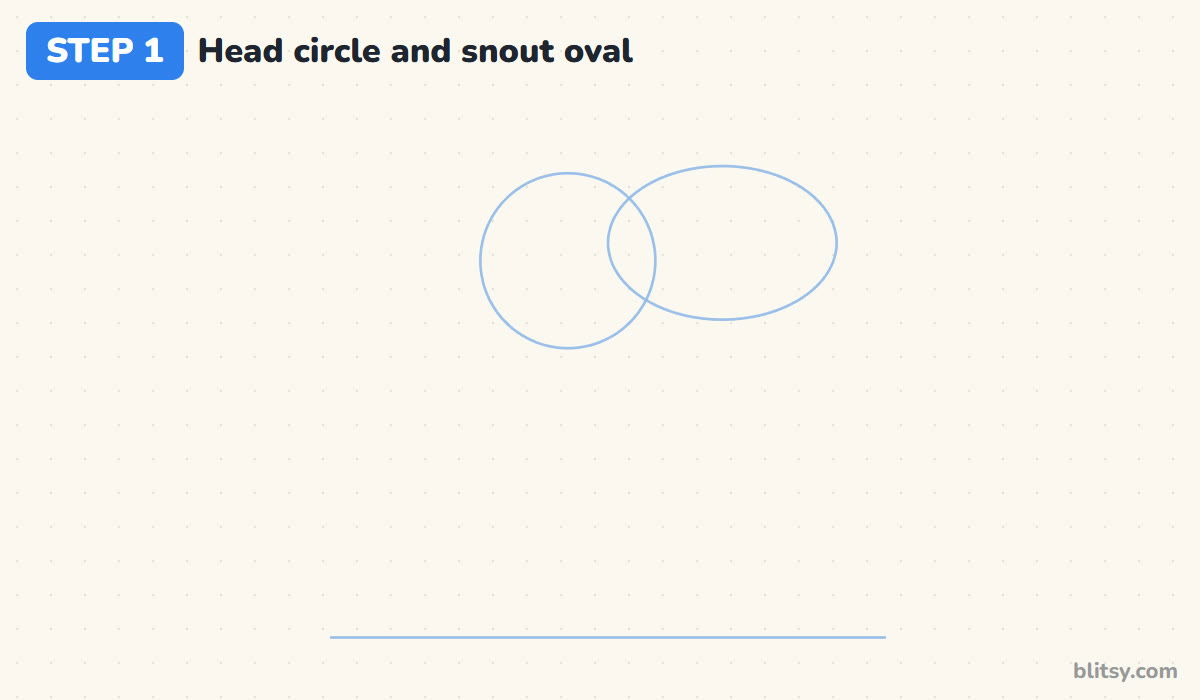
Put a light ground line near the bottom of your page first. Then, high up and a little left of center, draw a circle for the head. Overlap it with a wide oval to the right for the snout. The oval should be wider than the circle, because Yoshi's nose really is the biggest part of his face.
💡 Tip: Let the two shapes overlap by about a third. Too little and the nose looks glued on.
Step 2: Add guides for the eyes, the body and the feet
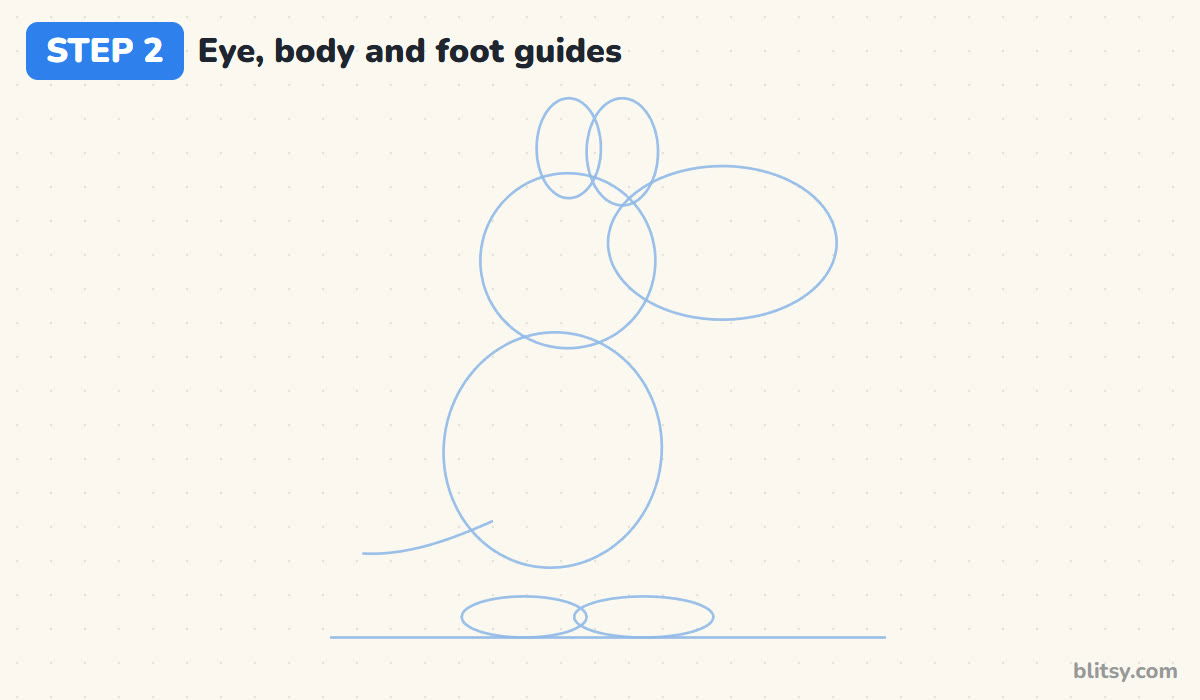
Two tall ovals sit on top of the head circle, touching each other, for the eyes. Below the head, draw a big egg shape for the body that tips slightly forward. On the ground line add two flat ovals for the boots, and from the lower back of the body sketch one curved line out to the left for the tail.
💡 Tip: Make the body a little smaller than the head and snout together. Yoshi is top heavy, and that's part of his charm.
Step 3: Outline the head and the big round nose
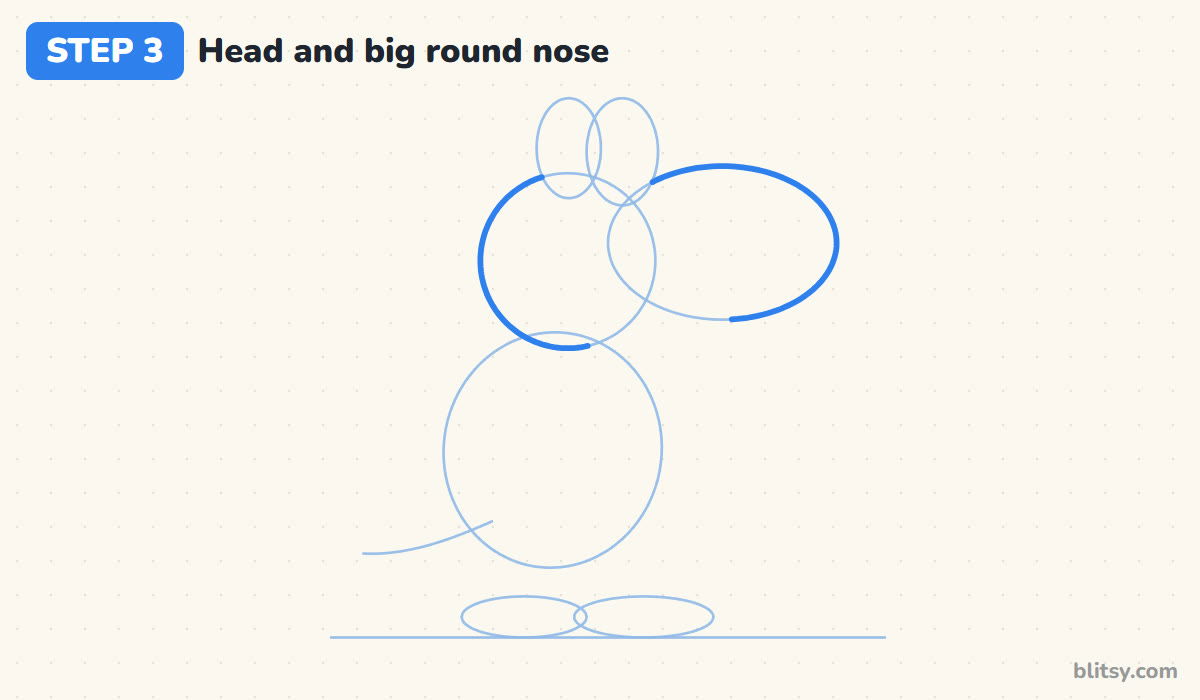
Now trace the outside of the circle and the oval as one shape with a firmer line. Skip the part where the two guides cross in the middle, so the head and snout become one smooth form. Stop short at the bottom of the nose and at the eyes; those edges get other lines soon.
💡 Tip: Keep the top of the snout nicely domed. A flat top makes him look more like a crocodile.




Step 4: Draw the tall eyes on top
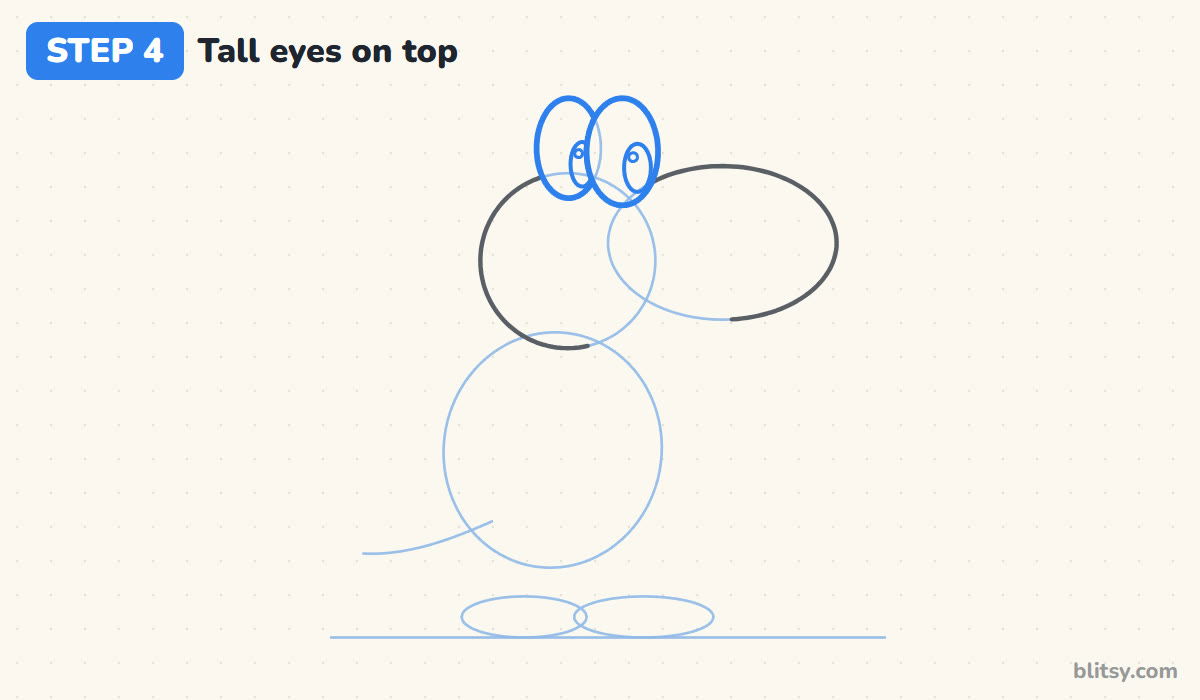
Go over the two eye ovals. The front one overlaps the back one, so draw it fully and let the back eye tuck behind it. Inside each, near the front and a bit low, add a tall black pupil with a tiny shine circle. Pupils that point forward make him look curious and alert.
💡 Tip: Place both shine dots in the same upper corner, or the eyes will seem to look different ways.
Step 5: Add the white jaw, the smile and the nostrils
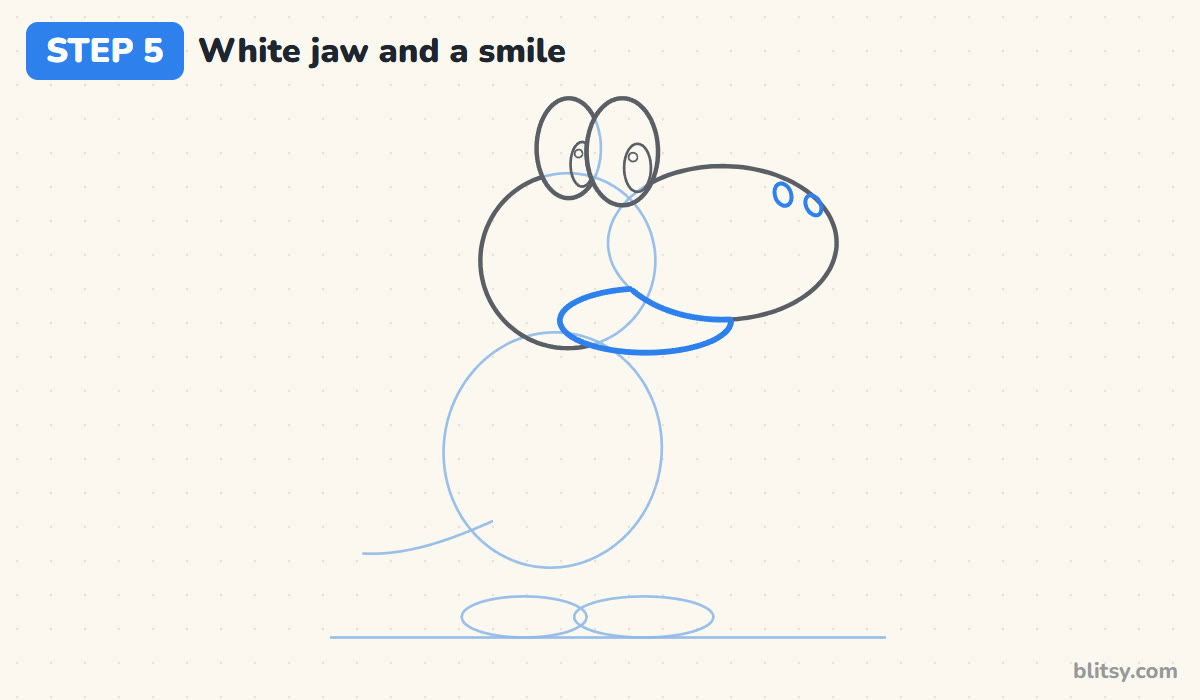
Under the snout, draw a flattened oval for the lower jaw that pokes out behind the nose. Where the bottom of the snout crosses it, that curved line becomes his wide smile. Near the front tip of the nose, add two small slanted ovals for the nostrils.
💡 Tip: Keep the jaw shorter than the snout. If it sticks out past the nose, he starts to look grumpy.
Step 6: Draw three red spines on the head
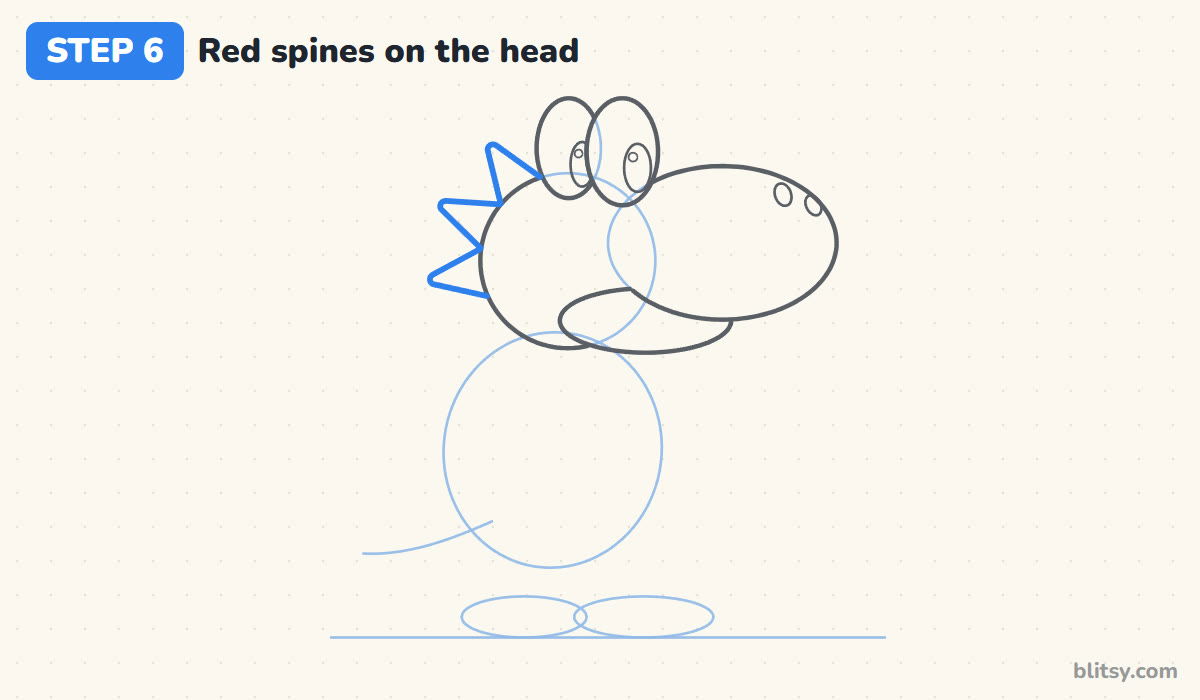
On the back of the head, add three pointed spines in a row, running from the top down toward the neck. Each one is a simple triangle with its base hidden behind the head line. I make them about the same size so they read as a neat little crest rather than random spikes.
💡 Tip: Point the spines outward and slightly back, like a fan. Straight up looks stiff.
Step 7: Outline the body, the belly and the tail
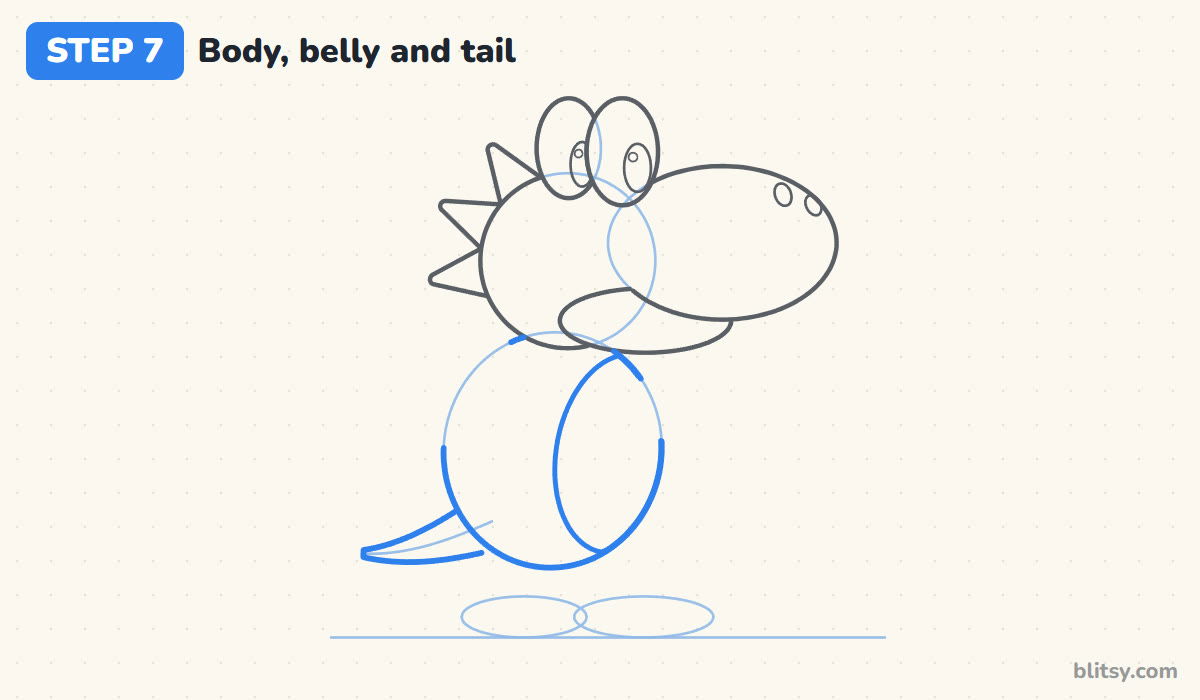
Trace the egg-shaped body, leaving out the top part the head covers. On the front, draw a tall oval for the white belly that follows the curve of the body. Finish with the tail: two lines that start wide at the back of the body and taper to a point over the ground.
💡 Tip: Hold the tail low and short. A long tail pulls the eye away from the face.


Step 8: Add the red saddle with a white rim
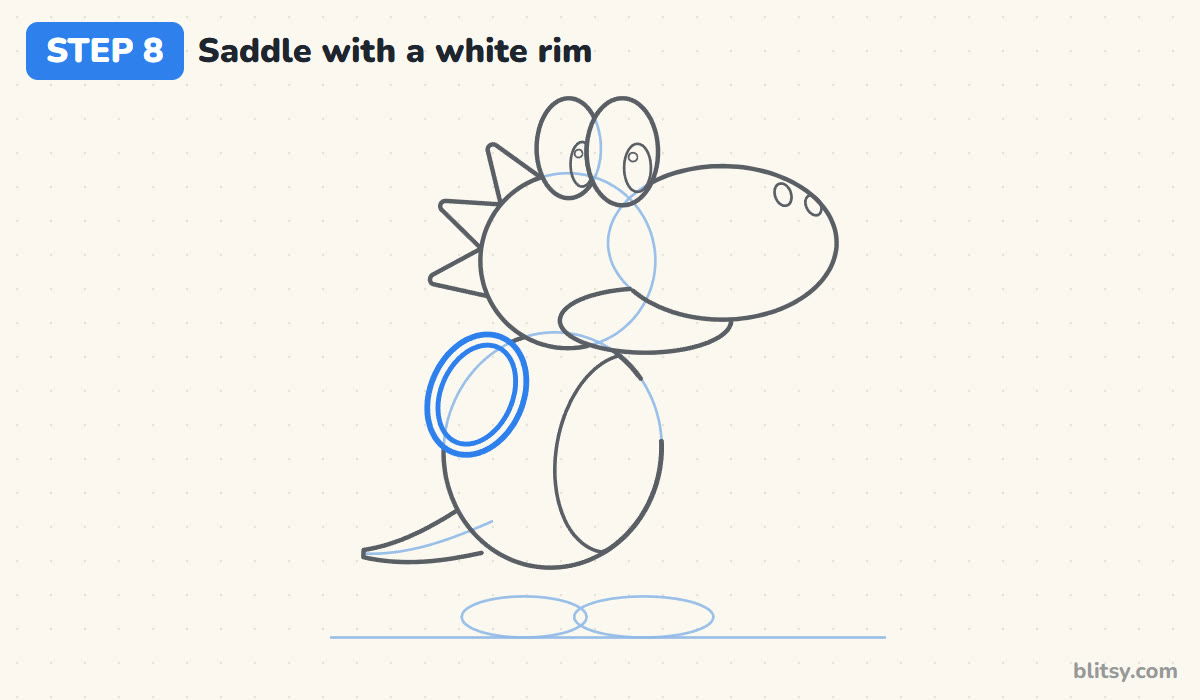
On Yoshi's back, draw a tilted oval for the saddle, half on the body and half sticking out past its edge. Draw a second, slightly bigger oval around it for the white rim. The gap between the two lines should be even all the way round.
💡 Tip: Tilt the saddle so its top leans toward the head. It then looks like it's resting on a rounded back.
Step 9: Draw the short arm and round hand
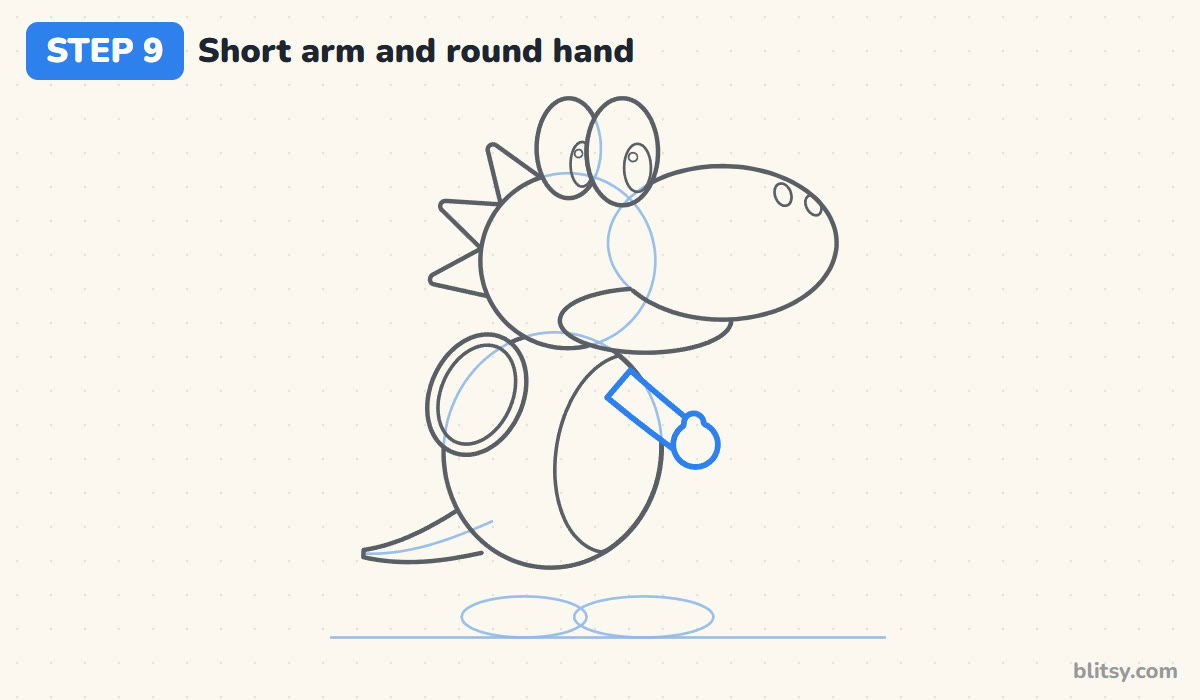
From the upper front of the body, draw a short, thick arm reaching forward and down. End it with a round mitten hand and a little bump on top for the thumb. One arm is enough in side view; the far arm hides behind the body.
💡 Tip: Give the arm real width. Thin stick arms make him look like a toy instead of a dinosaur.
Step 10: Add the legs and big boots
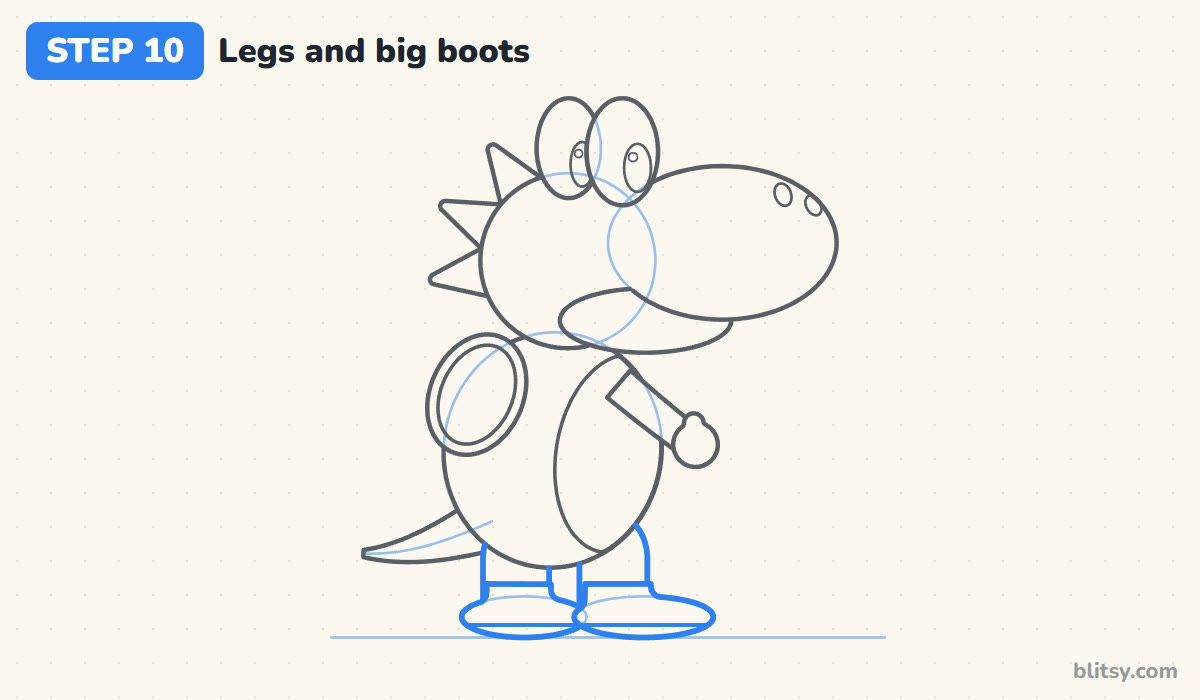
Two short legs come down from under the body to the foot ovals. Around each oval, draw a chunky boot with a rounded toe that points to the right and a short ankle on top. A straight line across the bottom of each boot makes the sole.
💡 Tip: Draw the boots bigger than feels right. Oversized shoes are a big part of Yoshi's look.
Step 11: Ink the drawing and erase the guides
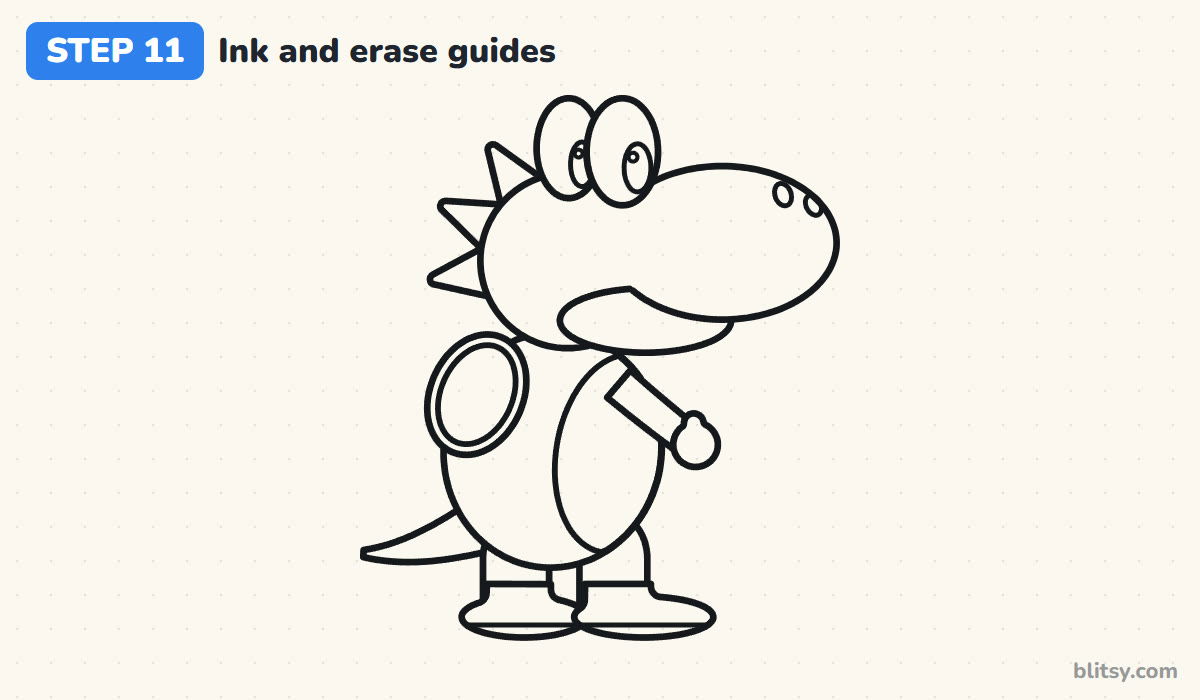
Trace every keeper line with your marker. I ink the eyes and face first while my hand is steady, then the body, the saddle and the boots. Wait a minute for the ink to dry, then erase all the light circles and guide lines underneath.
💡 Tip: Turn the paper so you always pull the marker toward you on curves. Lines come out smoother.


Step 12: Color your Yoshi
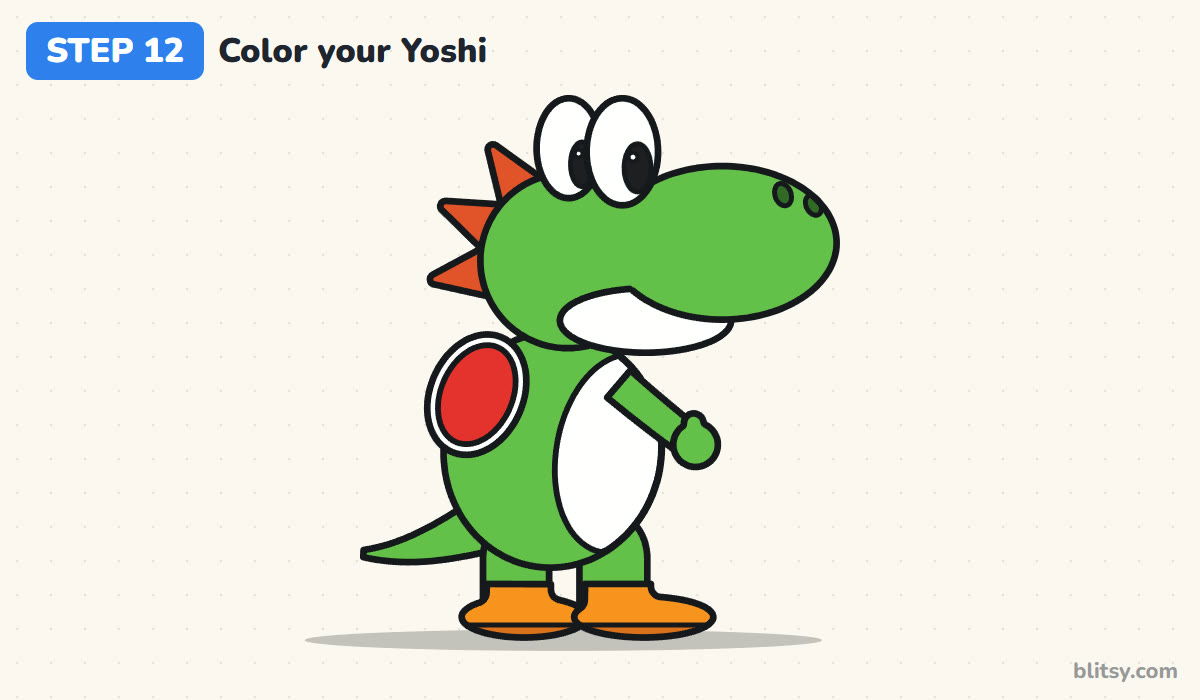
Bright green covers the head and body, the arm, the legs and the tail. Leave the belly, the jaw, the eyes and the saddle rim white. The saddle is red, the spines a red orange, and the boots orange with a darker orange sole. Fill the pupils black around their shine, color the nostrils dark green and add a soft gray shadow under the boots.
💡 Tip: Color the green in one direction with even pressure. Patchy green shows more than any other color here.
Where Yoshi Sketches Go Wrong
- A small nose. With a tiny snout he turns into a generic lizard. Make the nose oval wider than the head circle.
- Eyes drawn on the face. Yoshi's eyes sit on top of his head like two eggs. Draw them above the head line, not inside it.
- A huge jaw. If the white jaw reaches past the nose tip, the face looks sulky. Keep it tucked under the snout.
- Forgetting the saddle rim. A plain red circle can look like a patch. The white ring is what makes it a saddle.
- Tiny shoes. Small feet make the big head look wobbly. Chunky boots give him a stable, happy stance.
Yoshi Variations to Try Next
Swap the green for blue, pink, yellow or light blue and you get a whole crowd of colorful dinos. Add a spotted egg at his feet, or draw his tongue stretched out to grab an apple. Younger kids can skip the nostrils and the boot soles and he still reads fine. If you want to draw his best friend next, follow my how to draw Mario step by step lesson and put the two side by side. For another famous game character built from round shapes, the Pikachu drawing tutorial is a fun follow-up, and the frog drawing step by step guide uses the same big-eyes-on-top trick.
Free Yoshi Coloring Page and Printable Steps
The free Yoshi coloring page shows a colored example at the top with a key for each part, plus a large outline below to color yourself. The step-by-step PDF guide has all 12 steps with pictures and tips, handy for drawing away from the screen. Both print on Letter or A4 paper.
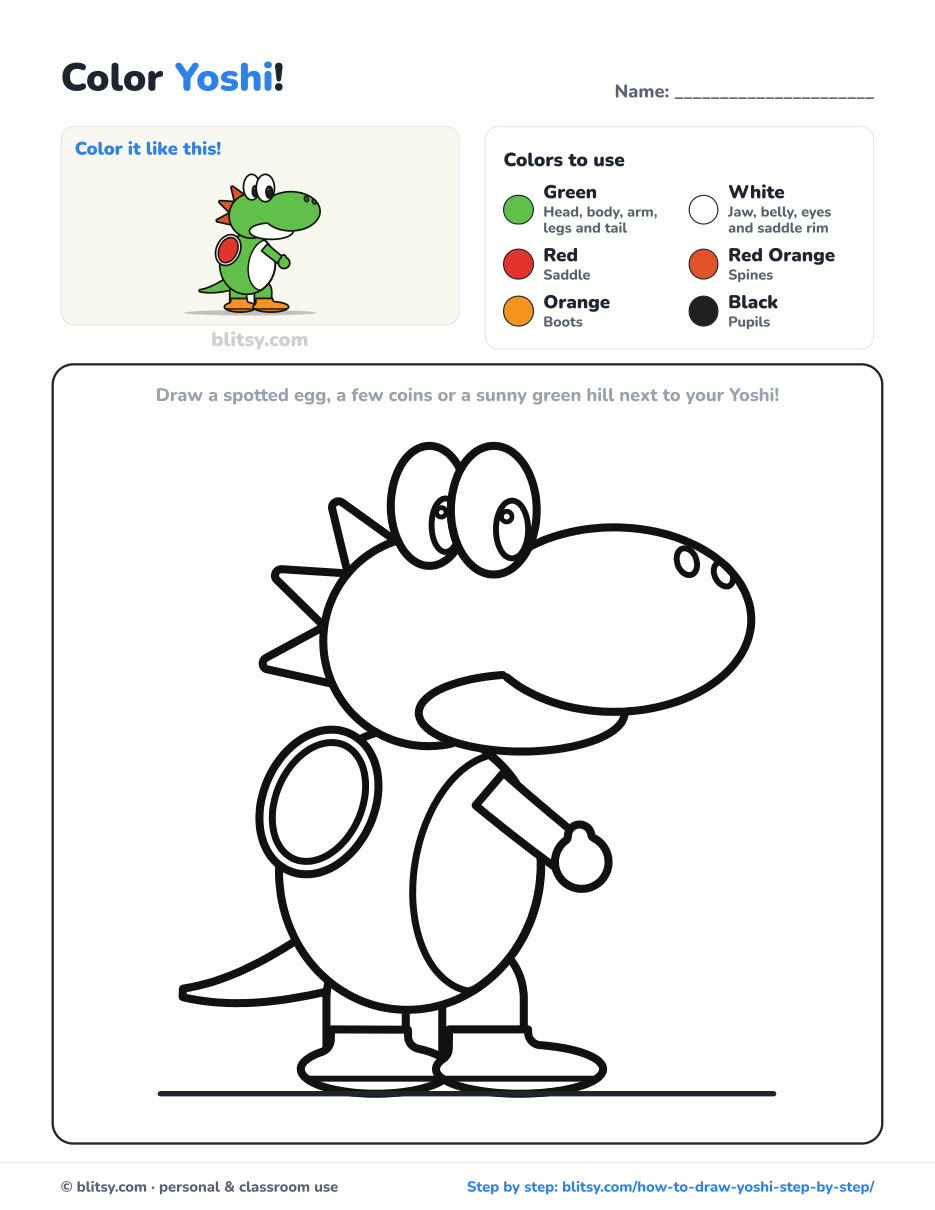
Black outlines with a colored example and the color names at the top. Ready to print and color.
⬇️ Download Coloring PageEvery step picture with its instructions and tips, to keep beside your paper while you draw.
⬇️ Download Drawing Guide📱 On a phone? Tap a download button, then open the file and choose Share → Save to Files or Print. On a computer, the PDF opens or saves straight to your Downloads folder.
Yoshi Steps on One Tall Pin
More Game Heroes and Cute Creatures to Draw
Each of these is a complete step-by-step lesson with a picture for every stage, so the circle-and-oval method carries straight over.
- Mario Drawing: Draw Yoshi's partner as a waving chibi in a red cap and blue overalls with this how to draw Mario step by step lesson.
- Pikachu Drawing: Build the yellow electric mouse from a few round shapes in this Pikachu drawing tutorial.
- Godzilla Drawing: A big upright monster with back plates and a heavy tail fills this how to draw Godzilla step by step guide.
- Frog Drawing: Another green friend with big eyes on top sits on a log in this frog drawing tutorial.
- Turtle Drawing: Practice a patterned shell on a friendly reptile with this how to draw a turtle step by step lesson.
Yoshi Drawing Questions From Young Artists
What is the easiest way to draw Yoshi?
Start with a circle for the head and a wider oval for the snout, then put two tall ovals on top for the eyes. Add an egg-shaped body, short legs and big boots, and the details come last.
Is this drawing good for kids?
Yes. Kids from about six can follow it, since every part is a circle, oval or triangle. Little ones can leave out the nostrils and boot soles.
What colors do I need to color Yoshi?
Green for his skin, red for the saddle, red orange for the spines, orange for the boots and black for the pupils. The white parts are just the paper.
How long does it take to draw Yoshi?
About 30 to 35 minutes including coloring. The head and eyes take the most care, and the rest goes quickly.
Grab a green crayon and give your Yoshi that big happy nose. 🦖✏️
Related posts:
 How to Draw a Car Step by Step (Easy Drawing for Beginners)
 How to Draw a Whale Step by Step (Easy for Beginners)
 How to Draw an Arctic Fox Step by Step (Easy for Beginners)
 How to Draw a Shark Step by Step (Easy for Beginners)
 How to Draw a Chicken Step by Step (Easy for Beginners)
 How to Draw a Fish Step by Step (Easy Goldfish for Beginners)
 How to Draw a Snowman Step by Step (Easy for Beginners)
 How to Draw Hands Step by Step (Easy Palm View for Beginners)
 How to Draw an Airplane Step by Step (Easy Jet for Beginners)
 How to Draw a Mouse Step by Step (Easy for Beginners)
 How to Draw the Joker Step by Step (Easy Chibi for Beginners)
 How to Draw a T-Rex Step by Step (Easy for Beginners)

