
Maple leaves look tricky because of all those points, yet every one of them hangs off five lines that meet at a single dot. This lesson shows you how to draw a fall leaf step by step, from that dot to a red maple that glows yellow in the middle. I've added a rounded oak leaf, a small birch leaf and an acorn tumbling past. If you can draw a straight line and a wobbly one, you can draw this.
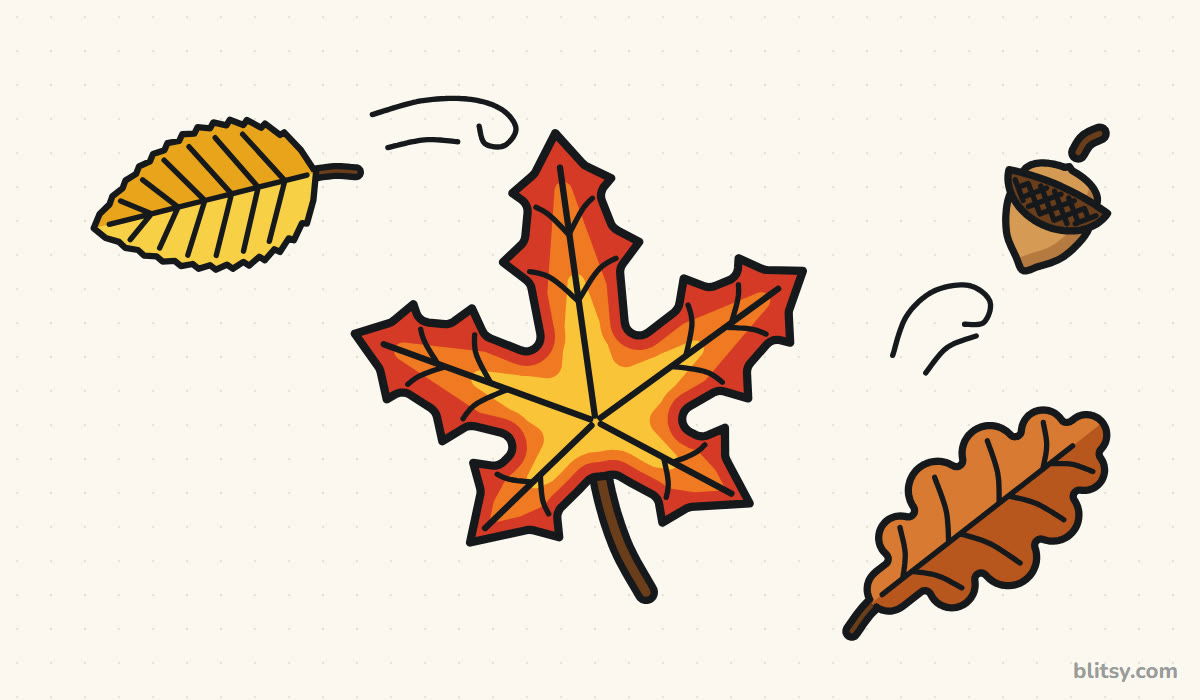
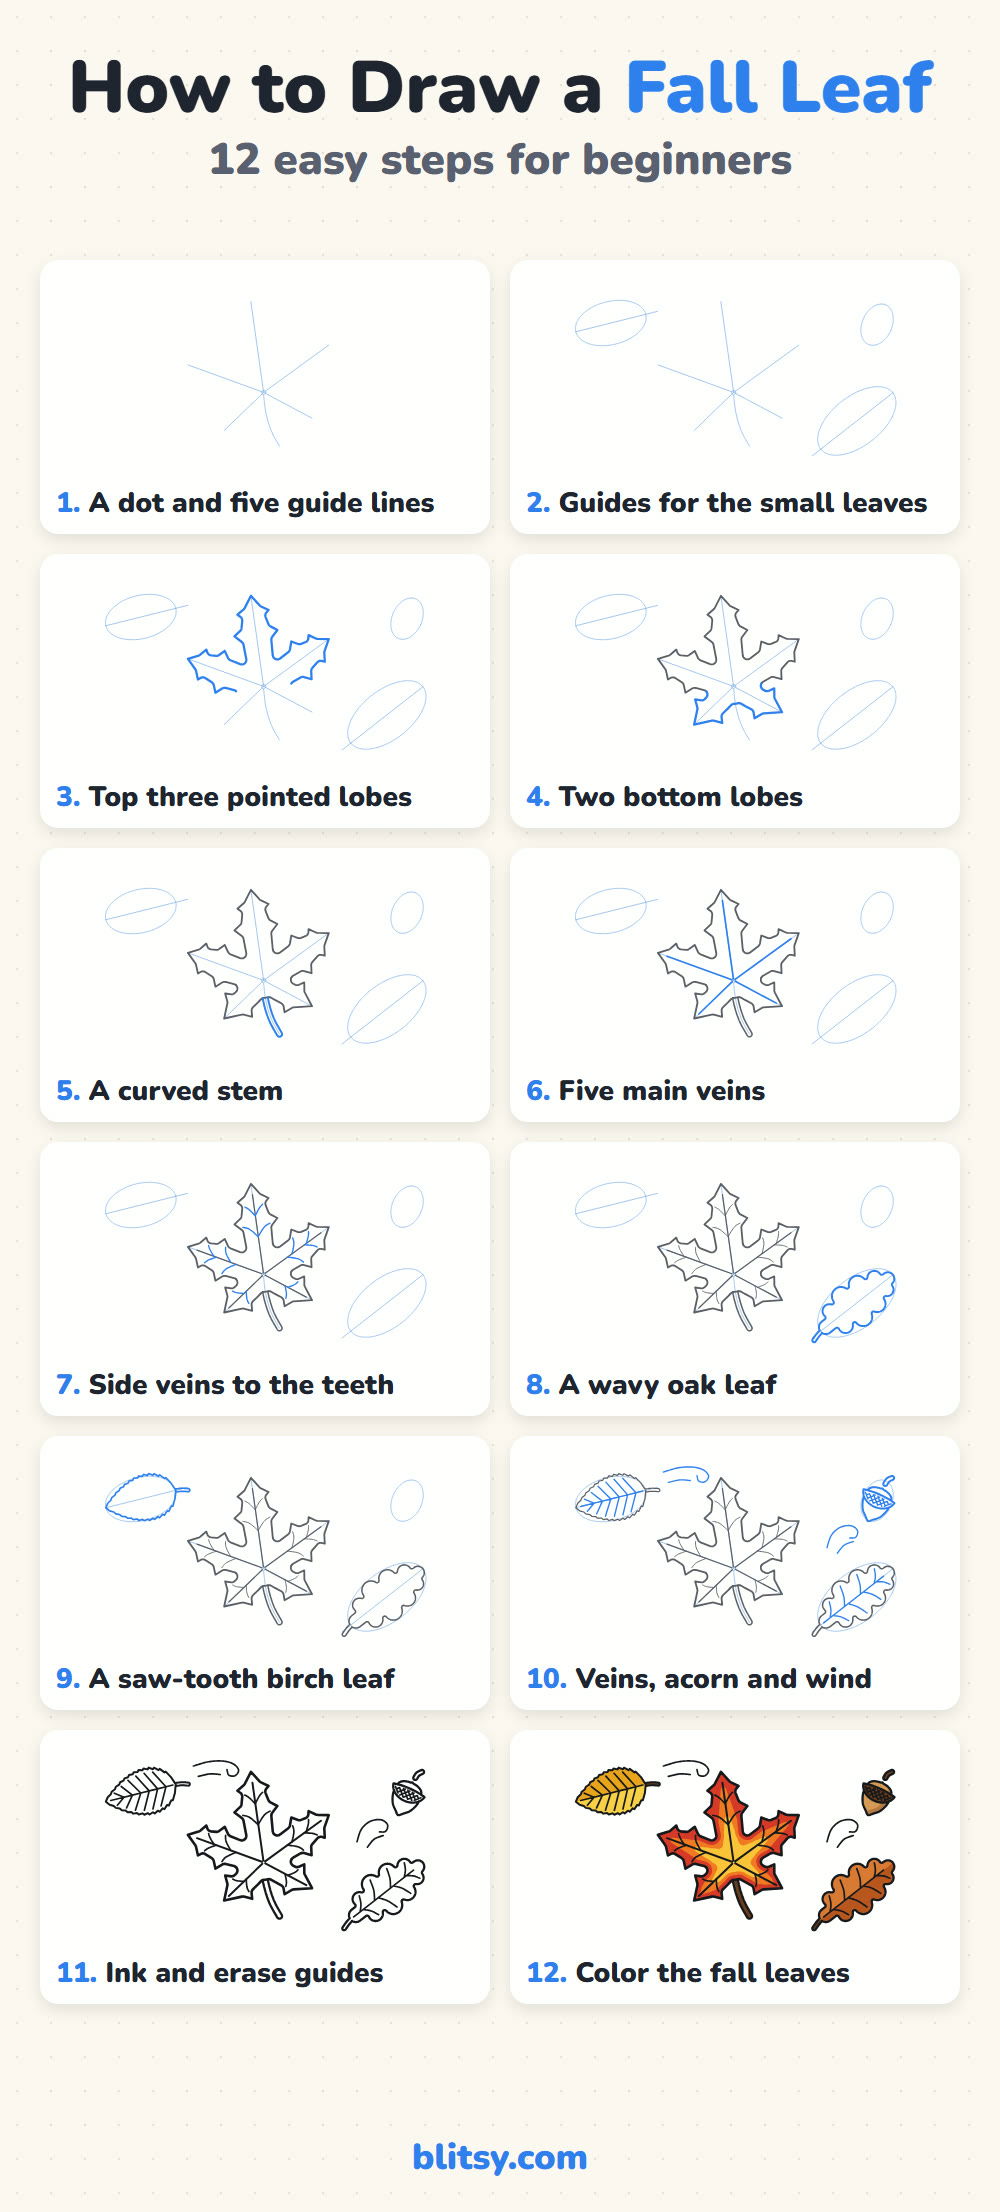
Blue shows the lines for the current step. Gray is earlier work, and the faint blue guides stay light until step 11 erases them.
Quick overview
⏱️ Time: about 35 minutes, coloring included
🎯 Level: beginner; kids from around 7 can follow it, and younger ones can stop after the maple
✏️ Steps: 12
🍁 You'll draw: a five-lobed maple leaf, an oak leaf, a birch leaf, an acorn and a few wind swirls
Supplies for an Autumn Leaf Page
- A regular HB pencil for the guide lines
- An eraser that lifts pencil cleanly
- A black fineliner or thin marker for inking
- Colored pencils or markers in red, orange, yellow, rust orange, golden yellow, light brown and dark brown
- A sheet of paper turned sideways
Any printer paper works; if you can, pick up a real leaf on your next walk and keep it next to you while you draw.
How to Draw a Fall Leaf Step by Step
Step 1: Draw a dot and five guide lines

Put a small dot a little below the middle of your page. From it, draw one long line straight up, two shorter lines out to the upper left and right, and two short lines angled down and outward. Add a gentle curve below the dot for the stem. I treat these lines as the bones of the leaf: every lobe sits on one, so the leaf stays balanced without measuring.
💡 Tip: Make the top line the longest; a maple's middle lobe is always the tallest.
Step 2: Add guides for the small leaves
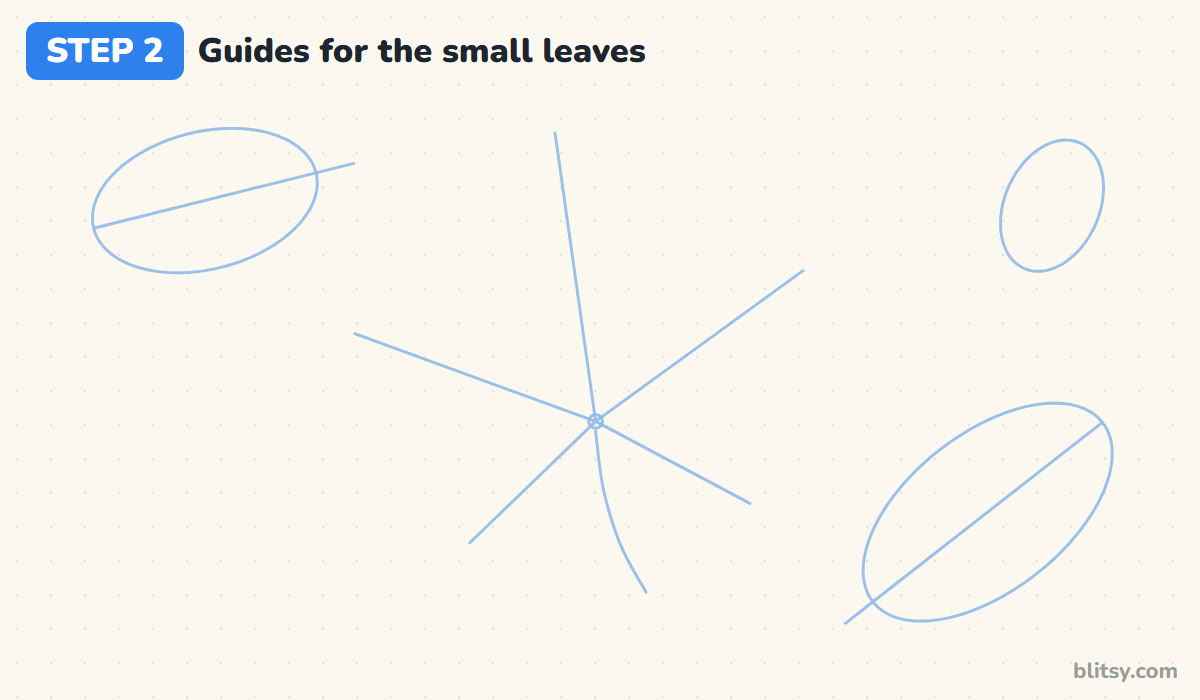
In the upper left corner, sketch a tilted oval with a line through it for the birch leaf. Lower right, draw a longer slanted oval with a line through it for the oak leaf. A small upright oval near the top right holds the acorn. I tilt each shape a different way so they look like they're falling, not lined up on a shelf.
💡 Tip: Leave a clear gap around the maple so the small leaves never touch it.
Step 3: Outline the top three pointed lobes
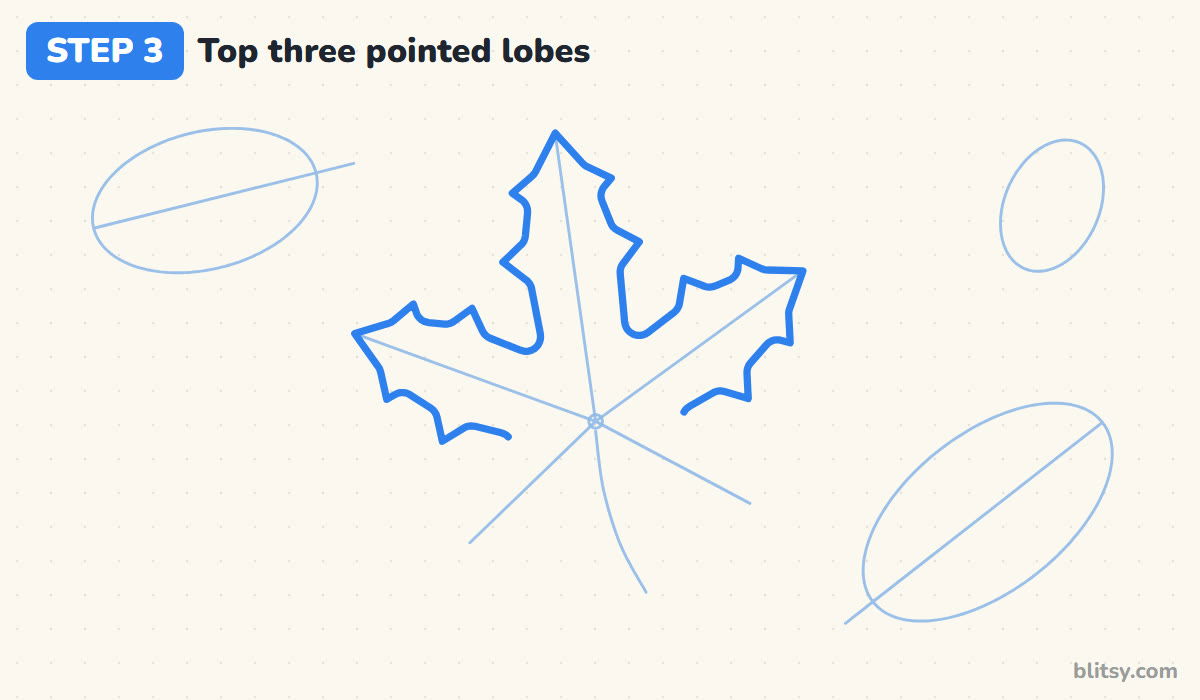
Start at the tip of the top guide line and work down each side of the middle lobe. Give it two sharp teeth per side, one big and one small, then curve into a rounded dip where it meets the side lobe. Repeat on both side lobes. Those rounded dips matter: pointed ones make the leaf look like a star.




💡 Tip: Point every tooth slightly toward the tip of its lobe, never straight out sideways.
Step 4: Close the leaf with two bottom lobes
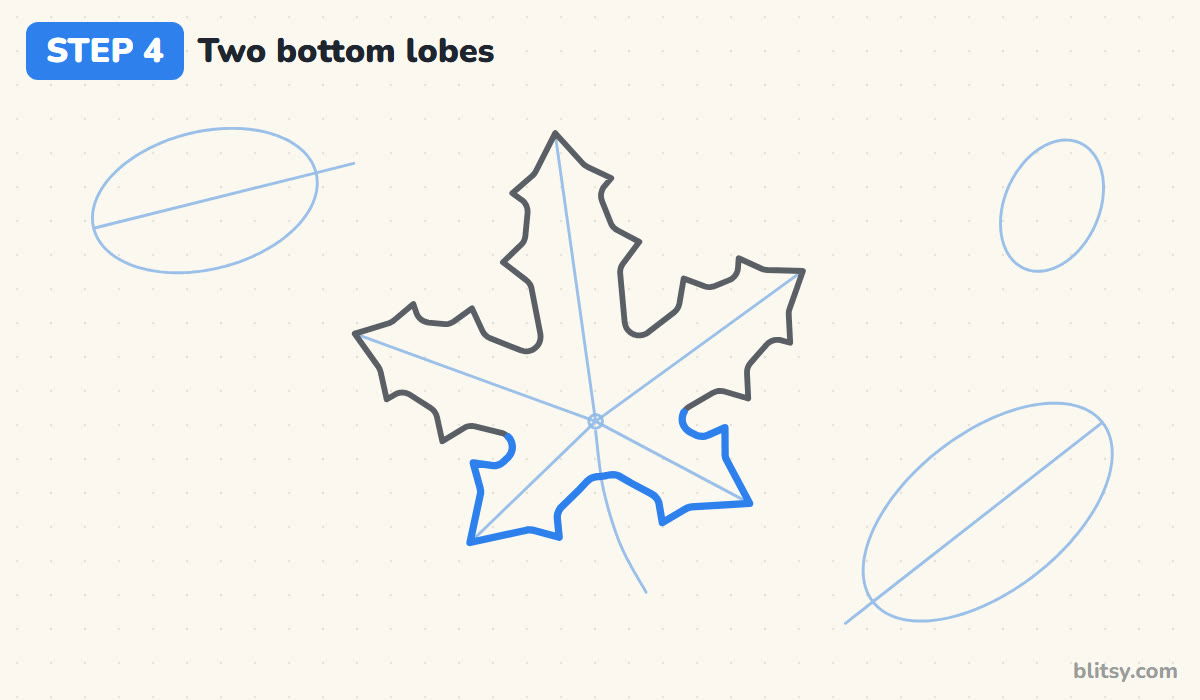
The two lower guide lines get smaller lobes, each with one tooth per side. Join their inner edges with a soft, shallow curve just under the dot, where the stem attaches. Most beginners make these lobes as big as the top ones, and the leaf starts to look like a hand.
💡 Tip: Keep each bottom lobe about half as long as the middle one.
Step 5: Draw a curved stem
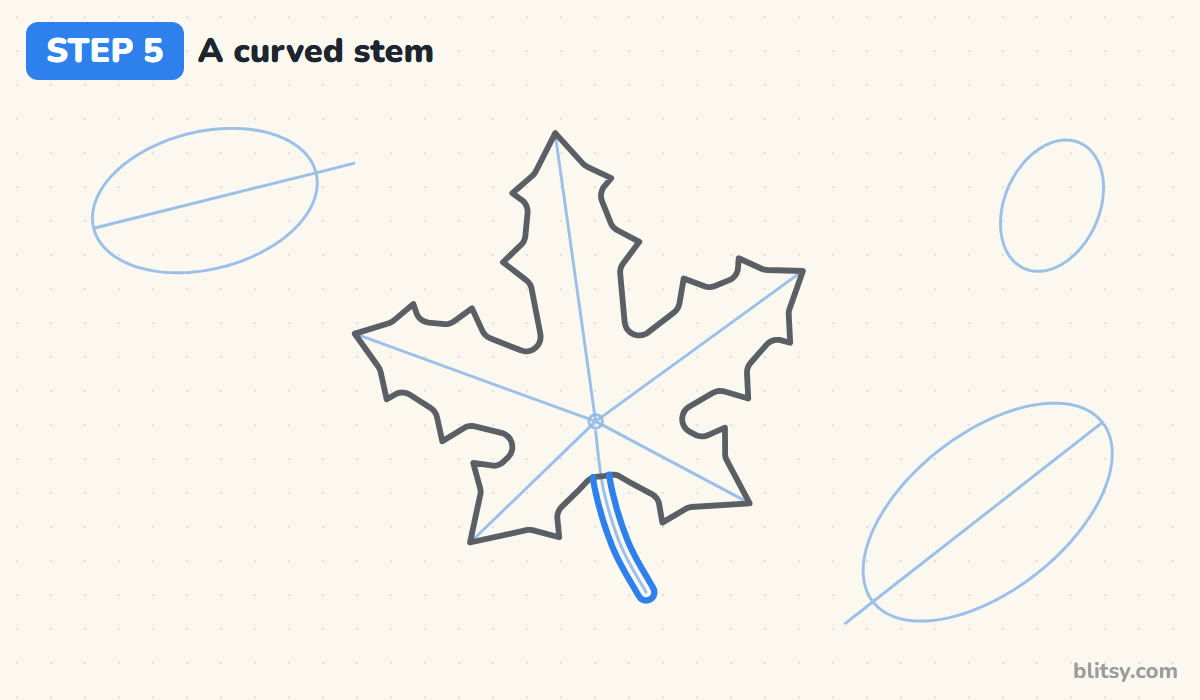
Trace both sides of the stem guide, keeping the lines close together. A thin, slightly bent stem makes the leaf look light, as if it just let go of its branch. Round off the bottom end, and let the top disappear into the outline rather than poke through it.
💡 Tip: Draw the stem with one smooth pull of your arm instead of short scratchy strokes.
Step 6: Add the five main veins
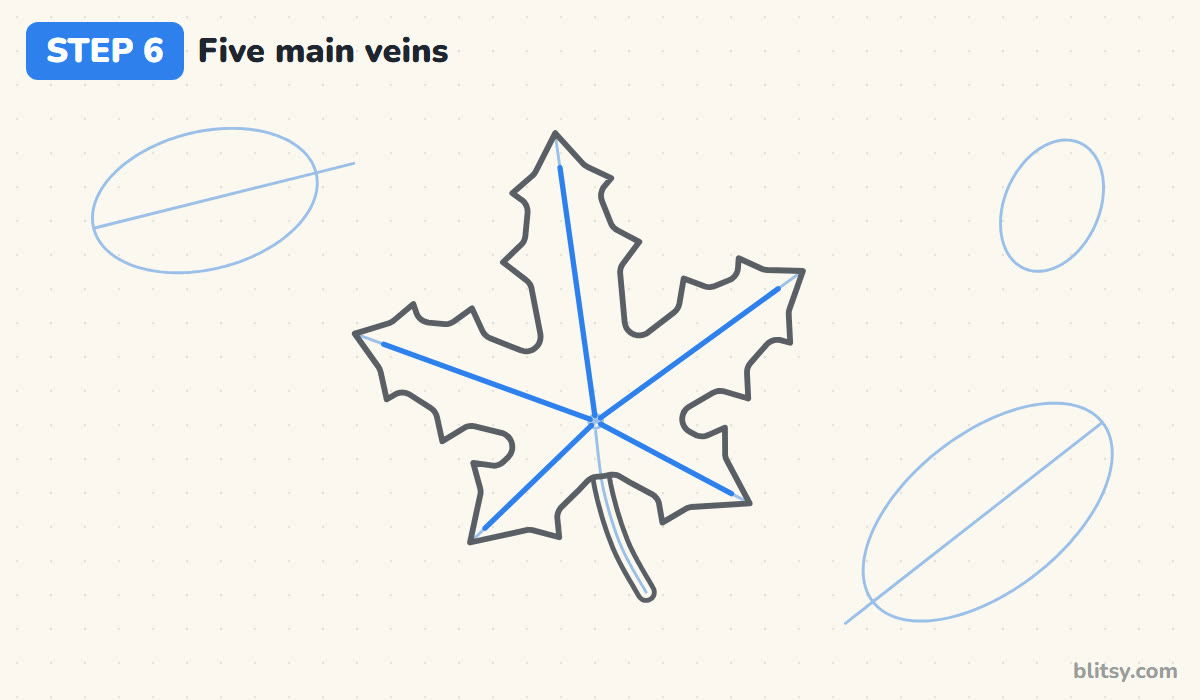
Go over each guide line inside the leaf with a firm line, from the dot toward the lobe tips. Stop each vein a little before the tip, because real veins fade out before the edge. In my experience this is the step where the leaf suddenly reads as a maple.
💡 Tip: If a guide line wandered off center, nudge the vein back to the middle of its lobe.
Step 7: Branch side veins toward the teeth
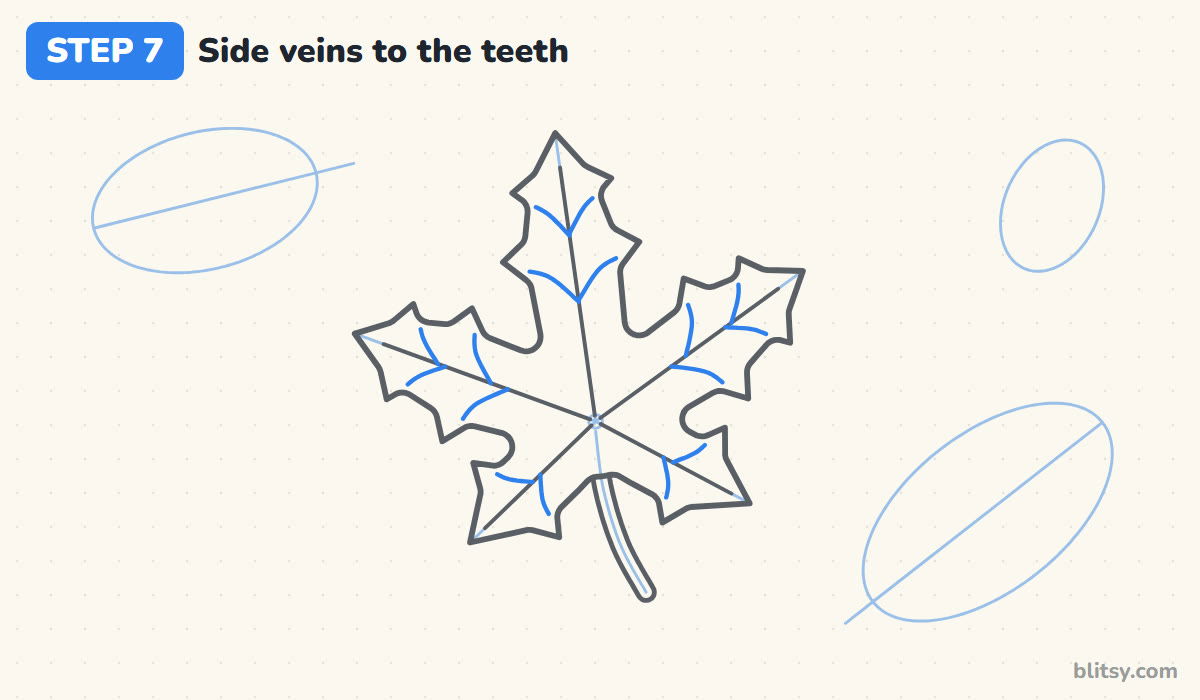
From each main vein, draw thinner curved lines toward the teeth, one per tooth, leaving the vein at a slant. I keep these shorter than the main veins so the leaf doesn't turn into a web. Small kids can skip this step and still have a clear maple.




💡 Tip: Curve the side veins gently; ruler-straight branches look stiff on a leaf.
Step 8: Draw a wavy oak leaf
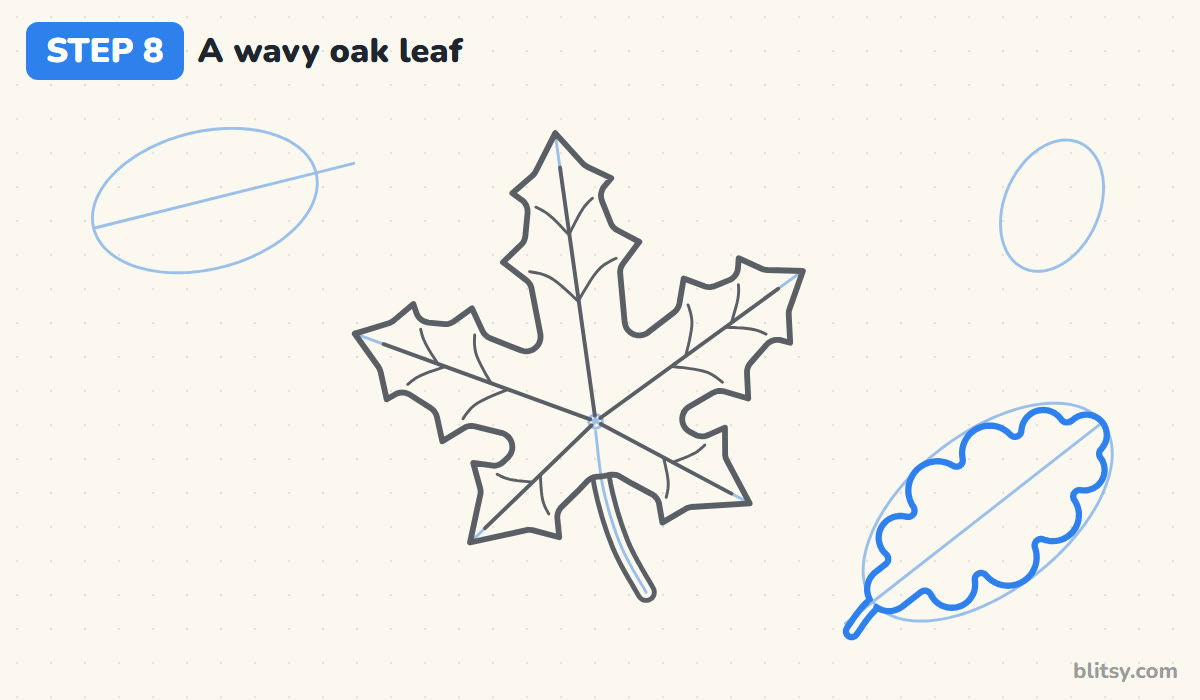
Inside the long oval, draw a short stem at the bottom end. Run a wavy edge up each side with four rounded bumps that shrink toward the top, and finish with a round tip. Dip in deeply between the bumps. Round lobes like these belong to the white oak group, and they're far easier than the pointy kind.
💡 Tip: Let the bumps on the two sides sit at different heights, so the leaf looks natural, not mirrored.
Step 9: Draw a saw-tooth birch leaf
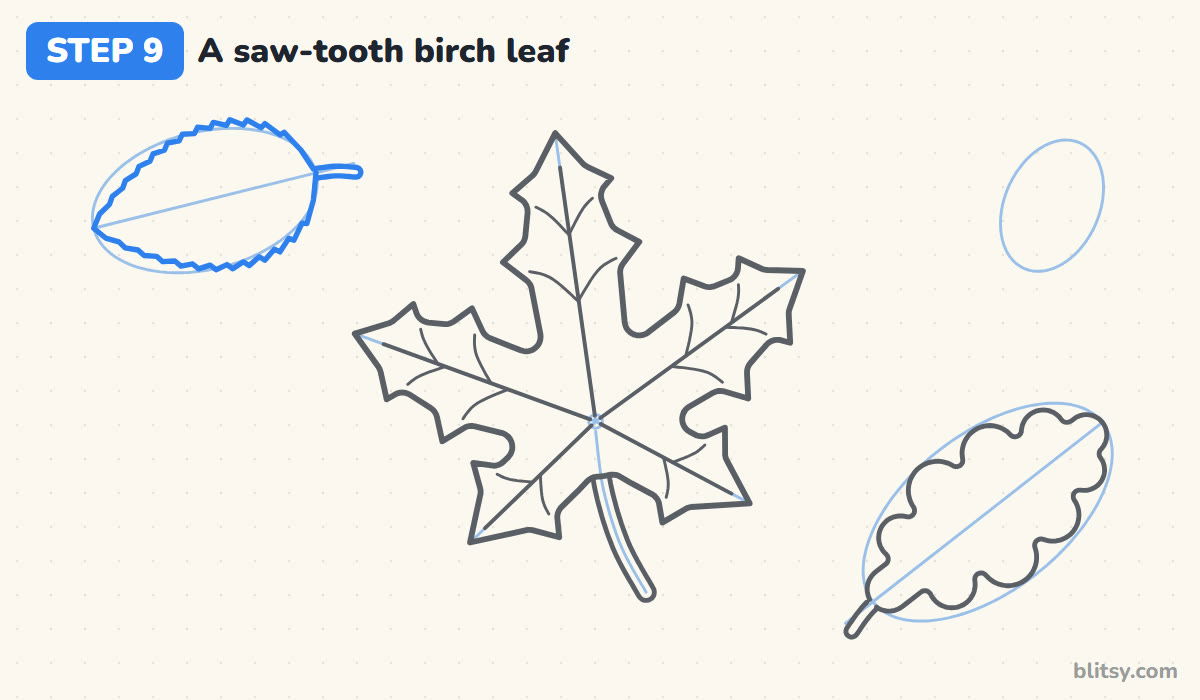
Around the top left oval, draw a leaf that's wide near the stem and narrows to a point. Give the edge lots of tiny teeth, like a small saw, each leaning toward the tip. Add a short stem at the wide end.
💡 Tip: Draw the teeth small and close; big ones turn a birch leaf into a holly leaf.
Step 10: Add veins, an acorn and wind lines
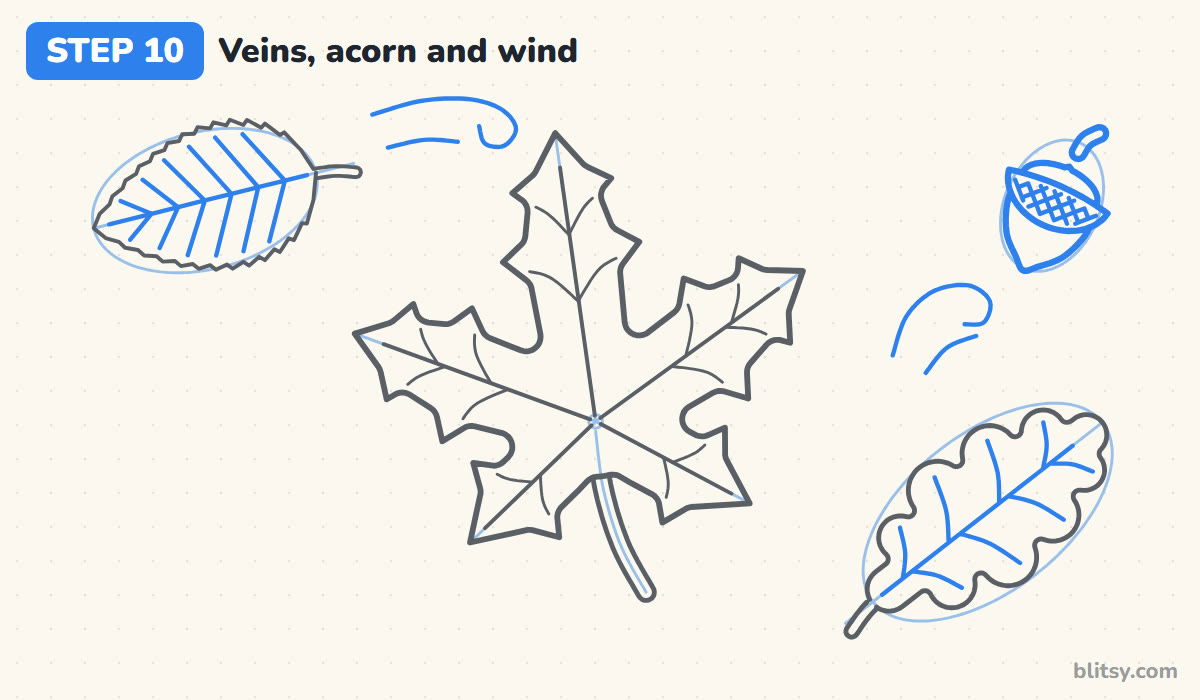
Give the oak a center vein and one curved side vein into each bump. The birch gets a center vein with straight, parallel side veins. In the small oval, draw an acorn: a nut with a little point at the bottom, a cap with crisscross lines and a short stalk. Finish with a few curling wind lines.
💡 Tip: End each wind line in a small curl; that one loop turns a plain line into a breeze.
Step 11: Ink the lines and erase the guides
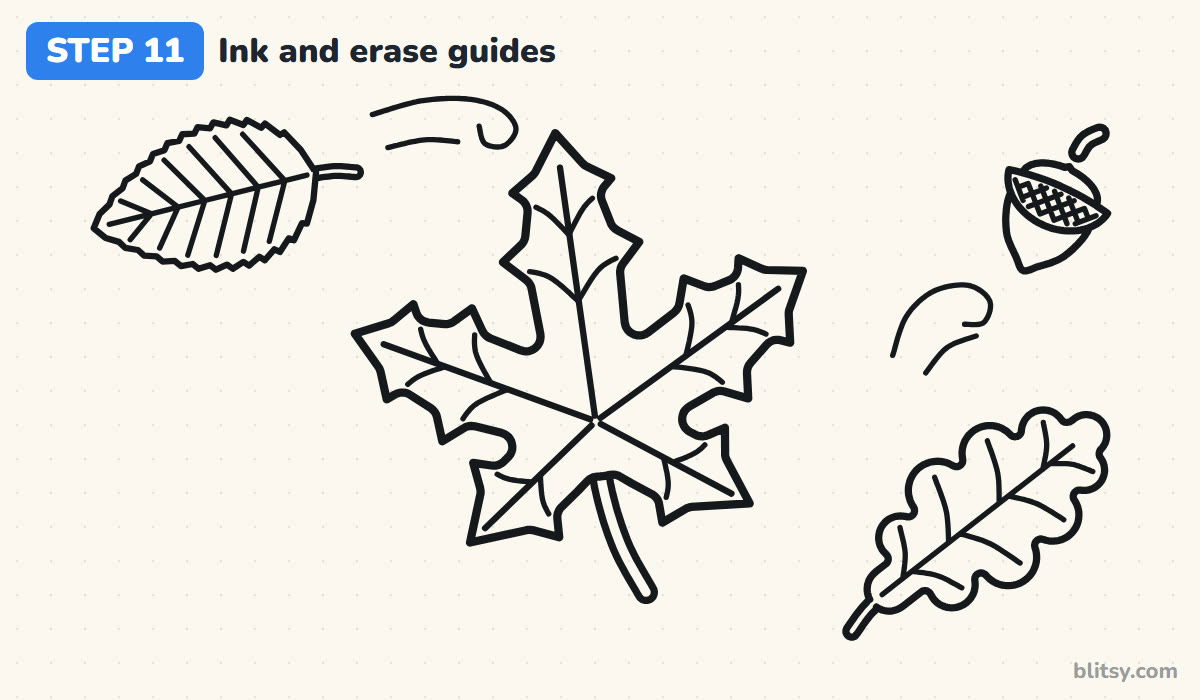
Trace every line you want to keep with a black pen, and skip the dot, the guide lines and the ovals. Wait until the ink is dry, then erase all the pencil. Thick outlines with thinner veins give the page a clean look.




💡 Tip: Ink the long outlines first while your hand is fresh, and the tiny birch teeth last.
Step 12: Color the fall leaves
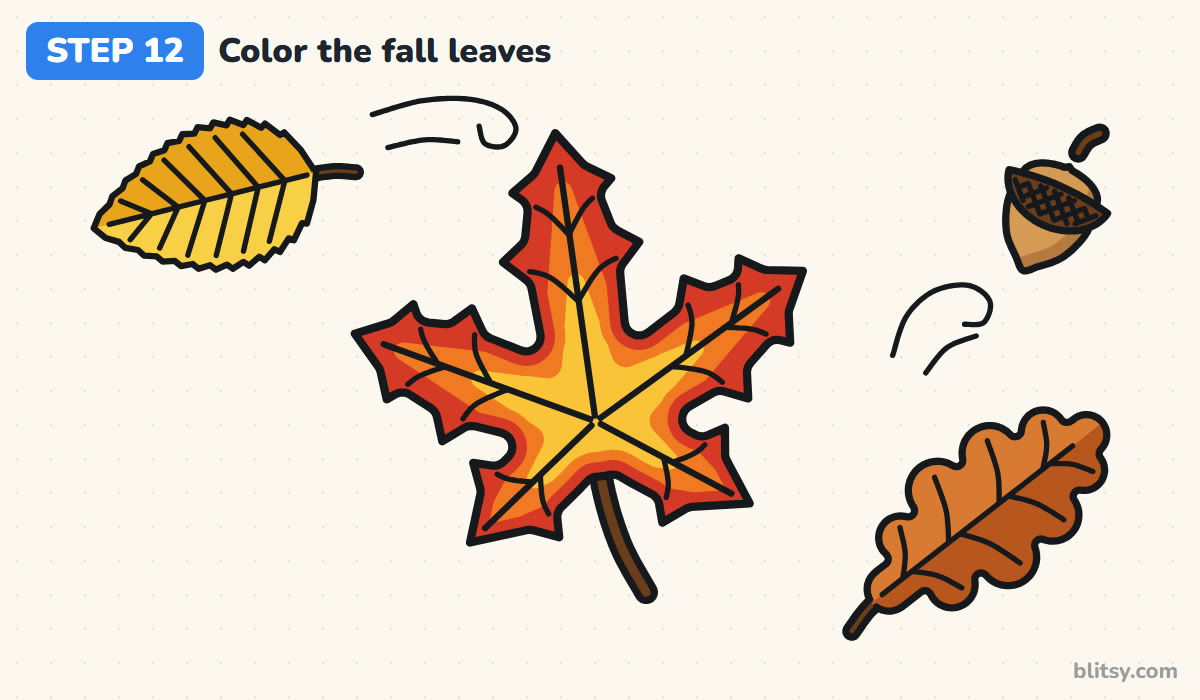
Color the maple's edges red, then an orange band along the veins and a yellow glow at the center. Real leaves change this way: as green chlorophyll breaks down in autumn, the yellow and orange pigments already there show through, and the reds come from anthocyanins the leaf makes in the fall. Make the oak rust orange, the birch golden yellow and the acorn light brown with a dark cap.
💡 Tip: Start with the yellow center and work outward, so the darker red never smudges into it.
Leaf Drawing Problems and How to Fix Them
- Lobes that all point in random directions. Draw the five guide lines from one dot first, and every lobe will grow out of the same center.
- Sharp dips between the lobes. The leaf ends up looking like a star. Round each dip into a soft U.
- Teeth sticking straight out. They read as spikes. Tilt each tooth toward the tip of its lobe.
- Veins that run right into the outline. Stop them a little short of the edge, and the leaf looks lighter and more real.
- One flat color on the maple. It looks like a sticker. Let red edges fade into orange and yellow toward the middle.
Autumn Leaf Variations Worth a Try
Once the maple feels easy, try a leaf that's half green and half red, caught in the middle of changing. A pile of overlapping leaves on the ground is another good challenge. A branch makes a natural home for your leaves, and the tree drawing tutorial shows how to draw a trunk and branches. For a full autumn scene, add a few shapes from how to draw a pumpkin step by step.
Fall Leaf Coloring Page and Printable Drawing Steps
Grab the free fall leaf coloring page for a quiet autumn afternoon. The small colored version at the top shows which part gets which color, and the key next to it names each one. The PDF drawing guide holds all 12 steps with their tips, and it prints fine on Letter or A4 paper.
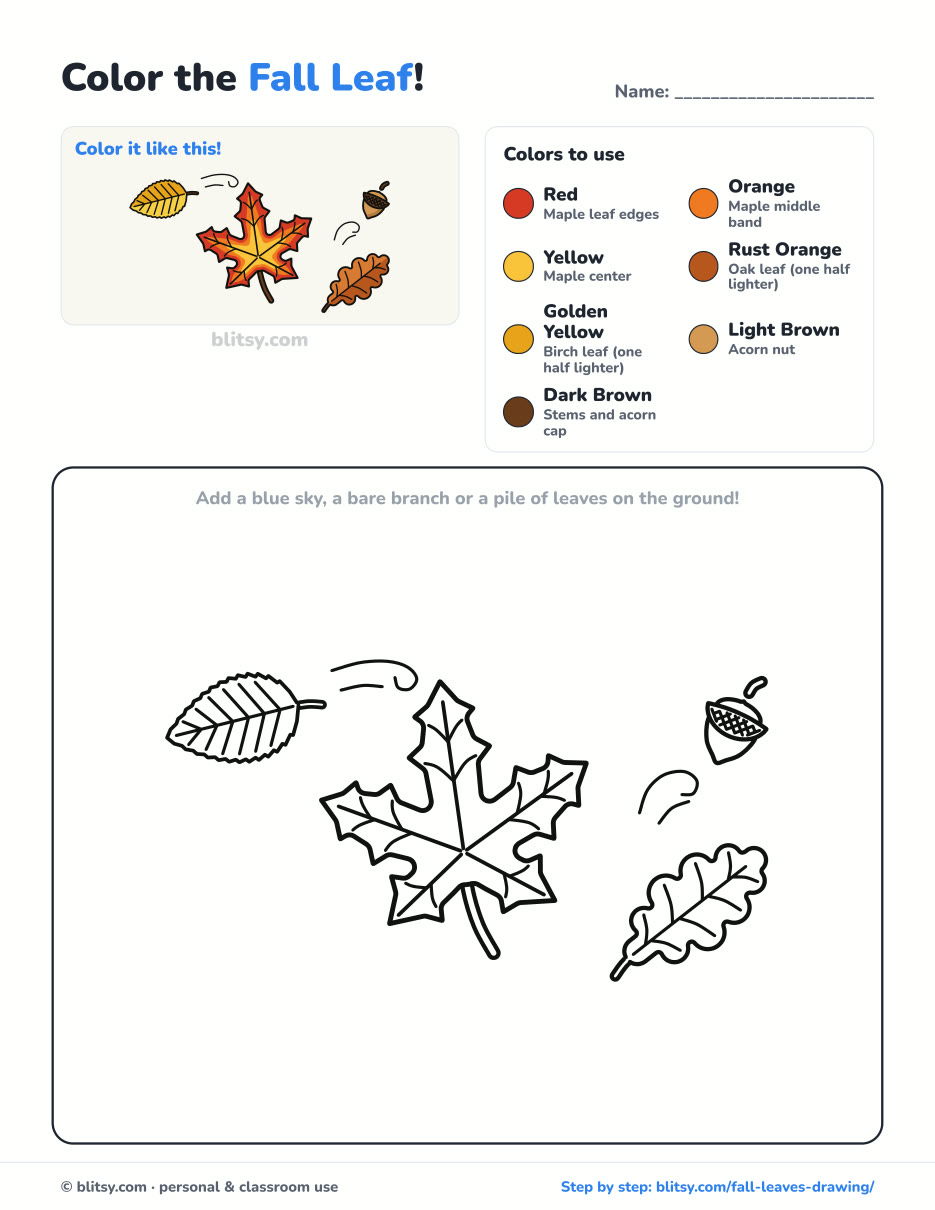
Black outlines with a colored example and the color names at the top. Ready to print and color.
⬇️ Download Coloring PageEvery step picture with its instructions and tips, to keep beside your paper while you draw.
⬇️ Download Drawing Guide📱 On a phone? Tap a download button, then open the file and choose Share → Save to Files or Print. On a computer, the PDF opens or saves straight to your Downloads folder.
Pin the Maple Leaf Lesson for Later
Fall Leaf Colored? Grow the Whole Tree
Your leaves need a home, and this step-by-step tutorial builds one.
- Tree Drawing: Follow the leafy apple tree drawing tutorial to a wide crown of leaf clusters, three branches, a knothole and apples ready to pick.
Fall Leaf Questions Beginners Ask Me
What is the easiest fall leaf to draw?
A simple oval leaf with a pointed tip, a center vein and a few side veins is the easiest. The oak leaf comes next, since its rounded bumps are forgiving.
How do you draw a maple leaf easily?
Draw a dot with five lines coming out of it, the top one longest. Then sketch a pointed lobe around each line, add a stem, and trace the lines as veins.
Why do leaves change color in the fall?
Leaves stop making green chlorophyll in autumn, so the yellow and orange pigments already in the leaf start to show. Reds and purples come from anthocyanins, which some trees make in the fall.
What colors should I use for fall leaves?
Red, orange, yellow and brown cover most autumn leaves. Using two shades on one leaf, like red edges with an orange middle, makes it look much more real.
Next time you step outside, pick up the brightest leaf you can find and see if you can draw its shape from those five guide lines. 🍁
Related posts:
 How to Draw a Scarecrow Step by Step (Easy Fall Drawing)
 How to Draw a Whale Step by Step (Easy for Beginners)
 How to Draw Lungs Step by Step (Easy Science Diagram)
 How to Draw a Pineapple Step by Step (Easy Crown and Slice)
 How to Draw Iron Man Step by Step (Easy Chibi for Kids)
 How to Draw a Dress Step by Step (Easy Party Dress)
 How to Draw a Chicken Step by Step (Easy for Beginners)
 How to Draw a UFO Step by Step (Cute Alien Saucer)
 How to Draw Flames Step by Step (Easy Campfire Drawing)
 How to Draw a Moon Step by Step (Sleepy Crescent + Phases)
 How to Draw a Sunflower Step by Step (Big and Bright)
 How to Draw a Heart Step by Step (Even, Symmetric Shape)

