
Tinker Bell first flew onto the page in J. M. Barrie's Peter Pan, and Disney gave her the blonde bun and leaf dress most of us picture in its 1953 film. In this lesson you'll see how to draw Tinkerbell step by step as a small chibi fairy in mid-flight, from one curved guide line to a colored drawing with sparkles. This is my simple fan-art version for practice, not official art, so feel free to change her pose or her colors after your first try.
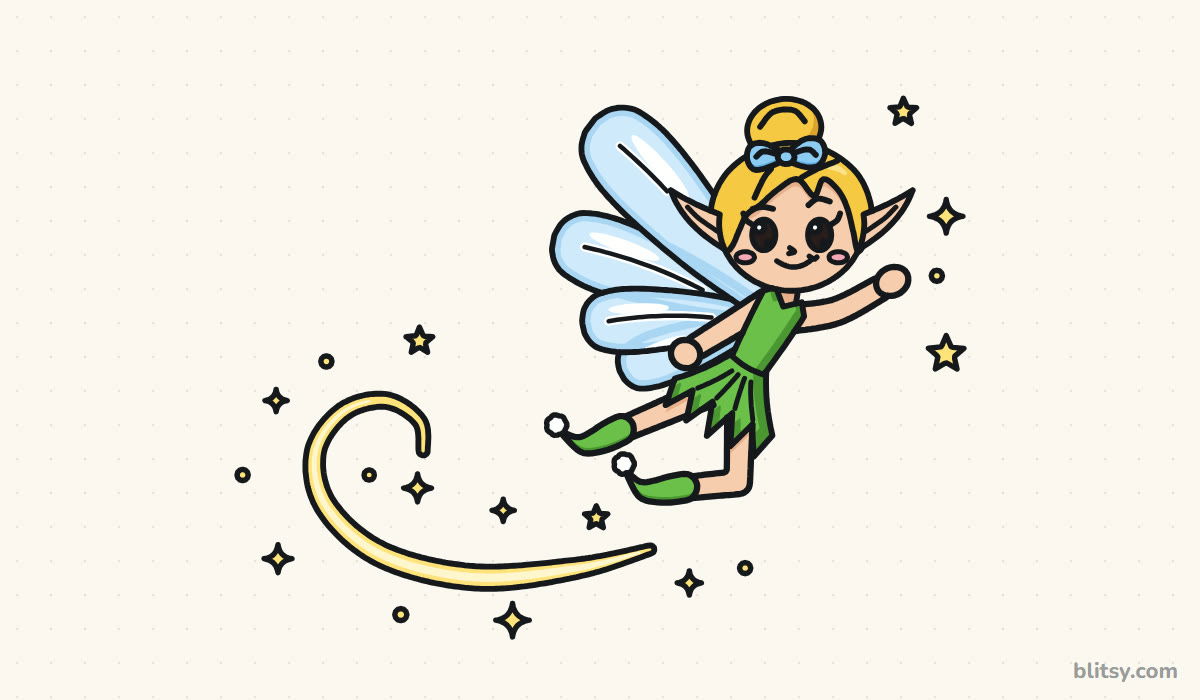
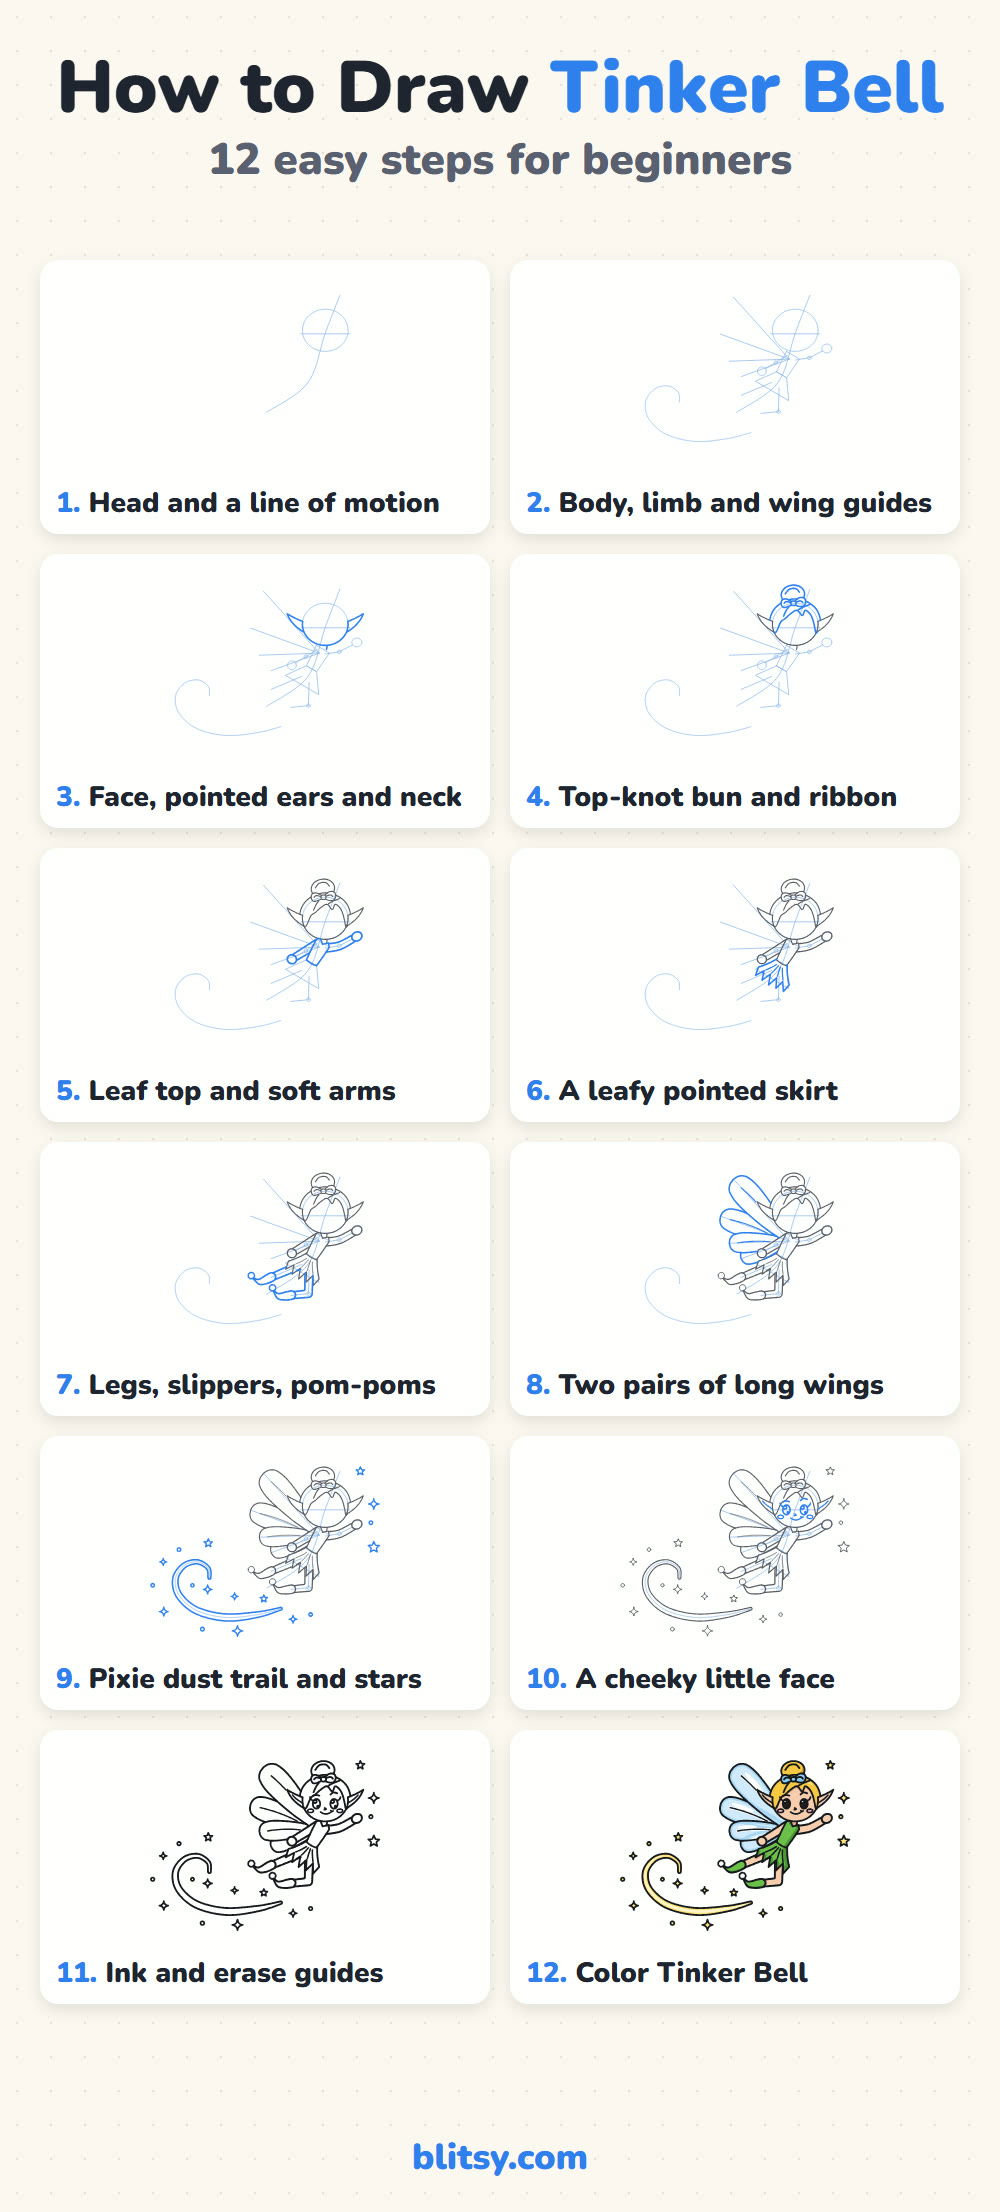
Think of the pictures as a stack of layers. Whatever you add in a step is blue, and the gray lines are already on your page from before. The pale guide lines hang around until step 11, when you ink and erase.
Quick overview
⏱️ Time: roughly 40 minutes, then coloring
🎯 Level: beginner; the diagonal pose takes a little care
✏️ Steps: 12
🧚 You'll draw: a chibi Tinker Bell flying with a bun and ribbon, a leafy dress, pom-pom slippers, long wings and a pixie dust trail
Gather a Pencil, a Pen and a Few Colors
- An HB pencil for the light guide lines
- An eraser that lifts pencil cleanly
- A black fineliner or thin felt-tip
- Colored pencils or markers in yellow, green, light blue and peach
- Paper turned sideways, since the dust trail needs room
If you only have a pencil and crayons, that's enough to get her flying.
How to Draw Tinkerbell Step by Step
Step 1: Draw the head and a line of motion
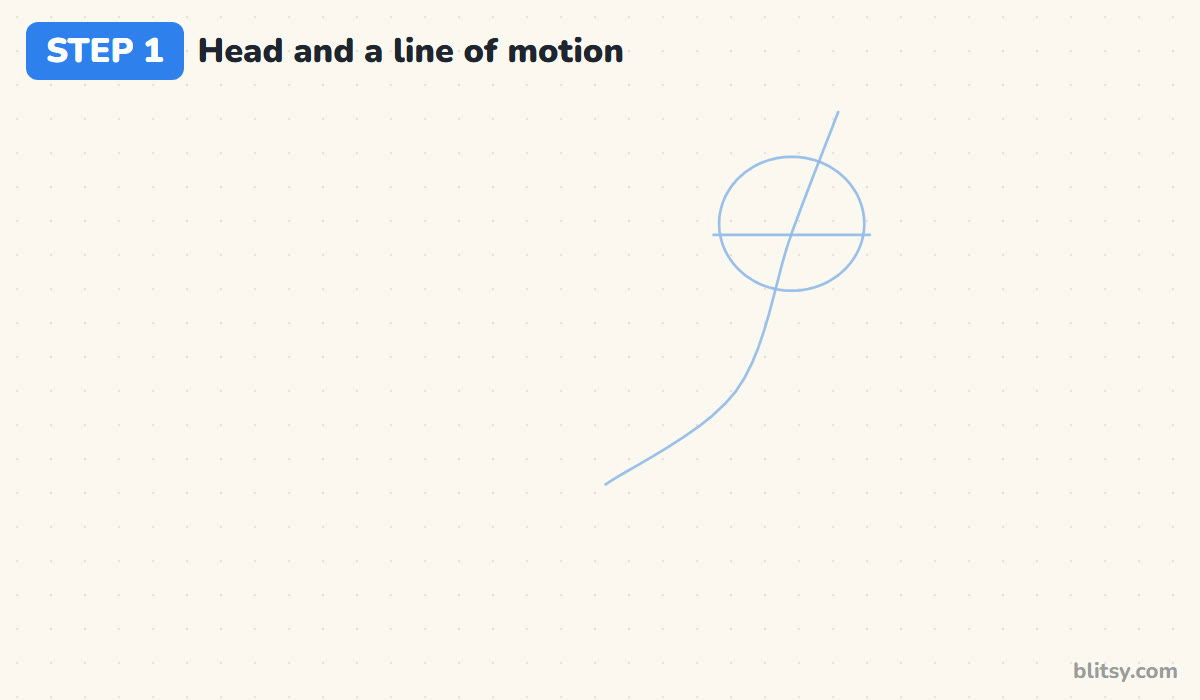
Begin with one long, gently curved line that slants from the upper right down to the lower left. It's the line her whole body will follow, and it's what makes her look like she's moving. Near the top of it, draw an oval for the head, a bit wider than tall, with a flat line across the middle for the eyes.
💡 Tip: Draw the motion line in one quick sweep; slow lines come out wobbly.
Step 2: Sketch the body, limb and wing guides
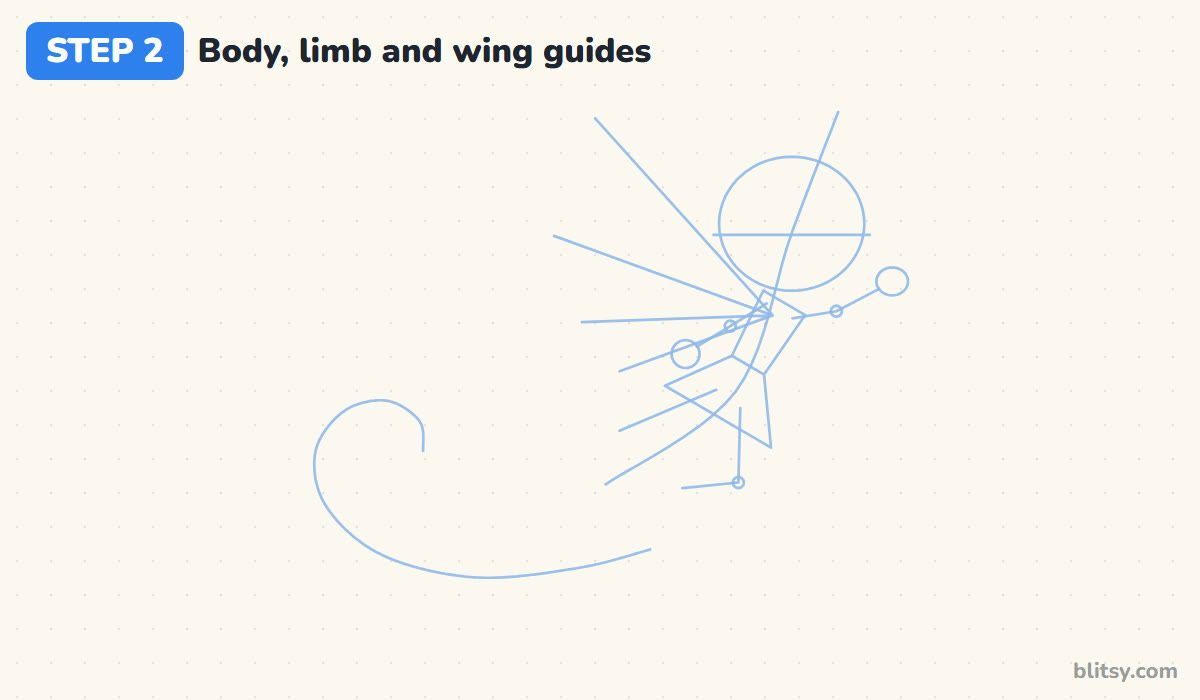
Along the motion line, add a short box for her top and a wider shape below it for the skirt. Use stick lines for the limbs: the front arm stretches up to the right, the back arm trails down, one leg goes straight back and the other bends. I add four lines fanning out from her back for the wings, then a loose curl for the trail.
💡 Tip: Mark the elbows and knee with tiny circles so the bends stay in place.
Step 3: Outline the face, pointed ears and neck
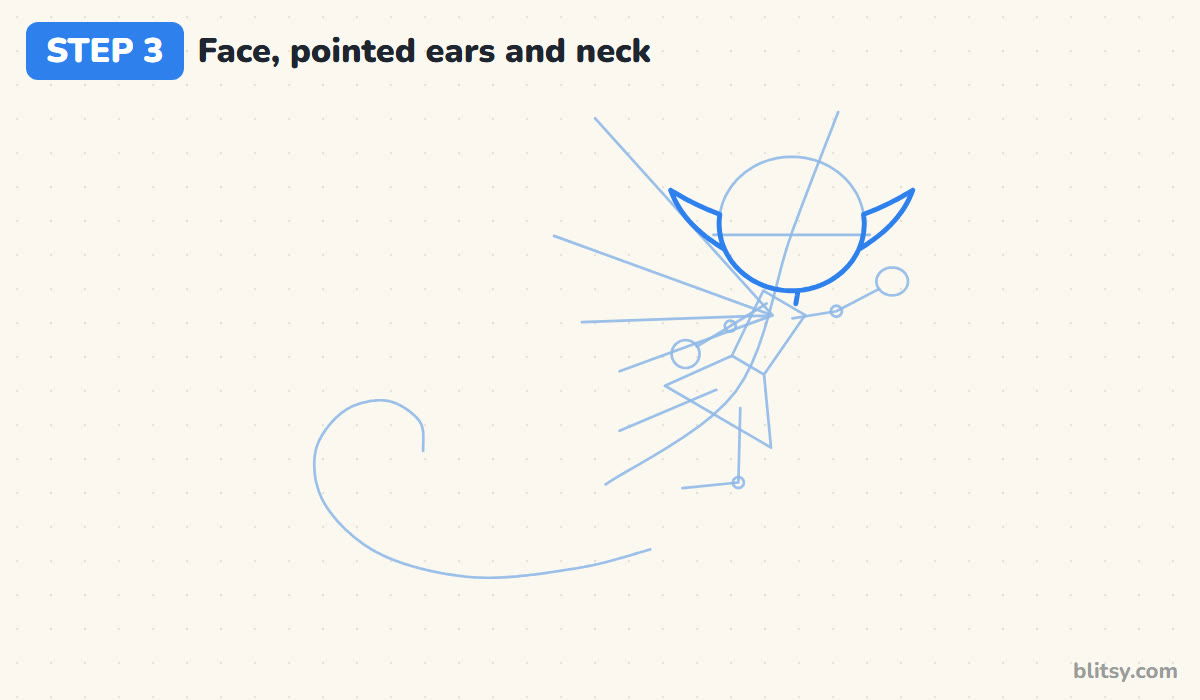
Trace the bottom half of the head oval to make a round chin. Her ears are the first thing that says Tinker Bell, so make them long and sharp, pointing up and out from each side at eye level. Then draw a short, fairly thick neck. A thin stick neck makes a chibi head look like it might wobble off.


💡 Tip: Compare both ears before moving on; they should tilt at the same angle.
Step 4: Add the hair, top-knot bun and ribbon
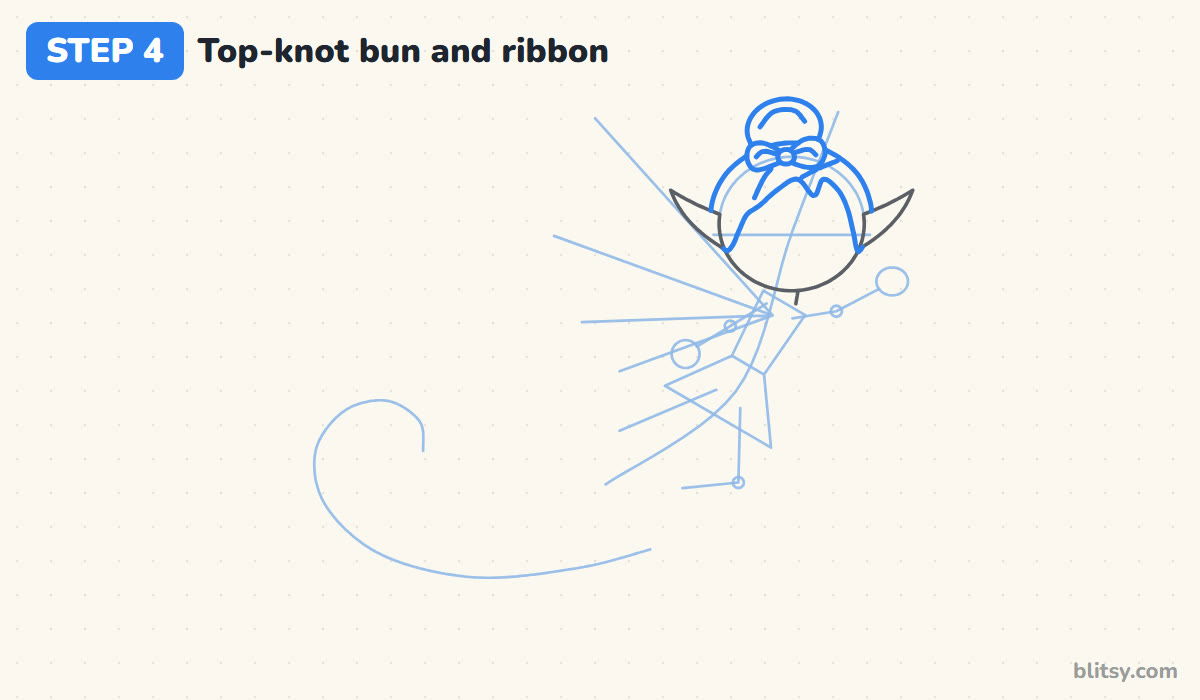
Draw the hair as a cap a little outside the top of the head, with bangs sweeping across the forehead to one side. Right on top, add a round bun, and where the bun meets the hair, a little bow with two loops and a round knot. One curved line inside the bun shows the twist.
💡 Tip: Keep the bun about half the width of the head, or it starts to look like a hat.
Step 5: Draw the leaf top and soft arms
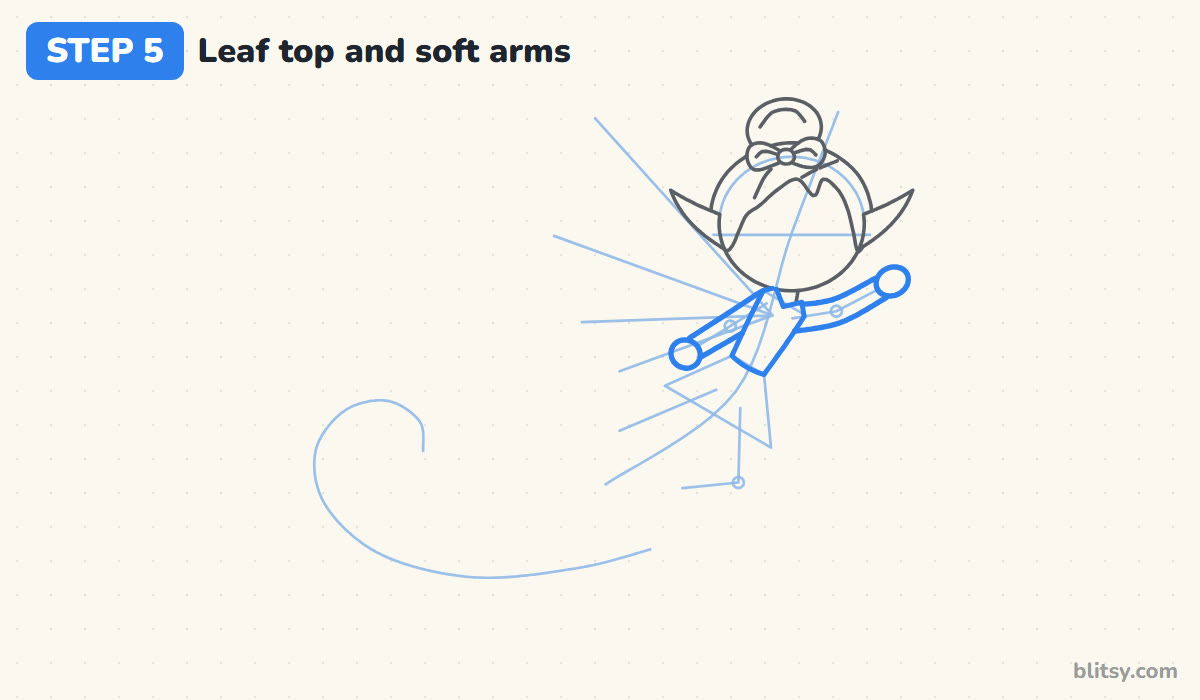
Her top follows the small box: slightly wider at the shoulders, narrower at the waist, with two leaf points along the neckline. Now wrap the arm sticks with two lines each so the arms have real width, and finish them with round mitten hands. The front hand reaches toward the upper right corner, as if she's about to grab a star.
💡 Tip: Tuck the top of each arm behind the dress so it doesn't look stuck on.
Step 6: Shape a leafy pointed skirt
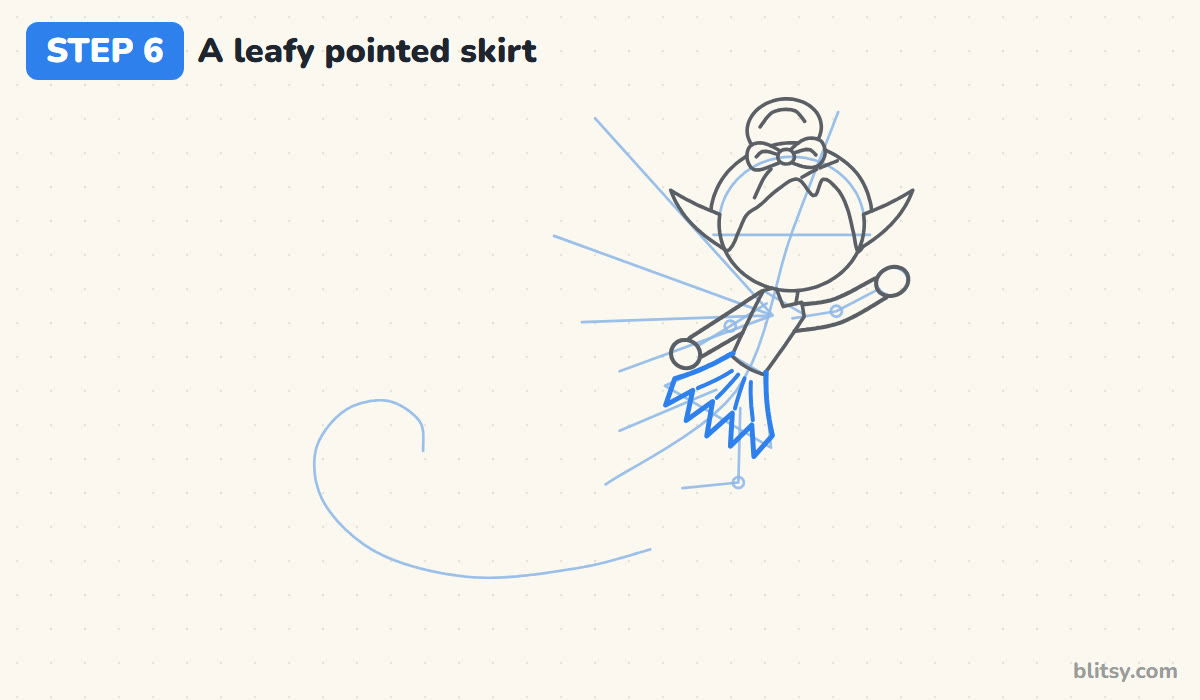
From the waist, flare the skirt out toward the lower left, because the air pushes it back while she flies. Instead of a smooth hem, give it five sharp leaf points with small notches in between. A few short lines from the notches up toward the waist split the skirt into separate leaves. Keep it short but covering, like a little tunic.
💡 Tip: Point every leaf tip down and back along the motion line, never sideways.
Step 7: Add the legs, slippers and pom-poms
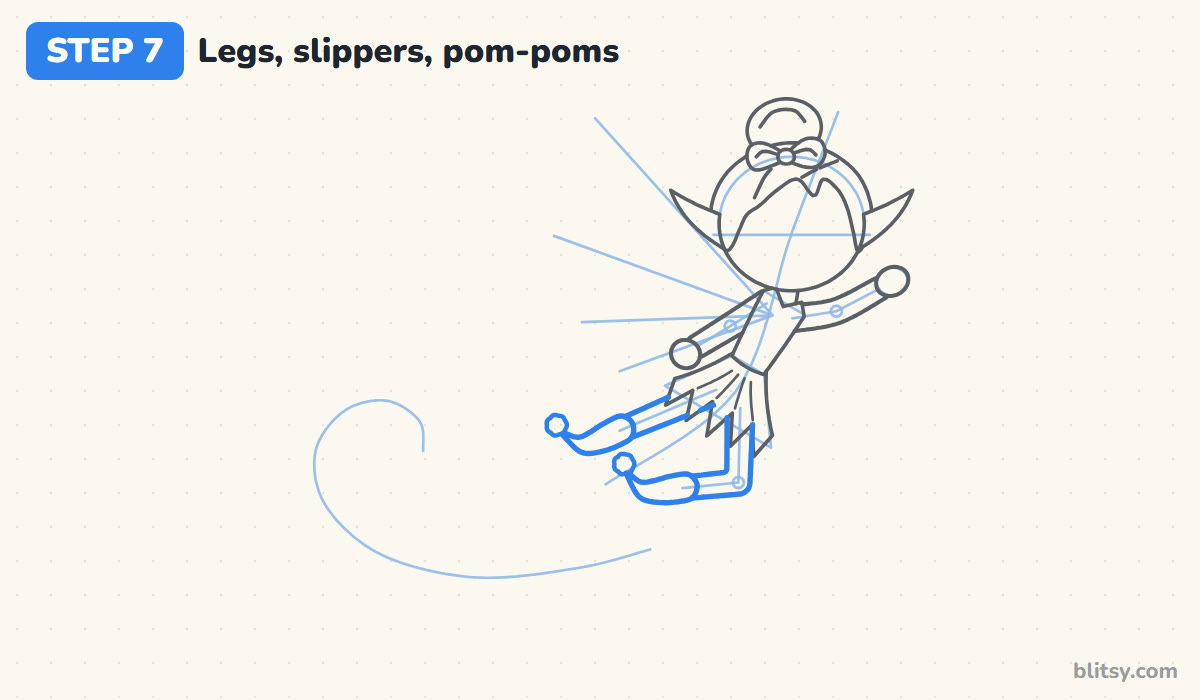
Most beginners draw legs too thin here. Give each leg a soft, even width, about the same as the arms. One leg stretches straight back; the other bends so the foot points behind her. Her slippers are pointed with toes that curl up, and each curl ends in a fluffy white pom-pom made of bumpy little curves.


💡 Tip: Draw the pom-pom with a wavy edge; a plain circle looks like a bead.
Step 8: Outline two pairs of long wings
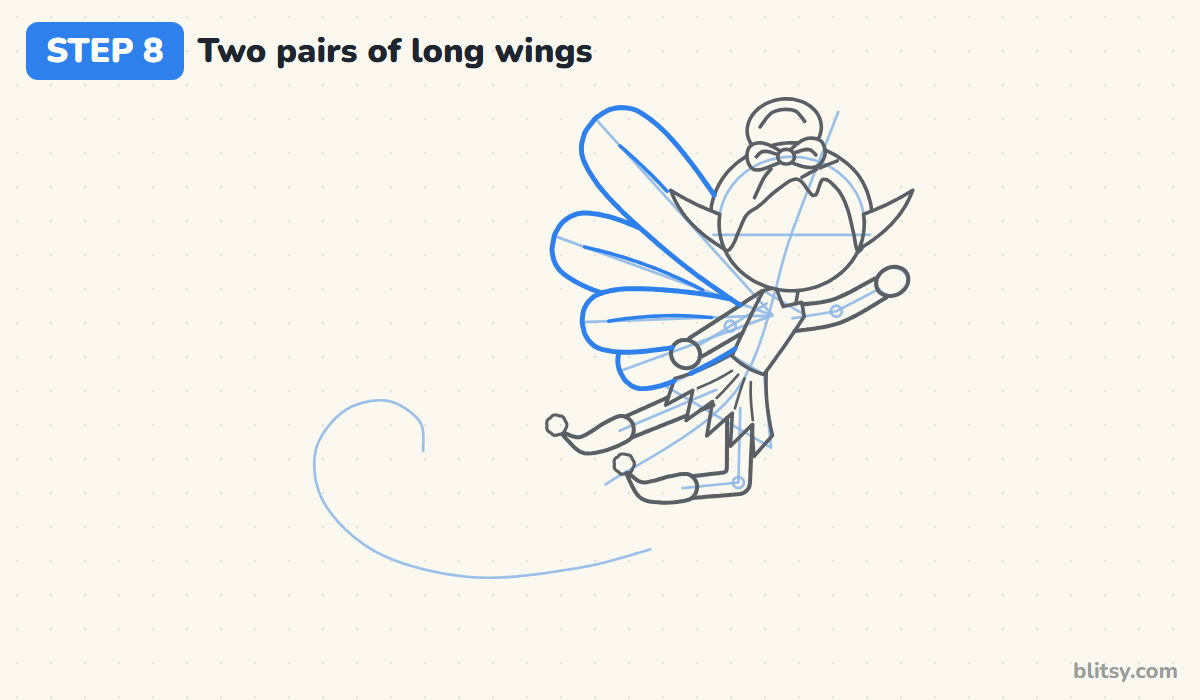
Use the four wing lines as the middle of each wing. The top two are long and slim, almost like dragonfly wings, with round tips. The lower two are shorter. Stop each outline where it meets her body, arm or ear, since the wings sit behind her. One thin line inside each wing hints at a vein without making it heavy.
💡 Tip: Leave the wing veins short of the edges so the wings stay light.
Step 9: Draw the pixie dust trail and stars
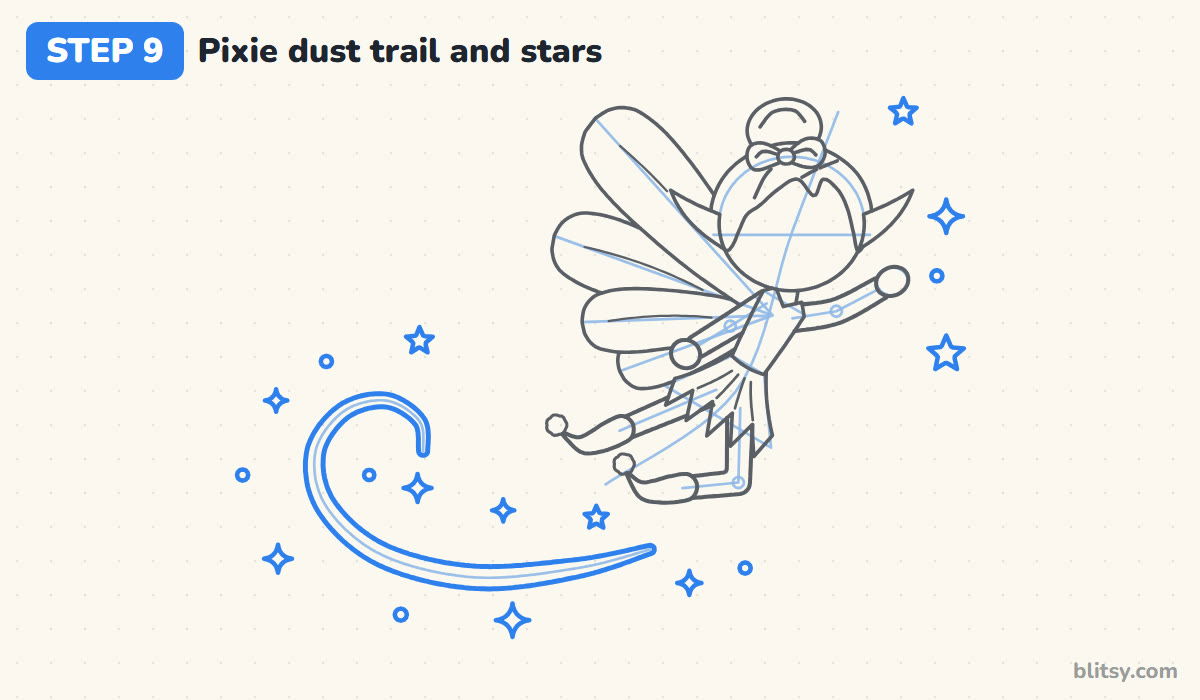
Follow the curl guide to draw a swoosh that starts thin, gets thicker as it sweeps down, then narrows again as it curls up. I keep the trail a short distance from her slippers, so it reads as dust left behind instead of a ribbon tied to her. Scatter sparkles, small stars and dots around her.
💡 Tip: Mix big and small sparkles; all the same size looks like wallpaper.
Step 10: Give her a cheeky little face
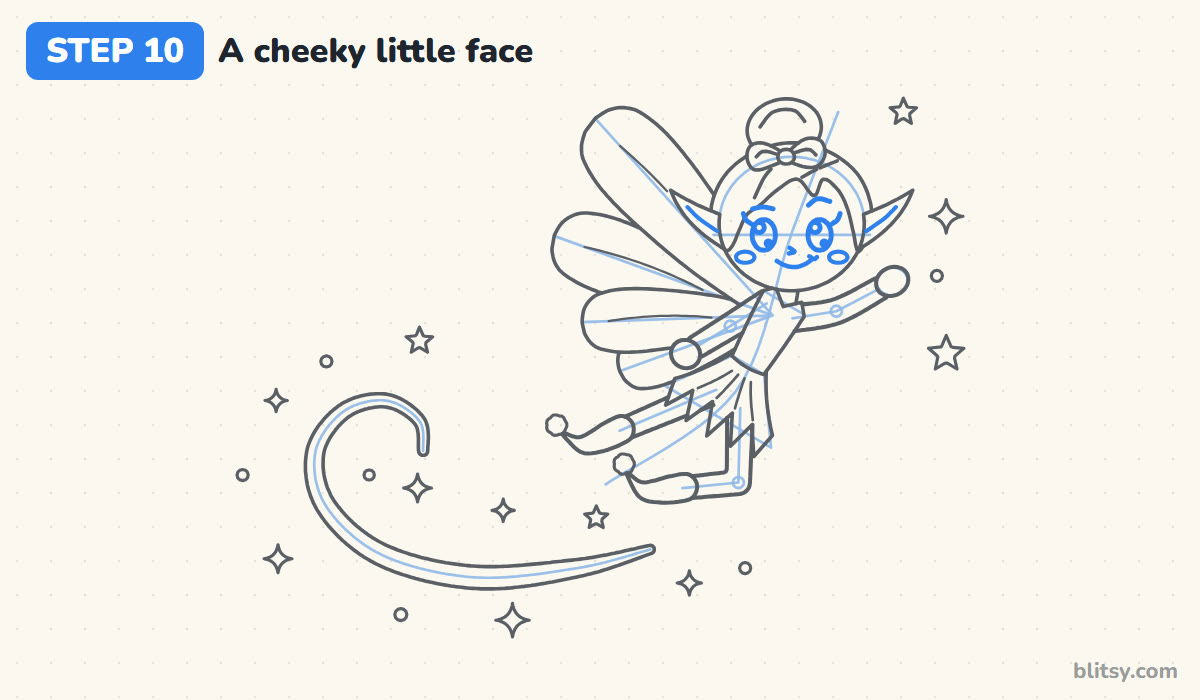
Place two tall oval eyes on the eye line with a white shine in the upper corner of each. The trick for her famous attitude is the brows: one stays calm and the other lifts a little higher. Add a short lash at each outer corner, a tiny nose, and a smile that curls up more on one side. Finish with oval pink cheeks.
💡 Tip: Tilt the smile just slightly; a big grin loses the cheeky look.
Step 11: Ink the lines and erase the guides
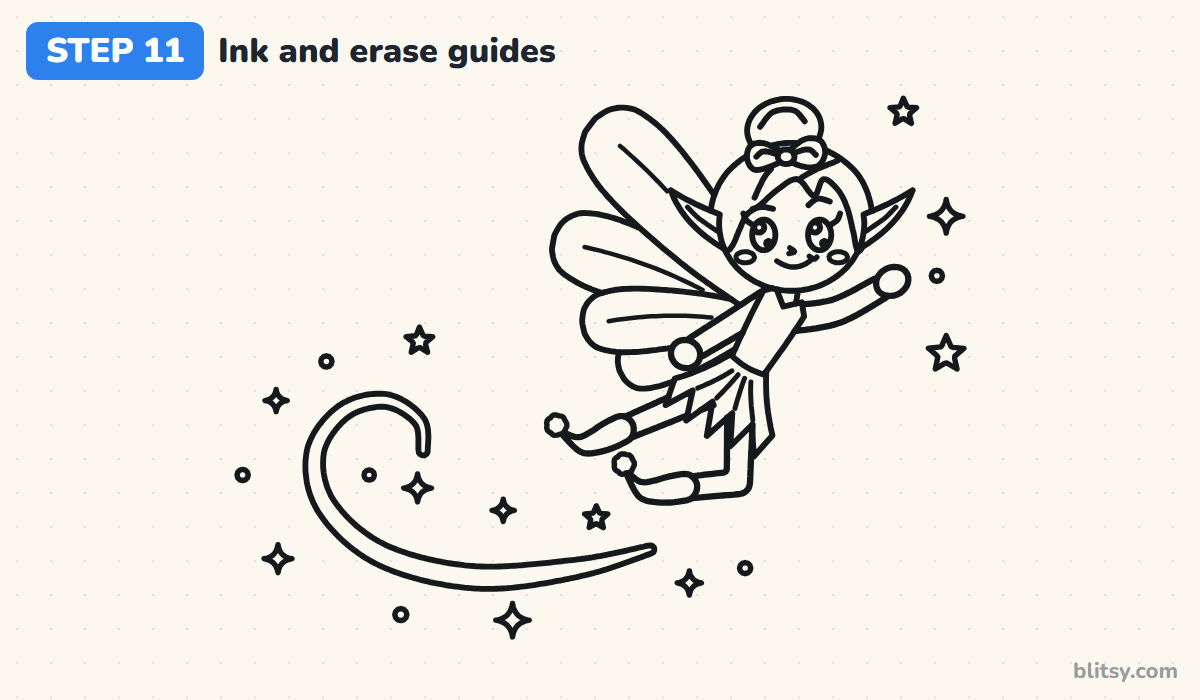
Go over all the lines you're keeping with the black pen, using short, steady strokes and turning the paper for the long wing curves. Skip the motion line, the sticks and the boxes. Once the ink is dry, erase every pencil mark underneath.

💡 Tip: Start inking at the face, where a shaky line would show the most.
Step 12: Color Tinker Bell
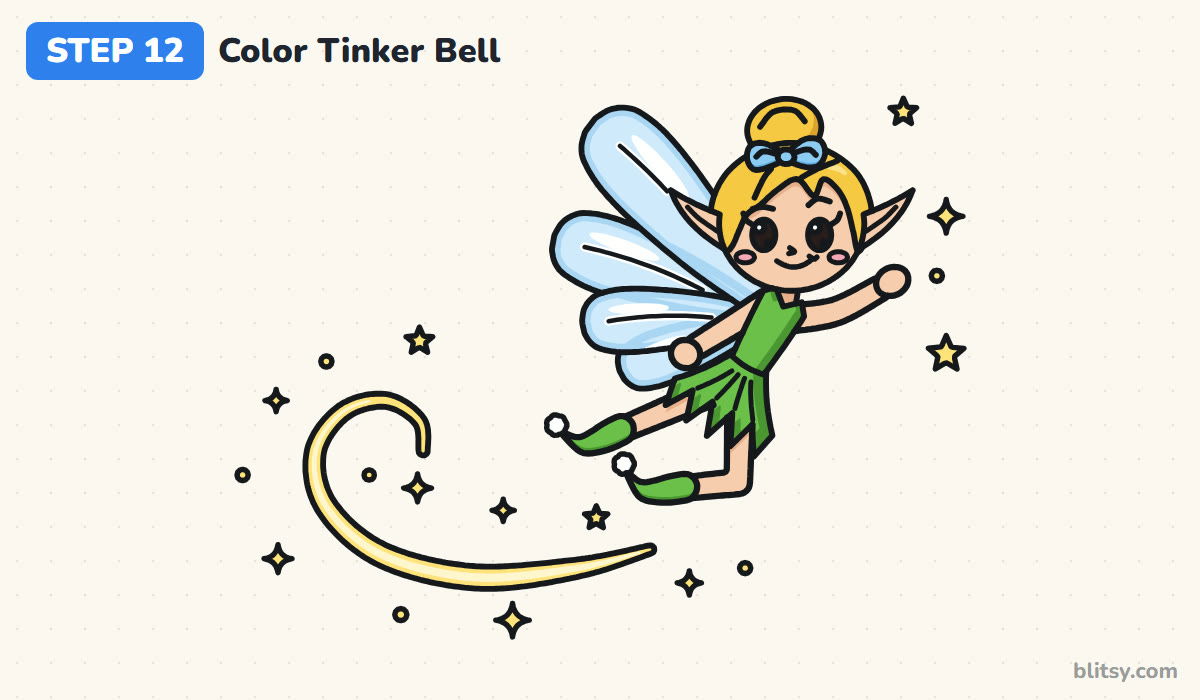
Color the hair and bun golden yellow and her skin a light peach. The dress and slippers are leaf green; press harder along one side of each leaf for a darker shade. Make the ribbon light blue, and use the same blue very softly on the wings, leaving white streaks so they look see-through. Leave the pom-poms white and finish the trail and stars in light yellow.
💡 Tip: Color the wings last, with almost no pressure, so they stay pale.
Where Tinker Bell Sketches Tend to Go Wrong
- A stiff, upright body. If she stands straight up, she looks like she's hovering in place. Lean everything along the diagonal motion line.
- Short, rounded wings. Round wings make a generic fairy. Hers are long and narrow, so stretch the top pair well past her head.
- Stick arms and legs. Single lines look unfinished next to the big chibi head. Give every limb two outlines and soft mitten hands.
- A trail glued to her feet. When the swoosh touches her slippers, it reads as a tail. Leave a small gap and let it taper at both ends.
- Ears hidden in the hair. Without sharp ears she's just a girl with wings. Draw them long and let them poke clearly out of the hair.
Send Your Tinker Bell Somewhere New
Once you've got the pose, try her sitting on a crescent moon or flying the other way with the trail curling to the right. The fairy drawing tutorial has wing shapes to borrow, and the Disney character drawing tutorial draws Nemo the clownfish if you want another Disney face to practice next.
Free Tinker Bell Coloring Page and Step Guide PDF
Want to skip ahead to the crayons? The free Tinker Bell coloring page has the inked outline, a colored example to copy and a color key for each part. The step-by-step guide PDF holds all 12 steps with tips, and both files print on Letter or A4 paper.
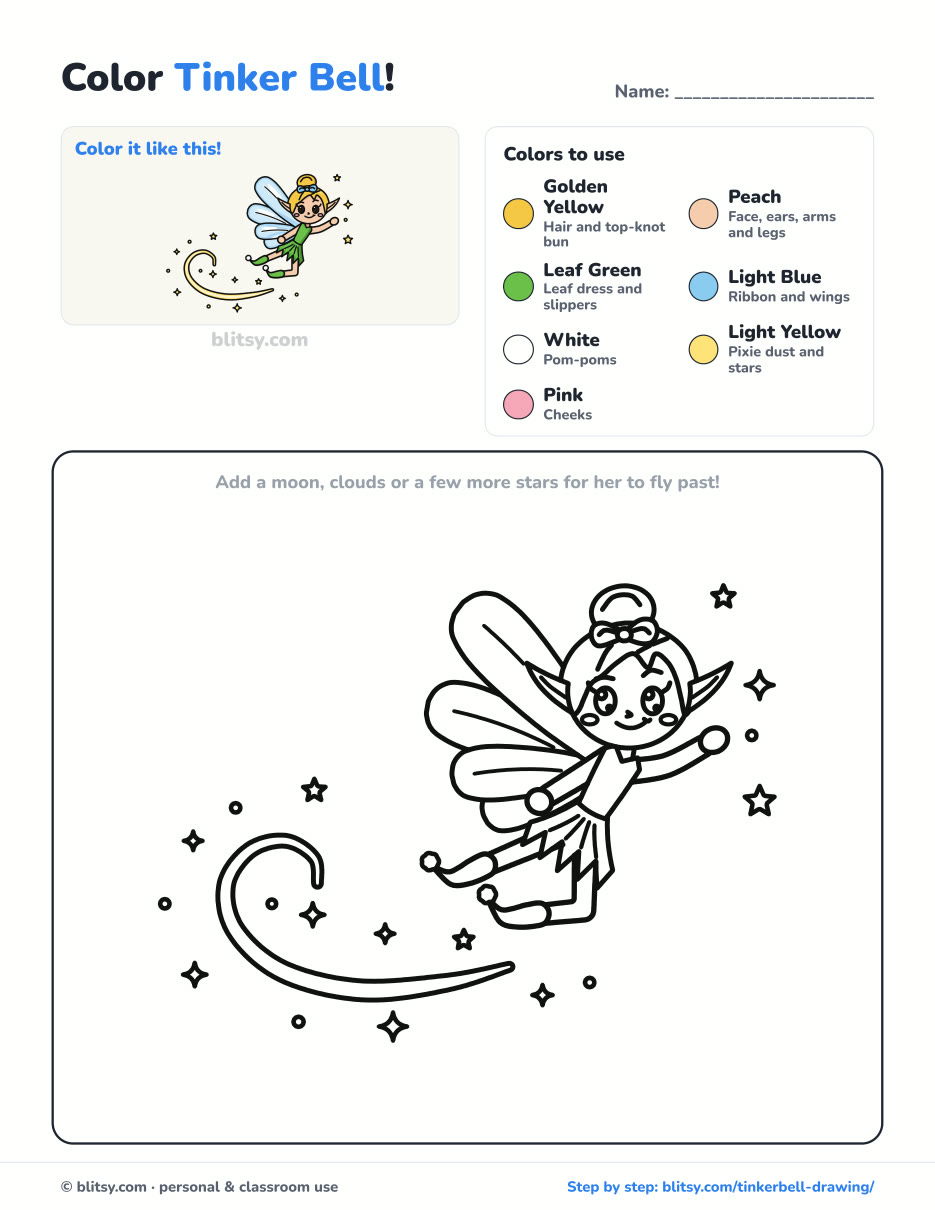
Black outlines with a colored example and the color names at the top. Ready to print and color.
⬇️ Download Coloring PageEvery step picture with its instructions and tips, to keep beside your paper while you draw.
⬇️ Download Drawing Guide📱 On a phone? Tap a download button, then open the file and choose Share → Save to Files or Print. On a computer, the PDF opens or saves straight to your Downloads folder.
Keep the Tink Steps on a Pinterest Board
Tinkerbell Flying? Characters to Draw Next
Here are six more step-by-step tutorials, from a cute monster to a waving astronaut.
- Monster Drawing: One furry cyclops and a three-eyed jelly buddy grow from ovals in the monster drawing tutorial.
- Abraham Lincoln Drawing: Learn how to draw Abraham Lincoln step by step, tall hat and chin beard included.
- Darth Vader Drawing: The Darth Vader drawing tutorial makes a chibi Sith lord with a big helmet and a red glow.
- Cowboy Drawing: A cartoon kid with a big hat and a lasso: cowboy drawing step by step.
- Cat Noir Drawing: Ears up and staff in hand, the Cat Noir drawing tutorial is another chibi hero.
- Astronaut Drawing: Draw a space explorer waving next to the moon when you learn how to draw an astronaut.
Tinker Bell Drawing Help for Kids and Parents
What is the easiest way to draw Tinkerbell?
Draw a chibi version with a big head and a small body. Start from one slanted motion line, add the head oval, then build the bun, leaf dress and long wings on top of simple guides.
How do you draw Tinkerbell's wings?
Draw four straight lines fanning out from her back, then outline a long, slim shape with a round tip around each one. Keep the top pair longer than the lower pair and color them very lightly.
Is this Tinkerbell drawing OK for kids?
Yes. Children around 7 and up can follow every step, and younger kids can skip the trail and the pom-poms. An adult can help with the first slanted guide line.
What colors do I need for Tinkerbell?
Golden yellow for the hair, leaf green with a darker green for the dress and slippers, light blue for the ribbon and wings, peach for her skin, pink for the cheeks and light yellow for the pixie dust.
Pin your finished fairy somewhere high on the wall, where she looks like she's still zooming off. ✨🧚
Related posts:
 How to Draw a Flying Bird Step by Step (Easy Swallow)
 How to Draw Wonder Woman Step by Step (Chibi for Kids)
 How to Draw the Hulk Step by Step (Easy Chibi for Kids)
 How to Draw Iron Man Step by Step (Easy Chibi for Kids)
 How to Draw Kurama Step by Step (Easy Chibi Nine-Tails)
 How to Draw Cat Noir Step by Step (Easy Chibi Hero)
 How to Draw Goku Step by Step (Easy Chibi Version)
 How to Draw Freddy Krueger Step by Step (Cute Chibi Version)
 How to Draw Ariana Grande Step by Step (Cute Chibi Fan Art)
 How to Draw Master Chief Step by Step (Easy Chibi Armor)
 How to Draw the Joker Step by Step (Easy Chibi for Beginners)
 How to Draw a Chibi Step by Step (Easy 2-Head Method)

