
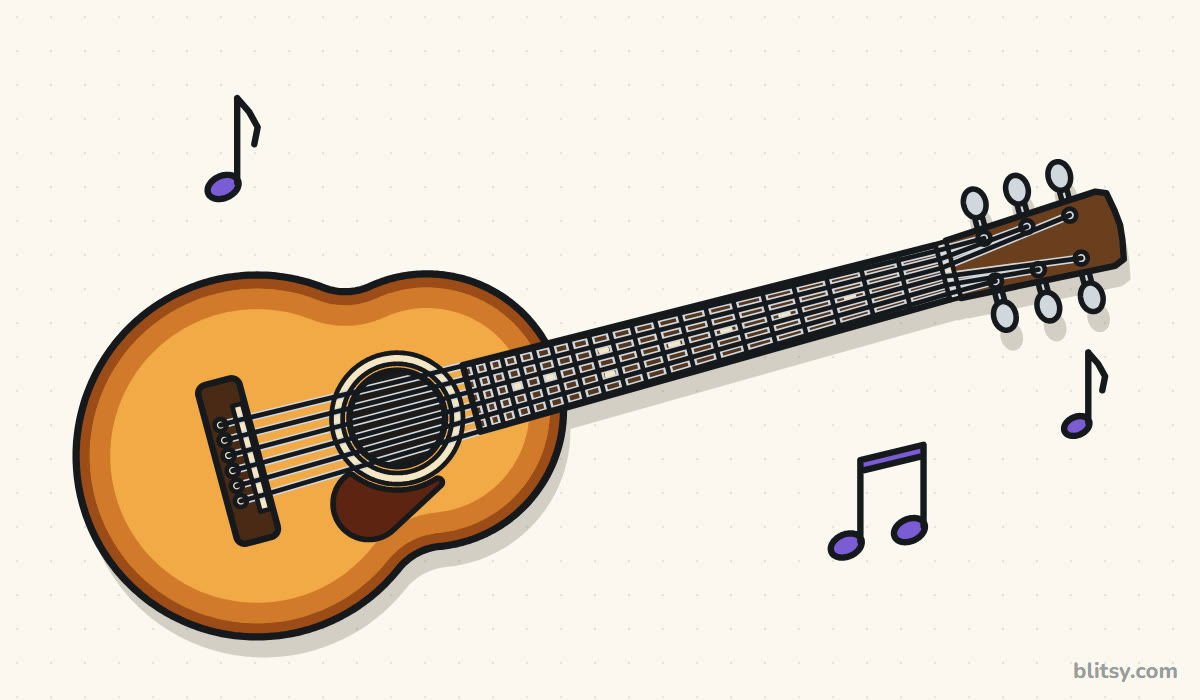
Most guitar drawings go wrong before the first string goes on: the body comes out lopsided, or the neck wanders off at an angle that doesn't match. Both problems disappear once you build the guitar on one straight centre line and make the body from two circles, a big one and a smaller one. That is exactly how this lesson on how to draw a guitar step by step works, from the first light line to the honey-colored finish. I add a few music notes in the empty corners at the end, so the page feels like it's playing.
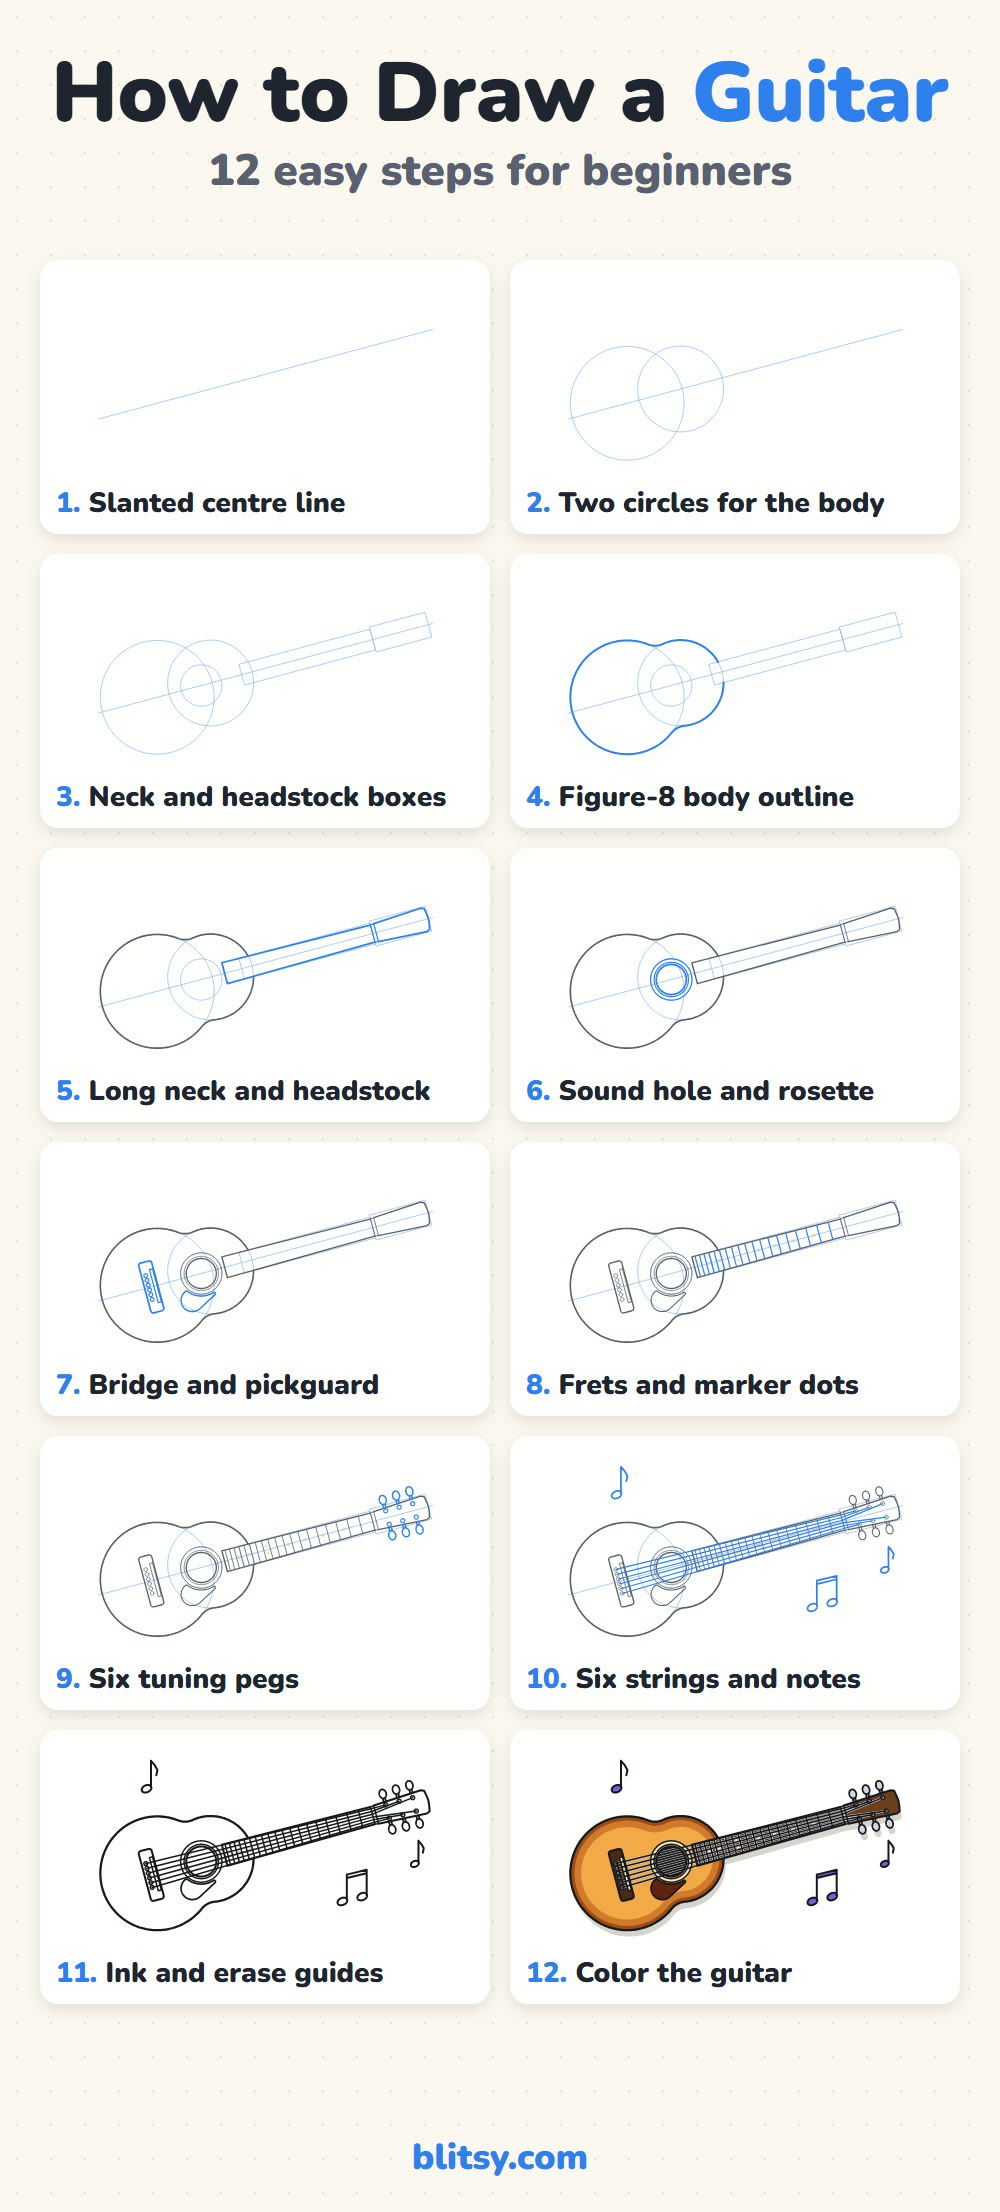
In every step picture, the part you draw right now is bright blue and the finished parts are gray. Pale blue shapes are construction guides; keep them faint, because you erase them near the end.
Quick overview
⏱️ Time: about 35 to 45 minutes, a little longer if you take your time on the strings
🎯 Level: easy to medium; the body and neck are simple, the frets need a steady hand
✏️ Steps: 12
🎸 You'll draw: an acoustic guitar with a sound hole, frets, six strings, tuning pegs and music notes
Gear to Set Out Before the First String
- A pencil you can press lightly, such as HB or 2B
- A soft eraser that won't smear graphite
- A ruler, handy for the centre line, the neck and the strings
- A black fineliner or thin marker
- Colored pencils or markers: orange, brown, dark brown, cream, black, gray, red brown and purple
- Paper turned sideways so the long neck fits
A ruler is optional for the circles, but it really helps the strings come out straight and evenly spaced.
How to Draw a Guitar Step by Step
Step 1: Draw a slanted centre line

Start low on the left side of the page and draw one long, light line rising gently toward the upper right corner. Every part of the guitar sits on this line, so both halves of the body and the neck stay balanced.
💡 Tip: Use a ruler here; a wobbly centre line makes the whole guitar look bent.
Step 2: Add two circles for the body
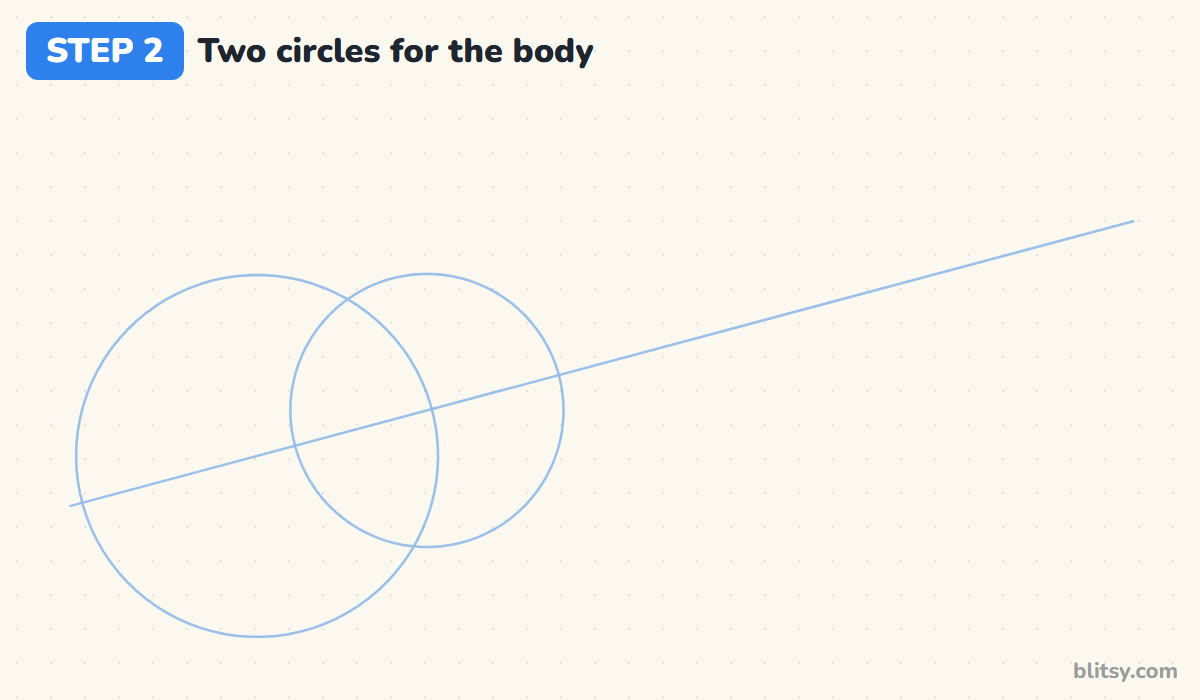
On the lower end of the line, draw a big circle with its centre on the line. Then draw a smaller circle further up the line, overlapping the first by about half. These are the lower and upper bouts. I make the small circle roughly three quarters the size of the big one, which is close to a real acoustic guitar.
💡 Tip: Check that the line cuts each circle exactly in half before you move on.
Step 3: Sketch boxes for the neck and headstock
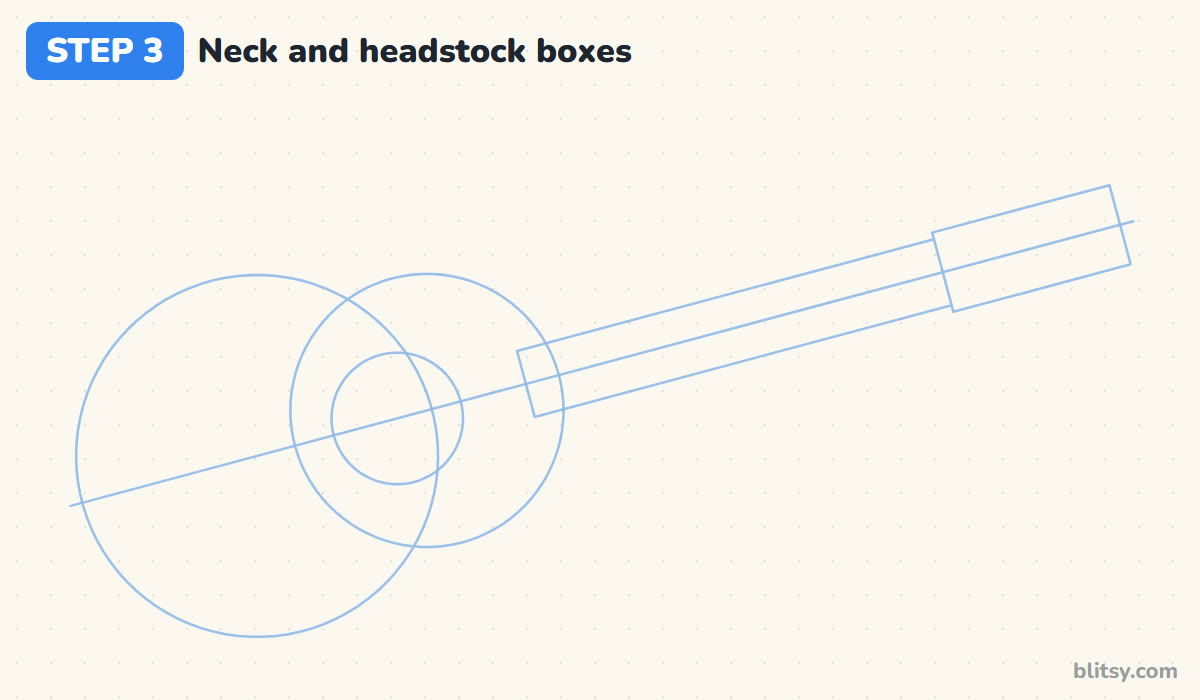
From the top of the small circle, draw a long, narrow box along the centre line for the neck. At its far end, add a shorter, slightly wider box for the headstock. Finally, put a small circle inside the upper bout, close to the neck, where the sound hole will go.




💡 Tip: Keep the neck box narrow; a fat neck turns the drawing into a ukulele or a banjo.
Step 4: Trace the figure-8 body outline
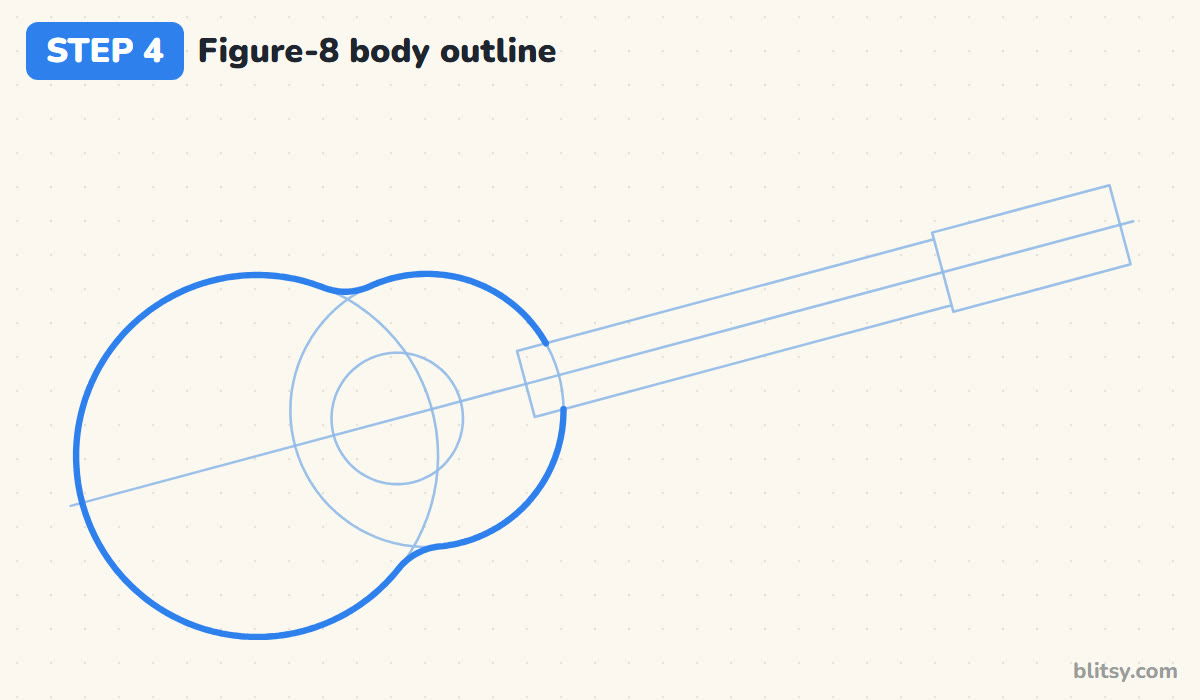
Now go around the outside of both circles in one smooth line. Where the circles meet, curve the line inward to make the waist, instead of letting it make a sharp corner. Stop the line where the neck box crosses the top of the body.
💡 Tip: Draw the waist curves on both sides at the same height, using the centre line as your mirror.
Step 5: Outline the neck and headstock
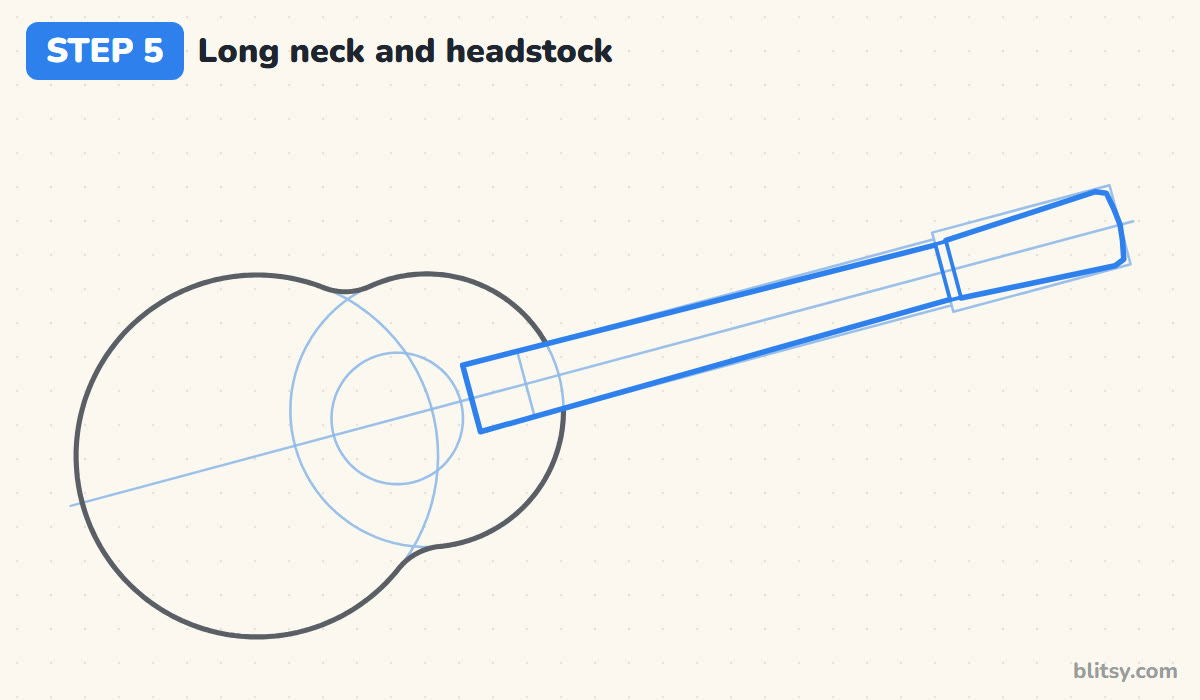
Trace the neck box, letting it get just a touch wider as it reaches the body. The fretboard on top of the neck runs a little way onto the body, so carry the lines down until they almost touch the sound hole circle. At the top, add a thin bar for the nut, then draw the headstock with rounded corners.
💡 Tip: Leave a small gap between the end of the fretboard and the sound hole so the two shapes don't merge.
Step 6: Draw the sound hole and the rosette
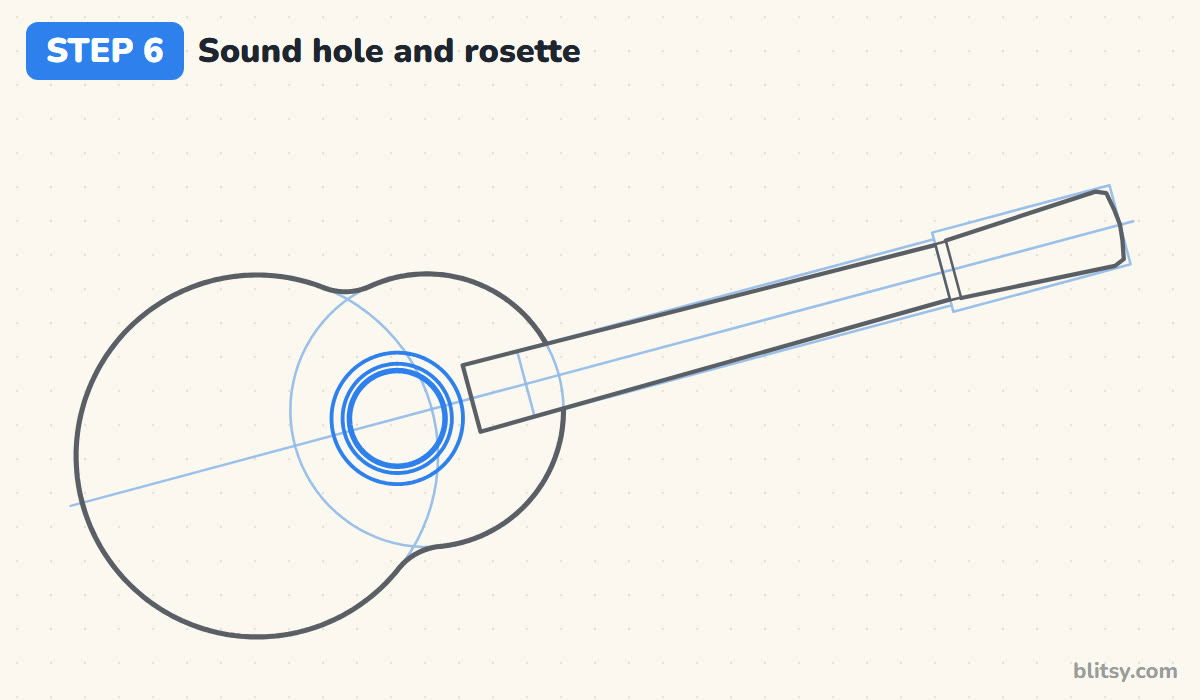
Trace the small guide circle firmly to make the round sound hole. Around it, draw two more circles close together, like a ring around a target. That ring is the rosette, the decorative band found on almost every acoustic guitar.
💡 Tip: Turn the paper as you go around each circle; your hand curves more naturally that way.
Step 7: Add the bridge and the pickguard
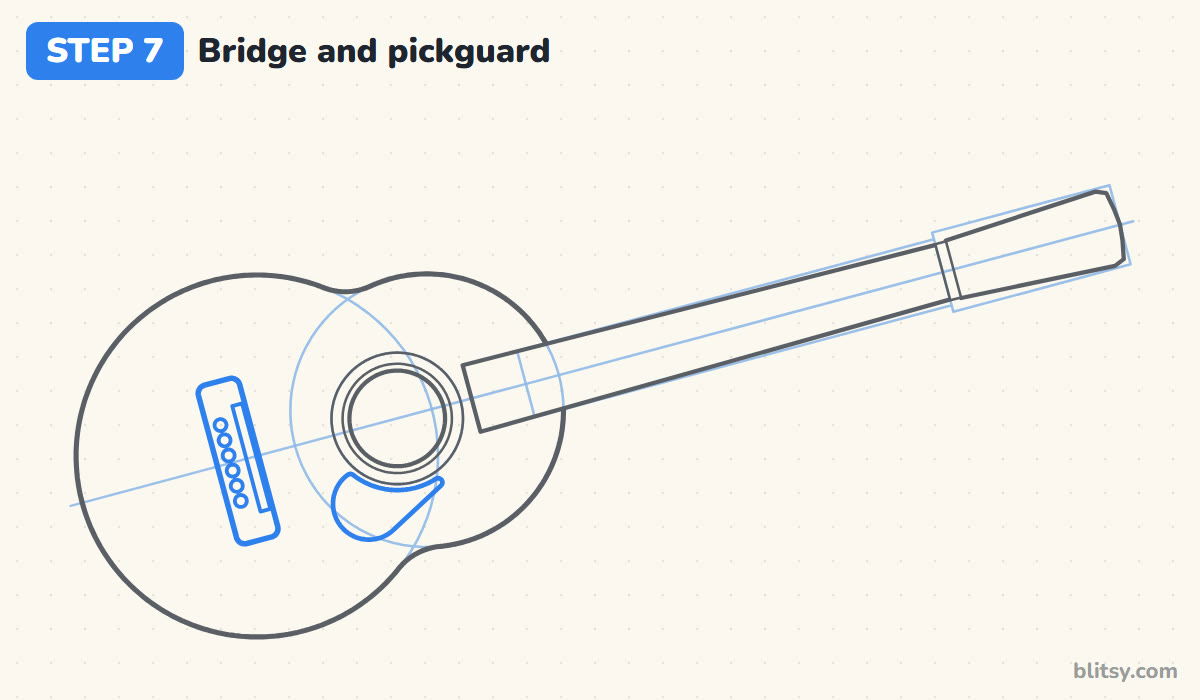
On the big circle, draw a rounded rectangle across the centre line for the bridge. Next to its neck side, add a thin strip for the saddle, and a row of six small circles for the bridge pins. Below the sound hole, draw a teardrop pickguard that hugs the rosette and points toward the waist. I keep it fairly small, since a huge pickguard swallows the body.




💡 Tip: Set the bridge the same distance from the body edge on both sides of the centre line.
Step 8: Draw the frets and marker dots
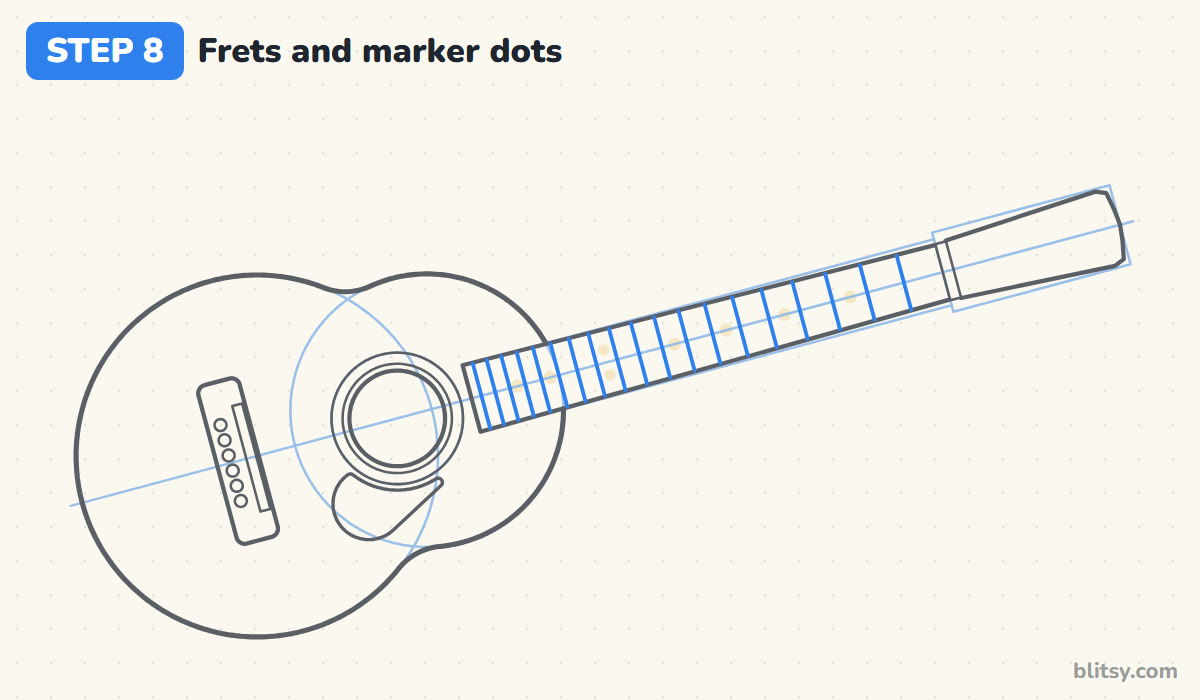
Frets are the short lines across the fretboard. On a real guitar the spaces are widest near the headstock and get closer together toward the body. Start near the nut with a wide gap, then make each gap slightly smaller than the last. Add little dots in a few spaces as fret markers, with two side by side in the middle of the neck.
💡 Tip: Mark the first and last fret, then fill in the middle; it's easier to keep the shrinking spacing even.
Step 9: Add six tuning pegs
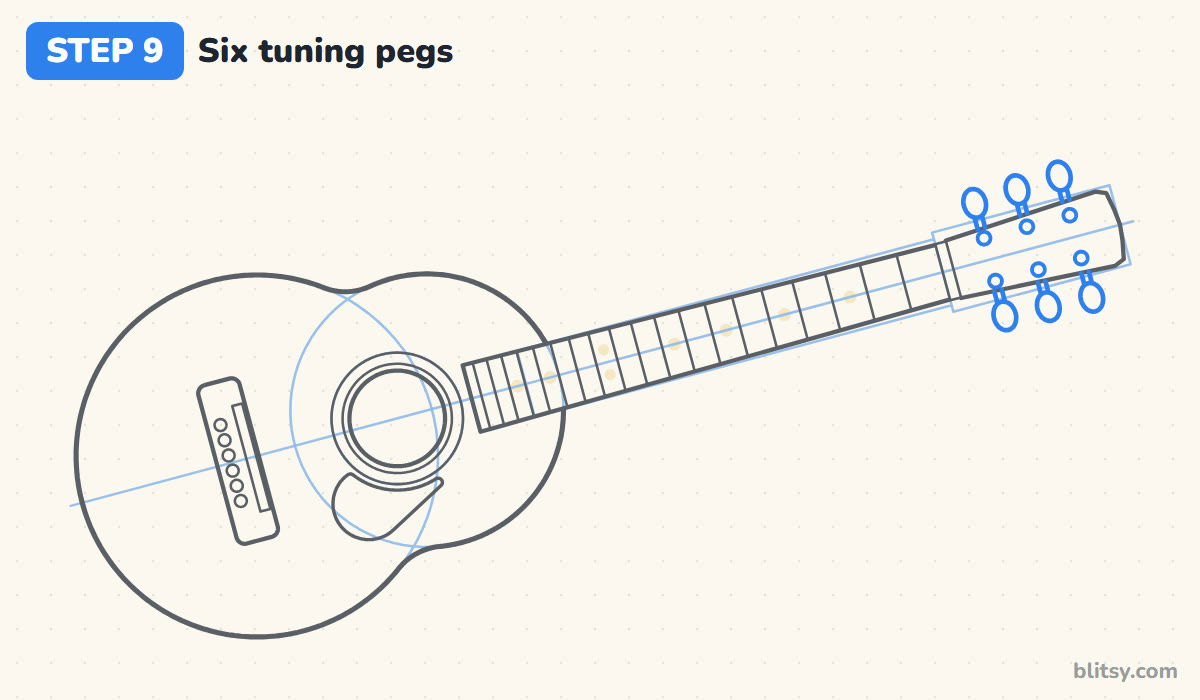
An acoustic guitar has six tuning pegs, three on each side of the headstock. Draw three small circles near each edge of the headstock for the posts. Then, just outside the edges, add a short stem and an oval button for each one.
💡 Tip: Space the three posts evenly along the headstock before adding any of the buttons.
Step 10: Draw six strings and a few notes
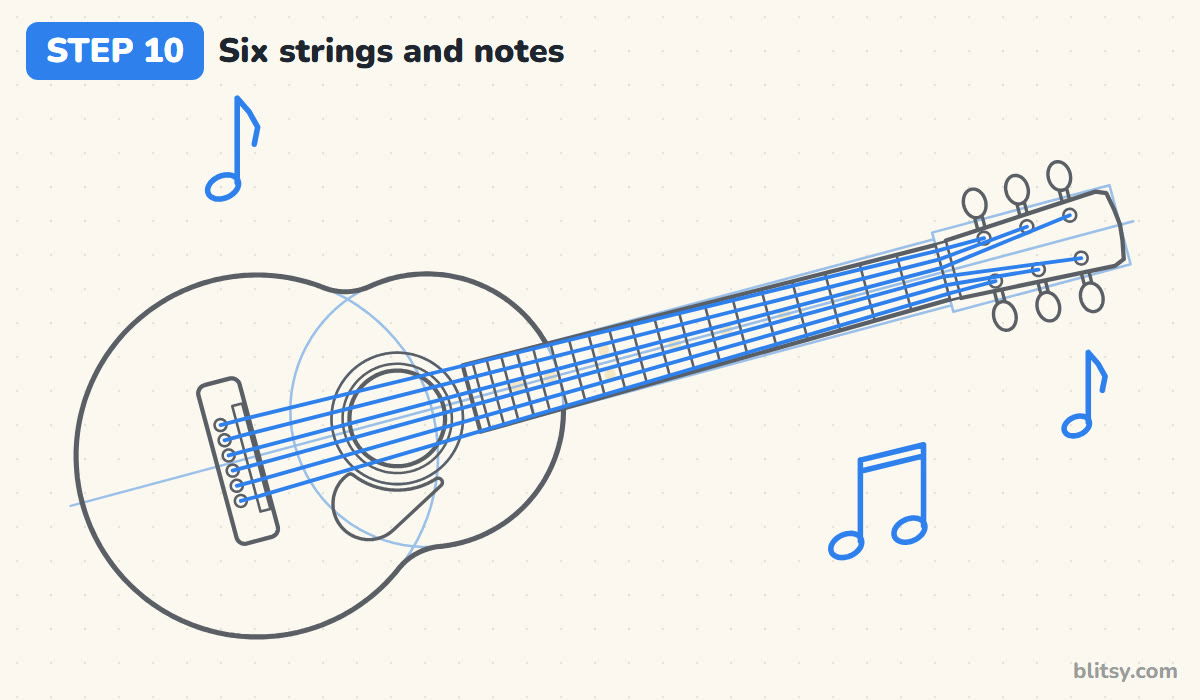
With a ruler, draw six straight lines from the bridge pins, over the saddle and sound hole, all the way up the neck to the nut. They fan out at the bridge and squeeze together at the nut. Past the nut, angle each string to its tuning post. Then add an eighth note above the body and a couple more near the headstock for fun.
💡 Tip: Mark six evenly spaced dots on the saddle and six on the nut first, then connect them in pairs.
Step 11: Ink the lines and erase the guides
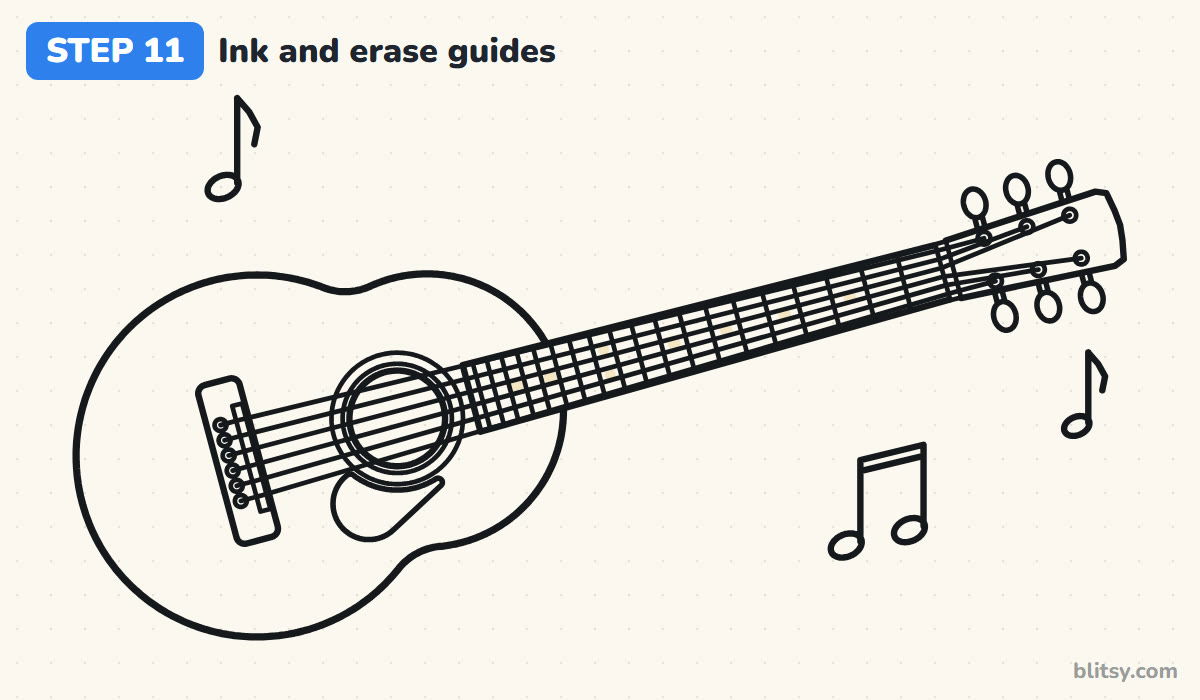
Go over every line you want to keep with the black pen. I ink the body outline first, then the neck, and save the strings and frets for last because they're the most delicate. When the ink is completely dry, erase the centre line, the circles and the boxes.




💡 Tip: Rest the side of your hand on a scrap of paper while inking, so it doesn't smudge the fresh lines.
Step 12: Color the guitar
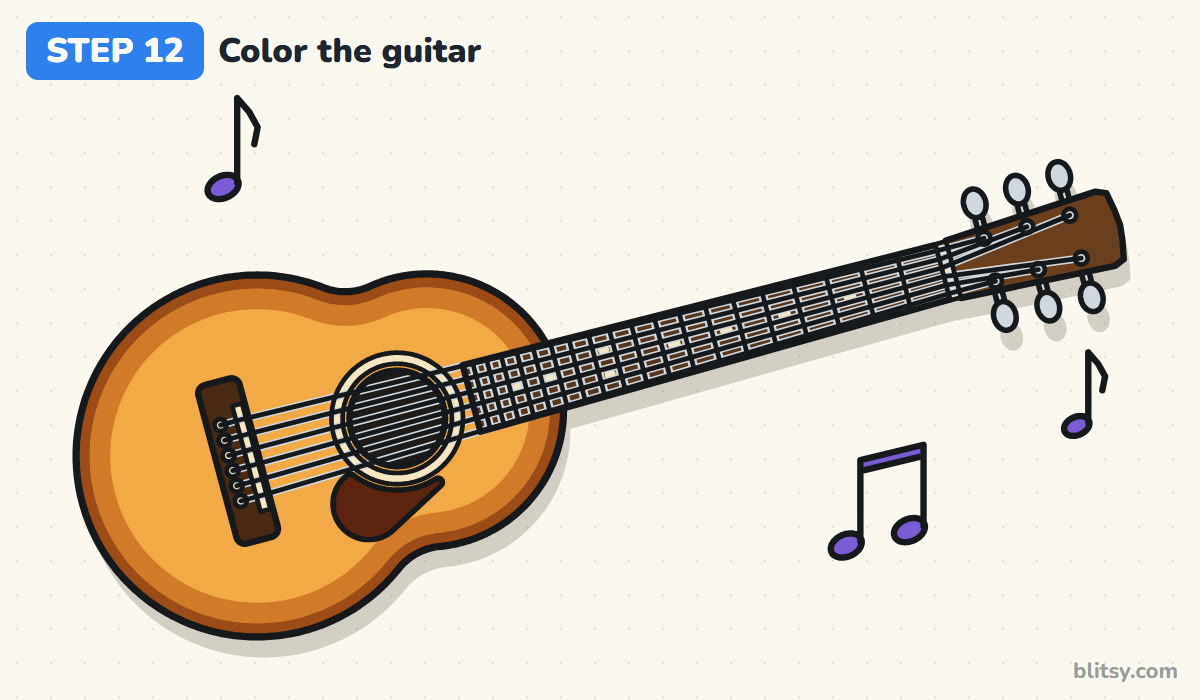
Fill the body with a warm orange, then press harder with brown around the edge for a sunburst look that fades inward. Use dark brown for the neck and bridge, cream for the rosette and pins, and solid black inside the sound hole. Gray covers the metal parts; the pickguard is red brown and my notes are purple.
💡 Tip: Color the edge burst in small circles; it blends into the orange more smoothly than straight strokes.
Guitar Sketch Trouble Spots and Their Fixes
- Two body circles the same size. The guitar ends up looking like a peanut. Make the upper circle clearly smaller than the lower one.
- A neck that leaves the centre line. Even a slight bend makes the guitar look broken. Keep both neck edges parallel to the line.
- Frets spaced like a ladder. Make them shrink as they get closer to the body.
- The wrong number of strings or pegs. A standard guitar has six of each. Count before you ink.
- A sound hole in the lower bout. It belongs in the upper bout, near the end of the fretboard, with the bridge down on the big circle.
Restring Your Sketch Into Something New
Once this version feels comfortable, try changing the finish: a black guitar with a white pickguard, a pale natural wood or a bright red body all work with the same lines. My favorite change is a cutaway: scoop a notch out of the upper bout on one side. If you liked the floating notes, the how to draw music notes lesson adds a treble clef and many more symbols, and the cowboy drawing tutorial could give your guitar someone to play it around a campfire.
Guitar Coloring Page and Printable Steps PDF
The guitar coloring page has the whole instrument and the music notes in thick outlines, plus a small colored example and a color key at the top, so kids can match the shades. The step-by-step guide PDF collects all 12 steps with their tips and prints on Letter or A4 paper.
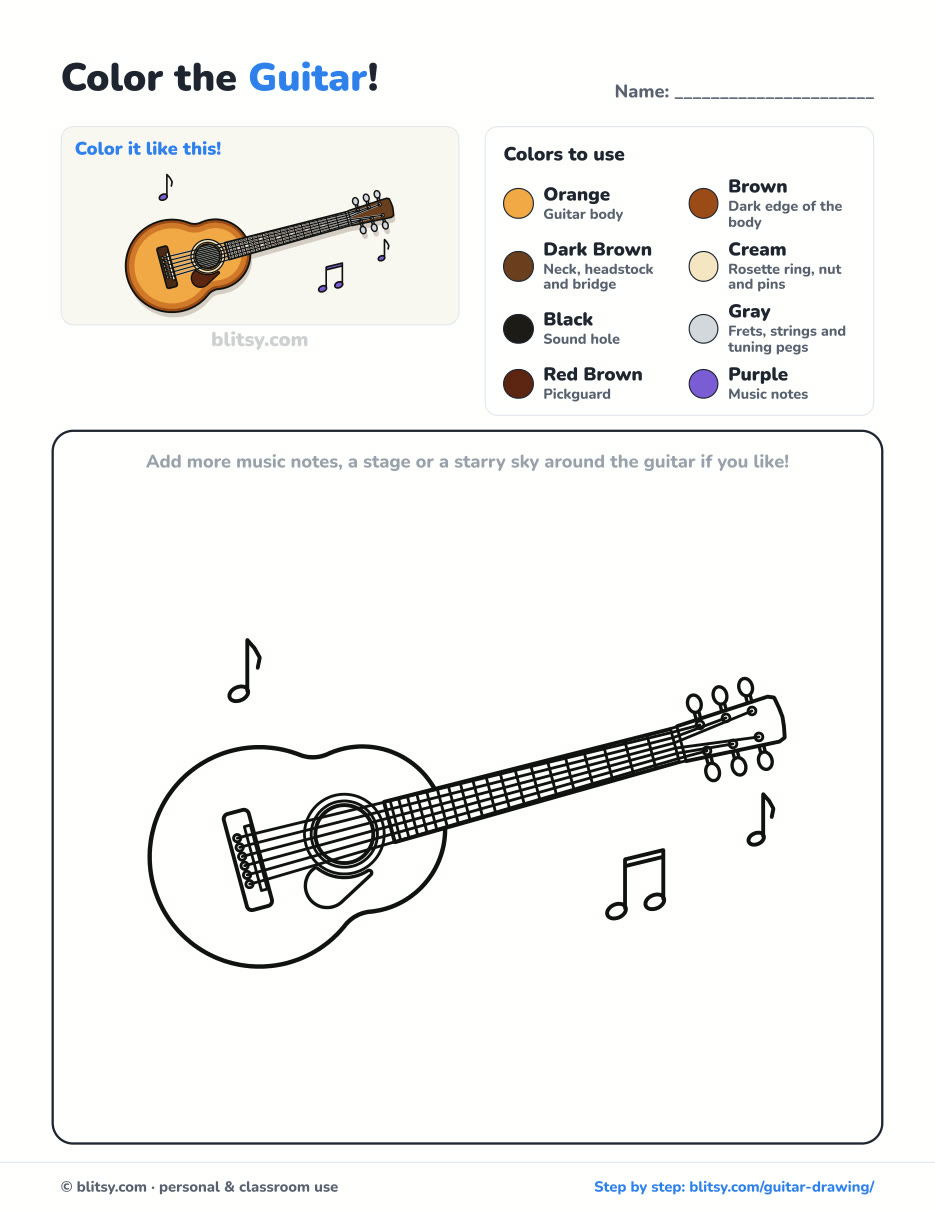
Black outlines with a colored example and the color names at the top. Ready to print and color.
⬇️ Download Coloring PageEvery step picture with its instructions and tips, to keep beside your paper while you draw.
⬇️ Download Drawing Guide📱 On a phone? Tap a download button, then open the file and choose Share → Save to Files or Print. On a computer, the PDF opens or saves straight to your Downloads folder.
Pin the Full Guitar Lesson
Guitar Drawing Questions From Beginners
What is the easiest way to draw a guitar?
Draw a straight line, then a big circle and a smaller overlapping circle on it. Join them into a figure-8, add a long neck box and a sound hole, and the basic guitar is done.
How many strings and frets should a guitar drawing have?
A standard acoustic guitar has six strings and six tuning pegs. Most have around 19 to 20 frets; you can draw fewer for a simple sketch, as long as they get closer together toward the body.
Is a guitar hard to draw for kids?
The body and neck are easy enough for most kids around seven or eight. The frets and strings take patience, so younger children can draw fewer frets and use a ruler for the strings.
How long does it take to draw a guitar?
Plan on about 35 to 45 minutes including coloring.
A line, two circles and six strings, and the guitar is yours; tune up your pencil and give it a try. 🎸
Related posts:
 How to Draw a Cowboy Hat Step by Step (Easy Western Sketch)
 How to Draw a Whale Step by Step (Easy for Beginners)
 How to Draw Lungs Step by Step (Easy Science Diagram)
 How to Draw a Pineapple Step by Step (Easy Crown and Slice)
 How to Draw Iron Man Step by Step (Easy Chibi for Kids)
 How to Draw a Dress Step by Step (Easy Party Dress)
 How to Draw a Chicken Step by Step (Easy for Beginners)
 How to Draw a UFO Step by Step (Cute Alien Saucer)
 How to Draw Flames Step by Step (Easy Campfire Drawing)
 How to Draw a Moon Step by Step (Sleepy Crescent + Phases)
 How to Draw a Tiger Step by Step (Easy Walking Pose)
 How to Draw a Heart Step by Step (Even, Symmetric Shape)

