
Faces look tricky because we know them so well: put the eyes a little too high and something feels off straight away, even if you can't say what. The good news is that a face follows a handful of simple measurements. In this lesson on how to draw a face step by step, I place those measurements first as light guide lines, and only then hang the features on them. You'll finish with a friendly front-view portrait and a method I still use for every face I draw.
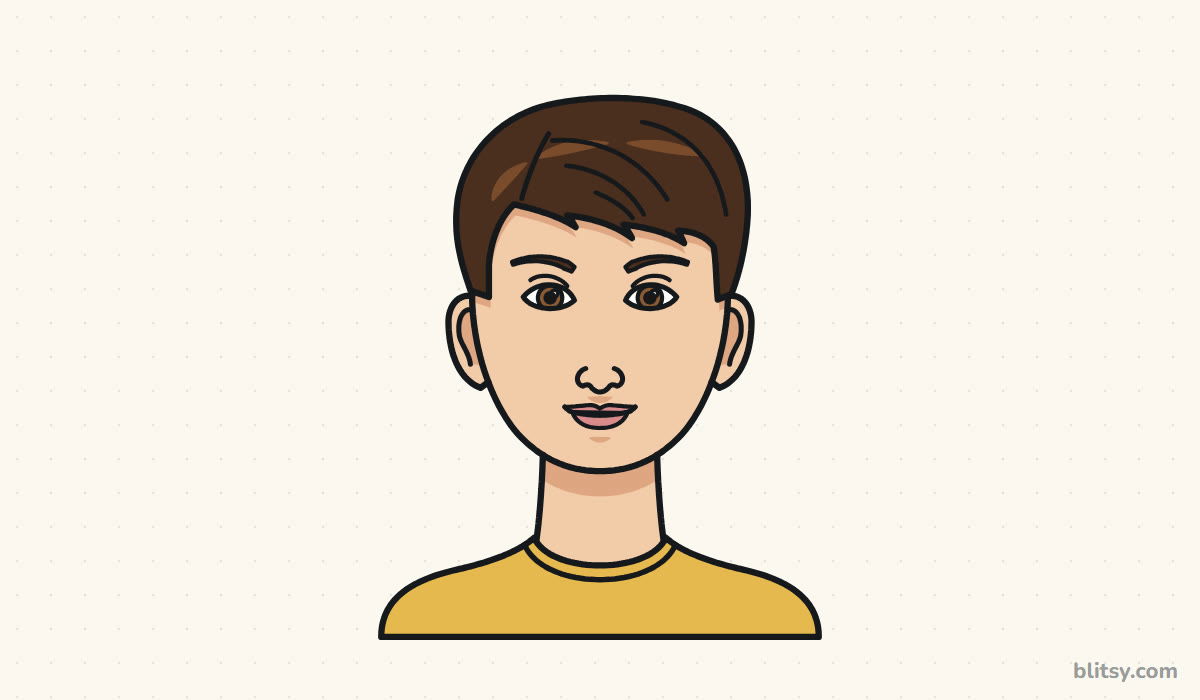
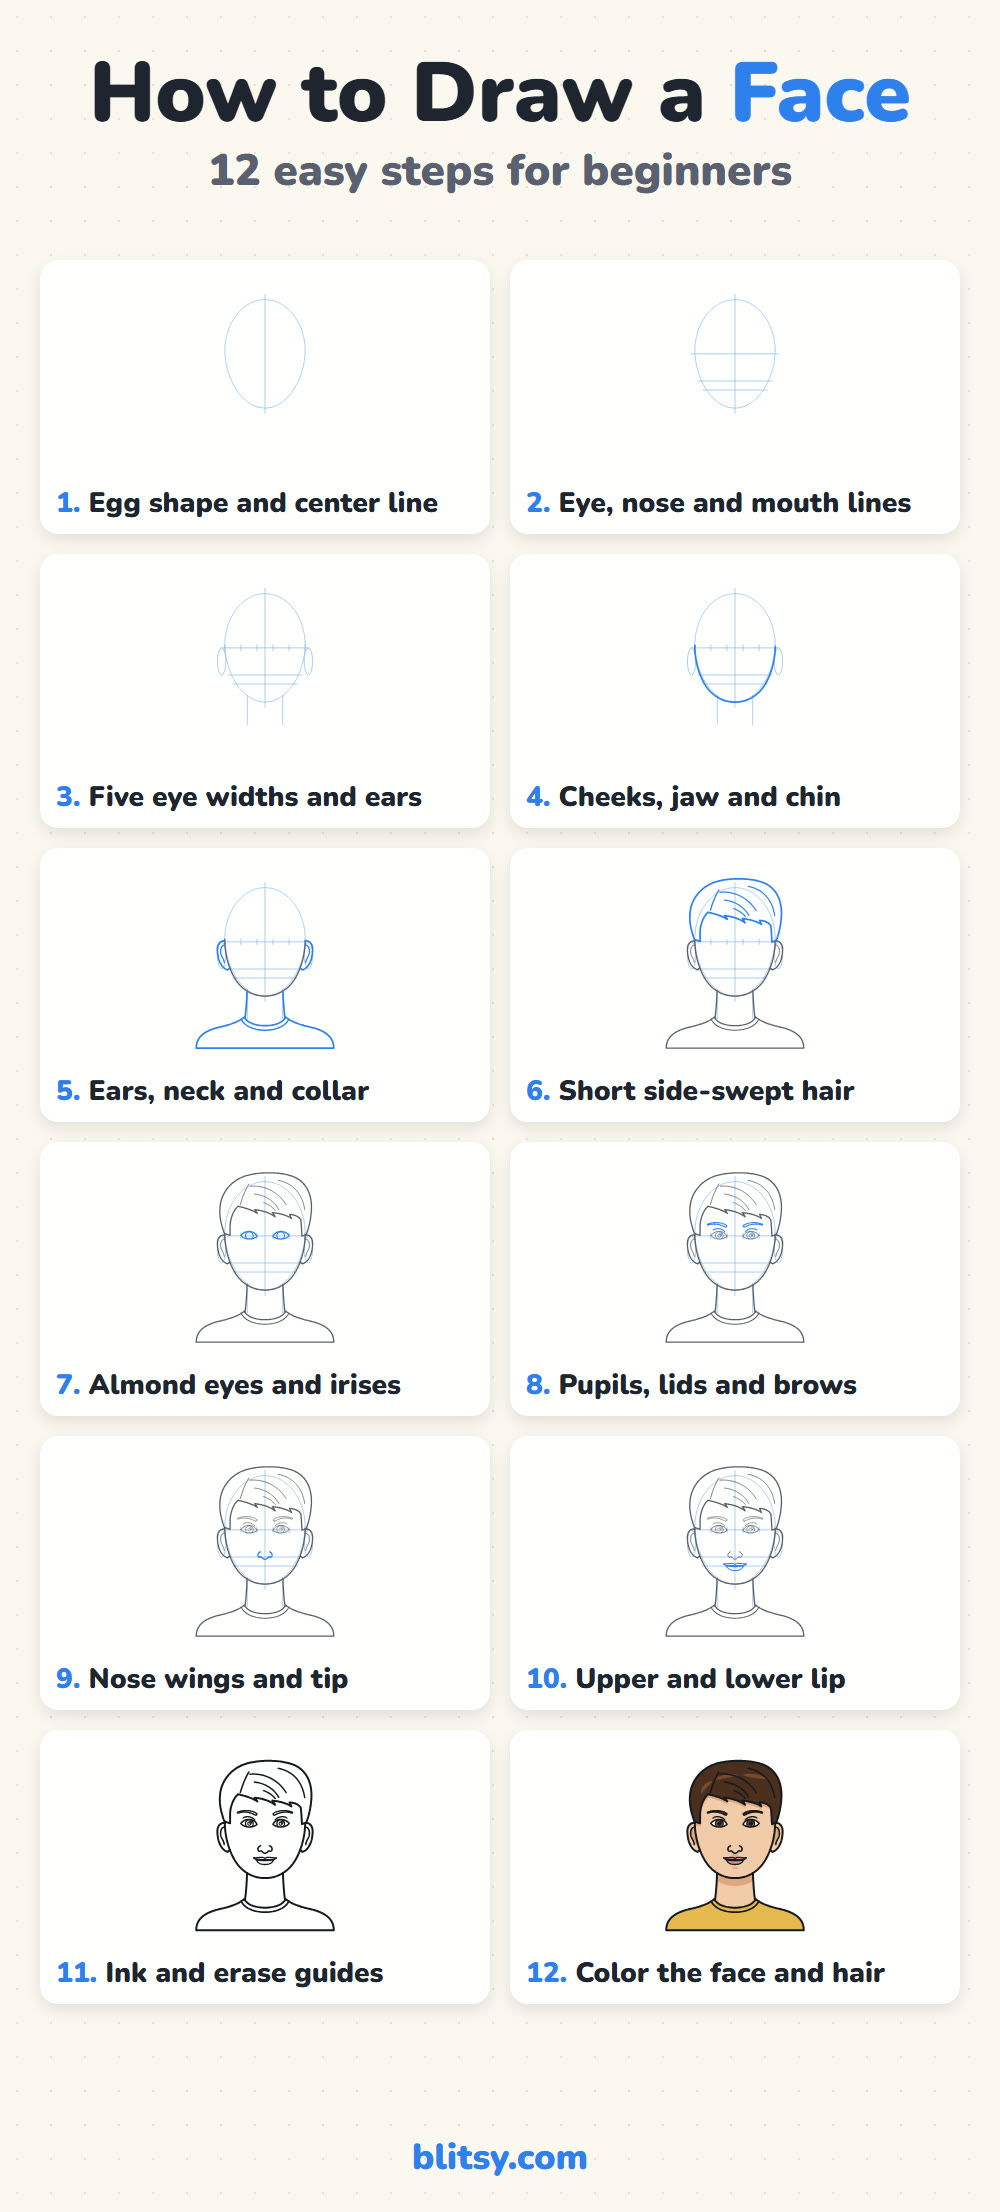
In these pictures, the current step shows up in blue, dark gray shows earlier work, and the pale blue measuring lines stay until we erase them in step 11.
Quick overview
⏱️ Time: about 30 minutes, plus 15 for coloring
🎯 Level: beginner friendly, ages 8 and up
✏️ Steps: 12
🙂 You'll draw: a smiling young person with short brown hair, seen from the front
Supplies for a First Portrait Sketch
- An HB pencil for the guide lines
- A soft eraser (kneaded erasers lift guides without smudging)
- A black fineliner or felt-tip pen for the final lines
- Colored pencils in skin tones plus a few brights
- A ruler, only if you want to measure the halfway points
No ruler? Folding a scrap of paper in half gives you a quick halfway marker that works just as well.
How to Draw a Face Step by Step
Step 1: Draw an egg shape and a center line
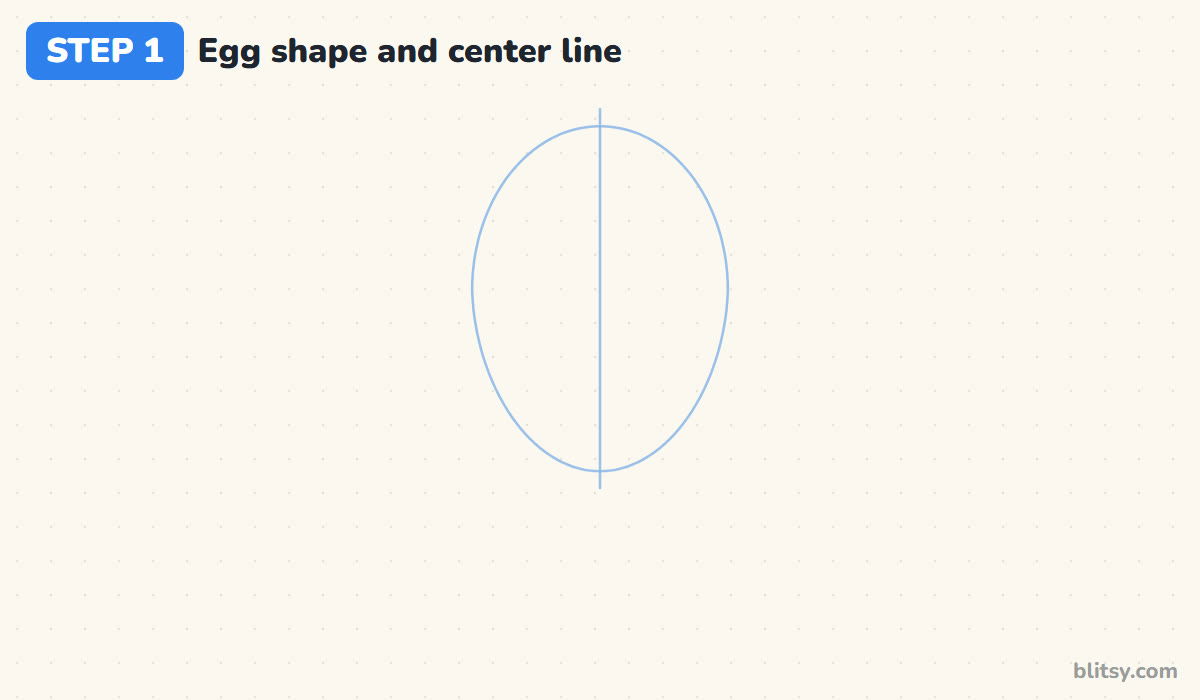
Sketch an upright egg in the middle of your page, wider at the top where the skull is and a little narrower at the chin. Run a straight vertical line through its middle. Everything later is mirrored on either side of it.
💡 Tip: Draw the egg in two halves, one from the top down each side. Matching halves are easier than one big loop.
Step 2: Add the eye, nose and mouth lines
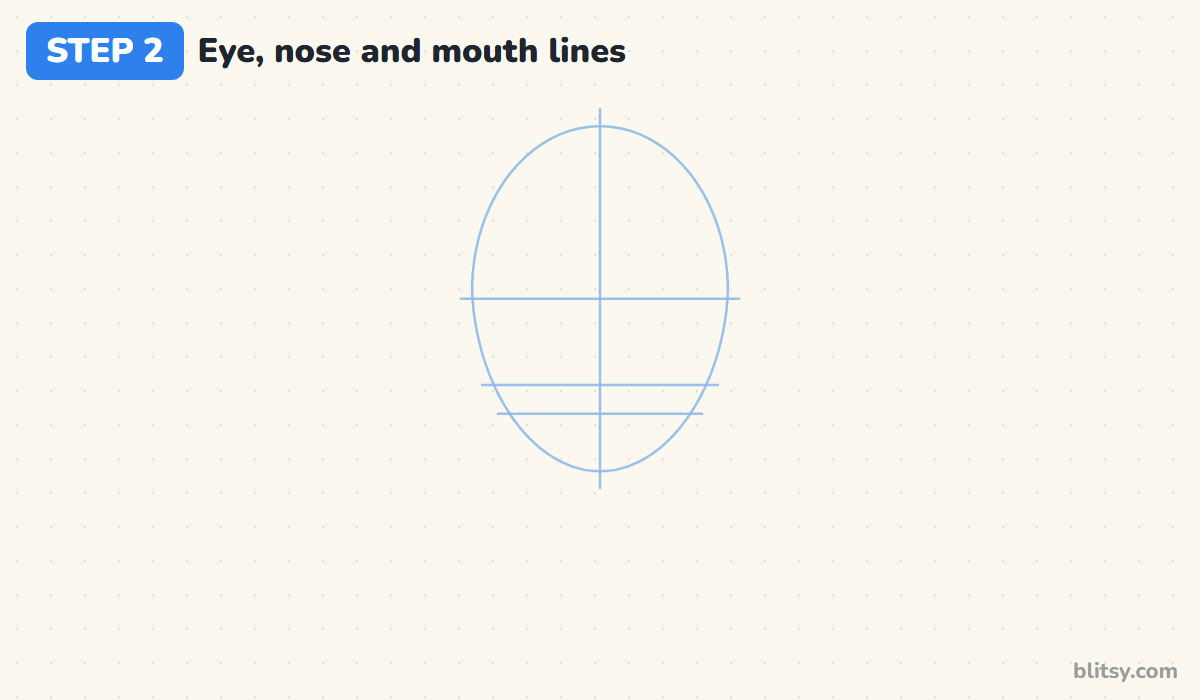
Measure the egg from top to chin and mark the exact halfway point. That's where the eye line goes, and yes, it really is that low. Halve the space between the eye line and the chin for the nose line. Then split the gap from nose to chin into thirds and draw the mouth line one third of the way down.
💡 Tip: Surprised the eyes sit so low? Almost every beginner puts them too high. Trust the halfway mark.
Step 3: Mark five eye widths and place the ears
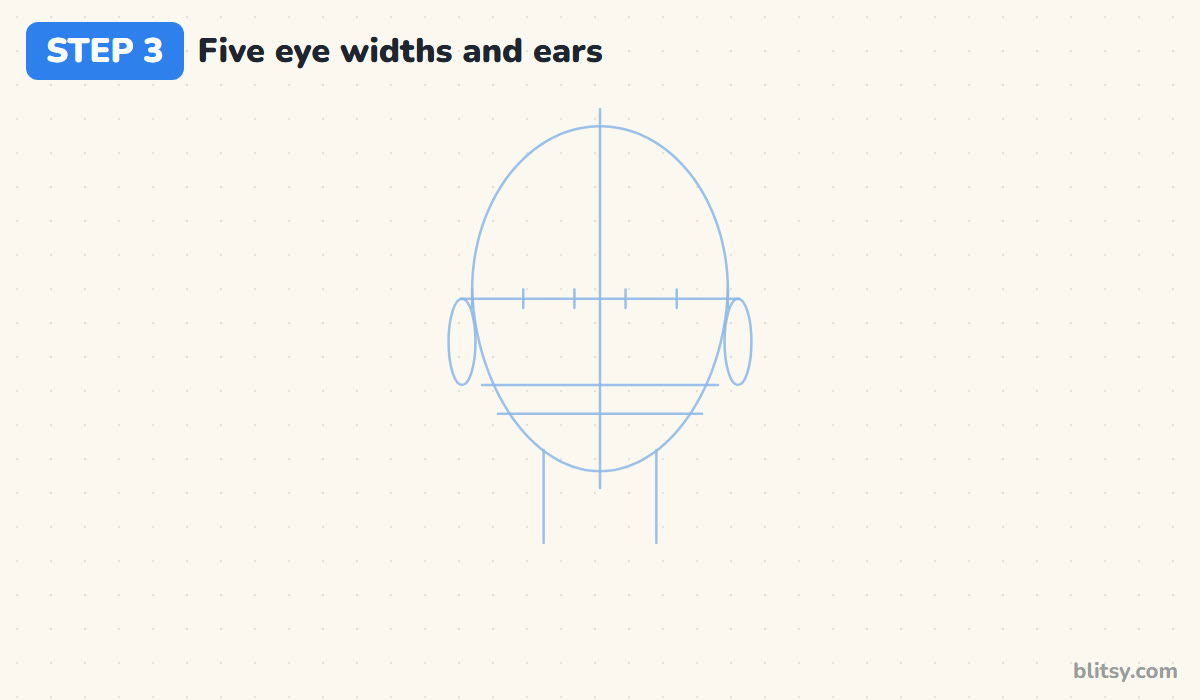
Across the eye line, the head is about five eyes wide. Make four small ticks so the line splits into five equal parts. The eyes will fill the second and fourth spaces, which leaves exactly one eye width between them. Next, draw a narrow oval on each side of the head, from the eye line down to the nose line. Drop two neck lines from below the jaw.



💡 Tip: Space the ticks by eye first, then check them with your pencil held against the paper as a measuring stick.
Step 4: Shape the cheeks, jaw and chin
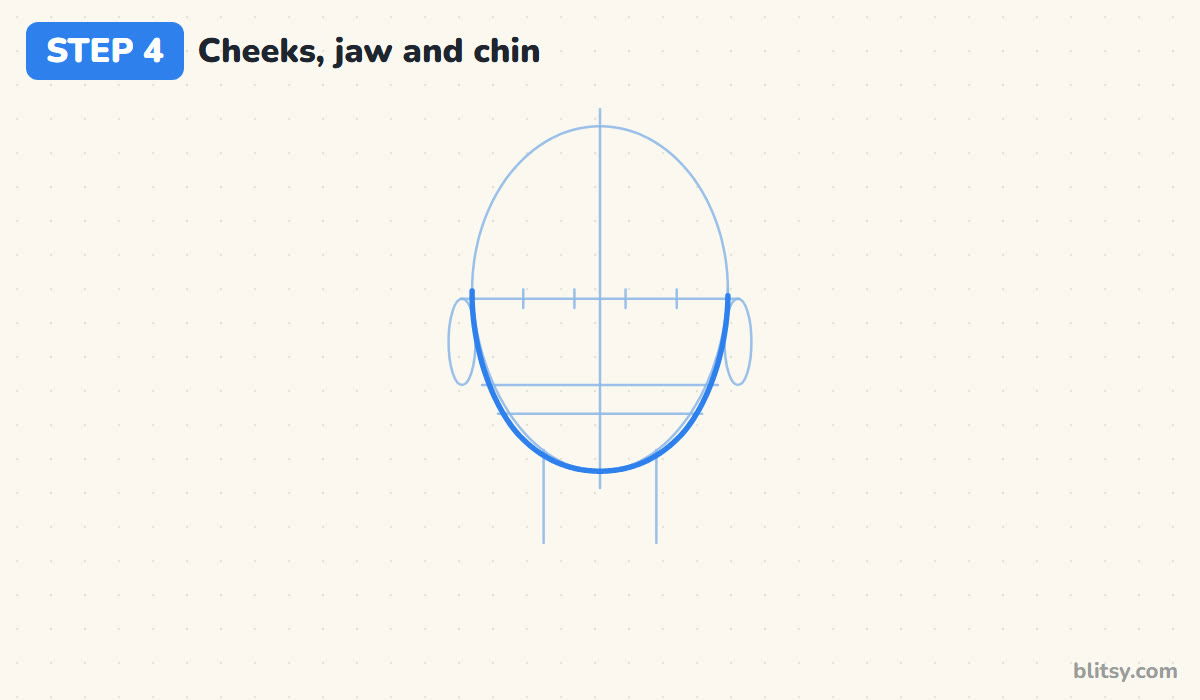
Now make the face more human than an egg. Starting at the eye line on each side, draw the cheek down and slightly in, round off a soft jaw corner level with the mouth, and meet at a gently rounded chin on the center line. I keep it smooth, because sharp angles add years to a young face.
💡 Tip: Draw one side, then the other while glancing back at the first. Comparing as you go keeps the jaw even.
Step 5: Draw the ears, neck and collar
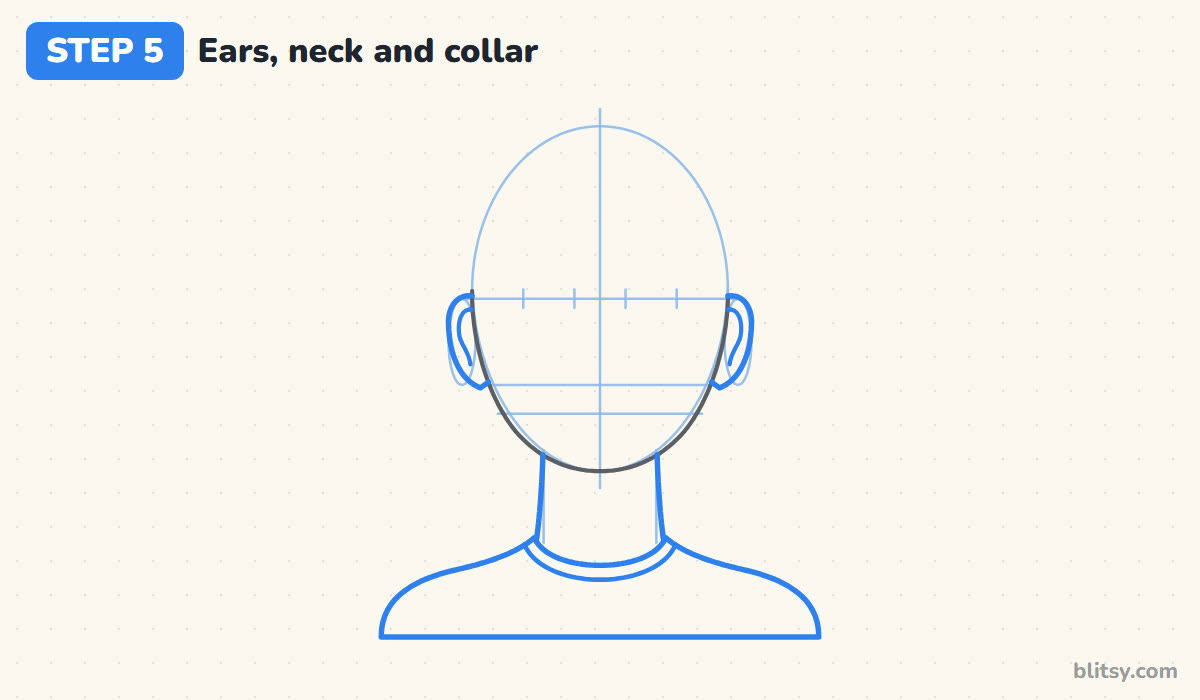
Trace each ear over its oval as a C shape, plus one curve inside for the rim. Follow the neck guides, curving the lines in a touch so the neck looks soft rather than like a tube. Finish with sloping shoulders and a round crew-neck collar with a second line inside it.
💡 Tip: The neck is a little narrower than the jaw. A neck as wide as the face looks like a tree trunk.
Step 6: Sketch a short side-swept hairstyle
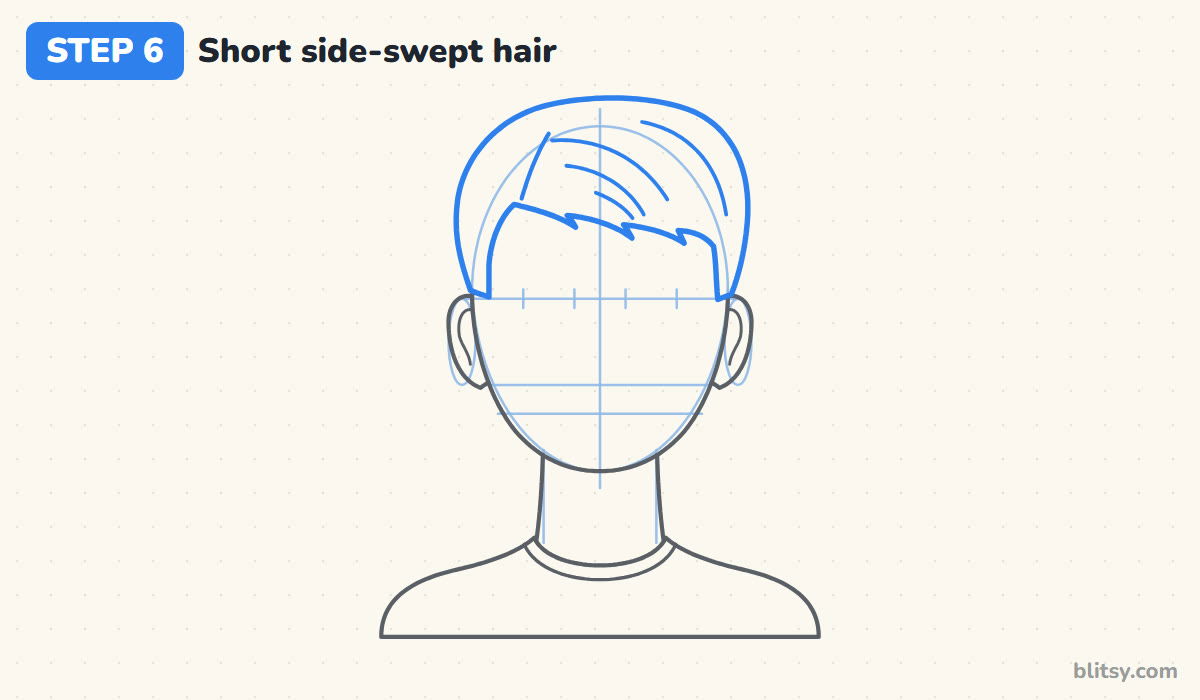
Hair sits on top of the skull, so start the outline a finger's width above the egg and wrap it down to just above each ear. For the fringe, begin at a side part on the left and sweep a zigzag edge down to the right, ending each lock in a soft point above the brows. Add the part line and a few curved strand lines that follow the sweep.
💡 Tip: Keep the strand lines few and curved in the same direction. Three or four say hair; twenty say scribble.
Step 7: Draw almond eyes with irises
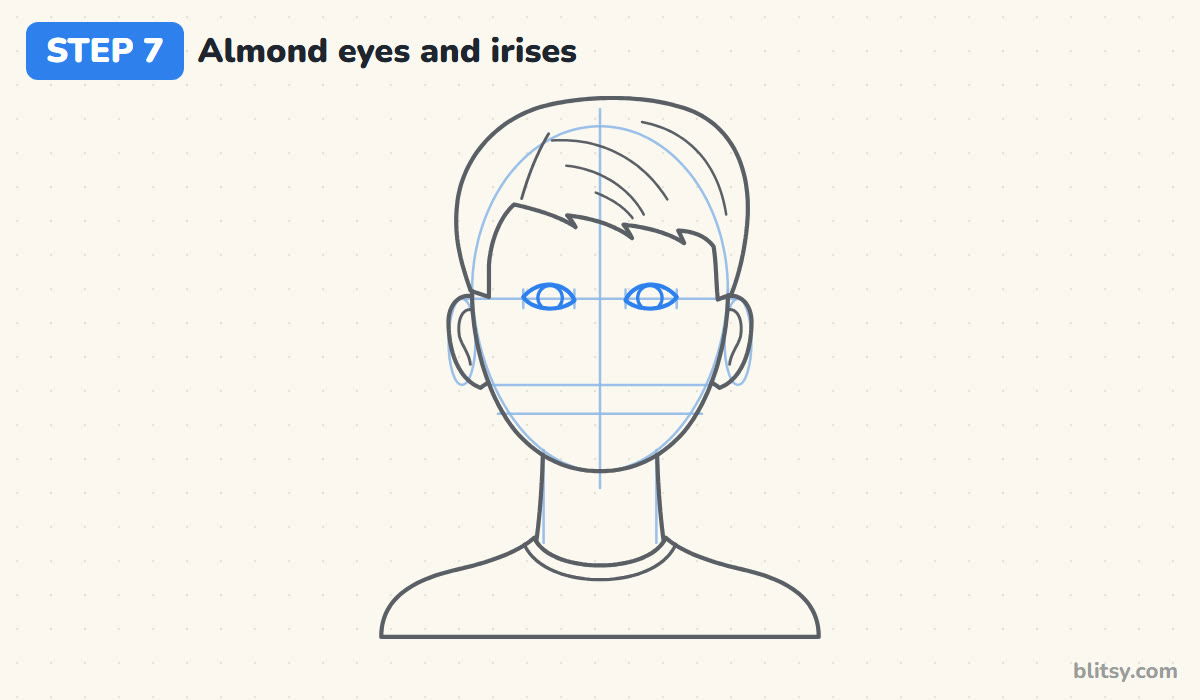
In the second and fourth spaces on the eye line, draw two almond shapes. The top lid arches higher than the bottom one, and its highest point sits a bit toward the nose. Then add a round iris in each eye, big enough that it almost touches both lids.


💡 Tip: Draw both upper lids first, then both lower lids. Working in pairs keeps the eyes matching.
Step 8: Add pupils, lid creases and eyebrows
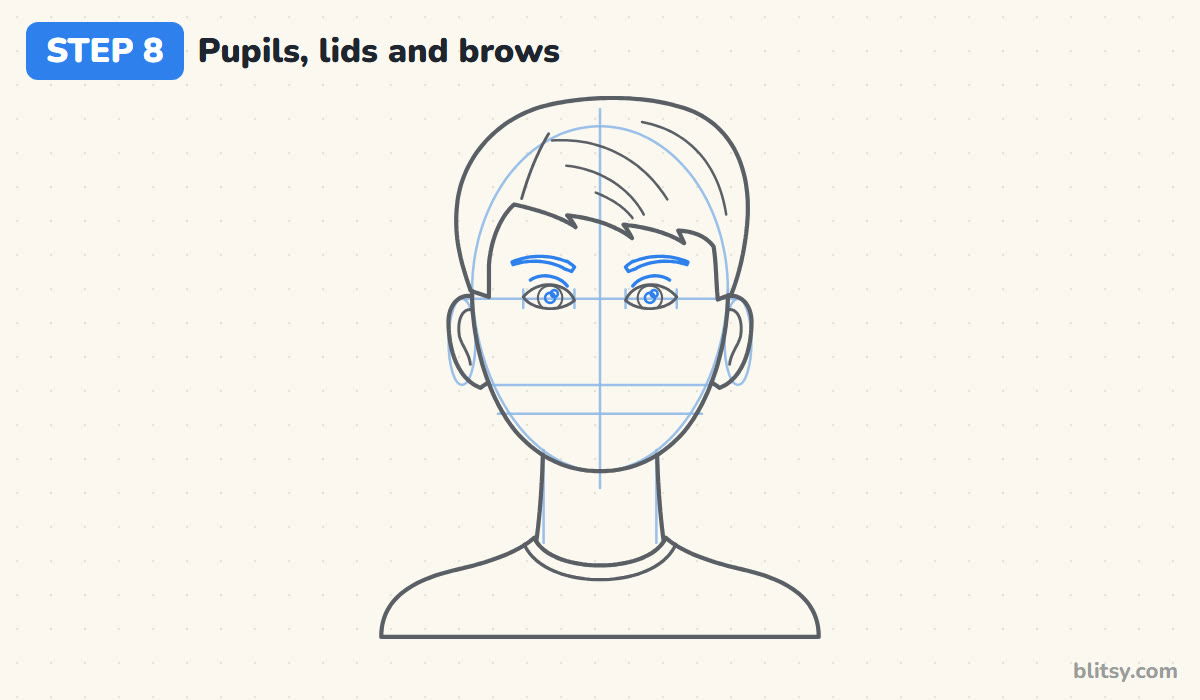
Put a dark pupil in each iris and a tiny shine circle placed up and to the same side in both eyes. A thin curve above shows the lid crease. The eyebrows sit higher still: thicker at the inner end, thinning toward the outer end with a gentle arch.
💡 Tip: Shines on opposite sides make the eyes look crossed. Copy the exact spot from one eye to the other.
Step 9: Draw the nose wings and tip
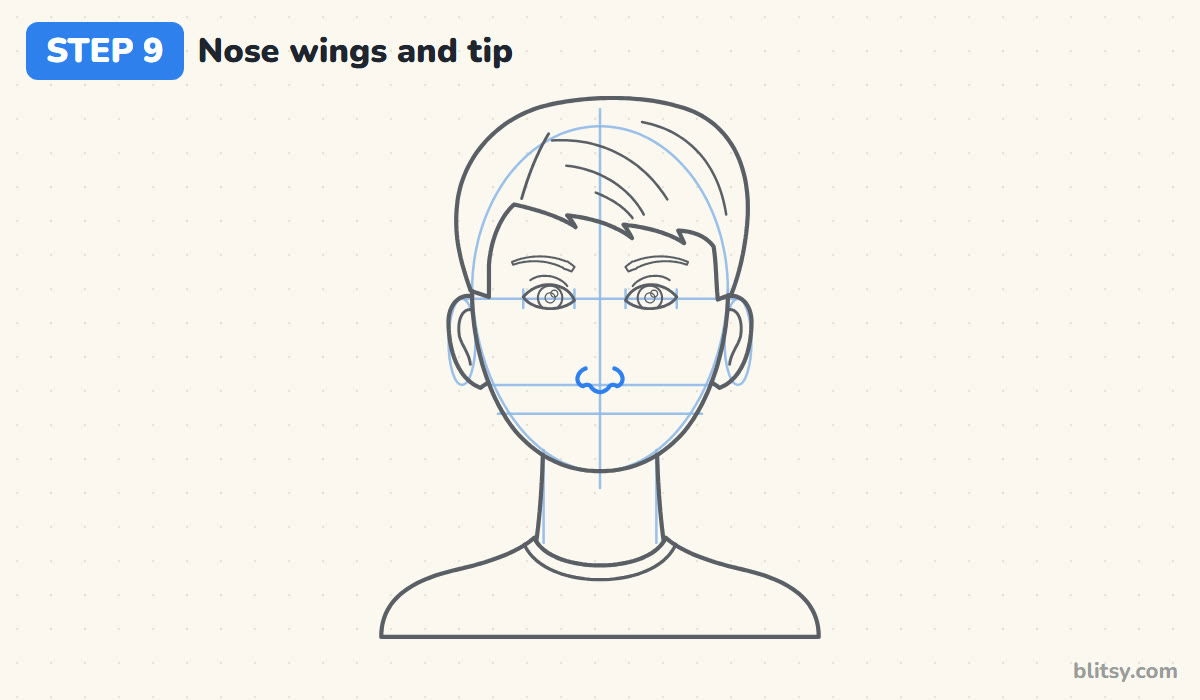
A front-view nose is mostly its bottom edge. On the nose line, draw a small rounded C for each nostril wing, then a little curve under the center for the tip, with tiny nostril hooks linking them. The wings line up roughly with the inner corners of the eyes. I skip the bridge line entirely; the shadow under the tip shows enough.
💡 Tip: Keep the nose small and light. A heavy nose outline pulls all the attention away from the eyes.
Step 10: Add the upper and lower lip
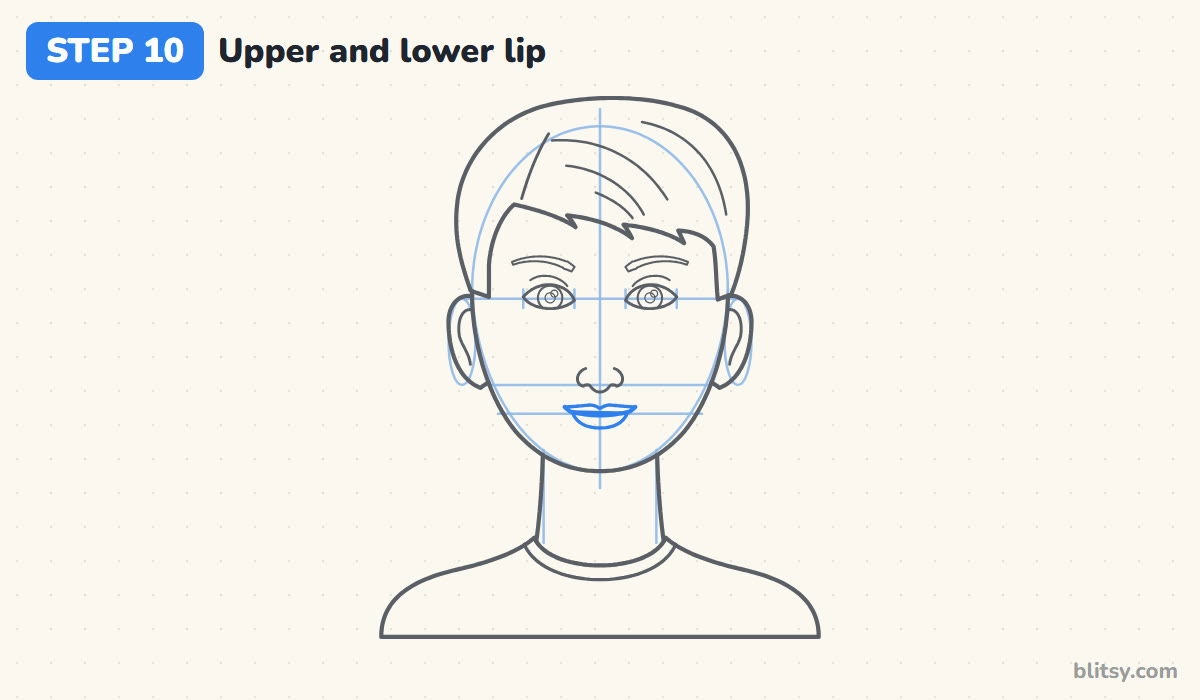
On the mouth line, draw the line between the lips first, curving the ends up slightly for a relaxed smile. Above it, add the upper lip with a soft dip in the middle. Below, a fuller curve makes the lower lip. The mouth is a bit wider than the nose, with its corners about under the irises.
💡 Tip: Draw the middle line darker than the outer lip lines. That's where the shadow actually sits.
Step 11: Ink the lines and erase the guides
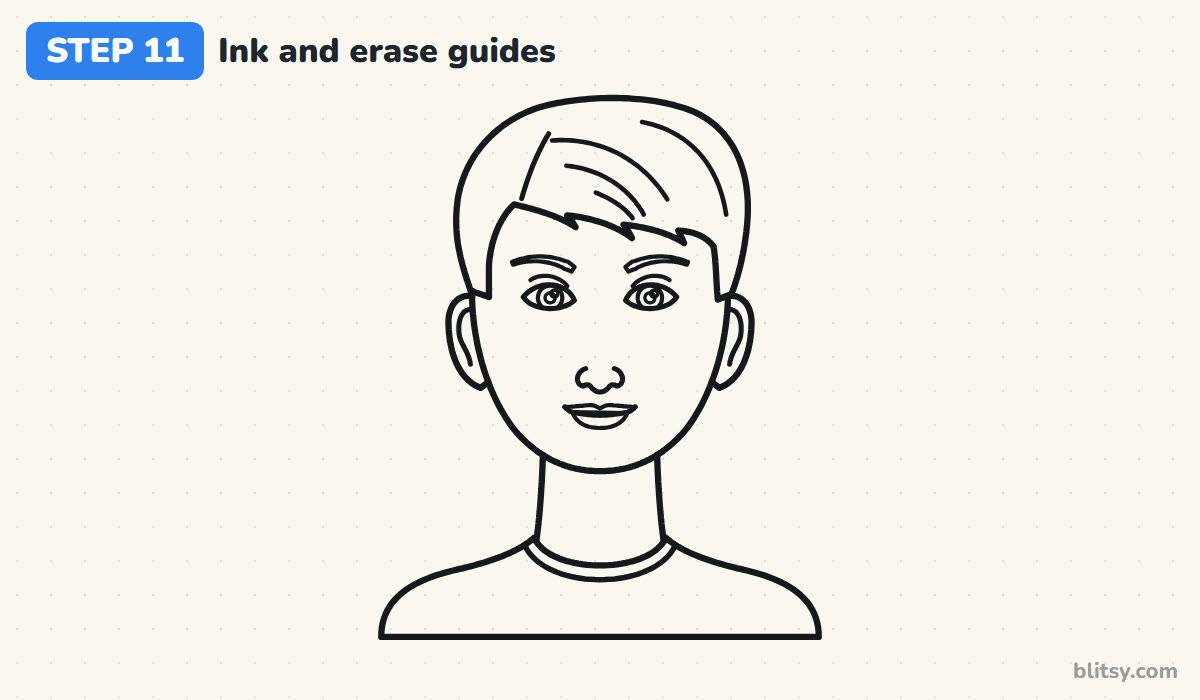
Trace every keeper line with your black pen, from the hair down to the collar. Leave all the measuring lines alone. Wait a minute for the ink to dry, then erase all the pencil underneath.
💡 Tip: Ink the small features with lighter pressure than the outline. Thinner lines keep the face gentle.
Step 12: Color the portrait
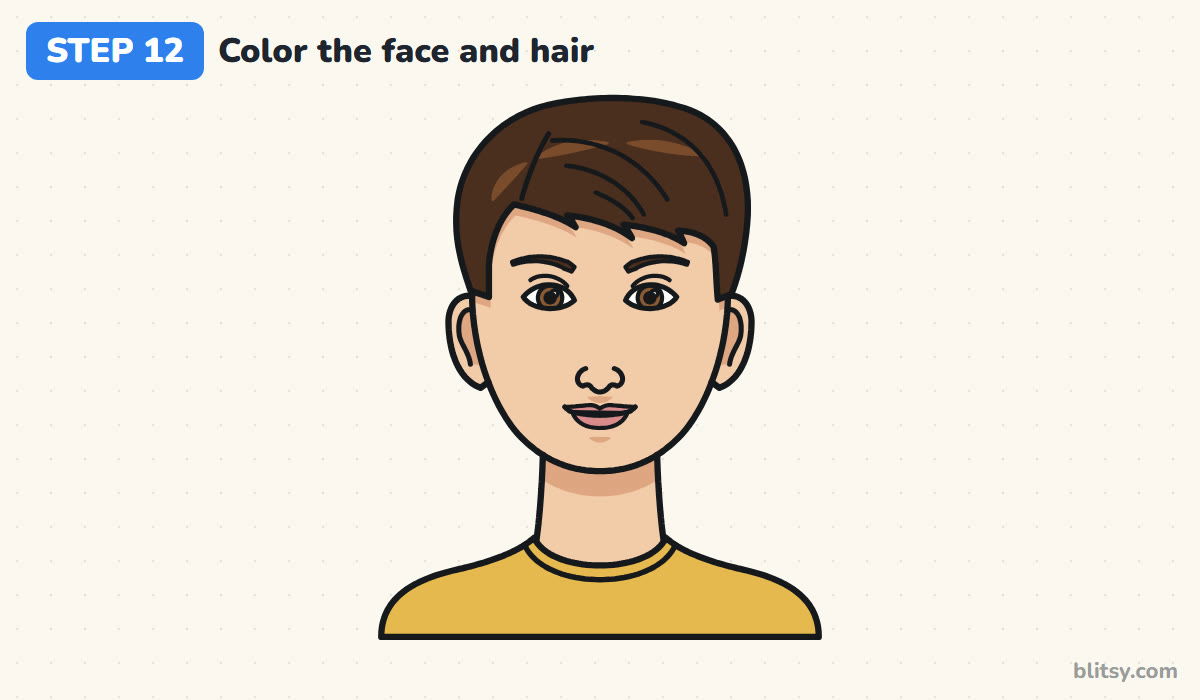
Fill all the skin with peach, then add tan just under the fringe, under the jaw on the neck, under the nose and below the lower lip. Those patches make the face look round. Then do the lips in pink, the irises in light brown and the hair in dark brown with a lighter shine. I finish with a yellow shirt.
💡 Tip: Leave the eye whites and the shine dots uncolored. White paper is brighter than any pencil.
Proportion Slips That Make Faces Look Odd
- Eyes placed too high. It's the classic one. Measure the head and keep the eye line at the halfway point, even if it feels low.
- Eyes too close or too far apart. Use the five eye widths rule, with one empty eye width between the eyes.
- Ears floating above the eyes. The tops of the ears line up with the eye line and the bottoms with the nose line.
- A pencil-thin neck. Let the neck come from under the jaw corners, only a little narrower than the jaw itself.
- Outlining the whole nose. Long side lines make it look like a beak. Draw the wings and tip, then let shading do the rest.
A Different Person on the Same Guides
The guide lines stay the same for nearly everyone, so the fun is in what you hang on them. Try a rounder jaw for a younger child, longer hair, or glasses resting on the nose line. When I sketch friends, swapping the colors is my quickest trick for a likeness. If the nose still gives you trouble, the nose drawing tutorial breaks it into small shapes, and once front views feel natural, the side profile drawing tutorial shows a face turned sideways.
Printable Face Coloring Page and Step Guide
Want to practise away from the screen? The free face coloring page has the finished portrait in bold outlines, a colored example to copy and a key for every color. The step-by-step PDF guide holds all twelve steps with their tips, two to a page, ready to print.
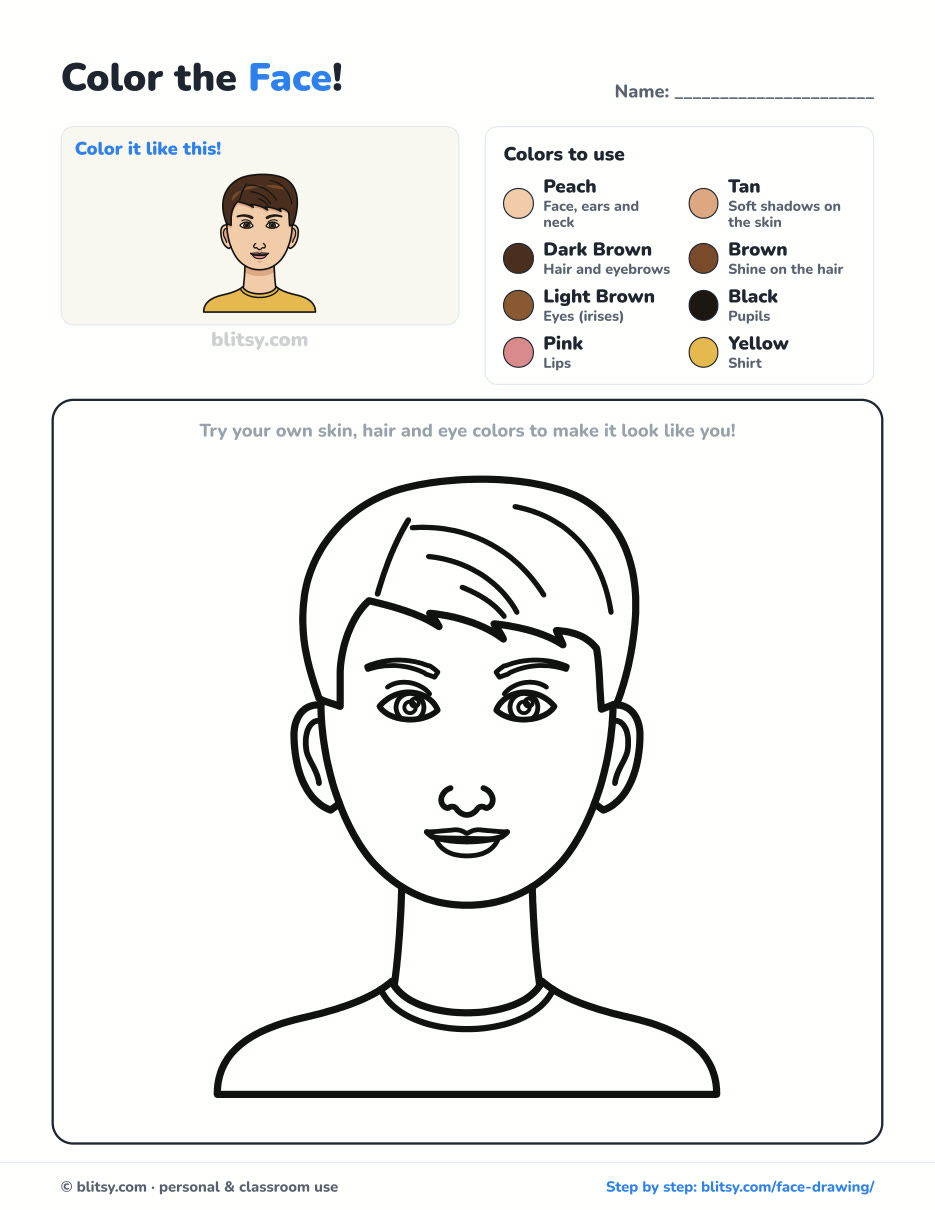
Black outlines with a colored example and the color names at the top. Ready to print and color.
⬇️ Download Coloring PageEvery step picture with its instructions and tips, to keep beside your paper while you draw.
⬇️ Download Drawing Guide📱 On a phone? Tap a download button, then open the file and choose Share → Save to Files or Print. On a computer, the PDF opens or saves straight to your Downloads folder.
Keep the Face Proportion Steps Handy
Face Drawing Questions From Beginners
What is the easiest way to draw a face?
Start with an egg and a center line, then mark the eye line halfway down, the nose line halfway between the eyes and chin, and the mouth line a third of the way below that. The features fall into place on those lines.
Where do the eyes go on a face?
Halfway between the top of the head and the chin. Across that line the head is about five eyes wide, with one eye width between the two eyes.
How can kids learn to draw faces?
Keep the guide lines and skip the small details. Round eyes and a simple smile on the same lines still look right.
Do these proportions work for every face?
They're an average, not a rule. Nudging the eyes, nose or jaw away from the guides is exactly how you make a portrait look like a specific person.
Draw it once with the guides, then try a second face where you change just one thing, and notice how much that single change says. 🙂✏️
Related posts:
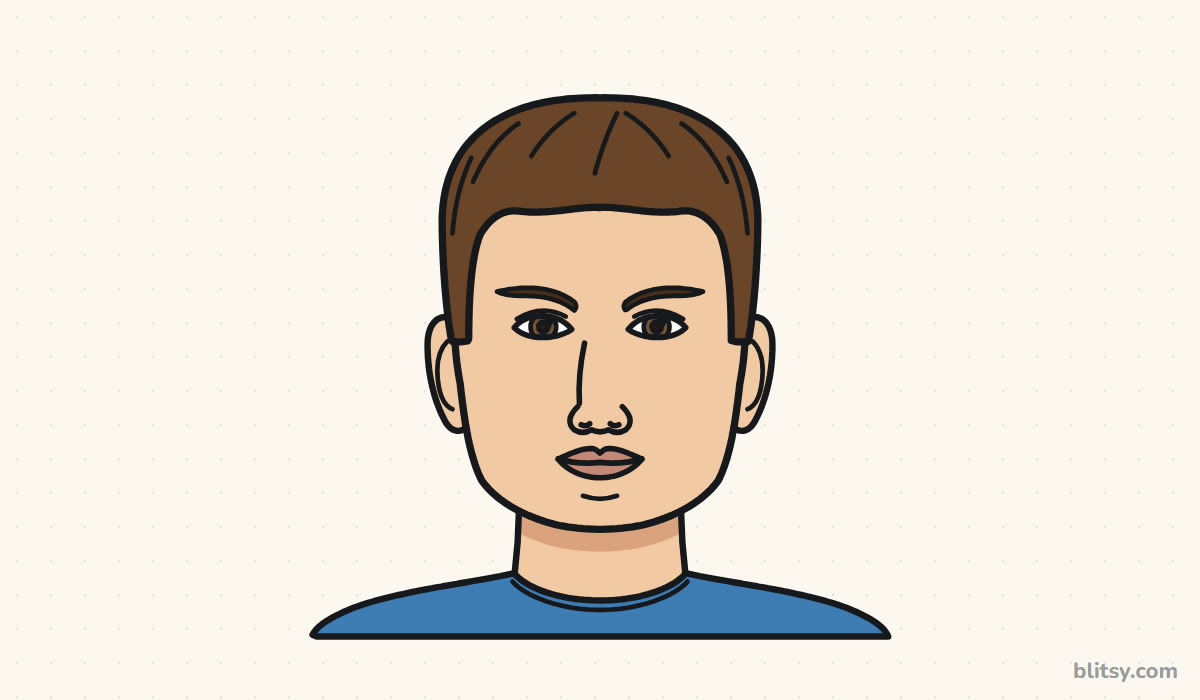 How to Draw a Male Face Step by Step (Easy Proportions)
 How to Draw a Woman Step by Step (Easy Body Proportions)
 How to Draw an Anime Girl Step by Step (Easy Face Guide)
 How to Draw a Cat Face Step by Step (Easy Tabby Guide)
 How to Draw Anime Step by Step (Easy Anime Boy Face)
 How to Draw a Sad Cat Step by Step (Easy Sad Face Lesson)
 How to Draw Luffy Step by Step (Easy Straw Hat Guide)
 How to Draw Todoroki Step by Step (Easy Fire and Ice Guide)
 How to Draw a Snow Leopard Step by Step (Easy Guide)
 How to Draw a Side Profile Step by Step (Easy Head Guide)
 How to Draw a Jellyfish Step by Step (Cute, Easy Guide)
 How to Draw a Magnolia Flower Step by Step (Easy Guide)

