
A big round head and a tiny body. That one choice turns a tricky horse into something any kid can manage, and it's the reason I teach unicorns in this chibi style. Below you'll find how to draw a unicorn step by step, from two light circles to a finished pony with a golden horn, a curly pastel mane and one hoof raised as it prances on a cloud. Nothing here needs real horse anatomy, just round shapes plus a few curls.
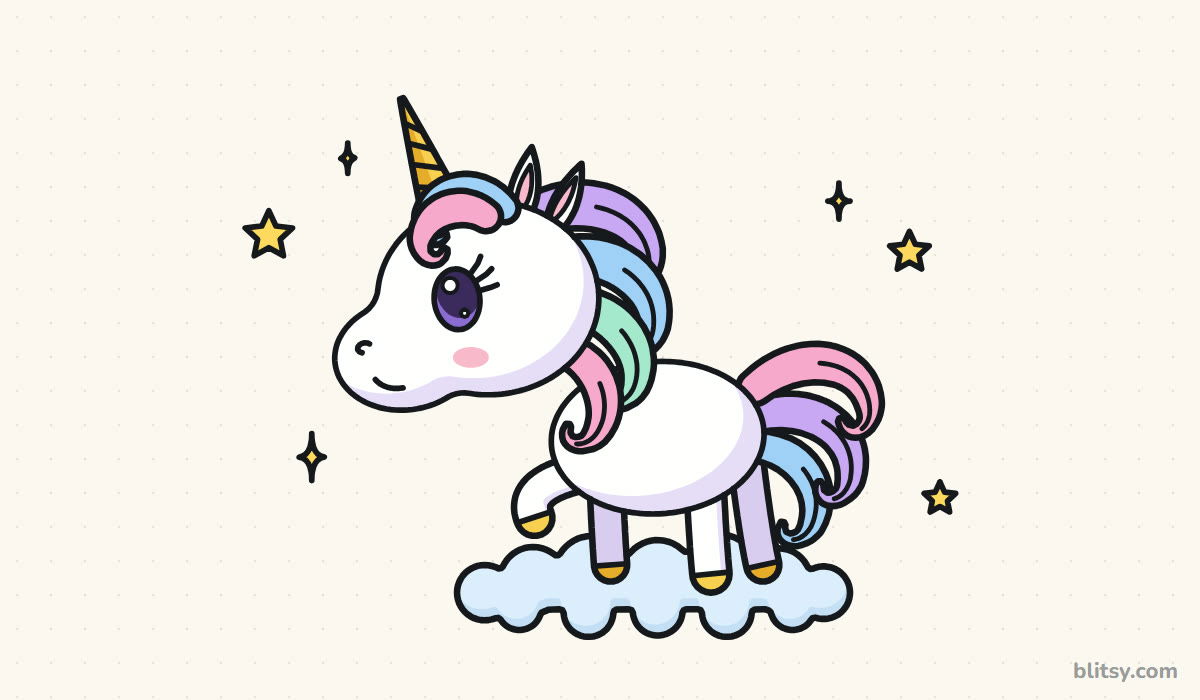
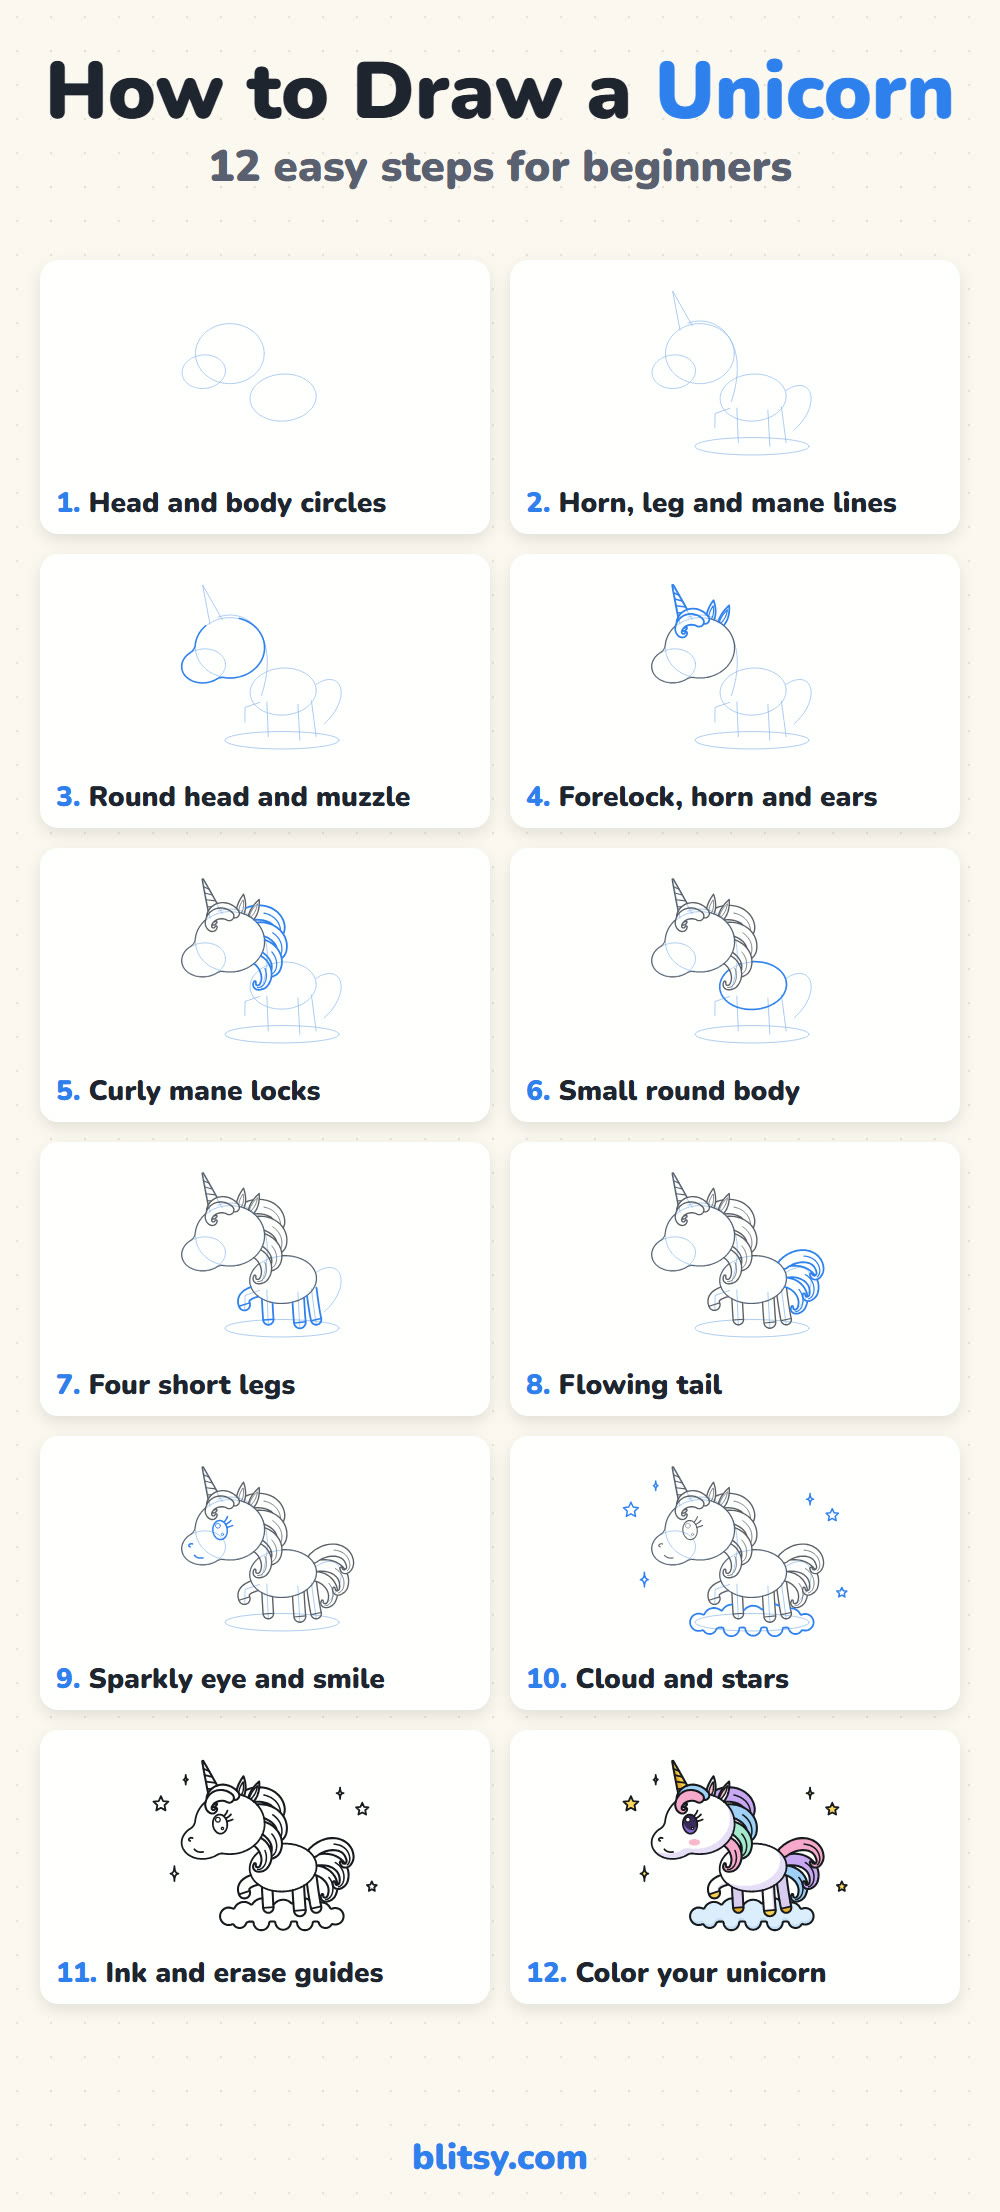
Every picture builds on the one before it. What's new is drawn in blue, and everything from the steps before stays gray, so it's easy to spot what changed. Draw the blue part on your own paper before you scroll on.
Quick overview
⏱️ Time: 35 to 45 minutes
🎯 Level: easy, good for kids about 6 and older
✏️ Steps: 12
🦄 You'll draw: a chibi unicorn with a spiral horn and a rainbow mane, prancing on a cloud
Stocking Up for a Pastel Unicorn
- A pencil (an HB is fine)
- A soft eraser that won't smear
- A black fineliner or thin marker for the outline
- Colored pencils or markers in pastel shades plus a gold or yellow
- Plain white paper, held sideways
If you only own bright markers, color lightly or leave white gaps so the mane still looks soft.
How to Draw a Unicorn Step by Step
Step 1: Sketch a head circle and a body oval
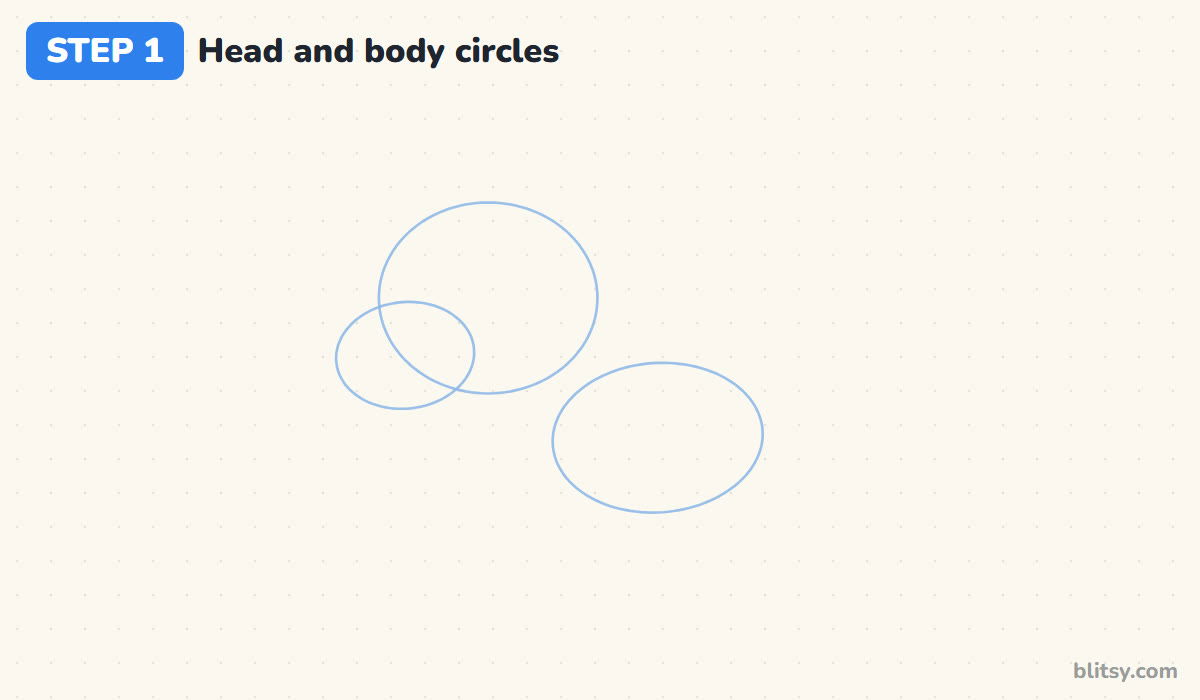
Put a big circle a little left of the middle of the page for the head. Overlapping its lower left side, add a smaller oval for the muzzle. Then draw a wide oval down and to the right for the body. In chibi drawings the head is about as big as the body.
💡 Tip: Hold the pencil further back from the tip. Your lines come out lighter without trying.
Step 2: Sketch the horn, leg and mane guides
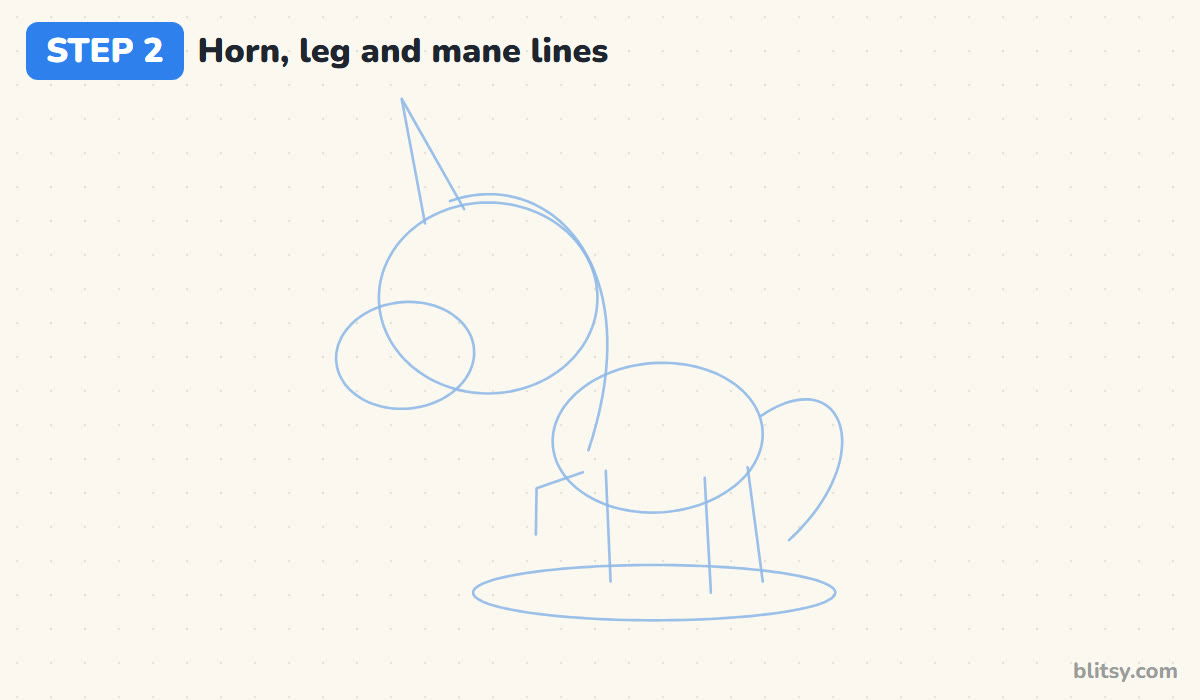
From the top front of the head, draw a tall, thin triangle leaning forward for the horn. Under the body, drop three short straight lines for the standing legs and a bent line for the front leg that's lifted. Then sweep one long curve down the back of the head for the mane, a loop off the rump for the tail, and a flat oval at the bottom for the cloud.
💡 Tip: Check the lifted leg line bends forward at the knee, like a pony stepping up a stair.
Step 3: Draw the round head and muzzle
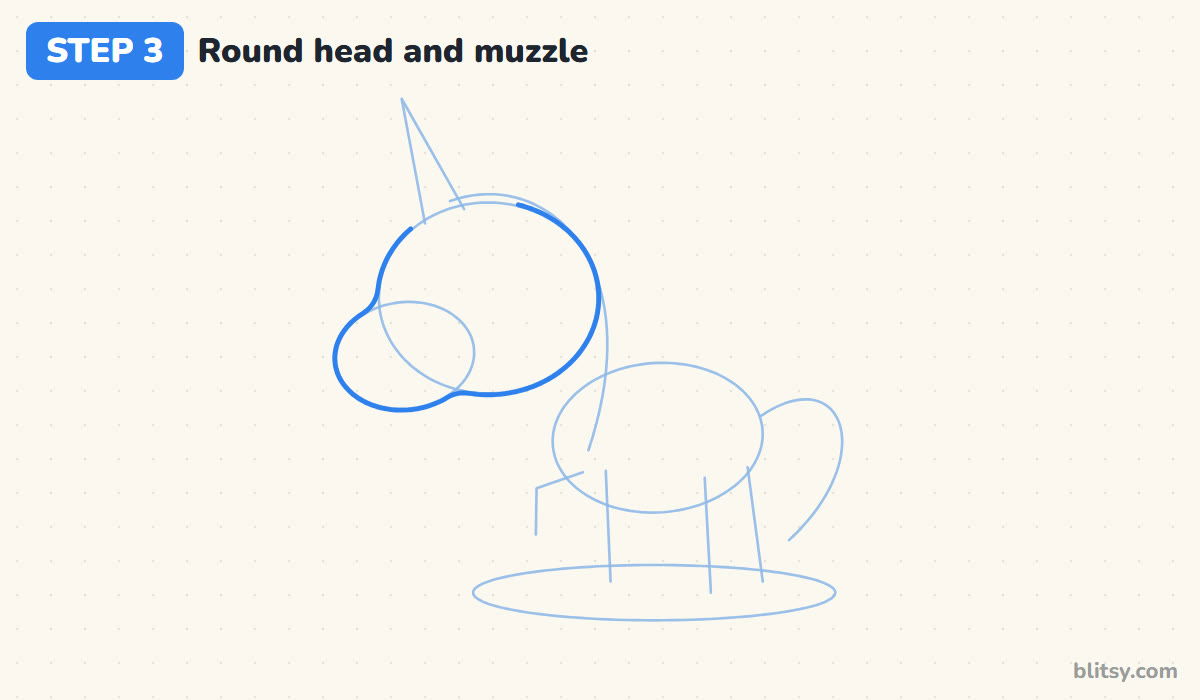
Trace around both head shapes as one smooth outline. Where the muzzle meets the forehead, let the line dip in just slightly, then round out again over the nose and chin. I leave a gap along the top of the head, because the forelock and ears will sit there and I don't want to erase a finished line later.

💡 Tip: Turn your paper so your hand curves naturally around the big circle.
Step 4: Add the forelock, spiral horn and ears
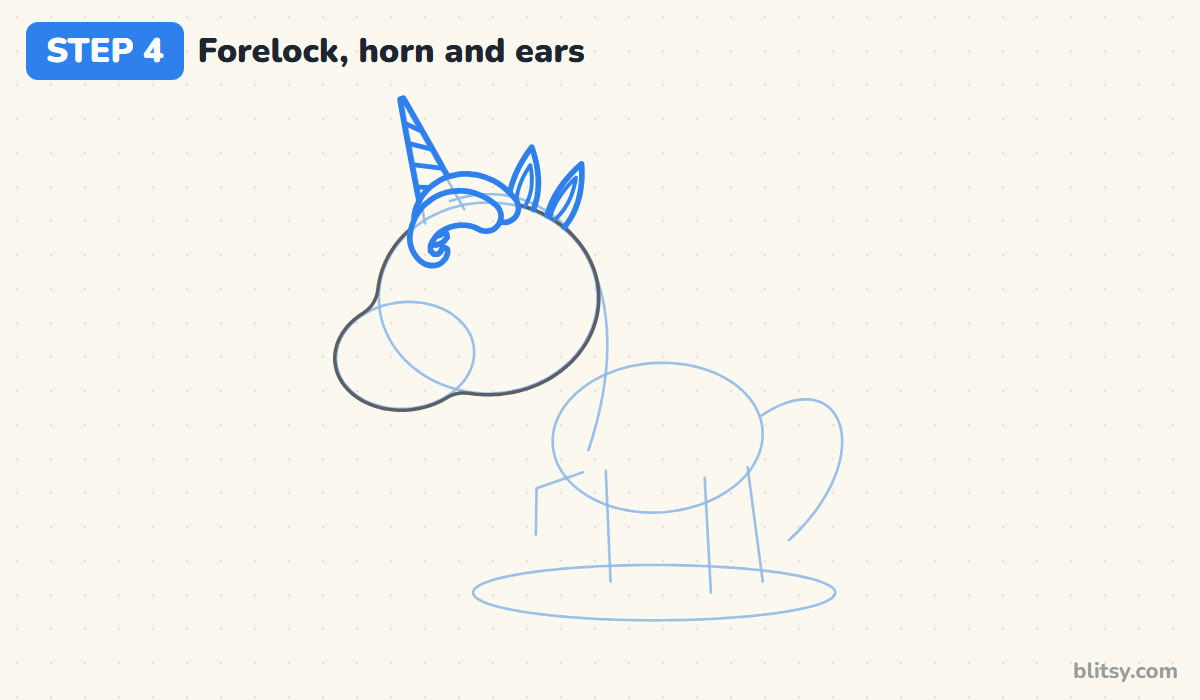
Start with the forelock: a fat comma shape that sweeps from the top of the head over the forehead and curls back up at its tip, with a second lock peeking out behind it. Now draw the horn on its guide as a narrow cone growing out from behind the forelock. Cross it with four slanted lines, all leaning the same way, to make the spiral. Finish with two small pointed ears behind the forelock, each with a thin inner line.
💡 Tip: Slant every spiral line in the same direction, or the horn will look like a ladder.
Step 5: Draw the curly mane locks
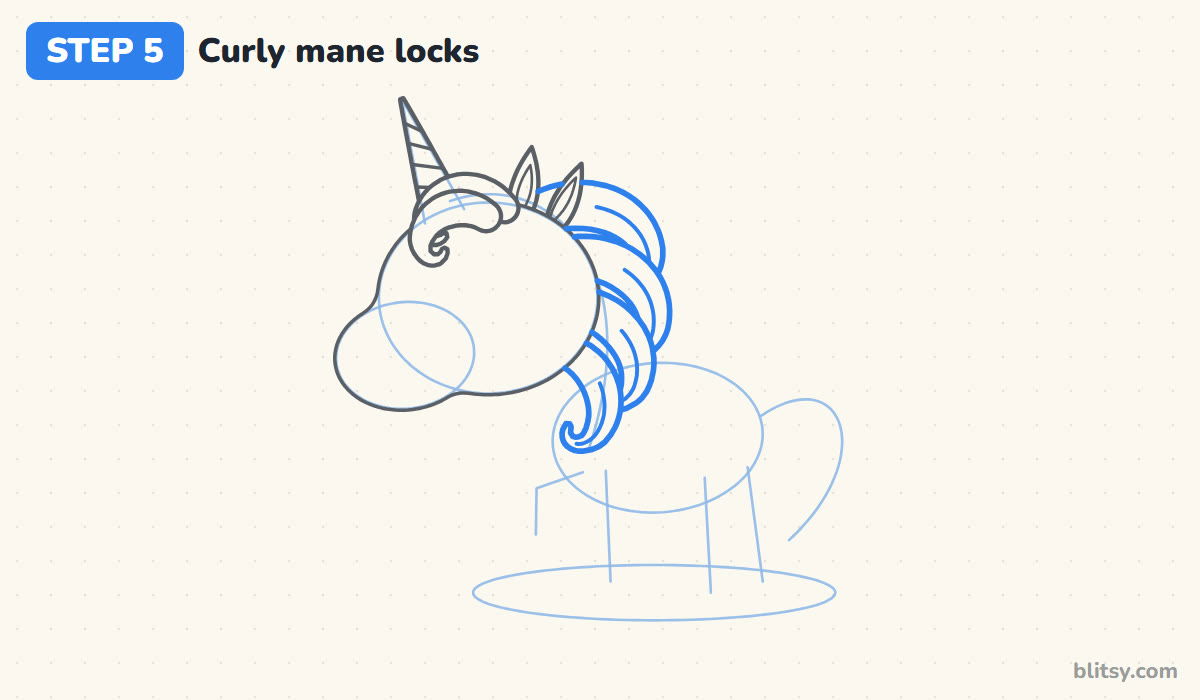
Down the back of the head, stack four locks of hair. Each one is a thick teardrop that bends outward, thins out, then curls back in at the end. Make the top lock the biggest and let them shrink as they go down toward the body. Add one thin line inside each lock, following its curve, to show the strands.
💡 Tip: Overlap each lock slightly with the one above it. Separate blobs look like balloons, not hair.
Step 6: Shape the small round body
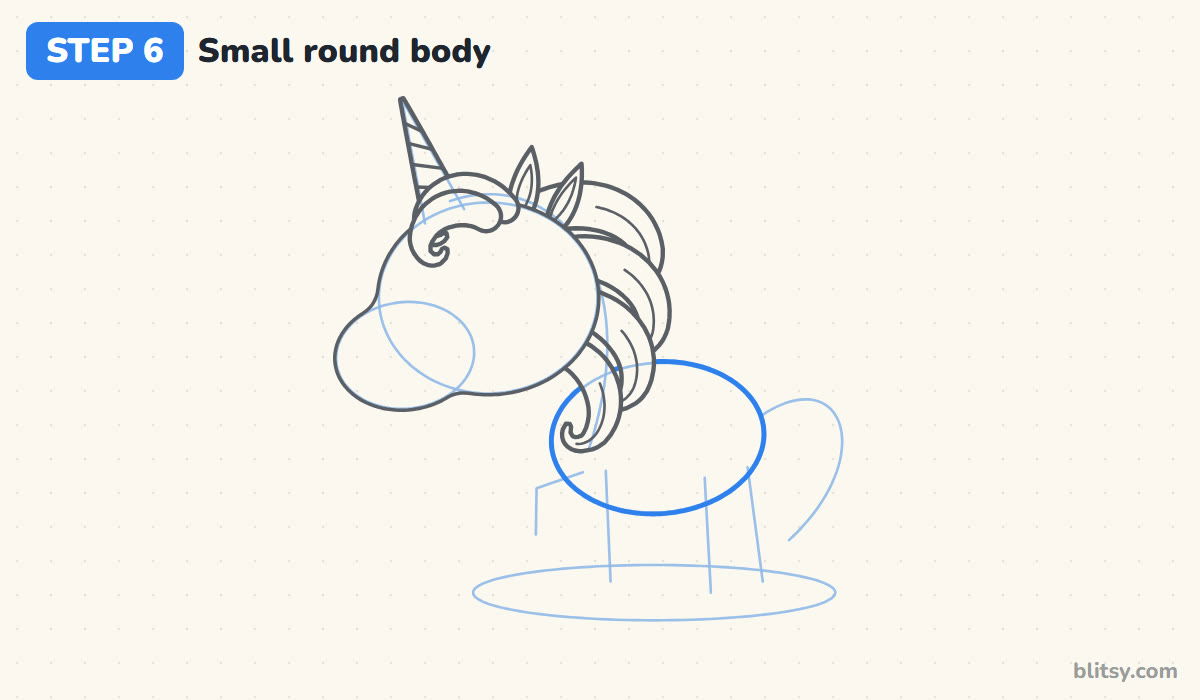
Follow the body oval, but stop the line wherever it meets the mane, so the hair looks like it's lying on top of the back. Keep the body plump and short. A long, horse-like body ruins the cute proportions.
💡 Tip: Compare the body width to the head now. They should look about equal.
Step 7: Add four short legs with hooves
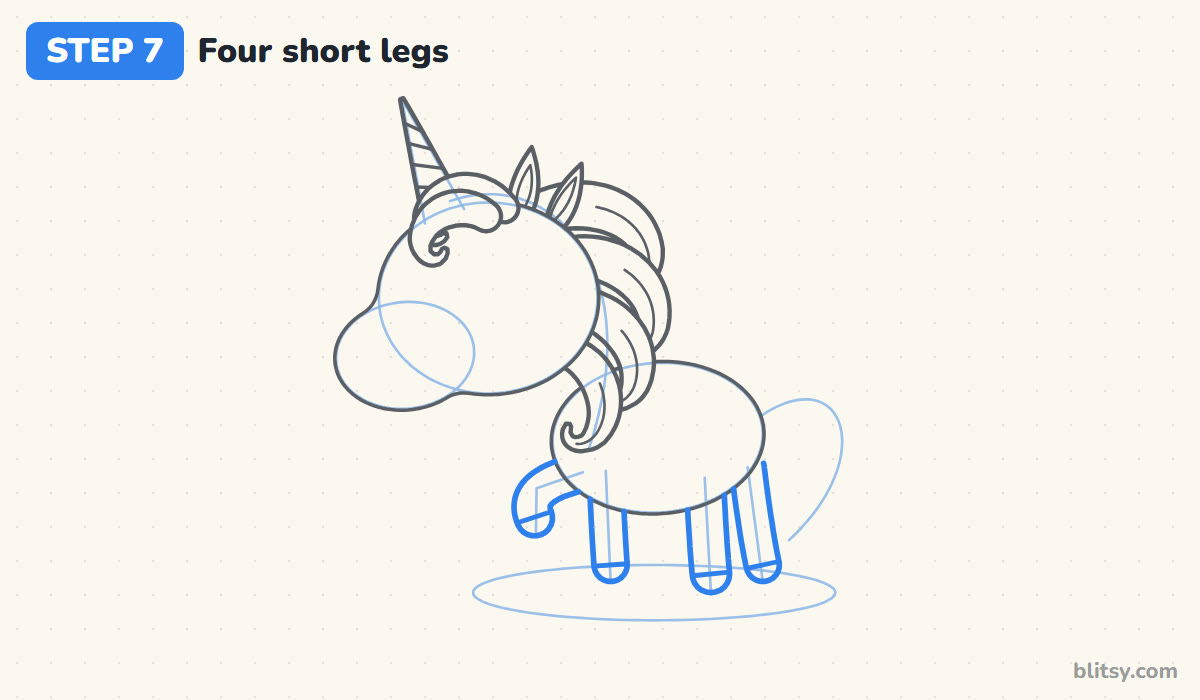
Draw the three standing legs as short tubes with rounded ends, coming out from under the belly. The two at the back sit close together, one partly behind the other. The lifted front leg bends forward at the knee and hangs its hoof in the air. Across the bottom of every leg, draw a line to mark off the hoof.

💡 Tip: Stubby legs are the point here. Stop each one only a little below the belly.
Step 8: Draw the flowing tail
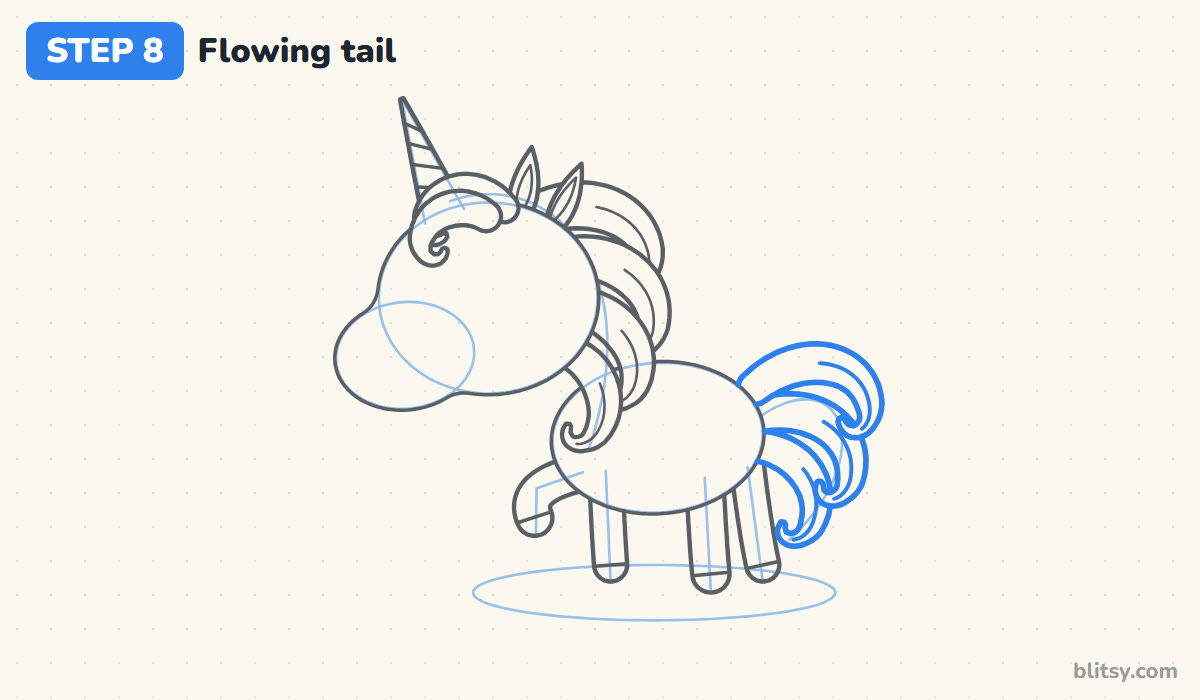
The tail works like the mane, just pointed the other way. From the rump, draw three curly locks fanning out and down, the top one arching highest. Each lock tapers and curls inward at its tip. Add a strand line inside each one, just like the mane.
💡 Tip: Let the bottom tail lock tuck behind the back leg. It makes the tail feel attached.
Step 9: Give it a sparkly eye and a smile
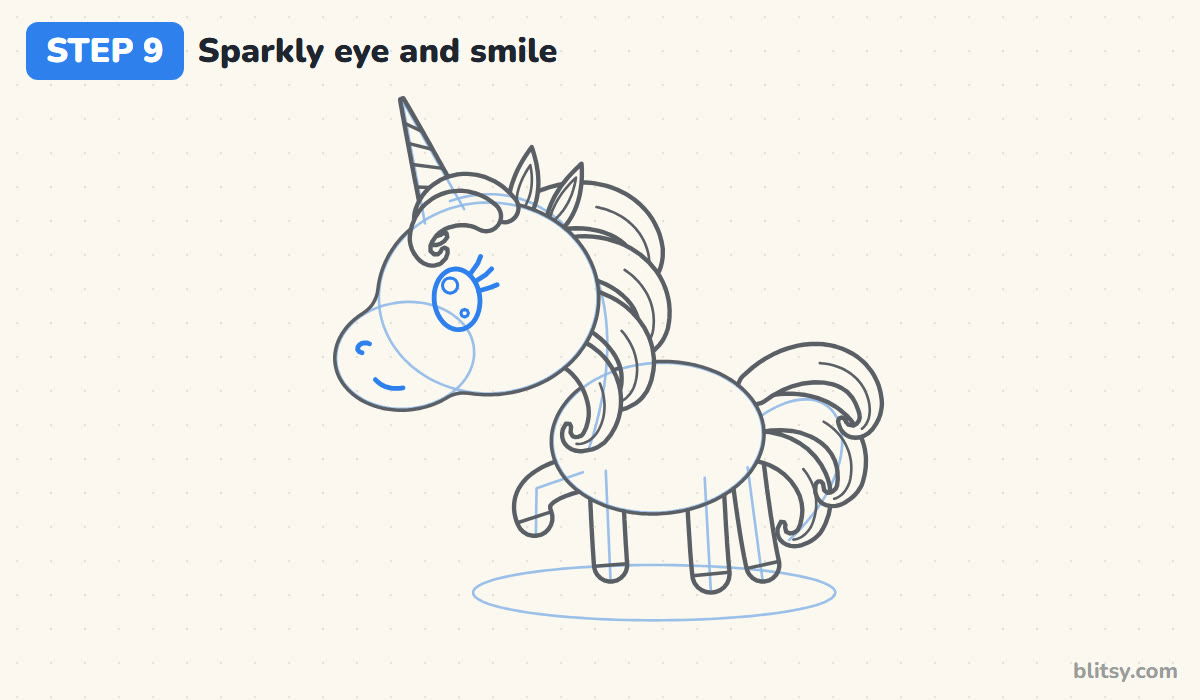
Place a tall oval eye just under the forelock, roughly in the middle of the head. Inside it, draw one big circle near the top and a tiny one lower down for the sparkle. Add three lashes flicking out from the back corner. On the muzzle, a small curved line becomes the nostril, and a short upward curve near the chin makes the smile.
💡 Tip: Keep the eye big. Shrinking it is the fastest way to lose the cute look.
Step 10: Add the cloud and some stars
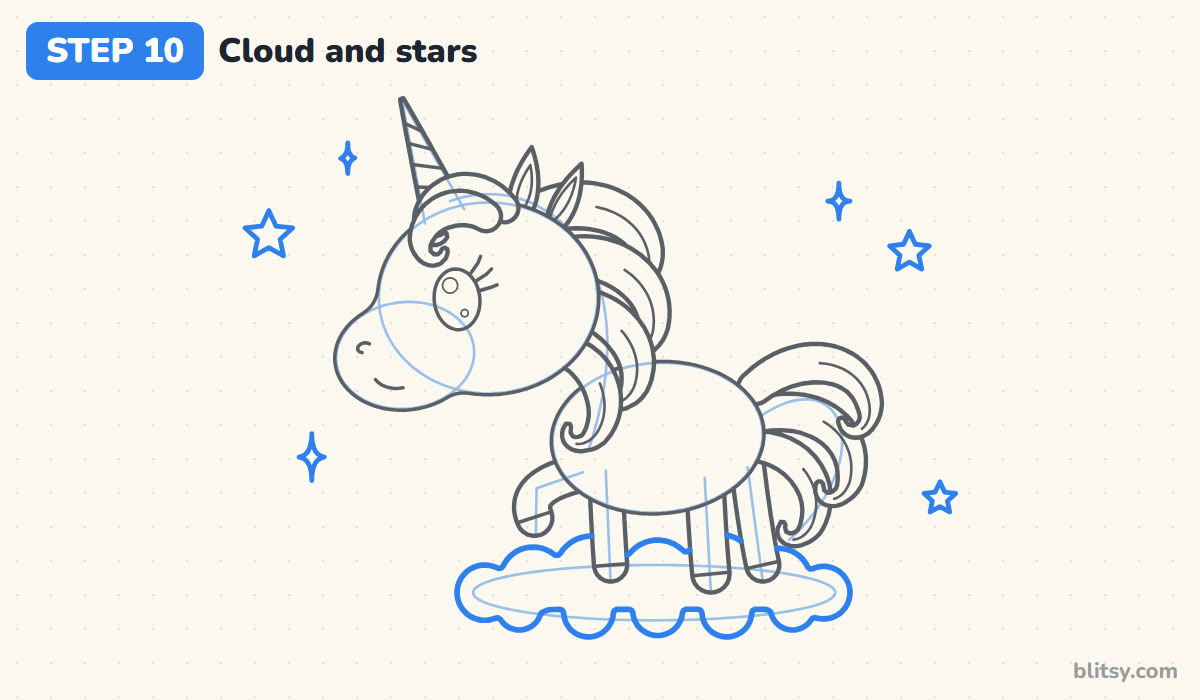
Around the cloud guide, draw a row of bumpy puffs along the top and smaller bumps along the bottom. Stop the line wherever a hoof stands in front of it. Then scatter a few five-point stars and four-point sparkles in the empty space around the unicorn, some big, some small.
💡 Tip: Use an odd number of stars and spread them unevenly. It looks less like wallpaper.
Step 11: Ink the outline and erase the guides
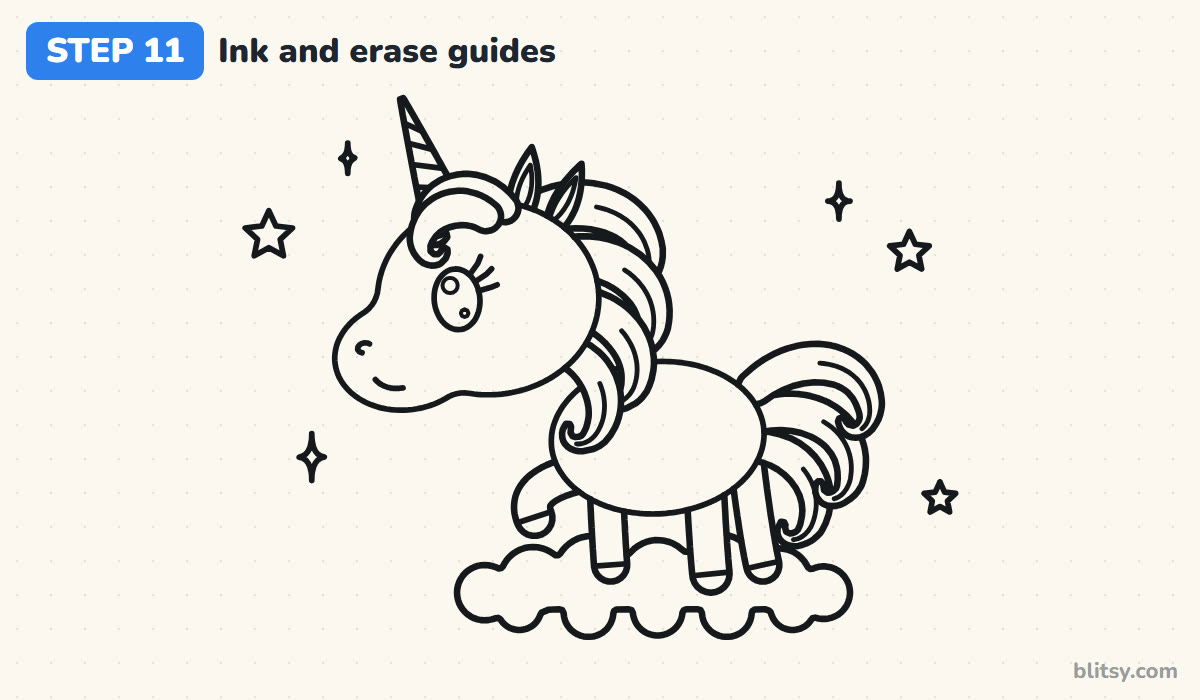
Go over every keeper line with your black pen: the head and horn spiral, the mane strands, the legs, then the cloud with its stars. Skip the circles and guide lines from the first two steps. Wait until the ink is fully dry, then erase all the pencil underneath. My habit is to ink the face first, while my hand is still fresh.

💡 Tip: Pull the pen toward you on long curves. Pushing it makes wobbly lines.
Step 12: Color your unicorn
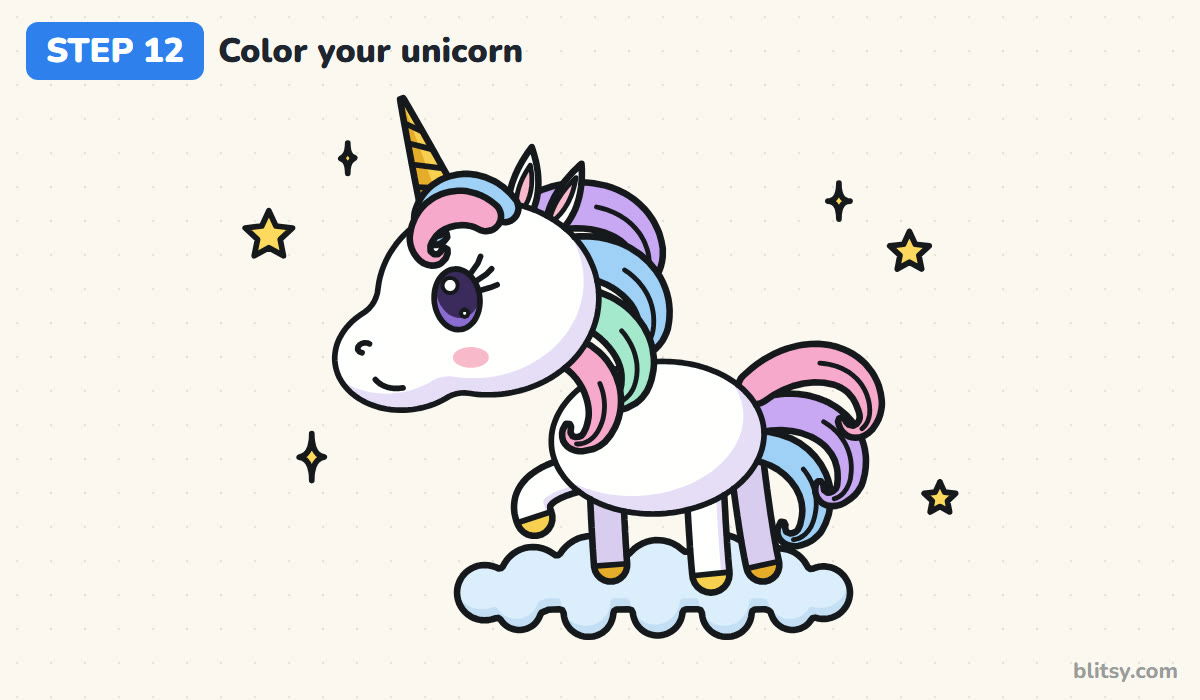
Leave the head and body white, along with the near legs, and shade the lower edges with lavender so the shape looks round. The far legs get lavender all over, which pushes them back. Give each lock its own pastel: pink, purple, light blue and mint. Color the horn and hooves gold, the stars too, the eye dark purple, and add a pink cheek and a pale blue cloud.
💡 Tip: Color each lock in the direction it curls. The strokes then read as hair.
Horn and Mane Slips to Watch For
- A body that's too long. A long horse body makes the head look tiny. Keep the body about as wide as the head.
- A horn growing from the nose. The horn belongs on the forehead, above the eye. Start it at the top front of the head circle.
- Spiral lines going both ways. Crossed lines turn the horn into a net. Slant all of them the same direction.
- Mane locks drawn as one flat shape. Break the mane into separate curls and let them overlap, or it will look like a helmet.
- Dark guide circles. Pressing hard in step one leaves marks you can't erase. Sketch the first shapes very faintly.
Ideas for Giving Your Unicorn a New Look
Once this pose feels easy, change it up. Try a mane in sunset colors, give the unicorn small feathered wings to make it a pegasus-style alicorn, or swap the cloud for a rainbow. Younger kids can skip the strand lines and the cloud bumps and still end up with a sweet drawing. If you'd like a more realistic animal next, practice with the horse drawing tutorial, or pair your unicorn with a royal friend from how to draw a princess step by step.
Free Unicorn Coloring Page and Printable Drawing Guide
The unicorn coloring page shows a colored example at the top, with a key naming each color and where it goes. The step-by-step PDF guide holds all 12 steps with their tips and prints on Letter or A4 paper.
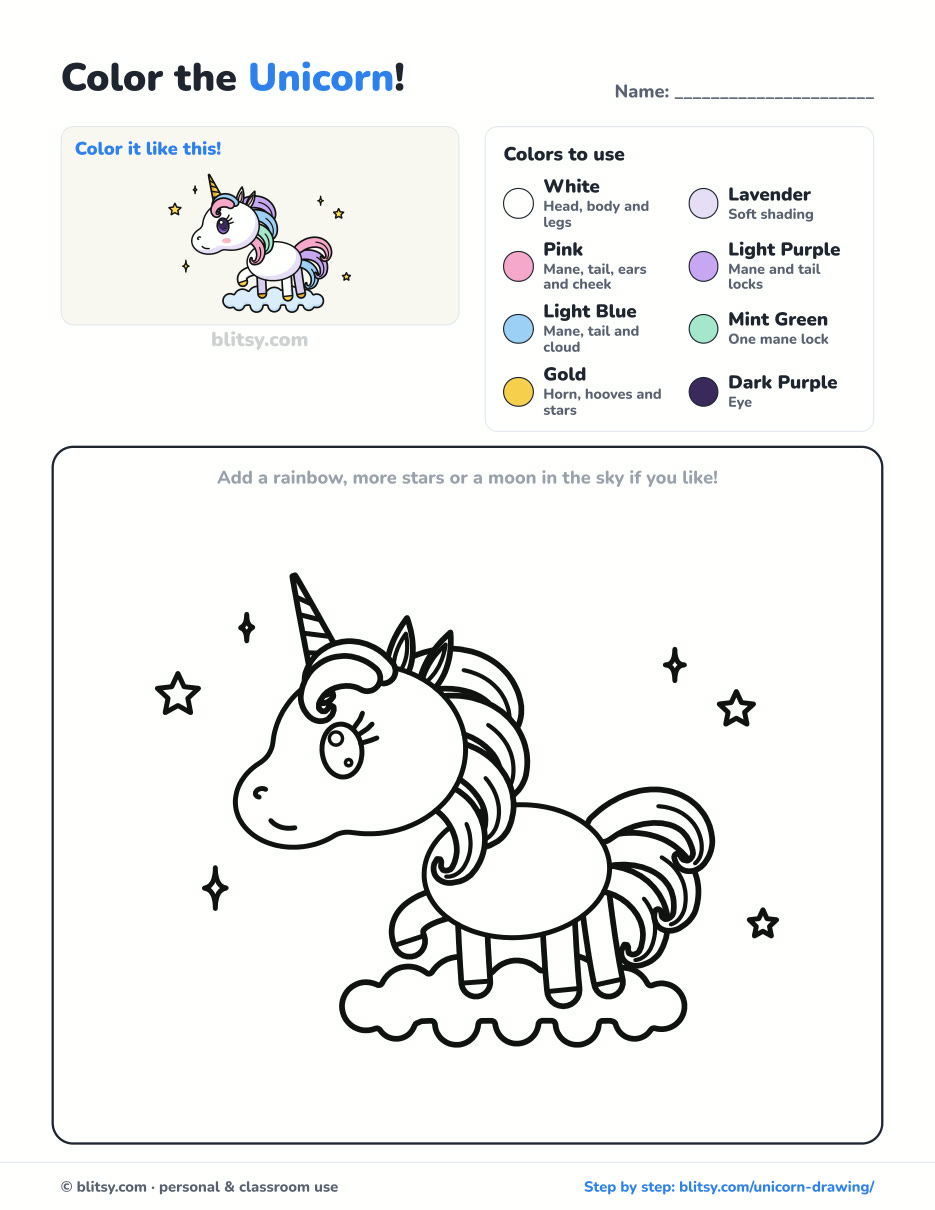
Black outlines with a colored example and the color names at the top. Ready to print and color.
⬇️ Download Coloring PageEvery step picture with its instructions and tips, to keep beside your paper while you draw.
⬇️ Download Drawing Guide📱 On a phone? Tap a download button, then open the file and choose Share → Save to Files or Print. On a computer, the PDF opens or saves straight to your Downloads folder.
Stash These Unicorn Steps on Pinterest
Unicorn on Its Cloud? Try a Friendly Ghost
This next one is a step-by-step tutorial too, and it starts from a single circle.
- Ghost Drawing: The cute ghost drawing tutorial draws a big ghost waving, a baby ghost floating and a pumpkin waiting below.
Unicorn Drawing Questions From Young Artists
What is the easiest way to draw a unicorn?
Draw it in chibi style: a big circle for the head, a smaller oval body and short legs. Then add a cone horn and a few curly locks. You skip the hard parts of horse anatomy completely.
How do you draw a unicorn horn?
Draw a tall, narrow cone on the forehead, leaning slightly forward. Then cross it with three or four slanted lines that all lean the same way. That simple trick reads as a spiral.
Are unicorns real?
No, unicorns are mythical creatures from old stories and legends. Fun fact: the unicorn is the national animal of Scotland, and you can spot one on the Scottish royal coat of arms.
How long does it take to draw a unicorn?
Plan on 35 to 45 minutes with ink and color. The mane and tail take the longest because every lock gets its own color.
Somewhere on your desk there's a blank page waiting for a unicorn, so tell me which colors you pick for the mane. 🦄✨
Related posts:
 How to Draw a Tooth Step by Step (Cute and Easy for Kids)
 How to Draw a UFO Step by Step (Cute Alien Saucer)
 How to Draw an Astronaut Step by Step (Cute and Easy)
 How to Draw an Owl Step by Step (Cute Night Owl)
 How to Draw an Axolotl Step by Step (Cute and Easy)
 How to Draw an Octopus Step by Step (Cute and Easy)
 How to Draw a Frog Step by Step (Cute Frog on a Log)
 How to Draw a Jellyfish Step by Step (Cute, Easy Guide)
 How to Draw a Grim Reaper Step by Step (Cute Halloween)
 How to Draw a Care Bear Step by Step (Cute Fan Art for Kids)
 How to Draw Cerberus Step by Step (Cute and Easy)
 How to Draw a Monster Step by Step (Cute and Easy)

