
Turtle shells scare off a lot of beginners, because that patchwork of plates looks like it needs a ruler and a lot of patience. It doesn't. The whole pattern grows out of one oval, one line through the middle and three hexagons sitting on that line. In this lesson I'll show you how to draw a turtle step by step, ending with a cheerful sea turtle gliding past some seaweed. No drawing experience needed.
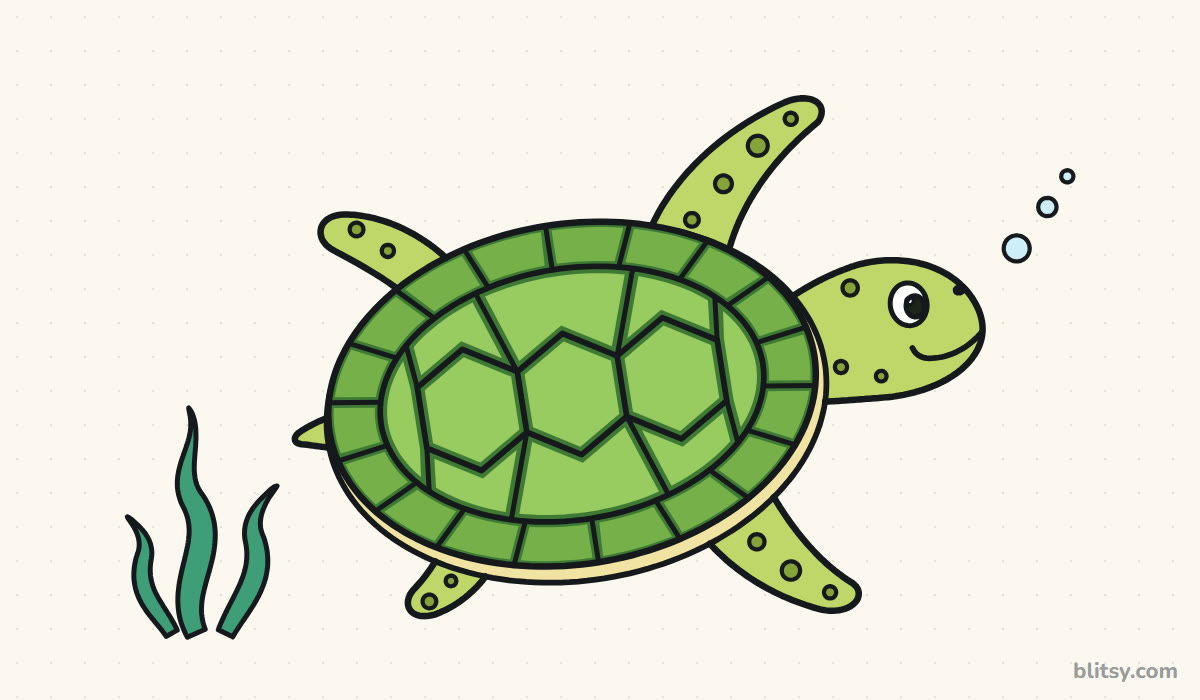
Blue lines in a picture are the new part for that step, and gray lines are what you've already drawn. The thin light blue oval and lines are guides, and they vanish when we ink in step 11.
Quick overview
⏱️ Time: around 30 to 40 minutes, coloring included
🎯 Level: easy, good for kids from about 6
✏️ Steps: 12
🐢 You'll draw: a smiling sea turtle swimming to the right, seen from above
Gear for a Shell Full of Hexagons
- A pencil with a sharp point for the plate lines
- A clean eraser
- A black fineliner or felt-tip pen
- Colored pencils or markers (greens, cream, light blue)
- Plain paper laid sideways
A sharp pencil helps more here than in most drawings, since the shell has many short lines that need to meet neatly.
How to Draw a Turtle Step by Step
Step 1: Sketch the shell oval and a center line
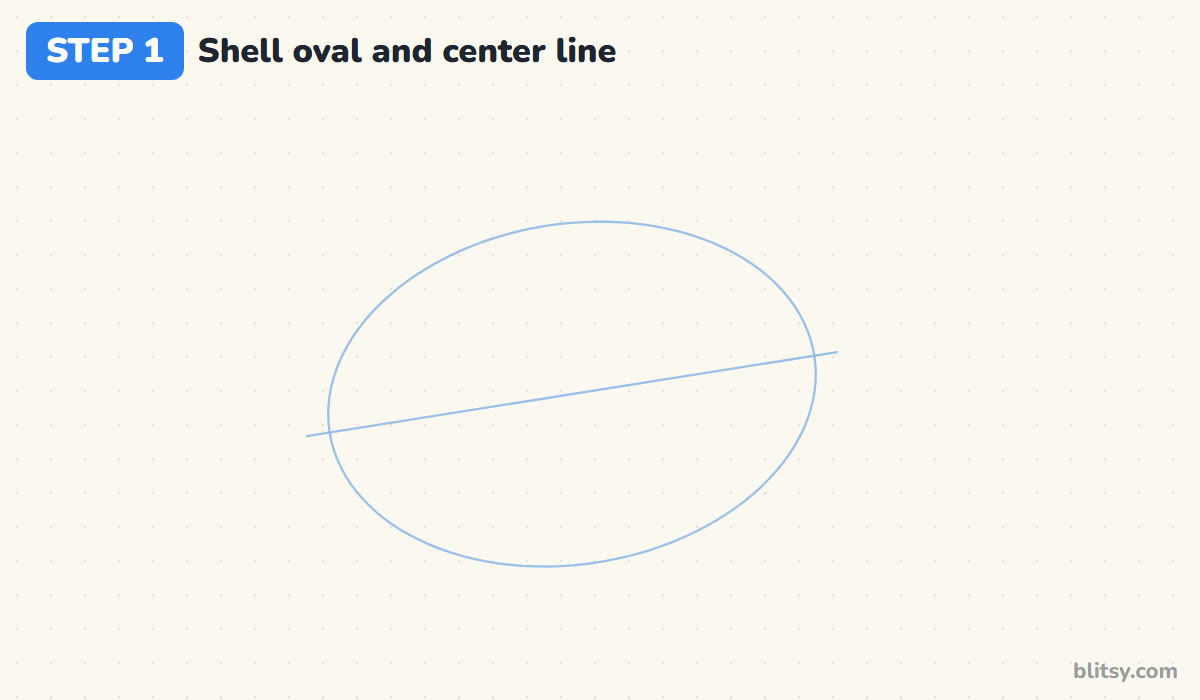
Draw a wide oval a little left of the middle of your page, about one and a half times as wide as it is tall. Tilt it slightly upward on the right, so the turtle swims uphill. Then draw a straight line through the oval from end to end. That center line is the spine of the whole shell pattern.
💡 Tip: Keep this oval faint. You will trace over most of it later.
Step 2: Add a head circle and flipper lines
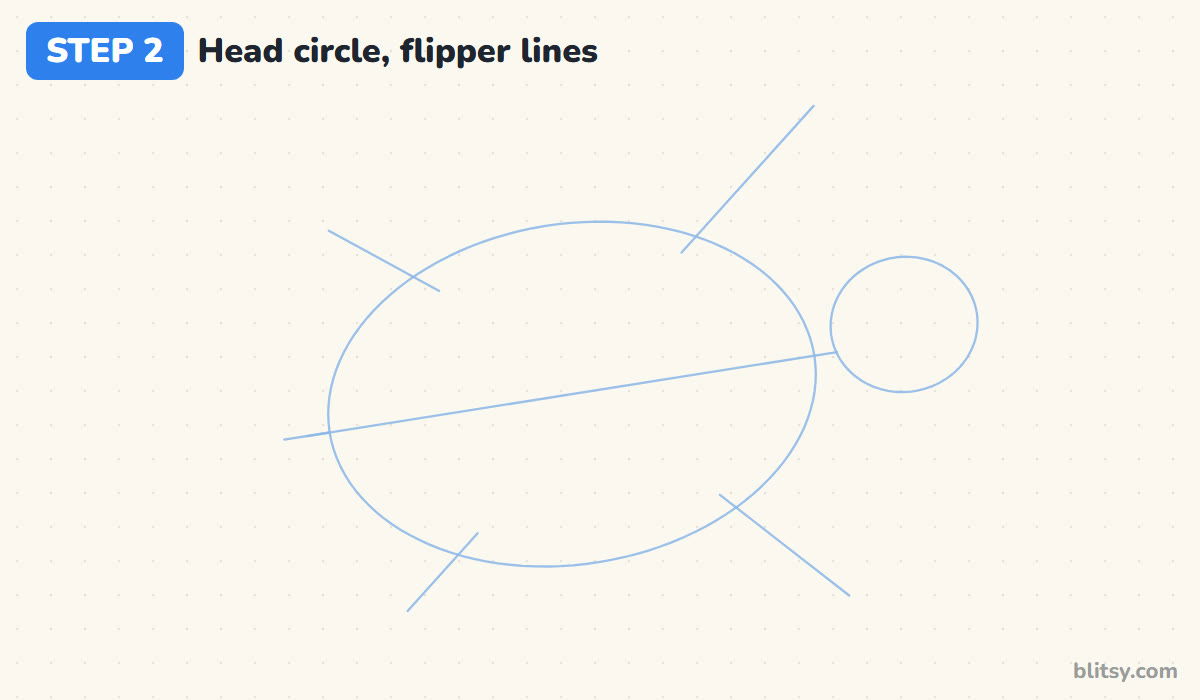
Place a small circle just past the right end of the oval, touching it, for the head. Now draw four straight lines coming out from under the shell: a long one up and forward, a long one down and forward, and two shorter ones at the back. A tiny dash at the far left end marks the tail.
💡 Tip: Make the two front lines about twice as long as the back ones.
Step 3: Trace the shell edge and the belly rim
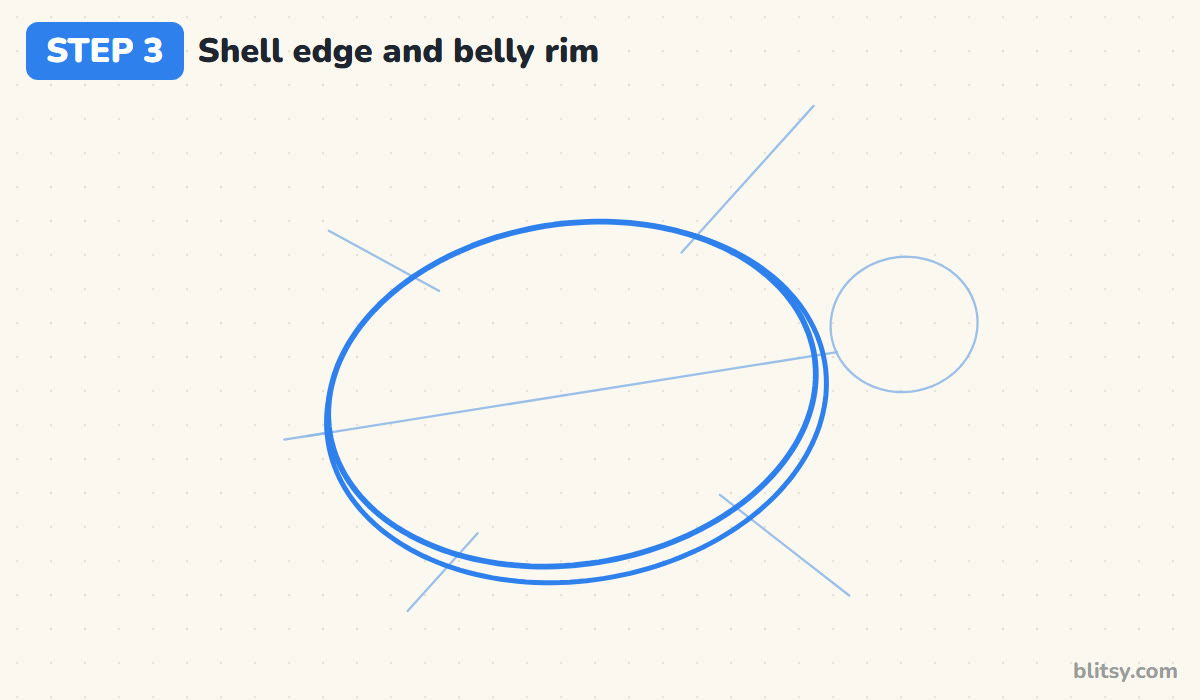
Go over the oval with a firm, smooth line. Then draw a second curve just under its lower edge, hugging the shell and fading out toward the top. This thin band is the edge of the belly shell peeking out underneath, and it gives the turtle a little thickness.




💡 Tip: Turn your paper as you go around the oval so your hand always pulls the line.
Step 4: Draw an inner ring for the edge plates
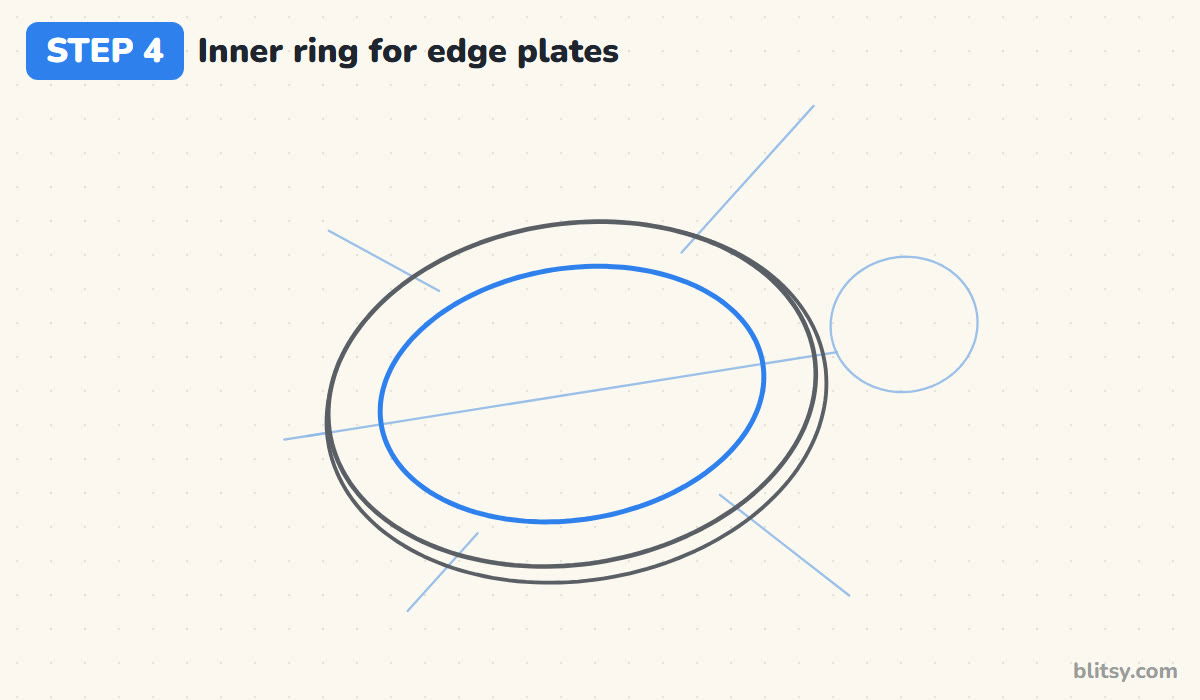
Inside the shell, draw a smaller oval with the same tilt, leaving an even gap all the way around. I make that gap about as wide as my thumbnail. The band between the two ovals will hold the small edge plates, and the space inside becomes the big middle plates.
💡 Tip: Look at both ends of the oval: the gap there likes to shrink.
Step 5: Line up three hexagons on the center line
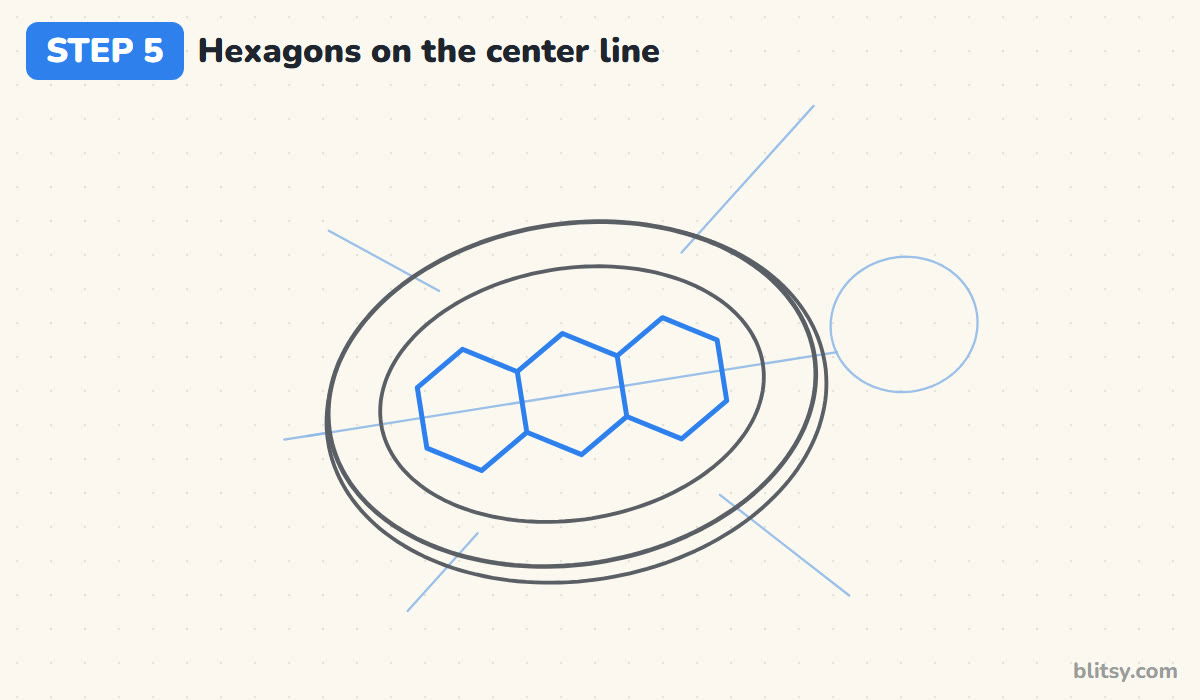
This is the part that makes a shell look like a turtle. Draw three hexagons in a row along the center line, each one sharing its side edge with the next. The line should cut every hexagon through its middle. I draw the center hexagon first, then add one on each side, so the row stays centered in the shell.
💡 Tip: A hexagon is six sides: a pointed roof, two straight walls and a pointed floor.
Step 6: Fan out the side plates and edge plates
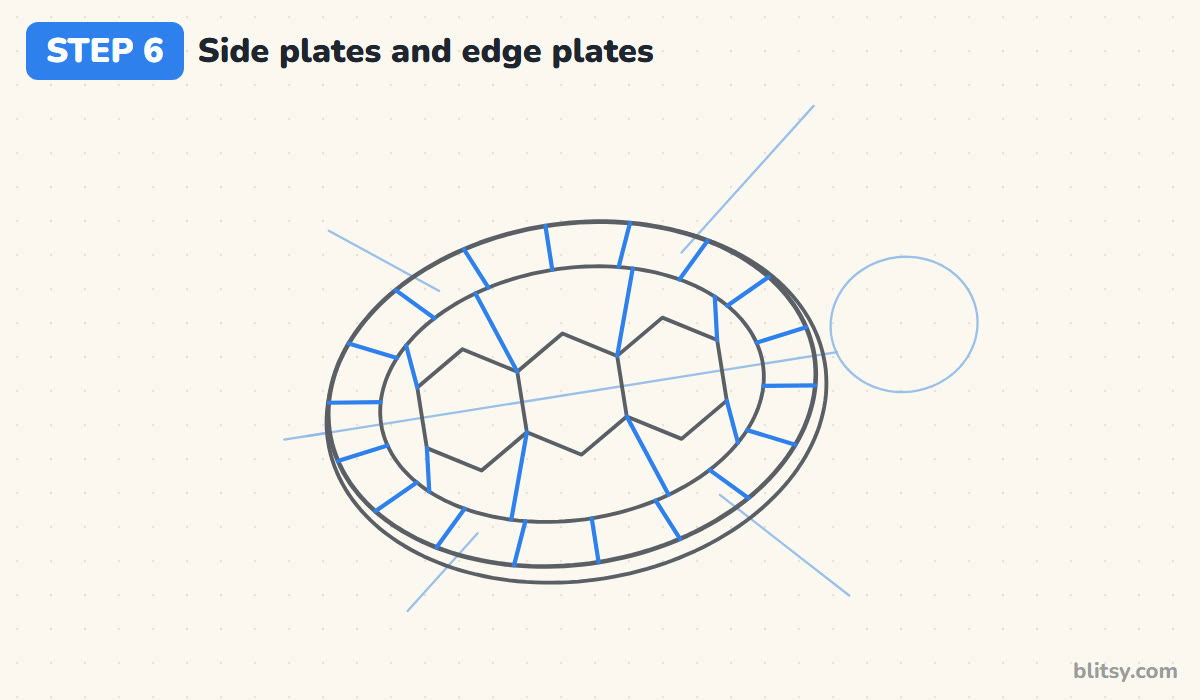
From each corner where two hexagons meet, draw a line outward to the inner ring, both above and below the row. Do the same from the outer corners of the end hexagons. These lines split the middle of the shell into wide side plates. Next, chop the outer band into small plates with short lines that point toward the center, spaced evenly around the ring.
💡 Tip: Space the edge plate lines first at the four ends of the oval, then fill in between.
Step 7: Draw a round head and neck
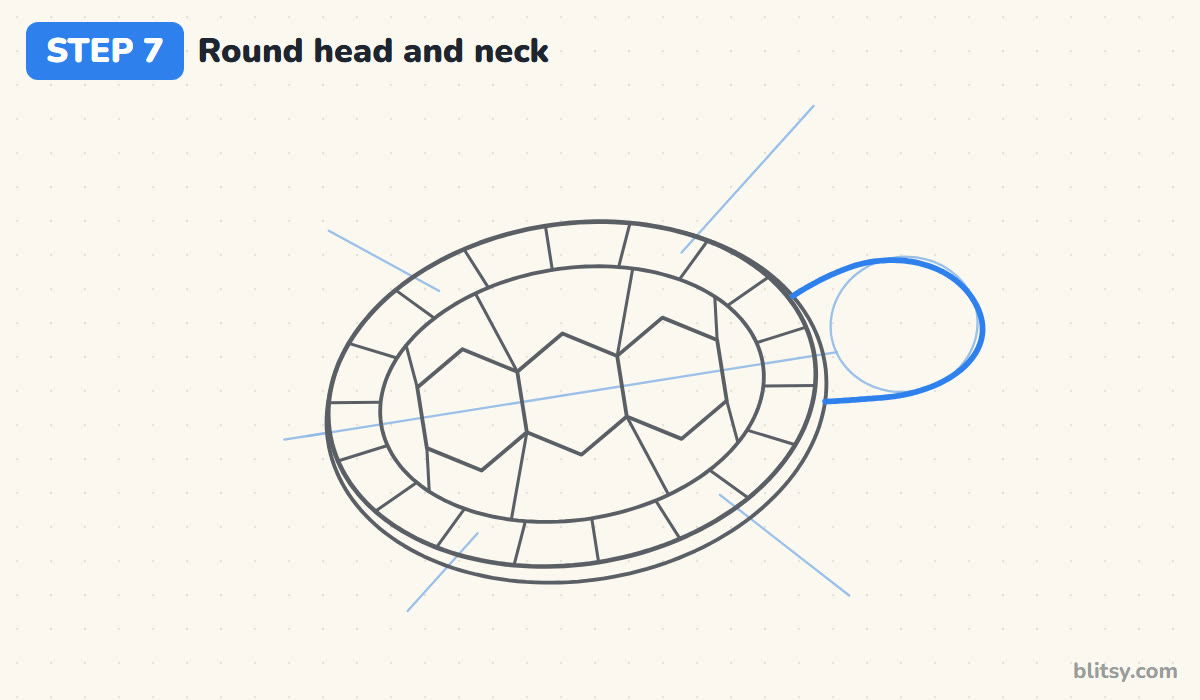
Start on the shell edge above the center line and draw the top of the neck rising into a rounded head. Curve around the front, where the face makes a blunt little beak, then come back under the chin to the shell. My head is a bit bigger than a real turtle's would be, because a larger head looks friendlier in a cartoon.




💡 Tip: Stop the neck lines at the shell edge. They disappear underneath it.
Step 8: Give it a kind eye and a smiling beak
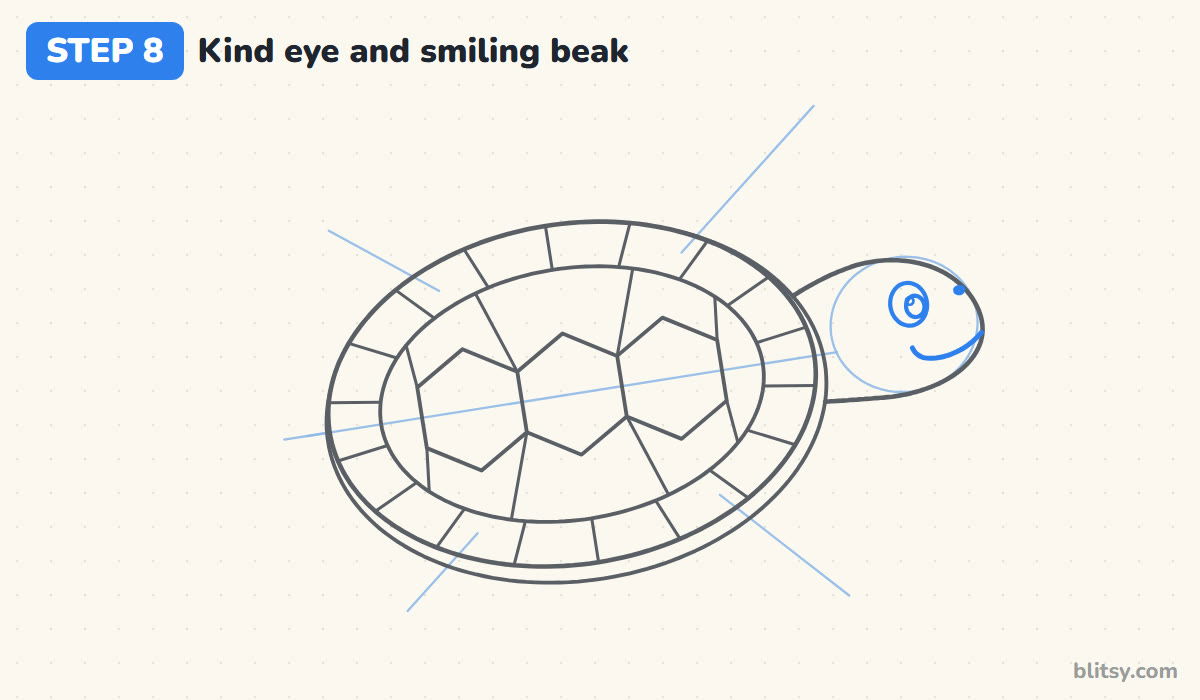
Put one oval eye high on the head, closer to the front than to the neck. Add a dark pupil looking forward and a small shine dot. For the mouth, draw a curved line from the tip of the beak back under the eye, ending with a tiny upward hook. A dot near the front is the nostril.
💡 Tip: Keep the smile short. If it runs past the eye, the face starts to look goofy.
Step 9: Shape four flippers and a short tail
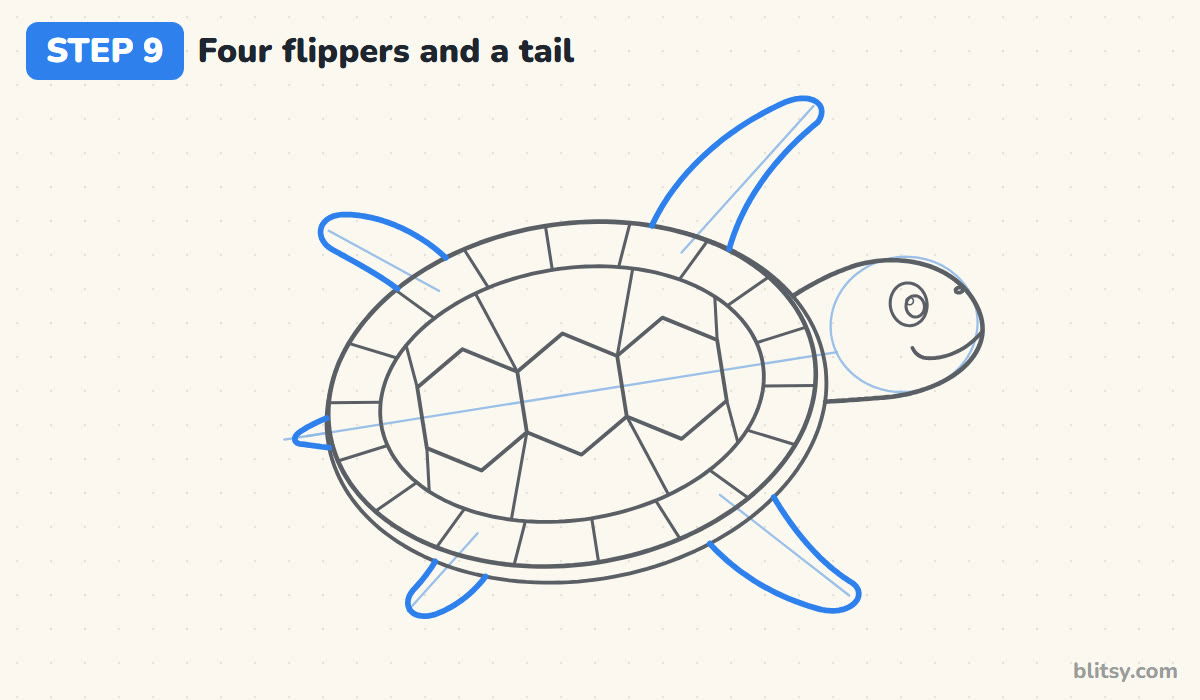
Around the long front guide lines, draw two flippers that look like curved paddles: wide where they leave the shell and narrow at the rounded tip. The back flippers are short, rounded ovals. Add a small pointed tail at the left end. Sea turtles push through water with their big front flippers and steer with the back ones, so that size difference matters.
💡 Tip: Curve the front flippers backward a little, like wings in the middle of a flap.
Step 10: Add spots, bubbles and seaweed
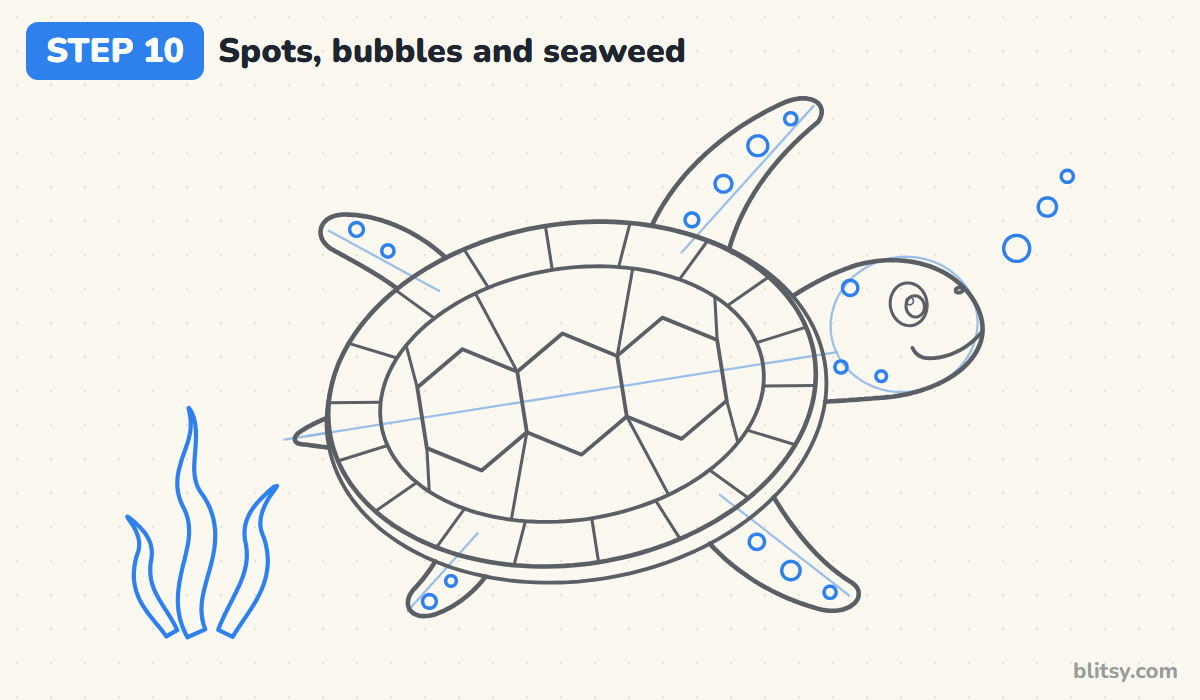
Sprinkle small circles of different sizes over the flippers and the head. Keep them clear of the outlines and the face. Then add three bubbles rising in front of the face, smallest at the top. A few wavy seaweed blades in the lower left corner tell everyone this turtle is underwater.
💡 Tip: Odd numbers of spots on each flipper look more natural than even ones.
Step 11: Ink the keeper lines and erase the guides
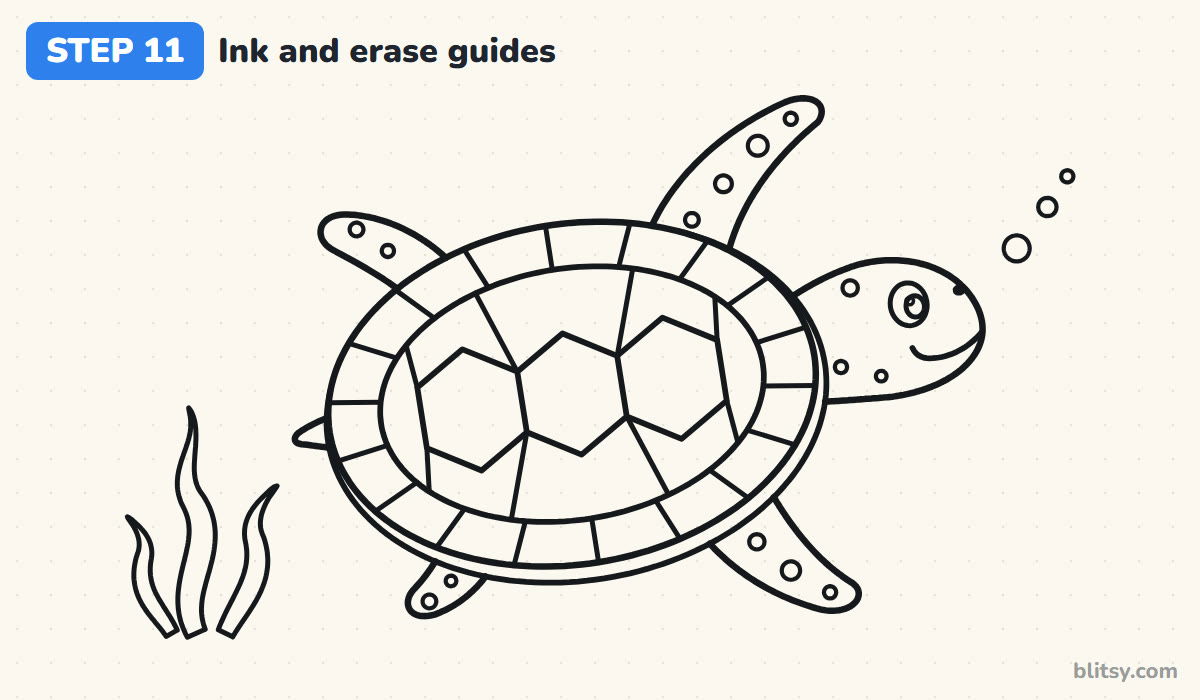
Trace every line you want to keep with the black pen: the shell, every plate line, the head, the flippers and all the little extras. Skip the guide oval, the center line, the head circle and the flipper sticks. Once the ink is fully dry, erase everything that's still pencil.




💡 Tip: Ink the long shell curves slowly; the short plate lines can go faster.
Step 12: Color your turtle
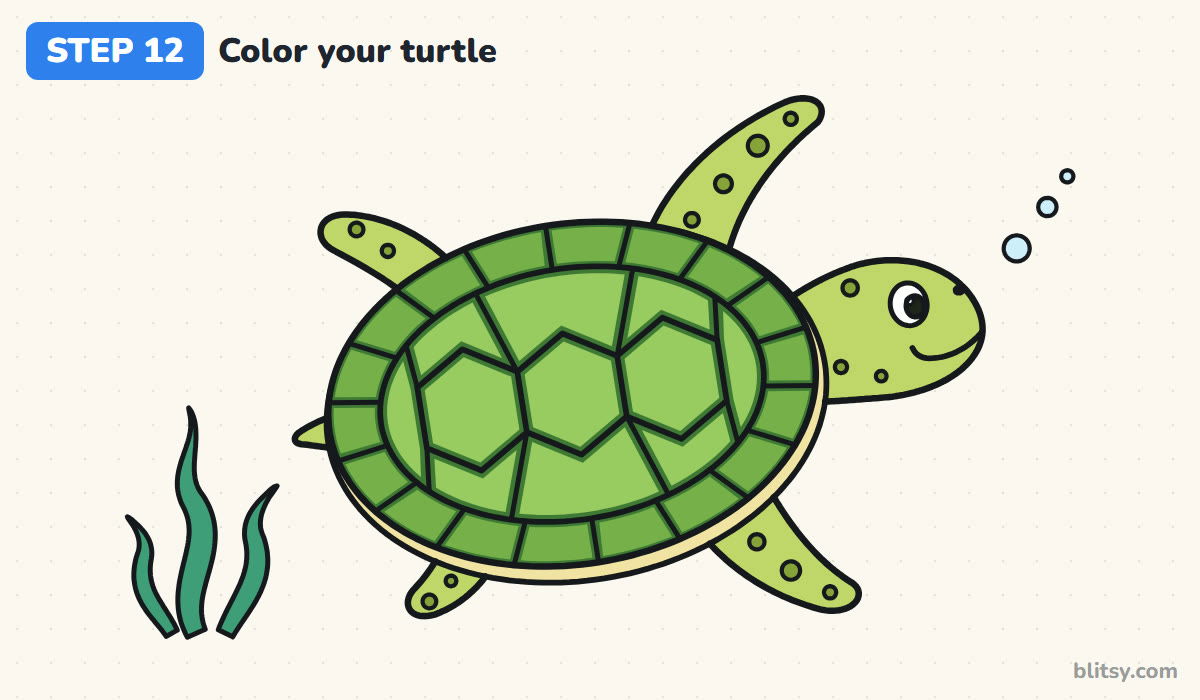
Color the head, flippers and tail yellow-green, then dot the spots with olive green. For the shell, color each plate light green in the middle and press harder with dark green near its edges. That darker frame around every plate makes the hexagon pattern pop. Finish the belly rim in cream, the bubbles in light blue and the seaweed in sea green.
💡 Tip: Leave a tiny white spot in the eye unshaded so the turtle looks bright.
Shell Patterns That Go Wobbly and How to Fix Them
- Hexagons scattered all over the shell. Real turtle shells have one row of hexagons down the middle. Draw the center line first and keep every hexagon on it.
- Plates that don't meet. Gaps between lines make the shell look broken. Start every side plate line exactly at a hexagon corner and run it all the way to the inner ring.
- Front and back flippers the same size. A sea turtle's front flippers are much longer. Draw them about twice the length of the back ones.
- Head stuck on top of the shell. The neck comes out from under the shell edge, so stop the neck lines where they touch the shell.
- One flat green everywhere. Without a darker edge on each plate, the pattern disappears after coloring. Keep the plate lines dark and the plate centers lighter.
New Shells, New Turtles
With the hexagon trick in your pocket, you can try a land turtle next: draw the shell as a tall dome from the side, keep the same row of hexagons across it and give it four stubby legs instead of flippers. A baby turtle is just a smaller shell with a bigger head. If you want company for your turtle, add a goldfish from the fish drawing tutorial or a pond friend from how to draw a frog step by step.
Printable Turtle Coloring Page and Step Guide
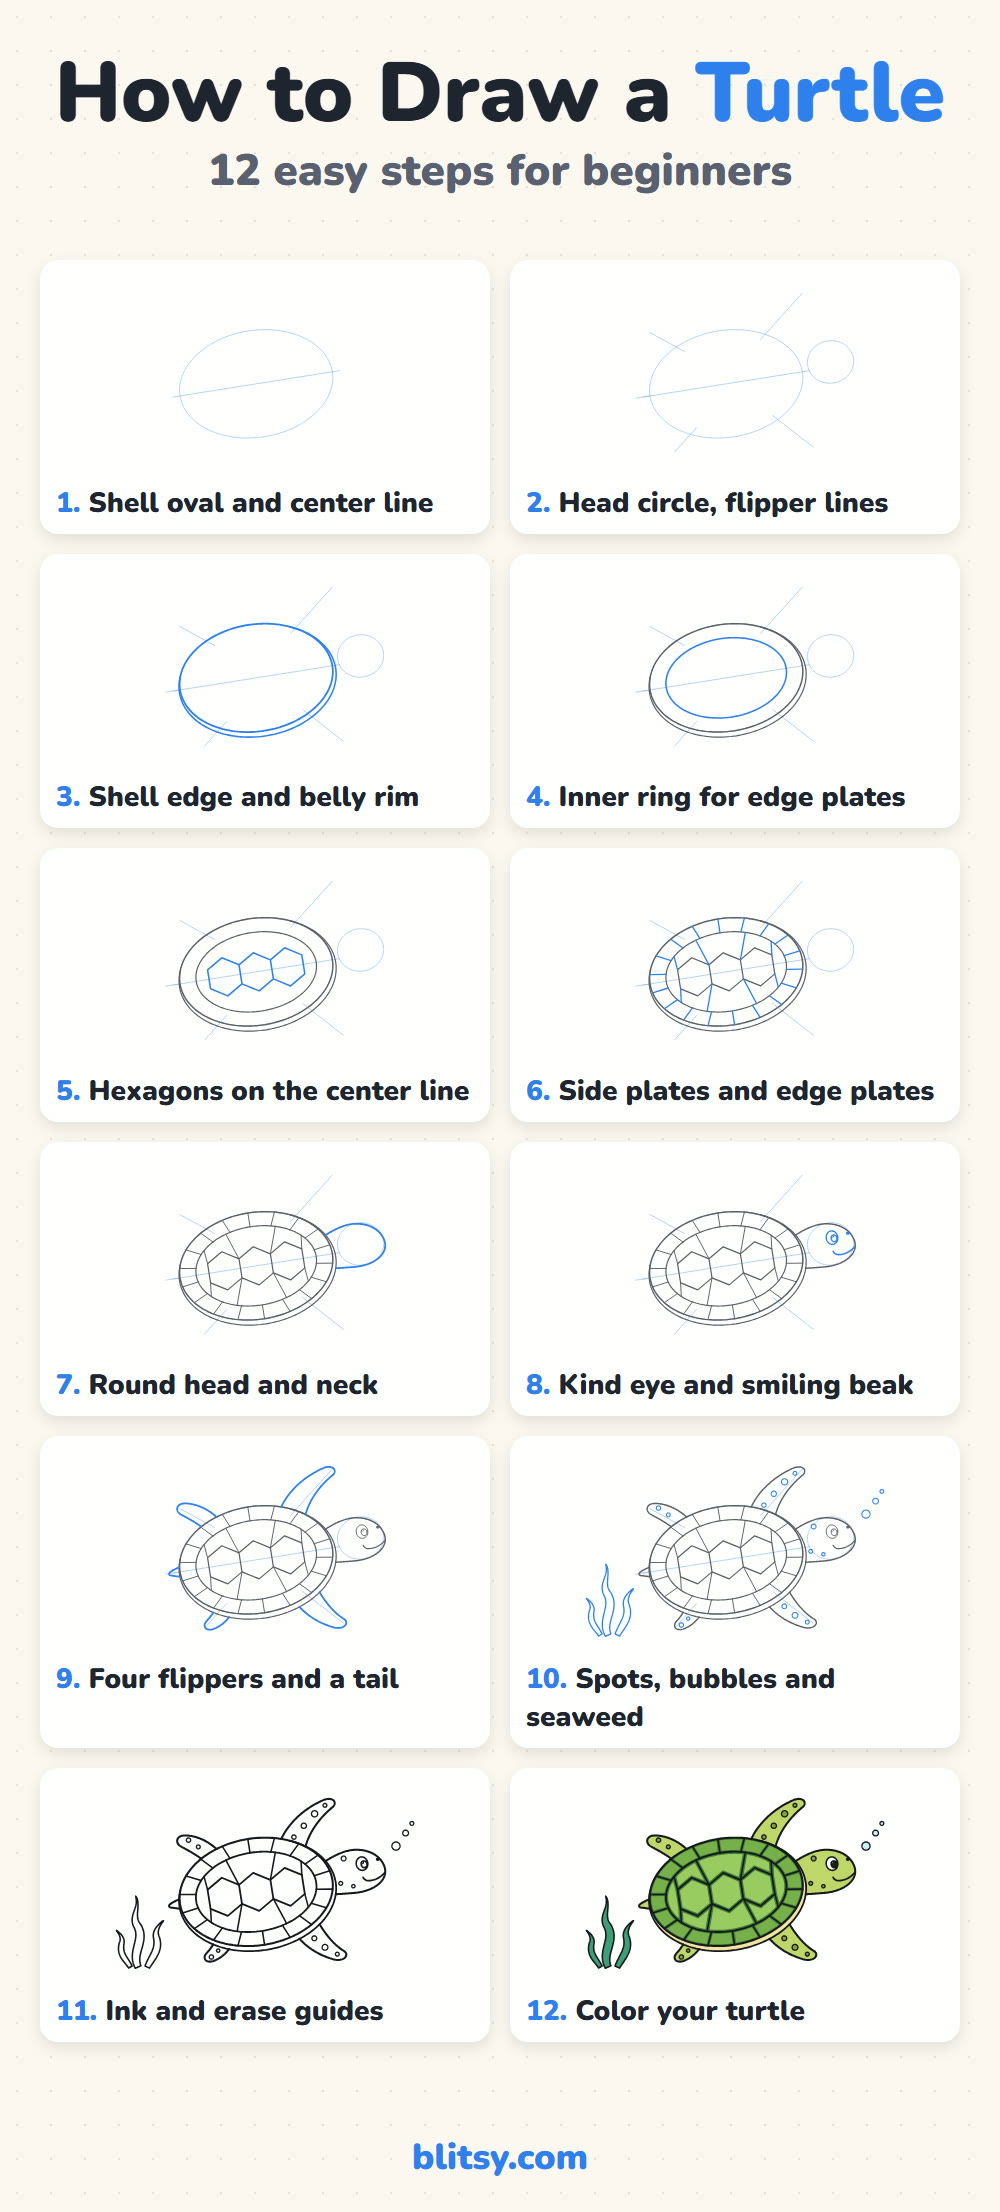
Prefer paper? The turtle coloring page has a finished color example at the top with a key that names each color and where it goes, plus a large outline for kids to fill in. The step-by-step PDF guide holds all 12 steps with their pictures and tips. Both print on Letter or A4 paper.
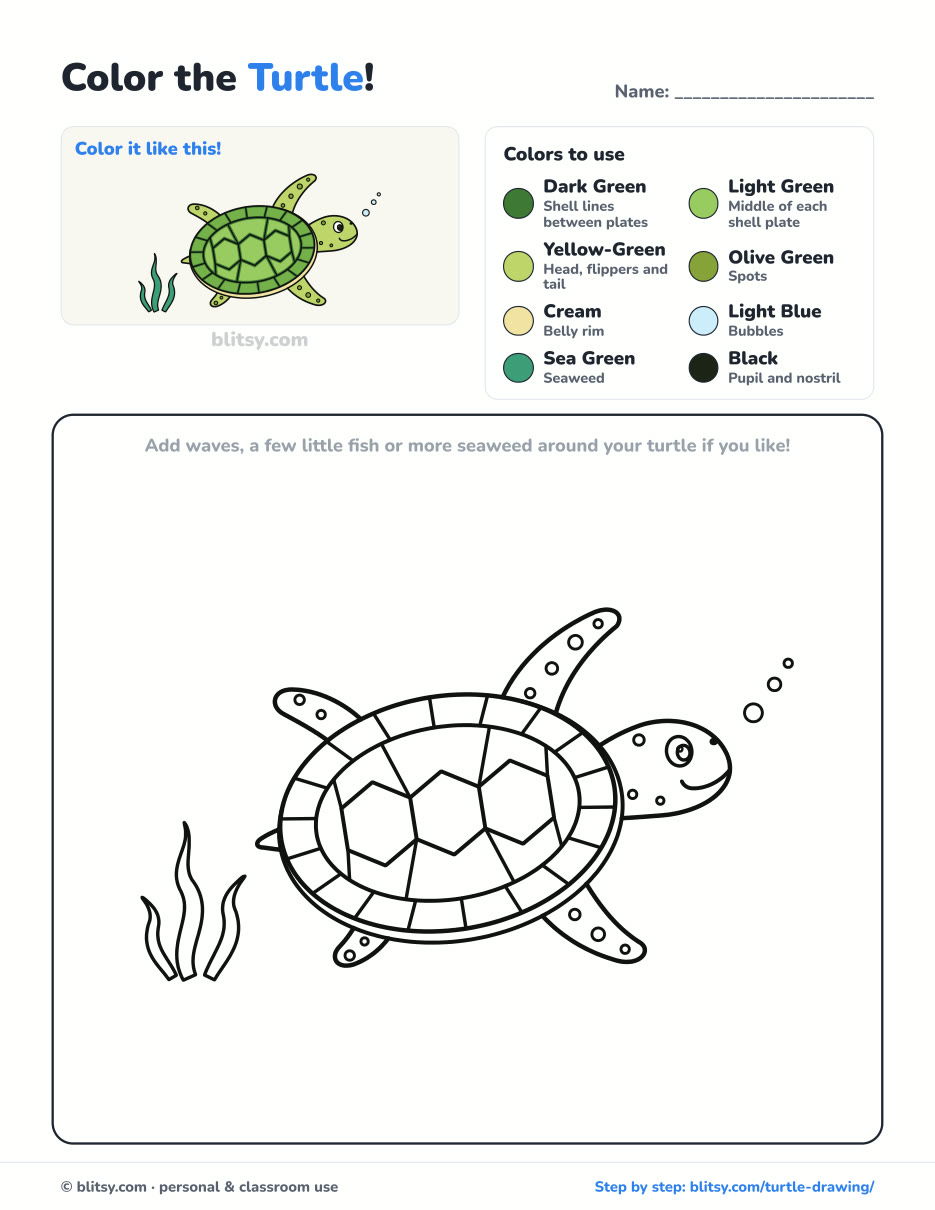
Black outlines with a colored example and the color names at the top. Ready to print and color.
⬇️ Download Coloring PageEvery step picture with its instructions and tips, to keep beside your paper while you draw.
⬇️ Download Drawing Guide📱 On a phone? Tap a download button, then open the file and choose Share → Save to Files or Print. On a computer, the PDF opens or saves straight to your Downloads folder.
Keep the Turtle Steps on Pinterest
Turtle Drawing Questions, Answered
What is the easiest way to draw a turtle shell?
Draw an oval, a line through its middle and a row of three hexagons on that line. Then connect the hexagon corners to an inner ring and split the outer band into small plates.
What's the difference between drawing a sea turtle and a land turtle?
A sea turtle has a flatter, smoother shell and long paddle flippers. A land turtle or tortoise usually has a higher, rounded dome and short legs with toes. The shell pattern works the same way for both.
How long does this turtle drawing take?
Plan on 30 to 40 minutes with coloring. Steps 5 and 6, the hexagons and plates, take the longest.
Is this turtle drawing okay for young kids?
Yes, kids from about 6 can follow it. Younger children can skip the edge plates and the spots and still end up with a clear turtle.
Your turtle is ready to swim, so pick a spot on the page and give it an ocean to explore. 🐢🌊
Related posts:
 How to Draw a Whale Step by Step (Easy for Beginners)
 How to Draw Lungs Step by Step (Easy Science Diagram)
 How to Draw a Pineapple Step by Step (Easy Crown and Slice)
 How to Draw Iron Man Step by Step (Easy Chibi for Kids)
 How to Draw a Dress Step by Step (Easy Party Dress)
 How to Draw a Chicken Step by Step (Easy for Beginners)
 How to Draw a UFO Step by Step (Cute Alien Saucer)
 How to Draw Flames Step by Step (Easy Campfire Drawing)
 How to Draw a Crow Step by Step (Easy for Beginners)
 How to Draw a Tiger Step by Step (Easy Walking Pose)
 How to Draw a Heart Step by Step (Even, Symmetric Shape)
 How to Draw a Jellyfish Step by Step (Cute, Easy Guide)

