
A smile is the part of a face people notice first, so when it looks stiff, the whole drawing feels a little off. Usually the trouble is small: corners that sit too low, or teeth drawn one by one like piano keys. In this lesson on how to draw a smile step by step, I build a big happy grin on one wide U curve, keep the teeth as a single soft band, and then reuse the same method for three smaller smiles beside it.
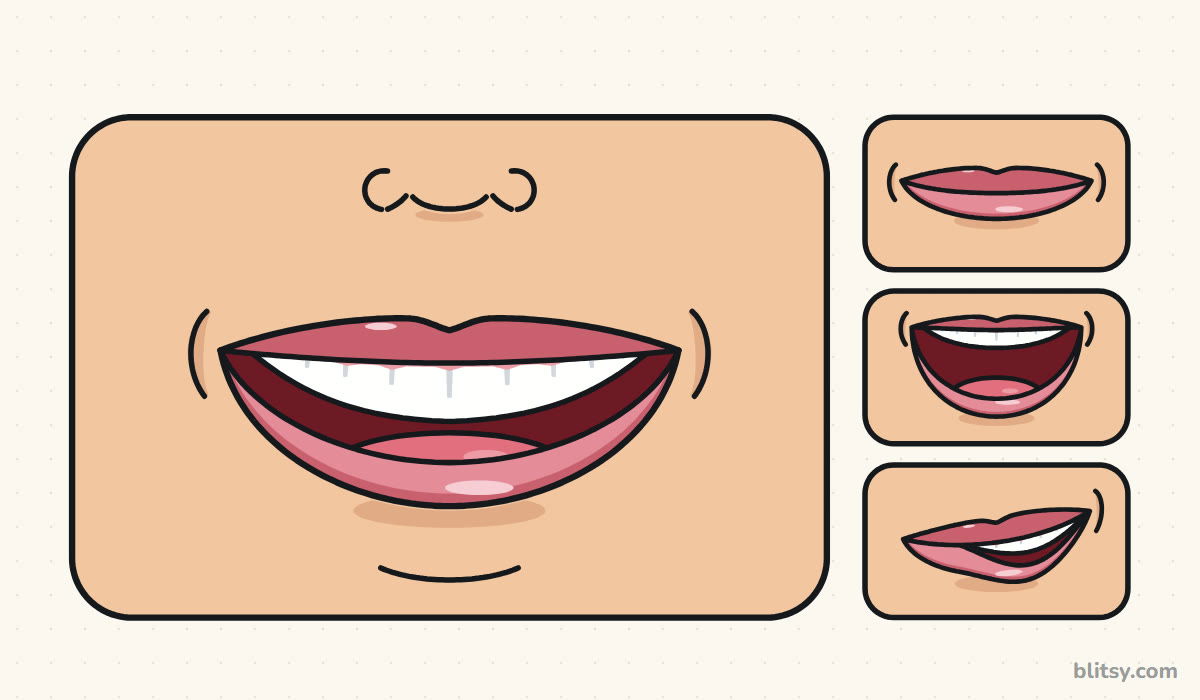
Every smile picture builds on the last one: bright blue shows what's new, gray shows earlier work, and the pale blue sketch lines vanish when we ink in step 10.
Quick overview
⏱️ Time: about 25 minutes, plus 10 for coloring
🎯 Level: beginner, ages 9 and up (younger kids can stop after the big smile)
✏️ Steps: 11
😁 You'll draw: a large smile with teeth, plus a closed smile, a laugh and a lopsided grin
Grin Supplies: Pencils, Pens and Pinks
- An HB pencil for light guide lines
- A soft or kneaded eraser
- A black fineliner or felt-tip pen
- Colored pencils: peach, tan, two pinks, a dark red, a light gray
- Smooth white paper (printer paper is fine)
You don't need a white pencil for the teeth; the paper itself is the brightest white you've got.
How to Draw a Smile Step by Step
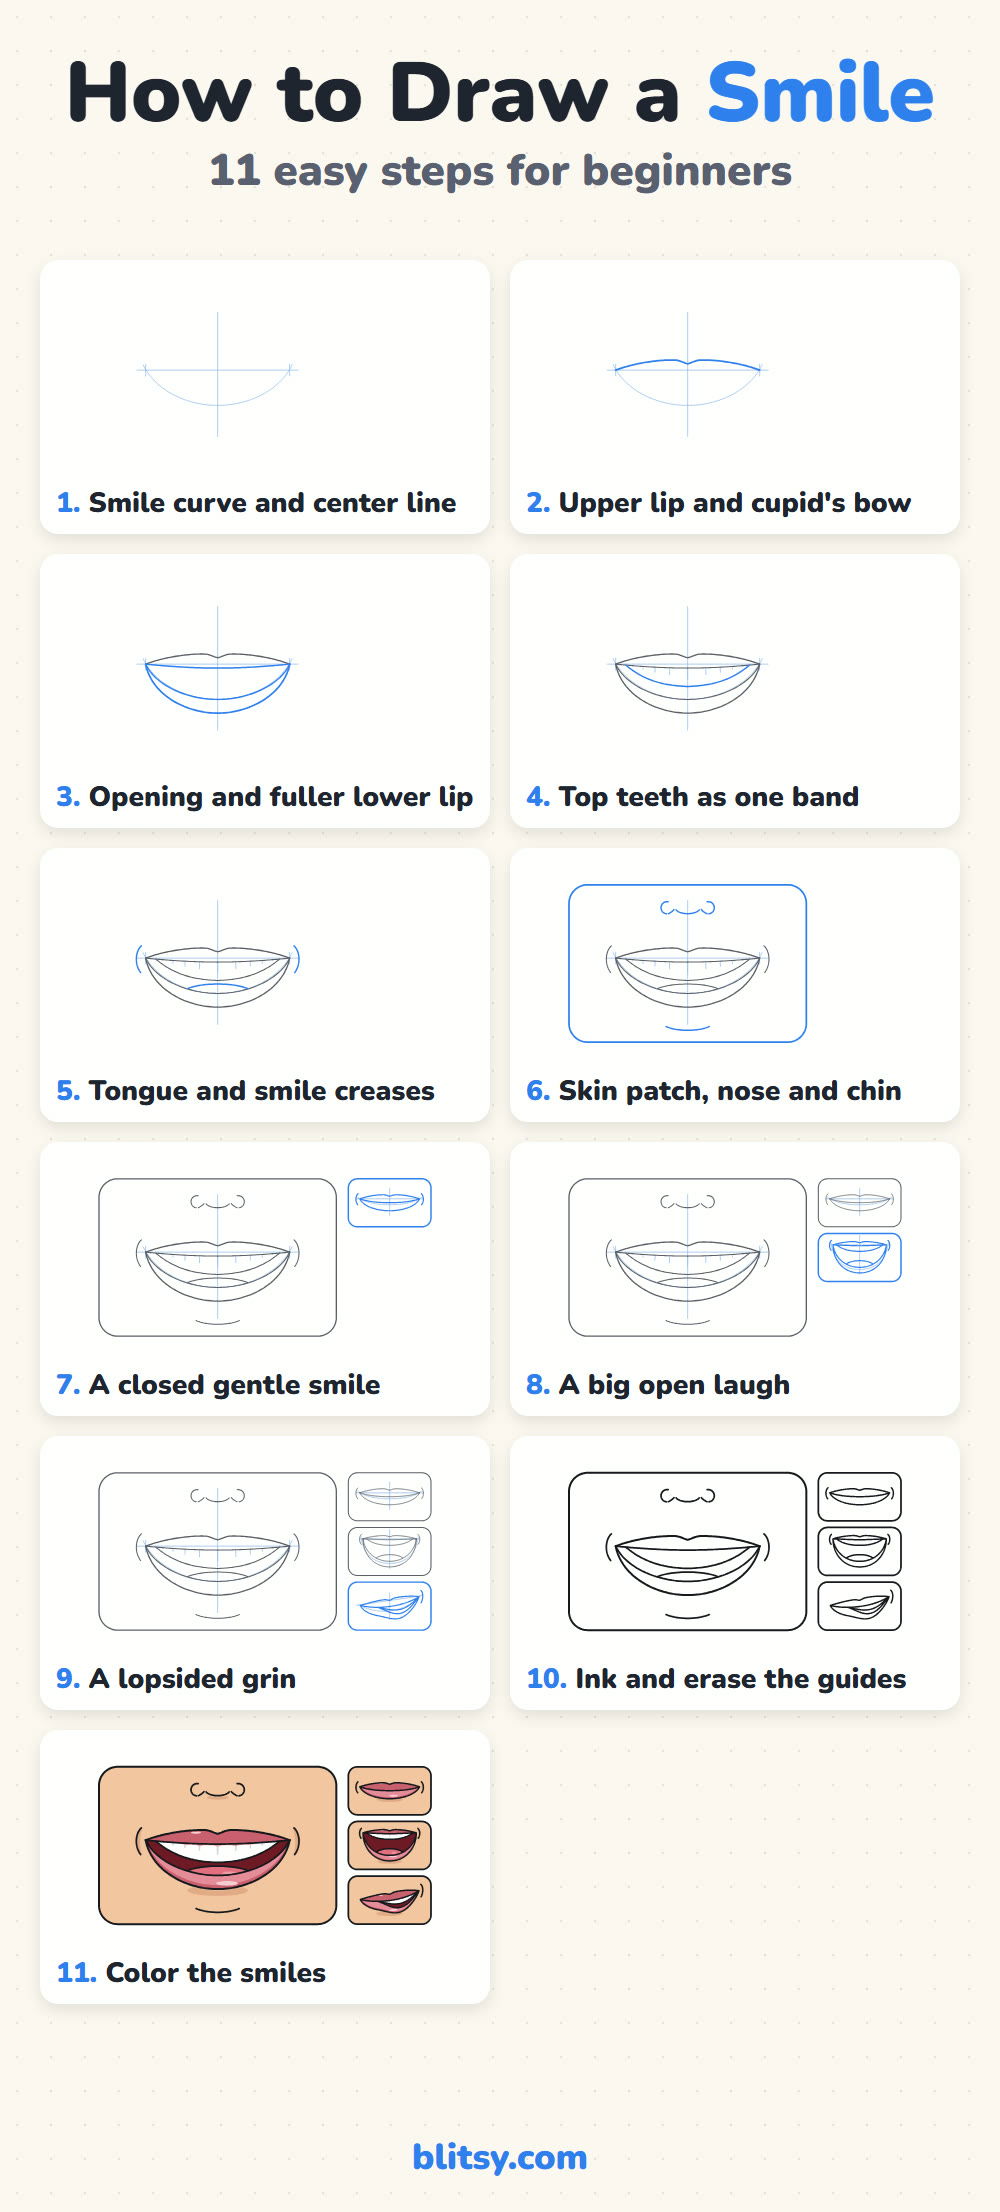
Step 1: Sketch the smile curve and center line
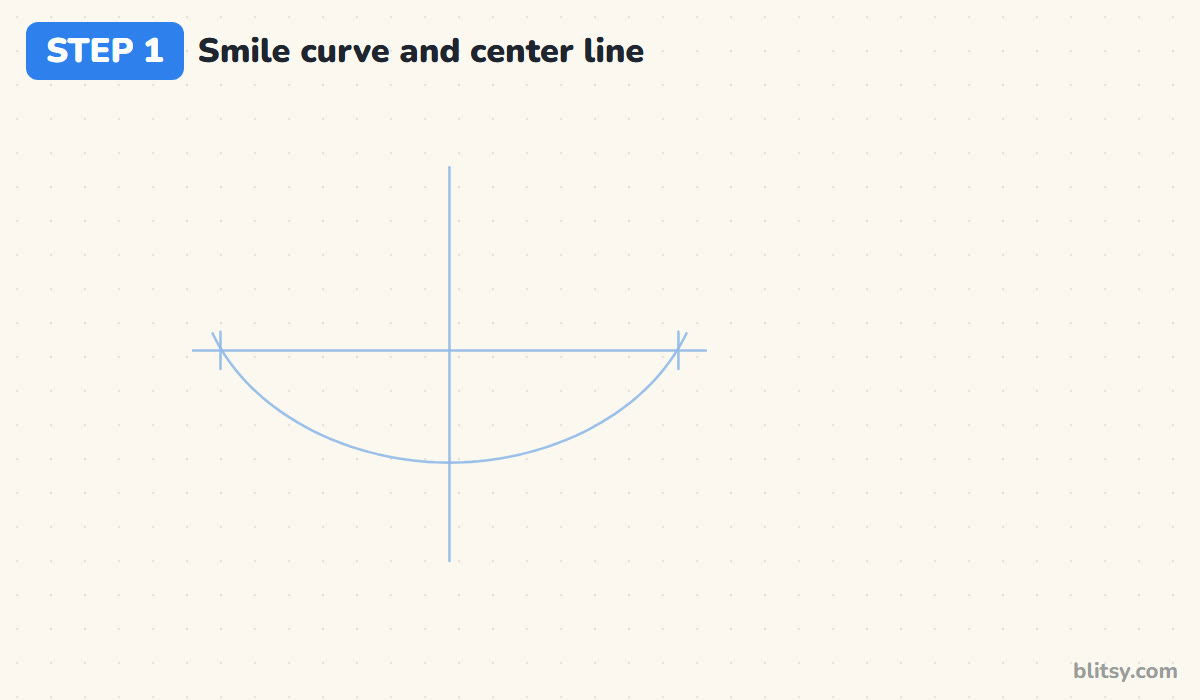
Press lightly and draw a vertical center line, then a level line across it for the mouth corners. Tick each end; the gap between ticks is your smile's width. Now swing a wide U from tick to tick. That U is the bottom of the open mouth and decides how happy the smile looks: a deeper U means a bigger grin.
💡 Tip: Draw the U in two halves, each starting at a corner tick and meeting at the center line.
Step 2: Draw the upper lip with a cupid's bow
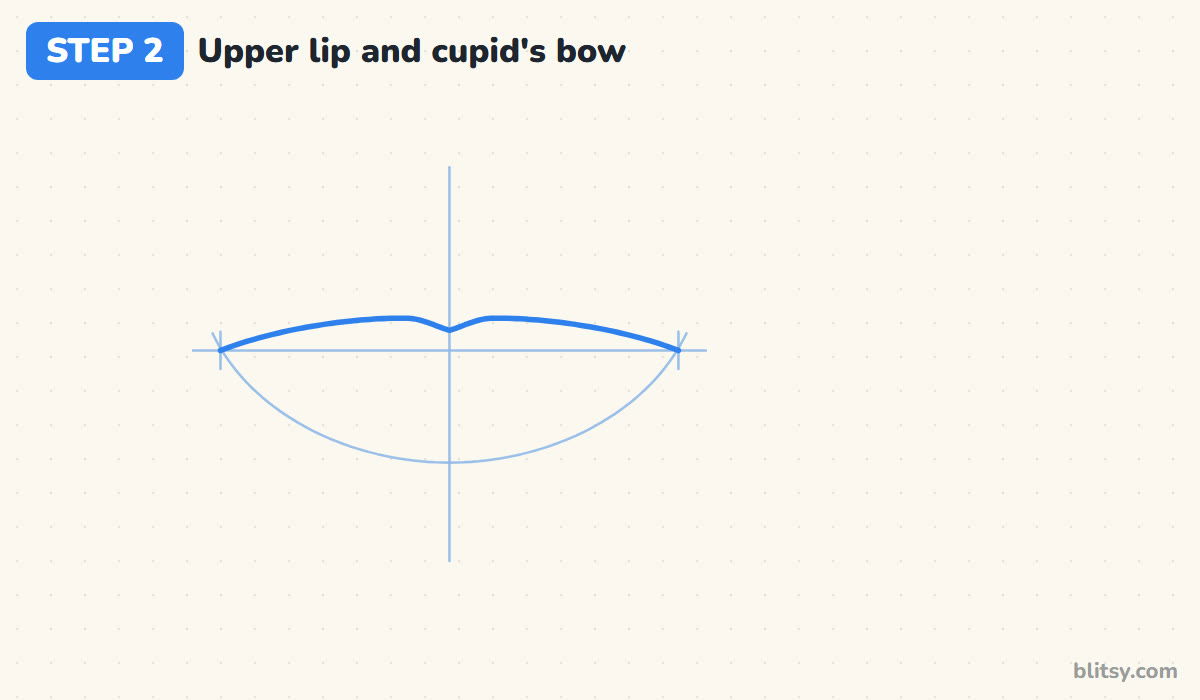
From the left corner, sweep a long, gentle curve up and toward the middle. Just before the center line it peaks, dips into a small V, and rises to a matching peak on the other side. That little M shape is the cupid's bow. In a wide smile the upper lip gets stretched, so I keep its top edge low and smooth rather than tall and puffy.
💡 Tip: Keep the two peaks close to the center line. Spread them too far apart and the lip looks like a mustache.
Step 3: Add the mouth opening and a fuller lower lip
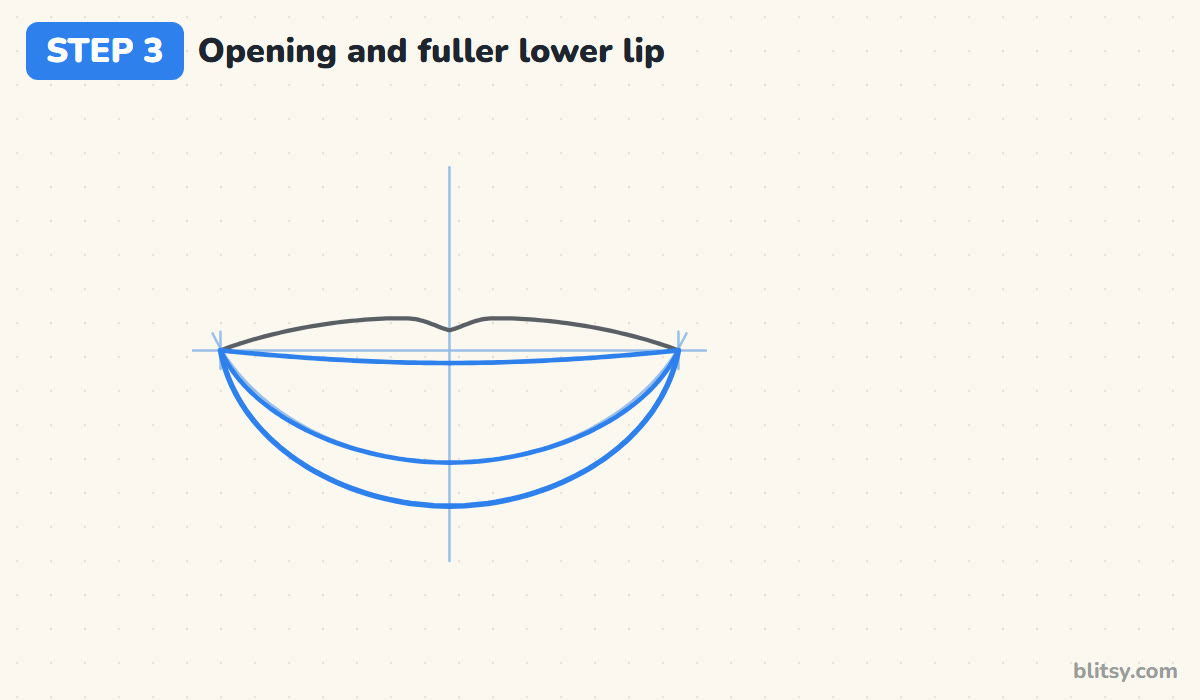
Join the corners with a shallow curve that dips slightly in the middle; that's the underside of the upper lip and the top of the opening. Then trace your U guide for the bottom of the opening. Below it, draw a second, rounder curve for the lower lip. Make the lower lip noticeably thicker than the upper one, because on most faces it is, and it gives the mouth weight.




💡 Tip: All four lip curves meet at the same two corner points. Let them pinch together there.
Step 4: Draw the top teeth as one band
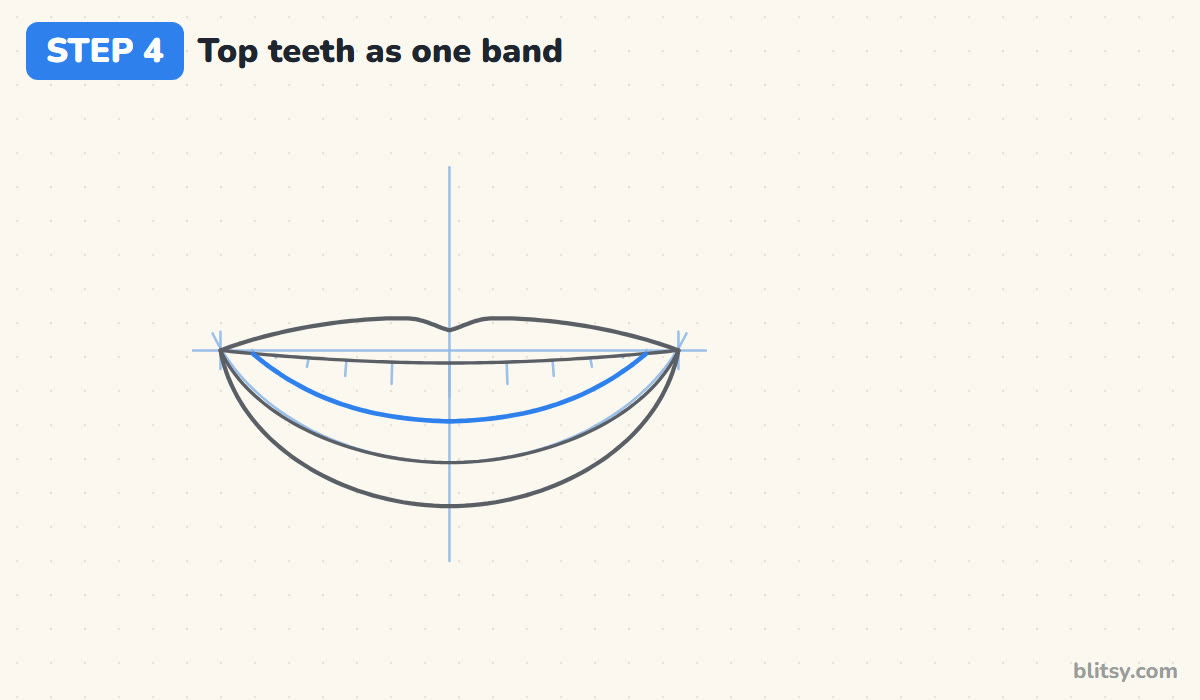
This step makes or breaks a smile. Draw one curve inside the opening, sagging in the middle; everything above it is the upper teeth. Stop it a little short of the corners so a dark gap stays there. Then mark where teeth meet with a few short, faint strokes, wider apart at the front and closer toward the sides.
💡 Tip: Never draw a box around each tooth. A grid of boxes is what makes cartoon teeth look creepy.
Step 5: Add the tongue and smile creases
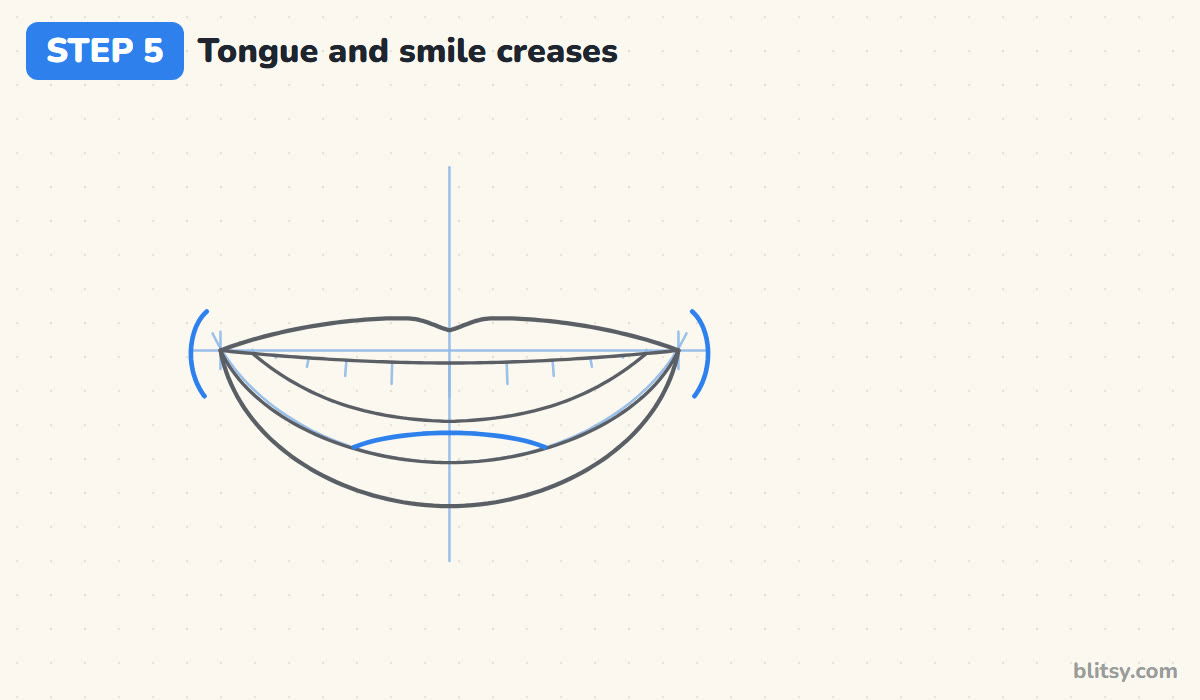
Near the bottom of the opening, draw a low, rounded arch for the top of the tongue. It should fill only the lower part, with dark space left between it and the teeth. Next, put a short curve just outside each mouth corner, shaped like a bracket. Those creases show the cheeks pushing up, and they're what makes a smile look real rather than painted on.
💡 Tip: Keep the creases short and a small gap away from the corners. Long ones add age to the face.
Step 6: Frame the skin patch, nose and chin
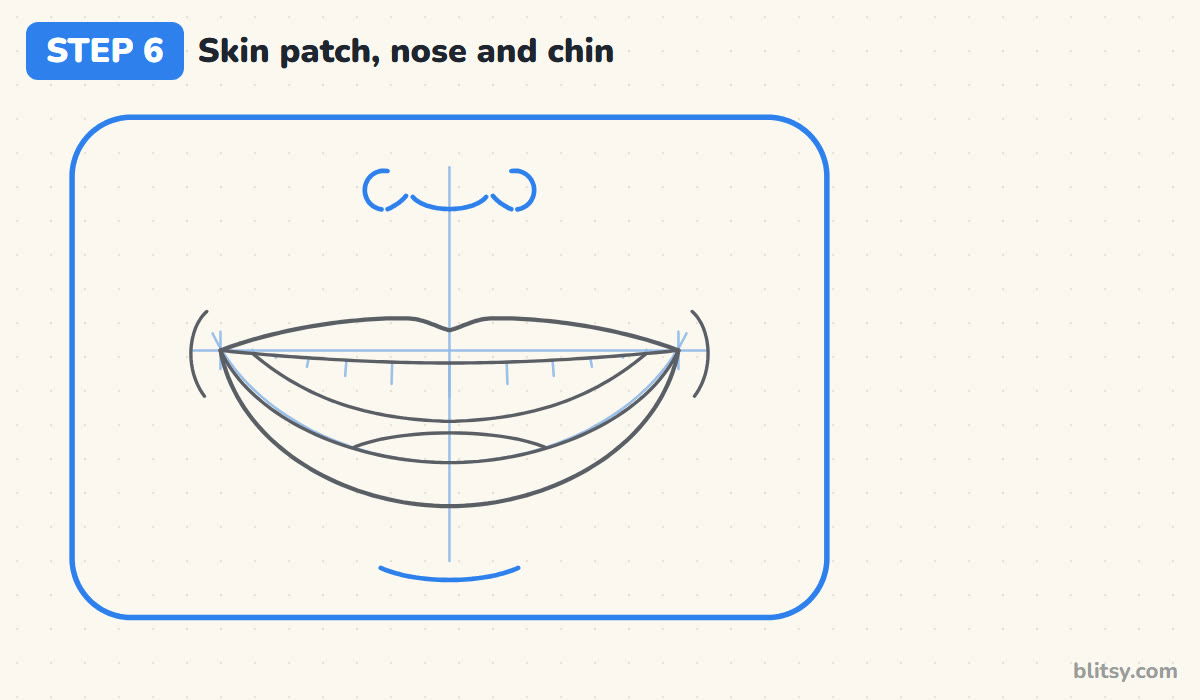
Draw a large rounded rectangle around the mouth to hold the skin color. Above the cupid's bow, leave a clear gap and sketch the nose base: a soft curve for the tip, a bracket for each nostril wing and two tiny hooks. Below the lower lip, a short curve marks the chin crease. These hints put the mouth on a face without drawing a whole head.
💡 Tip: Line the nostril wings up roughly above the cupid's bow peaks, not above the mouth corners.
Step 7: Try a closed gentle smile
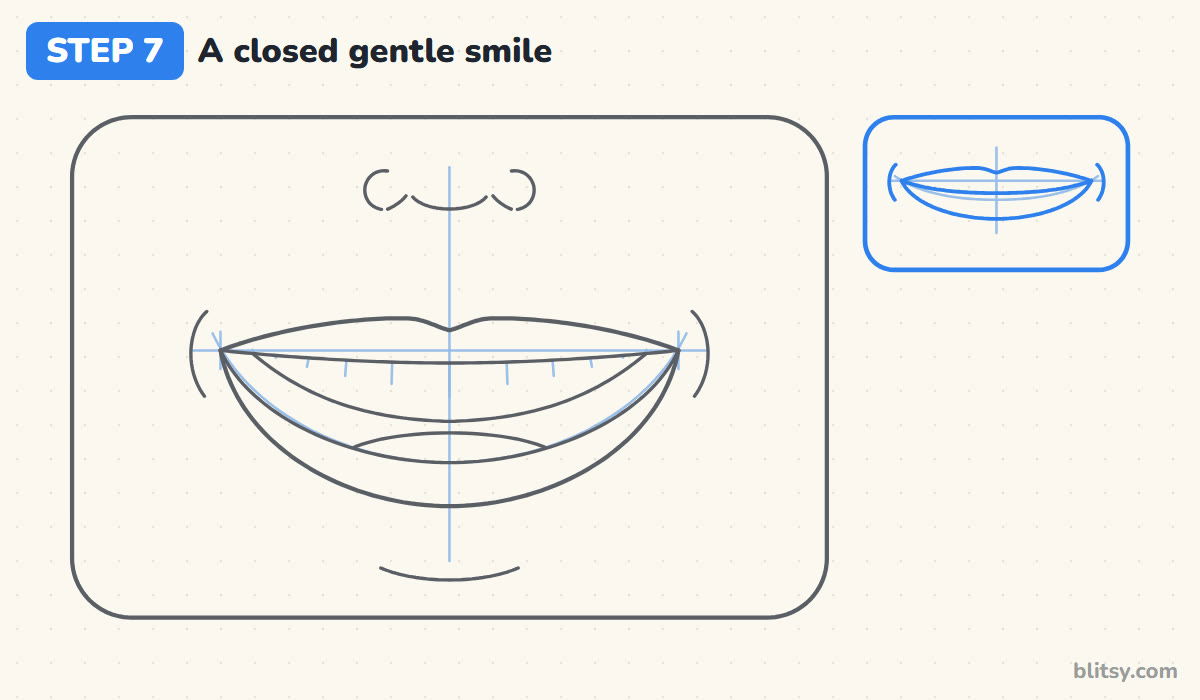
In the top small frame, make tiny versions of the step 1 guides with a much flatter U. The lips stay together this time, so you only need three curves: the upper lip with its bow, one line where the lips meet curving up at the ends, and a full lower lip. Add the two corner creases. It's the smile for a calm, kind character.




💡 Tip: The meeting line between the lips does all the smiling here, so lift its ends clearly.
Step 8: Draw a big open laugh
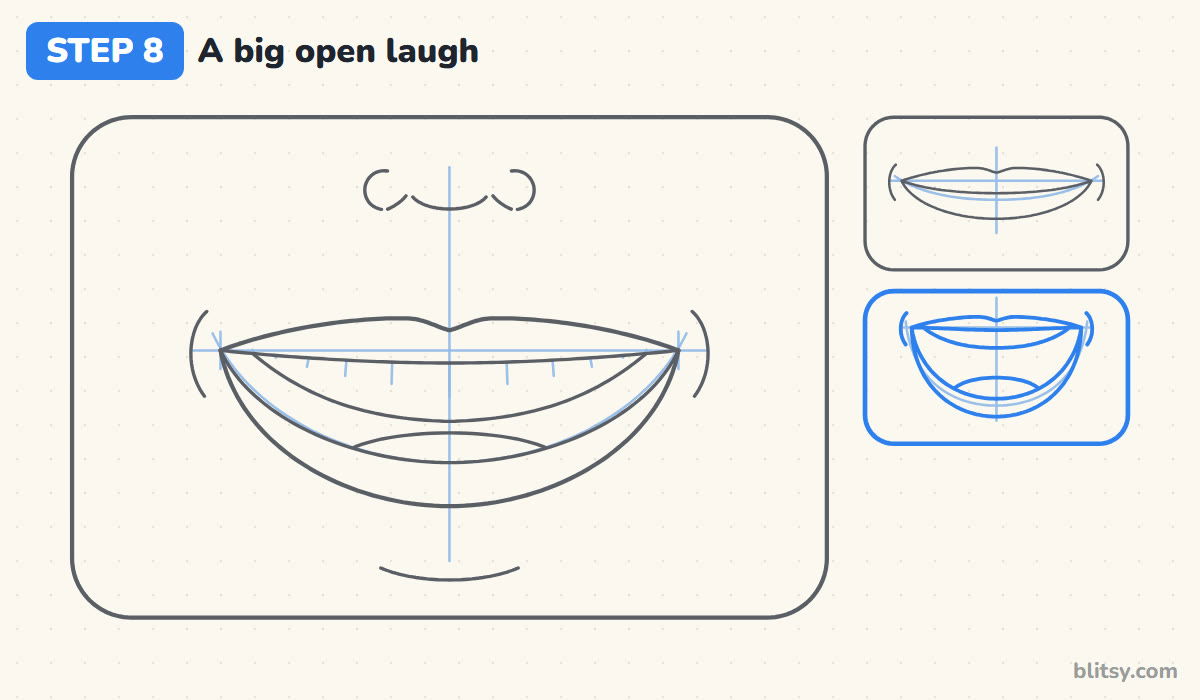
For the middle frame, keep the top of the opening almost straight and drop the U very deep, nearly into a half circle. The upper teeth become a thinner band at the top, and the tongue sits low with lots of dark mouth above it. Wrap a lower lip around the bottom and add the creases. A laughing mouth opens downward, not sideways.
💡 Tip: If your laugh looks like a scream, raise the corners and shrink the opening a little.
Step 9: Finish with a lopsided grin
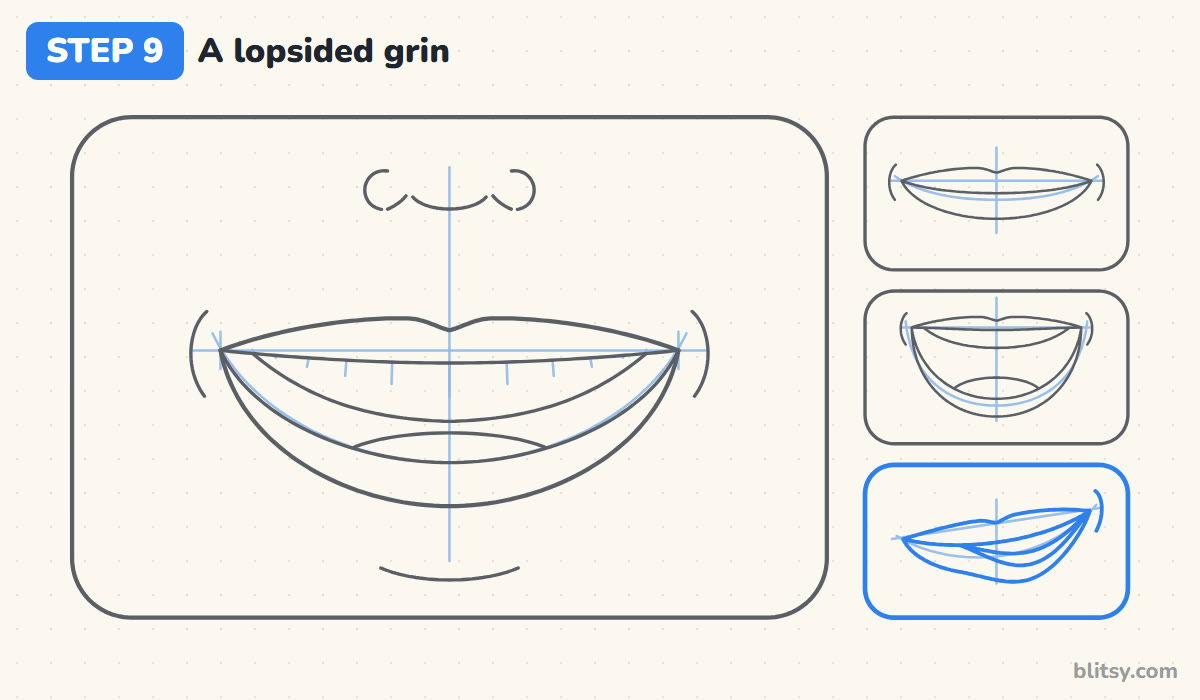
Tilt the guides in the bottom frame so the right corner sits higher than the left. On the left side the lips stay closed; on the right they part just enough to show a sliver of teeth. Only the raised side gets a crease. I like this one for cheeky or confident characters, though it takes a couple of tries to get the tilt right.
💡 Tip: Exaggerate the tilt in pencil first. A small tilt reads as a mistake, not a grin.
Step 10: Ink the lines and erase the guides
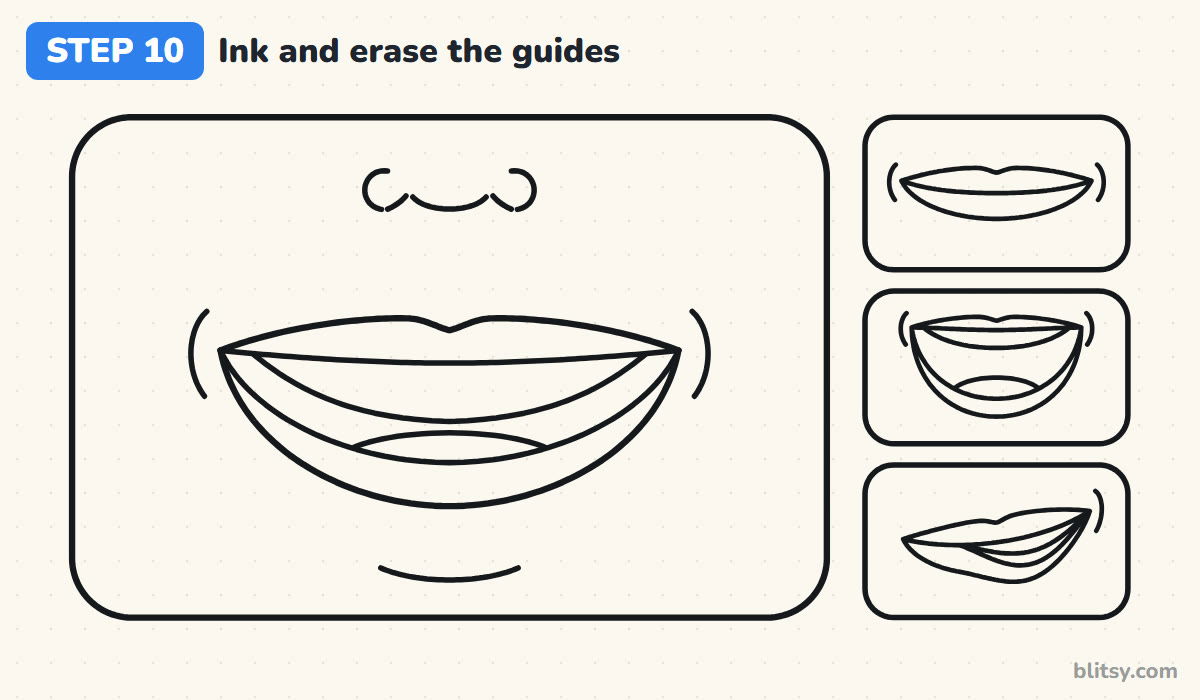
Trace every keeper line with your pen: lips, teeth curve, tongue, creases, nose, chin and the frames. Skip the faint tooth gap strokes and all the guides. Give the ink a minute to dry, then erase the pencil. The tooth gaps come back in the next step as soft gray, which looks far gentler than ink.
💡 Tip: Go slowly around the mouth corners, where four lines meet in one point.
Step 11: Color the smiles
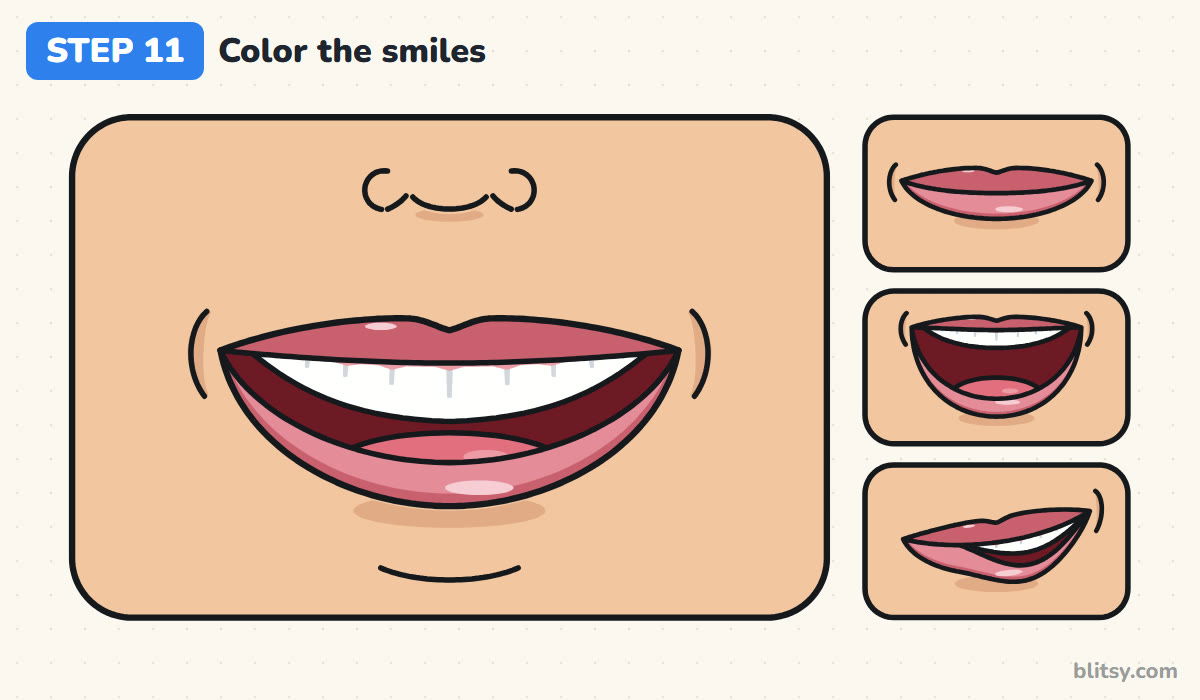
Start with peach skin and add tan below the nose, under the lower lip and inside each crease. Fill the mouth with dark red, then a rose red tongue. Leave the teeth white and touch in light gray only where teeth meet. Color the upper lip a darker pink than the lower lip, deepen the bottom edge of the lower lip, and leave a small unshaded spot on it for the shine.




💡 Tip: Color the dark mouth first, then the teeth. It keeps red from smudging into the white.
Smile Slips That Make Mouths Look Stiff
- Outlining every tooth. Separate boxes turn into a fence. Draw one band and only hint at the gaps in light gray.
- Mouth corners that point down or straight out. Lift both corners onto the same level line before anything else.
- Both lips the same thickness. Keep the upper lip slimmer and let the lower lip be fuller and rounder.
- Teeth filling the whole opening. Leave dark space at the corners and below the teeth so the mouth has depth.
- A smile with nothing around it. Two small creases at the corners push the cheeks up and make the expression believable.
Swap the Mood, Keep the Method
Once the big grin works, try changing just one curve: a deeper U for pure joy, a flatter one for a polite smile, or one raised corner for mischief. Bright lipstick colors, a gap between the front teeth or braces drawn as a thin gray line across the band all give a smile its own personality. To place your smile on a complete head, the face drawing tutorial is a good next stop, and for a simpler, cartoon take on happiness, try the emoji drawing tutorial.
Smile Coloring Page and Printable Lesson
Prefer pencil on paper? The free smile coloring page has all four mouths in bold outlines, a colored example to copy and a key for each color. The step-by-step PDF guide holds the eleven steps and their tips, two per page.
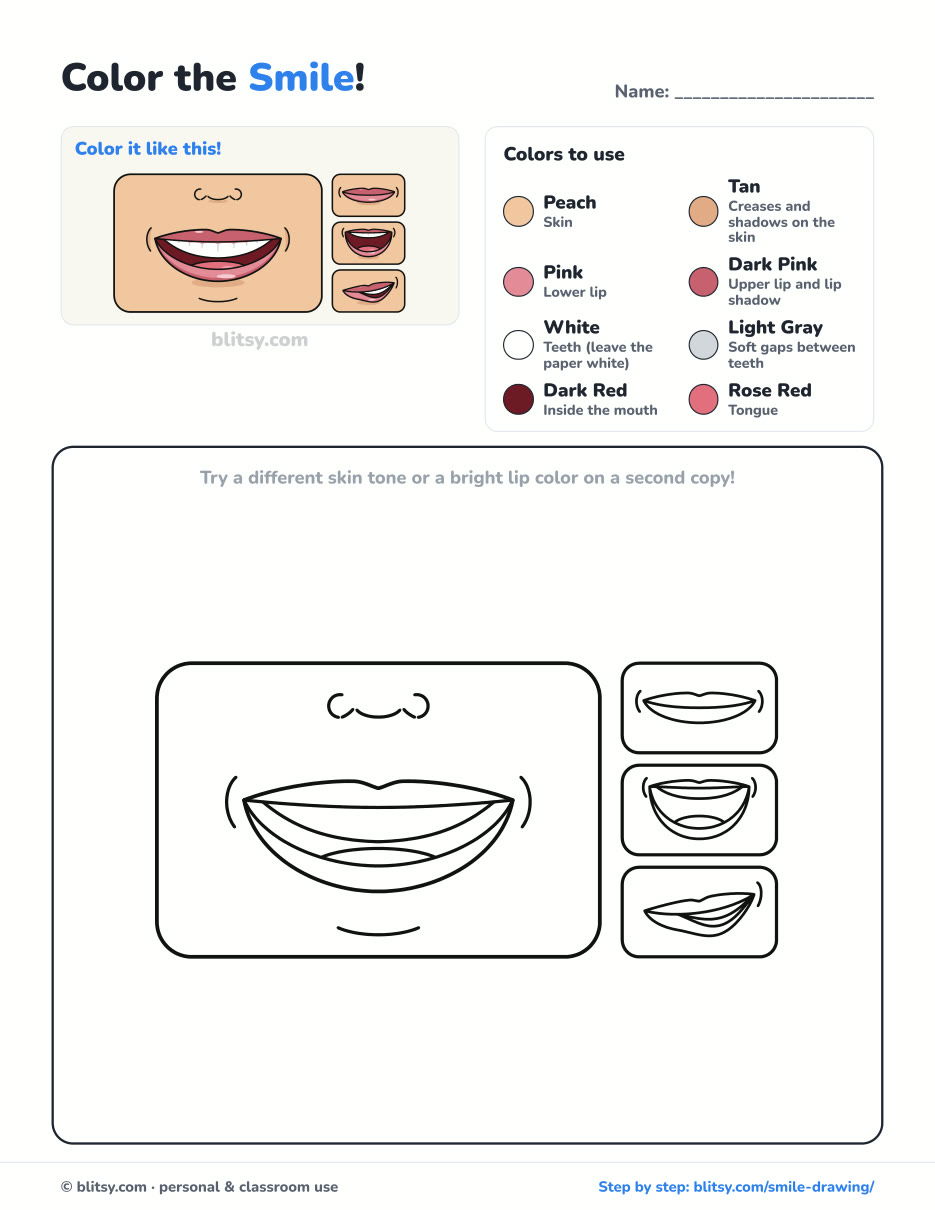
Black outlines with a colored example and the color names at the top. Ready to print and color.
⬇️ Download Coloring PageEvery step picture with its instructions and tips, to keep beside your paper while you draw.
⬇️ Download Drawing Guide📱 On a phone? Tap a download button, then open the file and choose Share → Save to Files or Print. On a computer, the PDF opens or saves straight to your Downloads folder.
Four Smiles on One Pinterest Board
Smile Drawing Questions That Come Up Often
What is the easiest way to draw a smile?
Draw a wide U between two corner points, add an upper lip with a small dip in the middle above it, and a fuller lower lip below. For a closed smile, a single curved line between the lips is enough.
How do you draw teeth in a smile without it looking weird?
Treat the upper teeth as one white band and leave the lower teeth hidden. Show the gaps with a few faint gray marks instead of dark outlines, and keep some dark space at the corners.
How do I make a drawn smile look real?
Lift the corners, add small creases beside them, and shade under the lower lip. A tiny shine on the lower lip helps too.
Is this smile tutorial good for kids?
Yes. Younger kids can draw the big smile and the closed smile and skip the lopsided grin, which needs a bit more control.
Draw your own grin in a mirror next and compare it with the one on paper; the corners usually turn out higher than you'd guess. 😁✏️
Related posts:
 How to Draw a Whale Step by Step (Easy for Beginners)
 How to Draw Lungs Step by Step (Easy Science Diagram)
 How to Draw a Pineapple Step by Step (Easy Crown and Slice)
 How to Draw Iron Man Step by Step (Easy Chibi for Kids)
 How to Draw a Dress Step by Step (Easy Party Dress)
 How to Draw a Chicken Step by Step (Easy for Beginners)
 How to Draw a UFO Step by Step (Cute Alien Saucer)
 How to Draw Flames Step by Step (Easy Campfire Drawing)
 How to Draw a Moon Step by Step (Sleepy Crescent + Phases)
 How to Draw a Sunflower Step by Step (Big and Bright)
 How to Draw a Fall Leaf Step by Step (Maple, Oak and Birch)
 How to Draw a Mushroom Step by Step (Easy Storybook Toadstool)

