
A red toadstool with white spots looks like it walked straight out of a fairy tale, and it's one of the friendliest things you can draw. Underneath, it's only a half oval on a flat oval, plus a tube. Here you'll learn how to draw a mushroom step by step, from those first light shapes to a colored scene with two small brown mushrooms and a curious snail. The trickiest part is the gills under the cap, and I'll show you a simple way to space them.
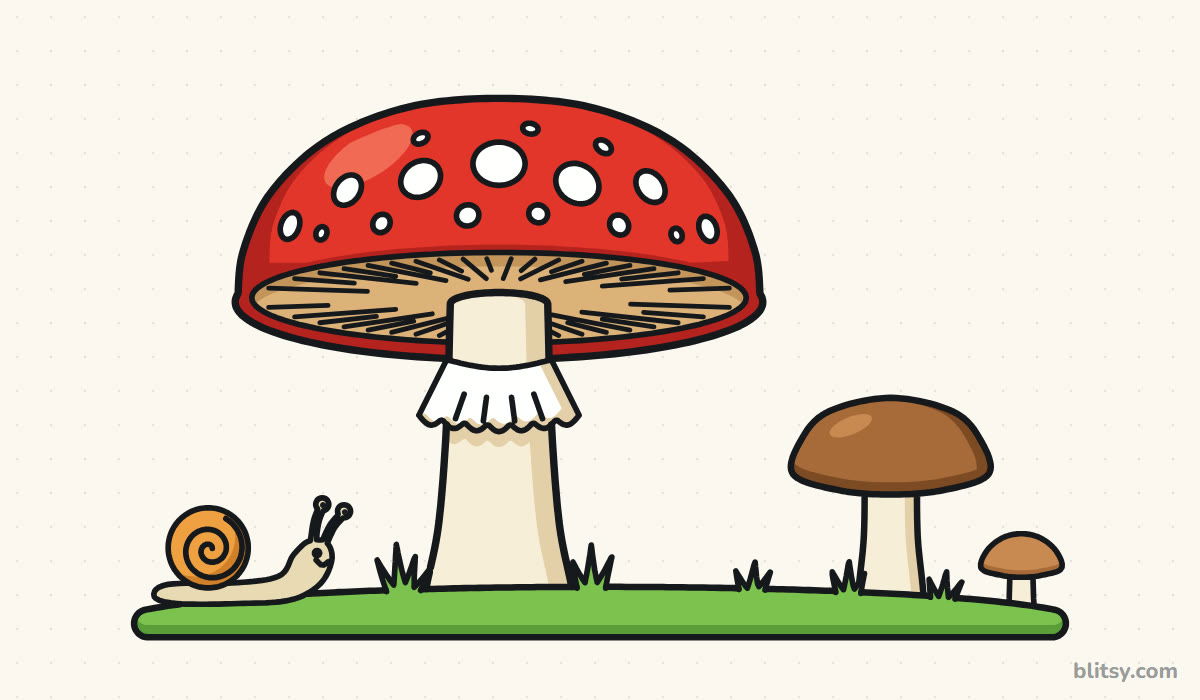
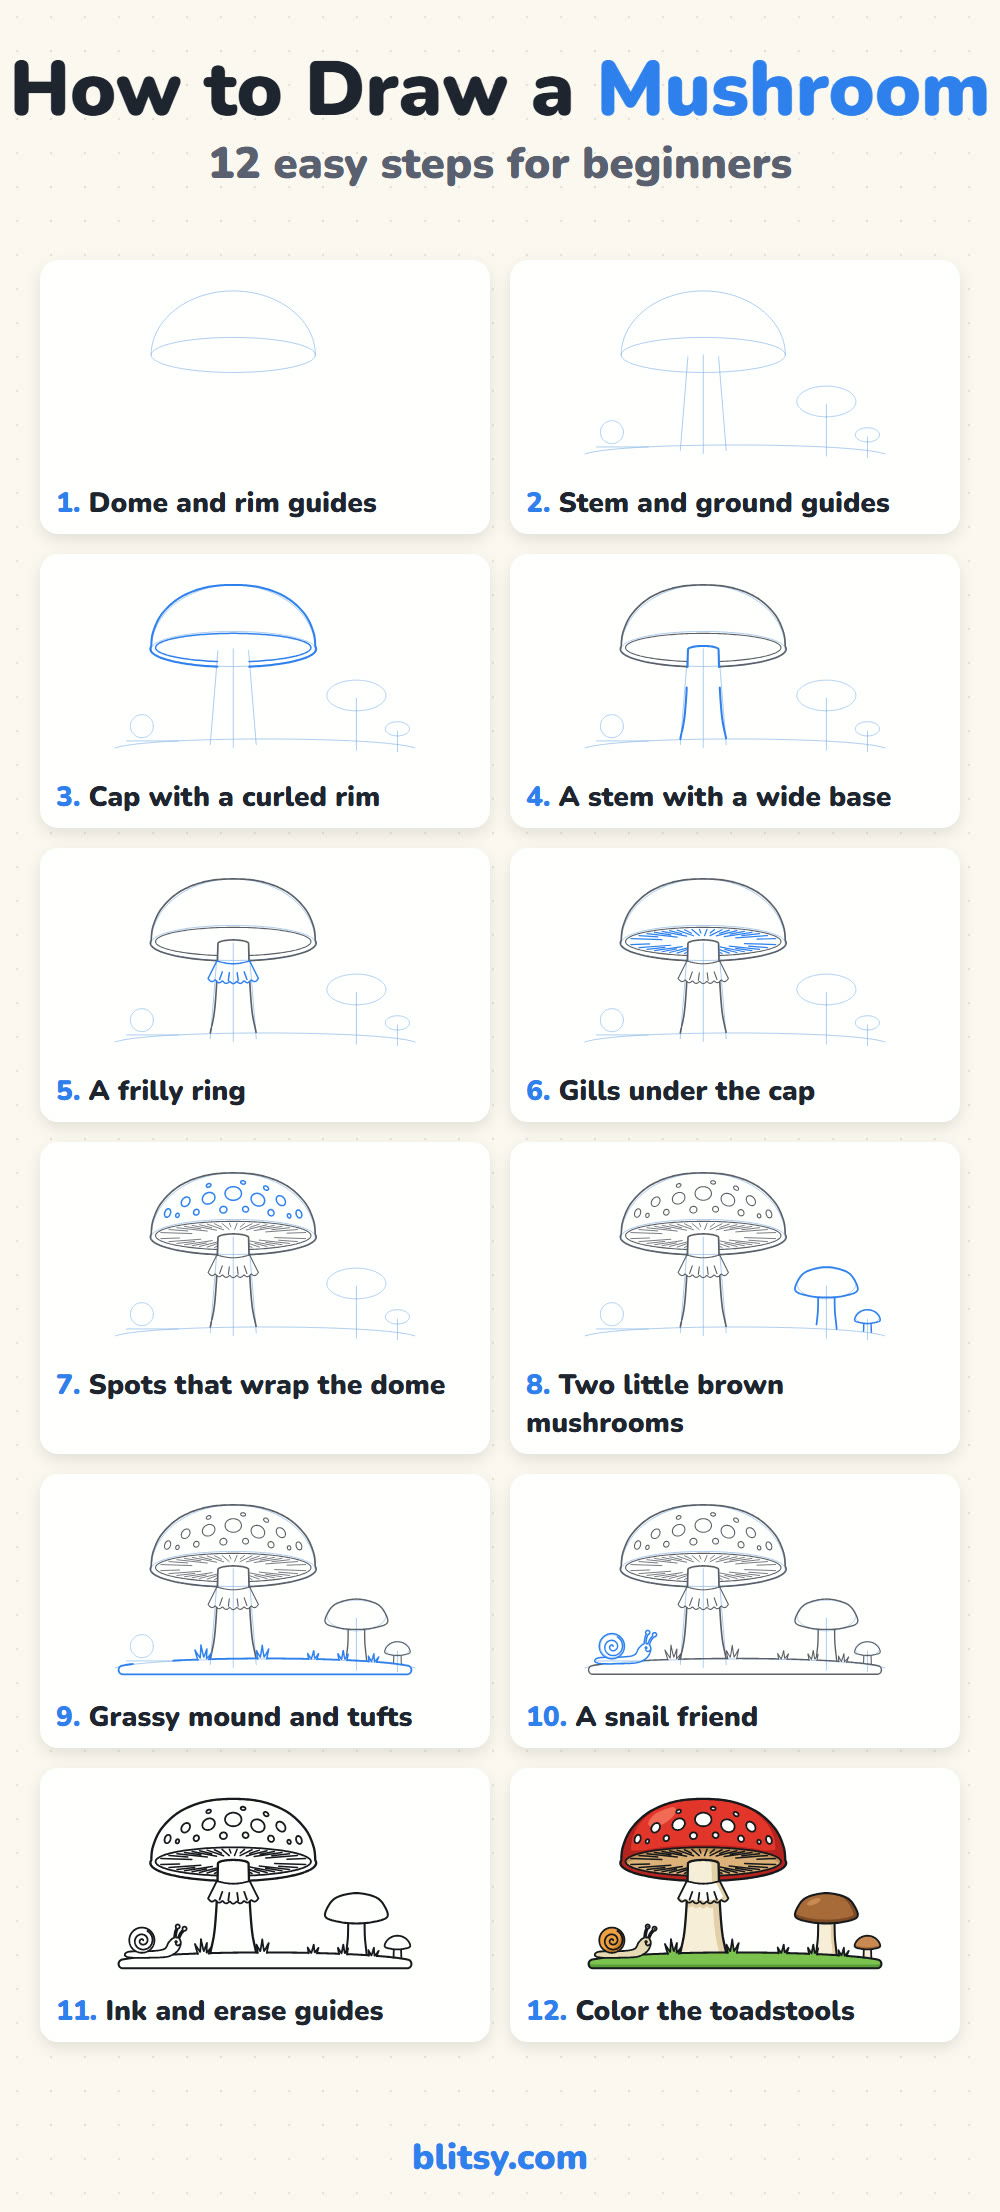
In each picture, the lines you draw in that step are bright blue. The gray lines are from earlier steps, and the pale blue shapes are construction guides you'll erase near the end.
Quick overview
⏱️ Time: roughly 40 minutes, including color
🎯 Level: easy; kids from about 6 can follow along
✏️ Steps: 12
🍄 You'll draw: a spotted red toadstool with gills and a frilly ring, a small brown mushroom, a tiny one and a snail in the grass
Toadstool Sketching Supplies
- An HB pencil for the soft first lines
- A clean eraser
- A black fineliner or felt-tip pen for inking
- Colored pencils or markers in red, dark red, white or cream, tan, brown, green and orange
- Plain paper turned sideways, so the mushrooms have room to spread out
No white pencil? Just leave the spots uncolored and let the paper do the job.
How to Draw a Mushroom Step by Step
Step 1: Sketch the dome and the rim oval
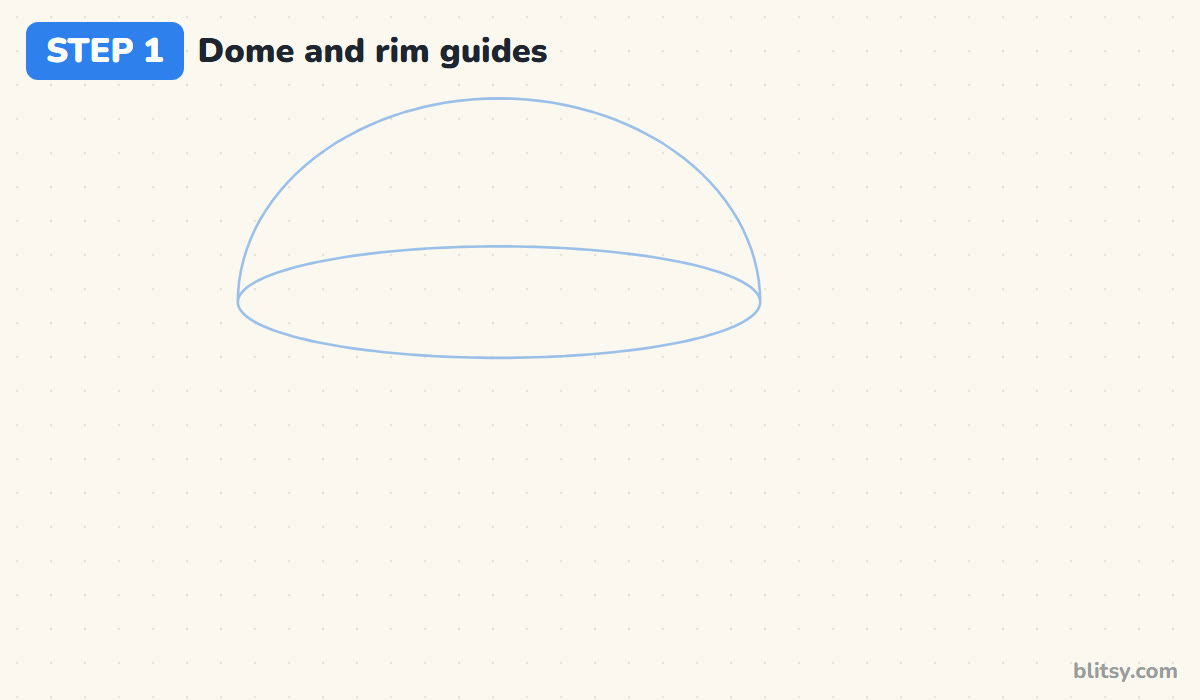
Start with a wide, flat oval in the upper middle of your page. This is the rim of the cap. On top of it, draw a half oval that is about as tall as the flat oval is half wide. Together they look like a bowl turned upside down.
💡 Tip: Draw the flat oval first. It decides how wide the whole cap will be.
Step 2: Add guides for the stem and the ground
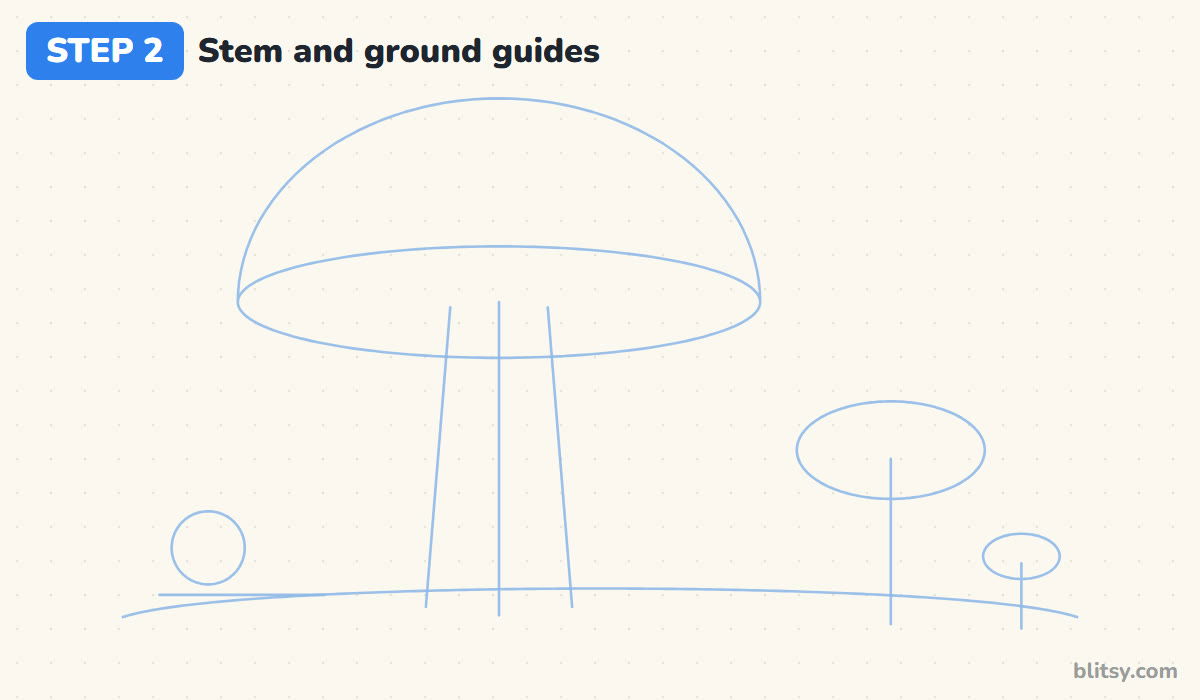
Drop a straight center line from the middle of the rim almost to the bottom of the page. Add two slanted lines beside it that spread a little apart as they go down, so the stem ends up wider at its base. Then draw a long, gently curved ground line, a small oval with a line for the brown mushroom on the right, an even smaller one beside it, and a circle on the left where the snail's shell will sit.
💡 Tip: Press so lightly that you can barely see the lines. They're only there to help you.
Step 3: Draw the cap with a curled rim
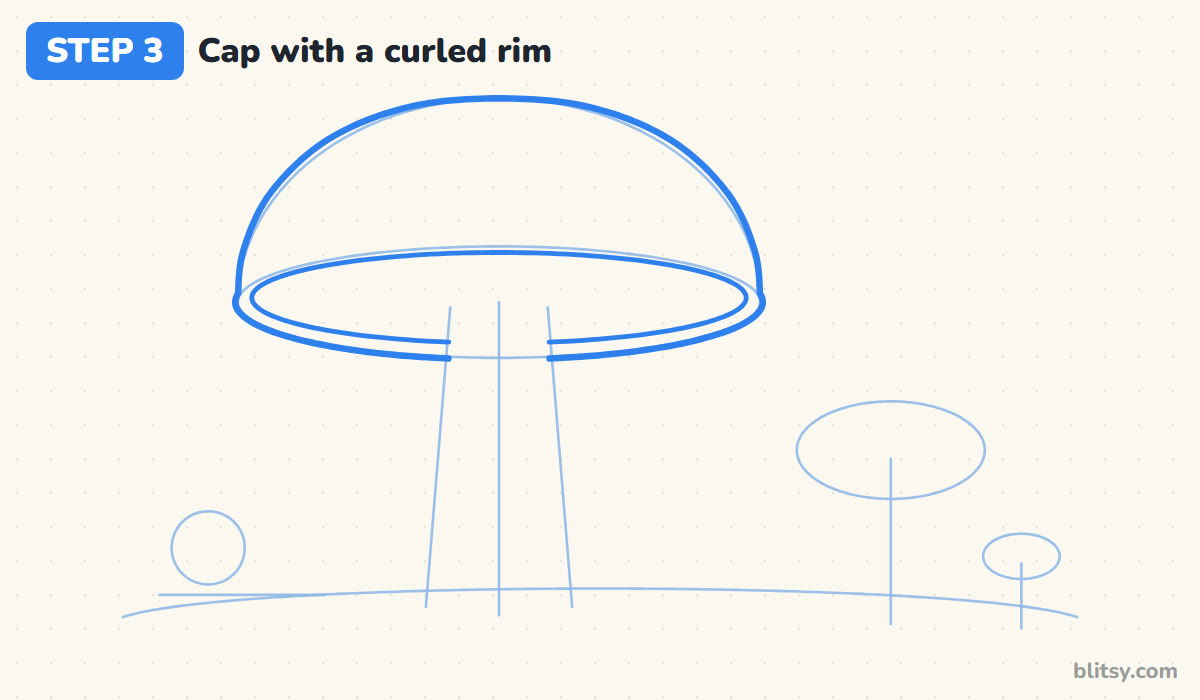
Trace over the dome guide with one smooth line and let it wrap around the outside of the flat oval. Next, draw a second, slightly smaller oval just inside the rim. The thin band between the two ovals is the edge of the cap curling under. I leave a gap at the bottom of both ovals, right where the stem will cover them.



💡 Tip: Make the band a little thicker at the bottom than at the top.
Step 4: Draw a stem that widens at the bottom
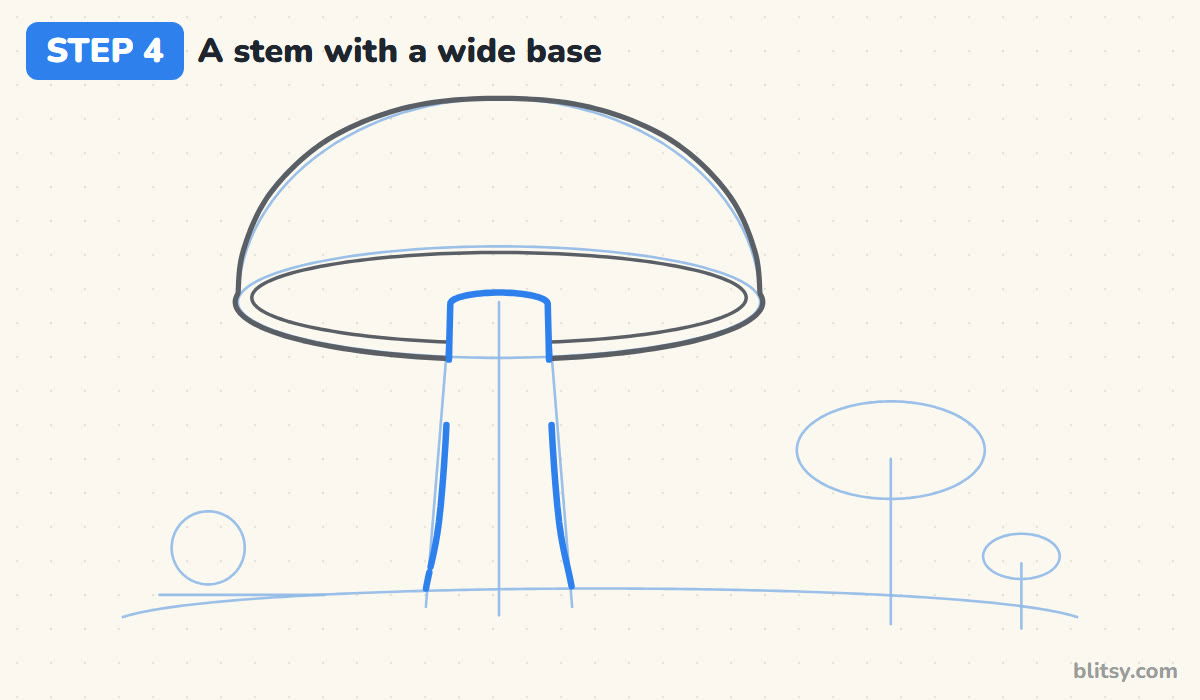
Begin at the underside with a short, rounded curve for the top of the stem, a bit narrower than a quarter of the cap's width. Then pull both sides down along your slanted guides, letting them flare out near the ground. Skip a short stretch just below the cap, because the ring goes there next.
💡 Tip: A stem that's too thin makes the cap look heavy. Keep it sturdy.
Step 5: Hang a frilly ring under the cap
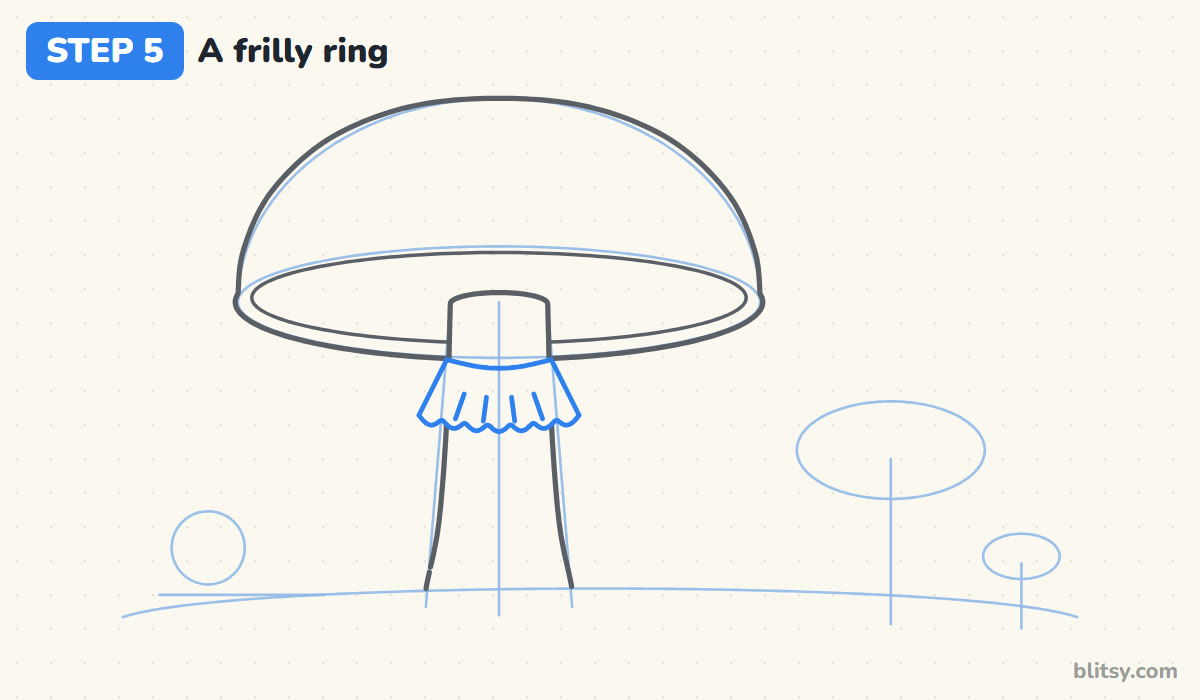
Just below the underside, draw a curved line across the stem. From each end, slant a line down and outward, like a small skirt. Join them at the bottom with a wavy edge of little bumps. Four short lines inside show the folds.
💡 Tip: Keep the bumps on the lower edge small and even, like a pie crust.
Step 6: Fill the underside with gills
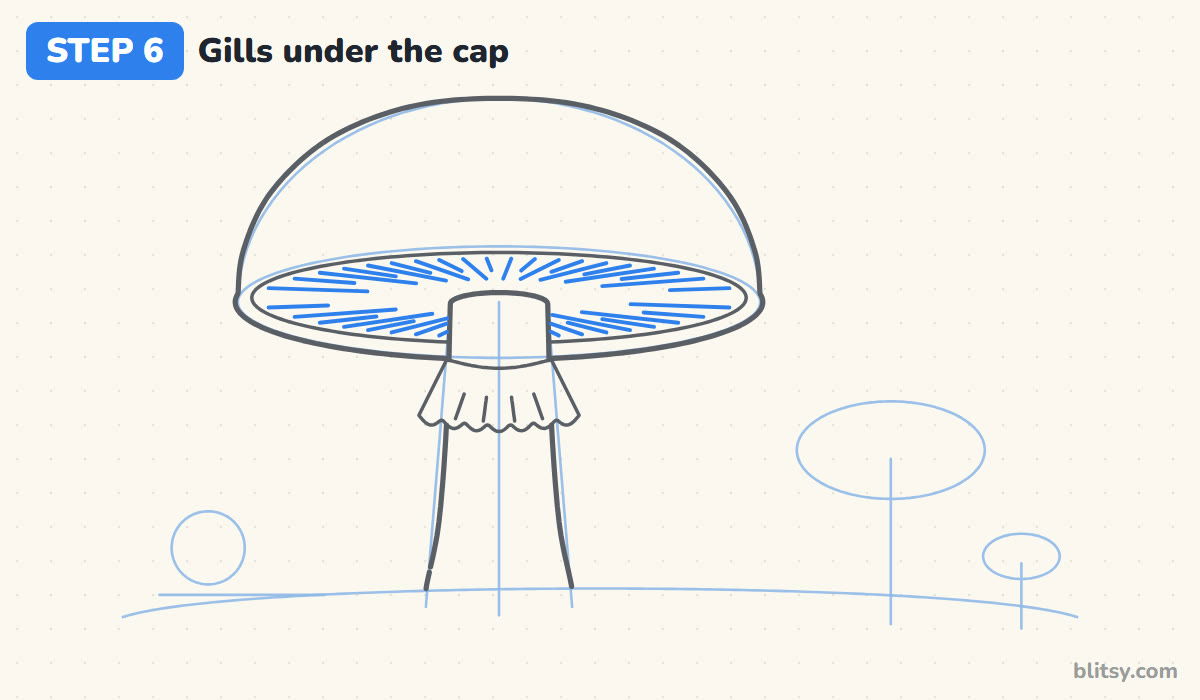
Gills are thin lines that fan out from the stem to the rim, like the spokes of a wheel. Draw a long one, then a shorter one, and keep switching all the way around. At the far left and right of the oval they run almost flat, so space those ones a little wider. Don't draw any gills behind the stem.
💡 Tip: Stop each gill a little before the rim instead of crashing into it.
Step 7: Wrap the spots around the dome
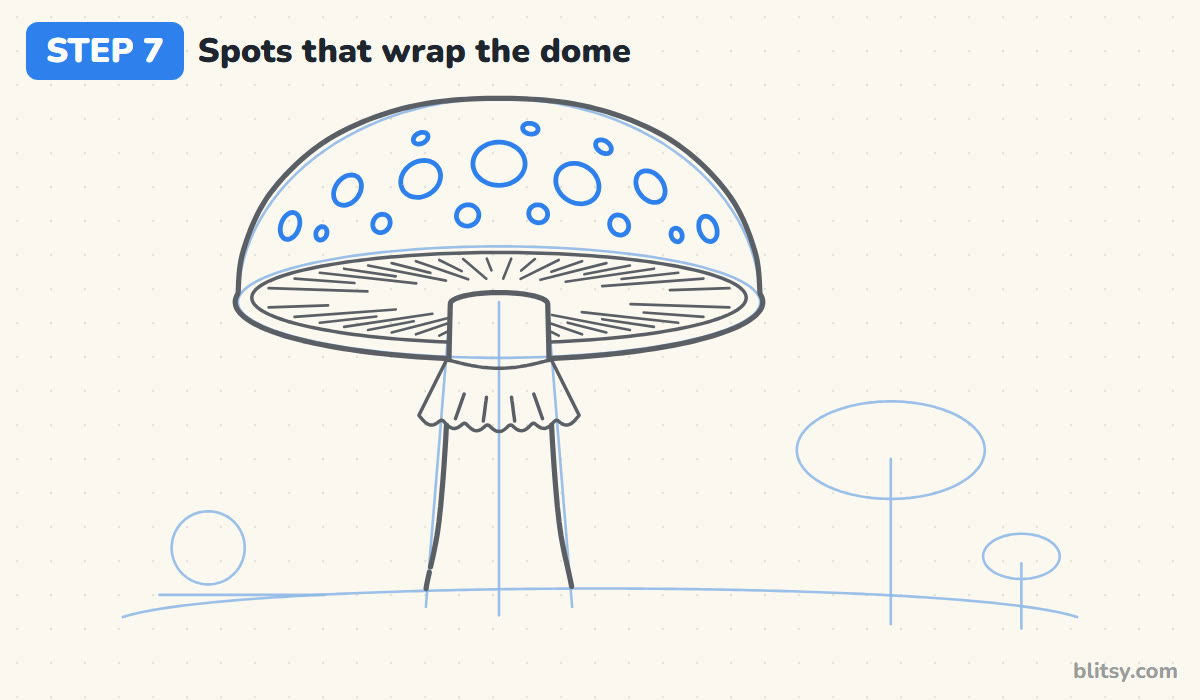
This is the step that makes the cap look round. Spots in the middle of the dome are round circles, and the bigger ones go there. As you move toward the edges, draw them smaller and squeeze them into thin ovals, as if they're bending away from you around the curve. Mix sizes so they don't form rows.




💡 Tip: Keep every spot off the outline. A spot touching the edge looks like a bite.
Step 8: Add two little brown mushrooms
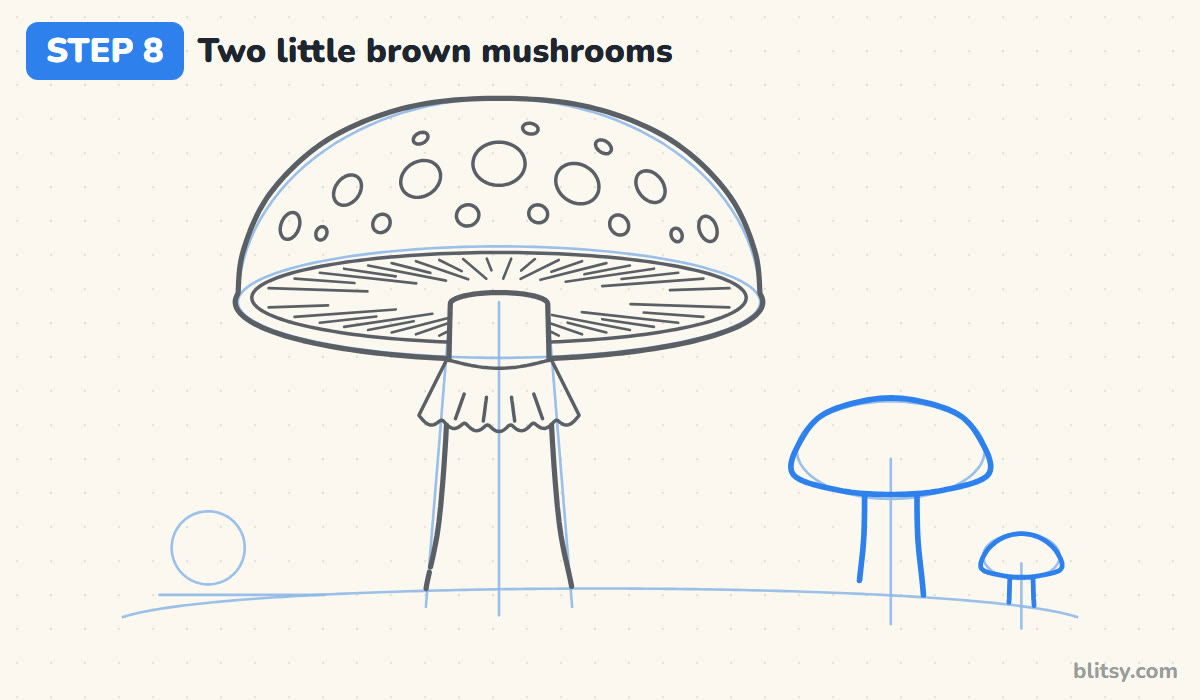
On the right, draw a rounded bun shape for the smaller mushroom's cap, with a softly curved bottom edge. Give it a short, straight stem. Next to it, draw a tiny version about half its size. These two sit lower than our eyes, so we see the tops of their caps, not the gills.
💡 Tip: Vary the heights. Three mushrooms of the same size look like a fence.
Step 9: Draw the grassy mound and tufts
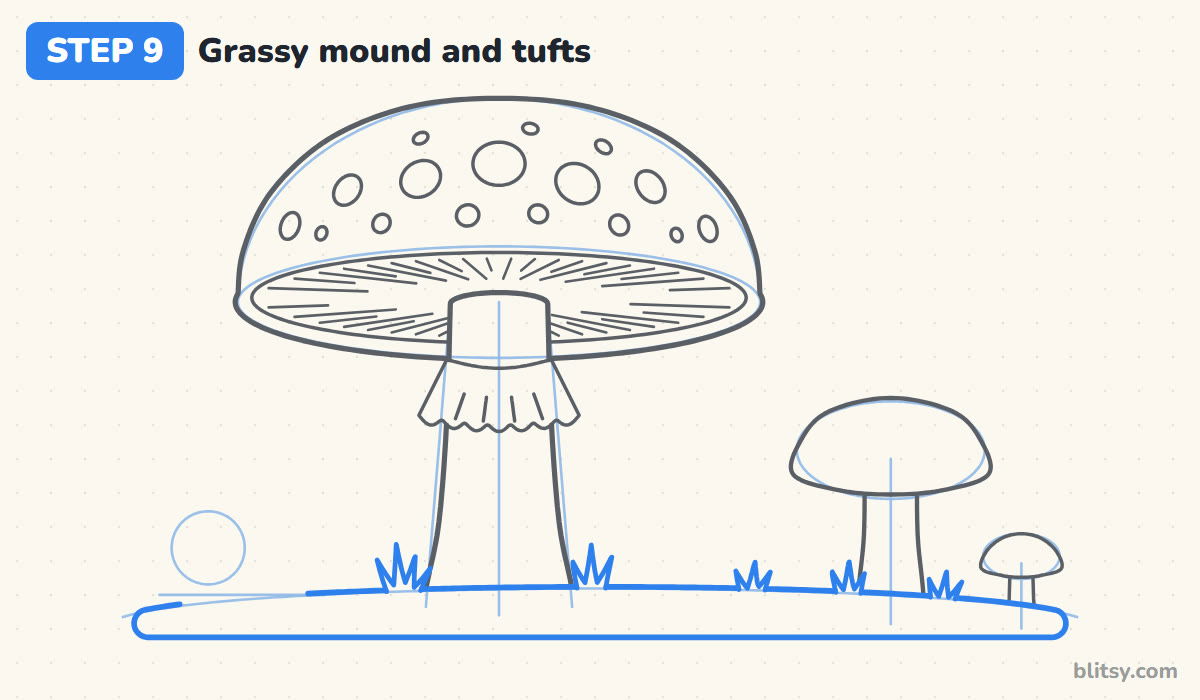
Follow your ground guide with a gentle hump that rises a little under the big toadstool, then round off both ends and close it with a flat line underneath. Now add small tufts of pointy grass blades where each stem meets the ground. They hide the stem bottoms nicely.
💡 Tip: Make each tuft with three or four blades of different lengths.
Step 10: Draw a snail friend
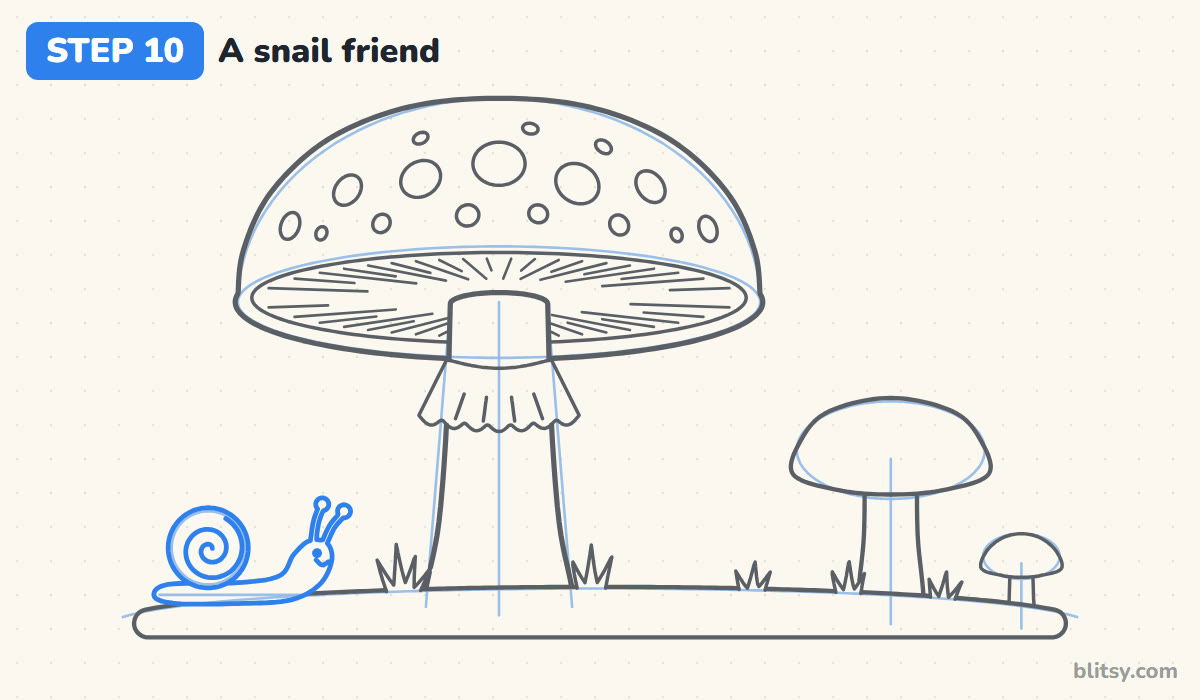
Turn the circle guide into the shell and draw a spiral inside it, starting near the outer edge and curling toward the middle. Under the shell, draw a long soft body that lifts into a head on the right. Two thin eye stalks with round tips, a dot for the eye and a tiny smile finish it off.
💡 Tip: Spin the paper as you draw the spiral. Your hand will thank you.
Step 11: Ink the lines and erase the guides
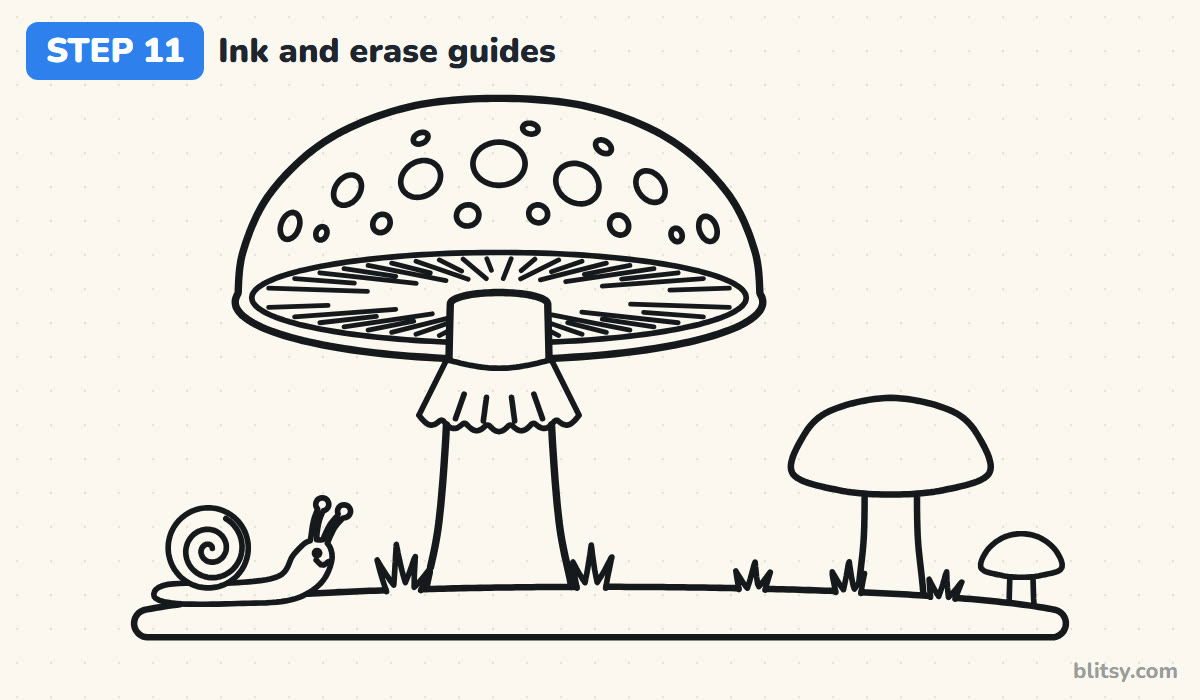
Go over every line you want to keep with the black pen. I ink the big toadstool first, since it's the main subject, then the small mushrooms, the ground and the snail. When the ink is fully dry, erase all the guide lines.




💡 Tip: Ink the gills with quick, light flicks so they stay thin.
Step 12: Color the toadstools
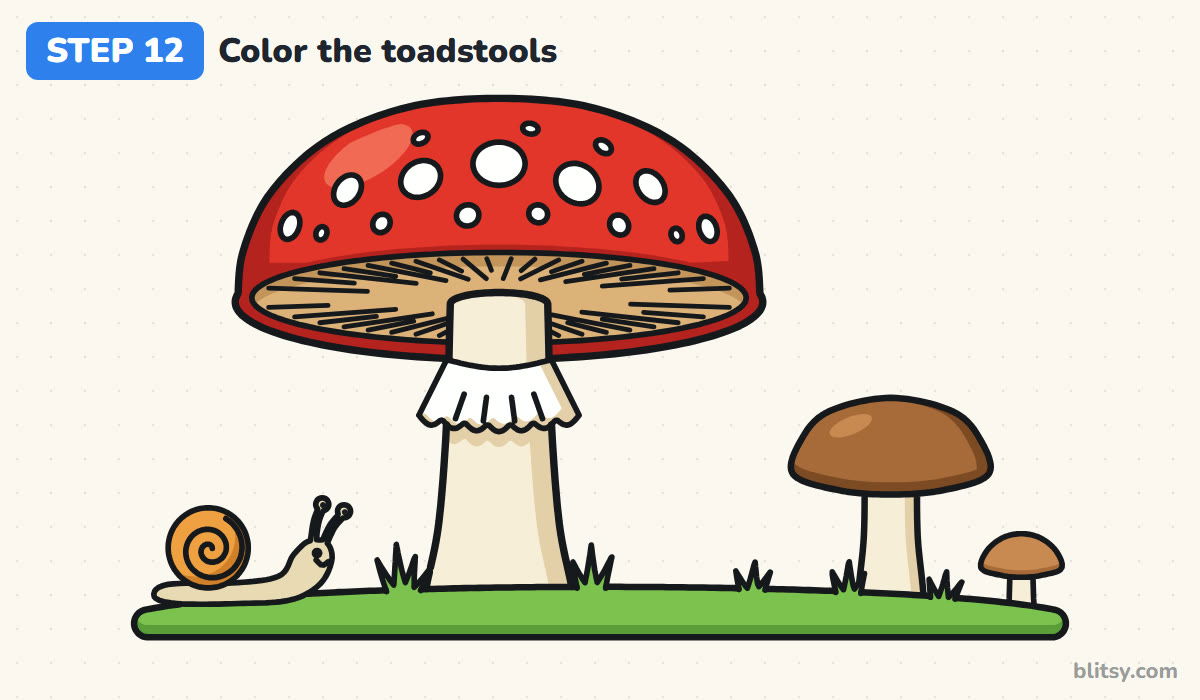
Color the cap bright red and add dark red along the bottom of the dome and on the curled rim. Leave the spots and the ring white. Make the gills tan and the stems cream with a beige stripe on the right; the small caps are brown. Finish with green grass and an orange shell.
💡 Tip: Leave a small lighter patch on the top left of the cap for a shine.
Spots, Gills and Other Toadstool Trouble
- Perfectly round spots everywhere. They make the cap look flat, like a sticker. Keep round spots for the middle and draw thin ovals near the edges.
- Gills packed into a dark blob. If the lines crowd together near the stem, the underside turns black. Alternate long and short gills and stop them before they reach the stem.
- A pencil-thin stem. A big cap on a skinny stem looks ready to tip over. Make the stem about a fifth of the cap's width and let it widen toward the ground.
- Drawing the gills on top of the cap. Gills only grow underneath. The dome stays smooth, with spots.
- Pressing hard on the guides. Dark guides won't erase cleanly. Sketch them faintly and save the pressure for the ink.
Change the Toadstool Into Your Own Scene
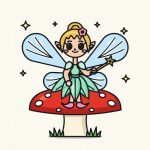
Once you've got the basic shape, try a whole ring of toadstools, or paint a round door and a tiny window on the big stem to turn it into a fairy house. A tall, thin cap gives a moodier woodland mushroom. Younger kids can skip the snail. A toadstool also pairs well with the fairy drawing tutorial, whose fairy sits on a spotted red seat of her own, and if you like nature scenes, how to draw a frog step by step is another good next step.
Free Toadstool Coloring Page and Printable Guide
Want to color without drawing first? Grab the free mushroom coloring page. It shows a small colored example at the top for kids to copy, and a large outline below with space for more mushrooms or a ladybug. The PDF drawing guide collects all 12 steps with their tips and prints on Letter or A4 paper.
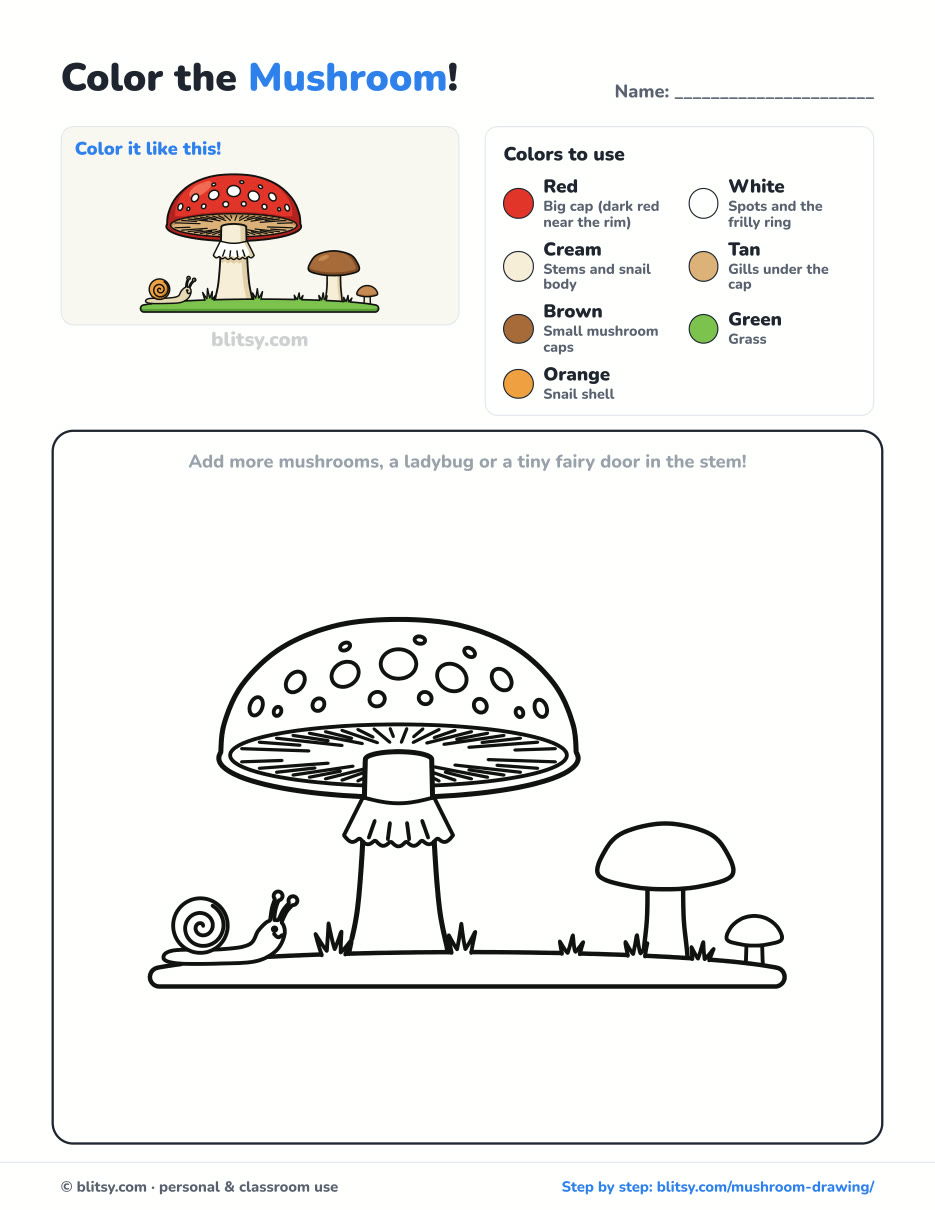
Black outlines with a colored example and the color names at the top. Ready to print and color.
⬇️ Download Coloring PageEvery step picture with its instructions and tips, to keep beside your paper while you draw.
⬇️ Download Drawing Guide📱 On a phone? Tap a download button, then open the file and choose Share → Save to Files or Print. On a computer, the PDF opens or saves straight to your Downloads folder.
Pin the Mushroom Steps for Another Day
Toadstool Finished? Draw a Peach Next
Try this step-by-step tutorial next. It also starts from simple round shapes.
- Peach Drawing: The peach drawing tutorial goes from two plain circles to a blushing whole peach and a sliced half with its stone.
Mushroom Drawing Questions I Hear a Lot
What is the easiest way to draw a mushroom?
Draw a half circle for the cap and a short rectangle under it for the stem, then round the corners. Add a few spots and you have a cute mushroom in under five minutes. Gills and a ring can come later.
Why does the red mushroom have white spots?
The red-and-white mushroom is called the fly agaric. When it's young, the whole mushroom is wrapped in a thin white skin. As the cap grows and stretches, that skin breaks into the white patches you see, and rain can wash some of them off.
Is the red mushroom with white spots poisonous?
Yes. The fly agaric is poisonous and should never be eaten. It's safe to draw and look at, but never eat any wild mushroom you find, because many harmless-looking ones are toxic.
How long does it take to draw this mushroom?
Most beginners need about 25 minutes for the pencil and ink, and another 15 for color. Skip the snail for a quicker version.
That's one storybook toadstool, ready for a fairy to move in. Did you add more spots than mine? 🍄
Related posts:
 How to Draw a Fairy Step by Step (Easy Toadstool Fairy)
 How to Draw a Whale Step by Step (Easy for Beginners)
 How to Draw Lungs Step by Step (Easy Science Diagram)
 How to Draw a Pineapple Step by Step (Easy Crown and Slice)
 How to Draw Iron Man Step by Step (Easy Chibi for Kids)
 How to Draw a Dress Step by Step (Easy Party Dress)
 How to Draw a Chicken Step by Step (Easy for Beginners)
 How to Draw a UFO Step by Step (Cute Alien Saucer)
 How to Draw Flames Step by Step (Easy Campfire Drawing)
 How to Draw a Moon Step by Step (Sleepy Crescent + Phases)
 How to Draw a Sunflower Step by Step (Big and Bright)
 How to Draw a Fall Leaf Step by Step (Maple, Oak and Birch)

