
Green hair, a white face and a purple suit with an orange vest: put those colors on one small figure and almost anyone will tell you who it is. The Joker is a DC Comics character who first appeared in Batman #1 in 1940, and in this lesson you'll learn how to draw the Joker step by step as a tiny chibi with a cheeky closed-mouth grin, holding up a playing card. This is my simple fan-art version for practice, not official art, and he's meant to look like a magician about to show you a card trick.

In each picture below, the blue lines are new for that step and the gray lines are what you drew before. The light blue helpers get erased in step 11, so keep them faint.
Quick overview
⏱️ Time: about 35 minutes, plus 15 for coloring
🎯 Level: easy (the hair waves take a little practice)
✏️ Steps: 12
🃏 You'll draw: a full-body chibi Joker in his purple tailcoat, holding up a playing card
Card-Trick Supplies for a Chibi Joker
- A pencil you can press lightly (HB works)
- A clean eraser for the helper shapes
- A black felt-tip pen or fineliner for the final lines
- Green, purple and orange markers or pencils
- Red and pink for the smile, the cheeks and the card
- Plain white paper, held the tall way
Leave the face and hands as plain white paper; no white pencil needed.
How to Draw the Joker Step by Step
Step 1: Draw a head oval, a center line and the ground
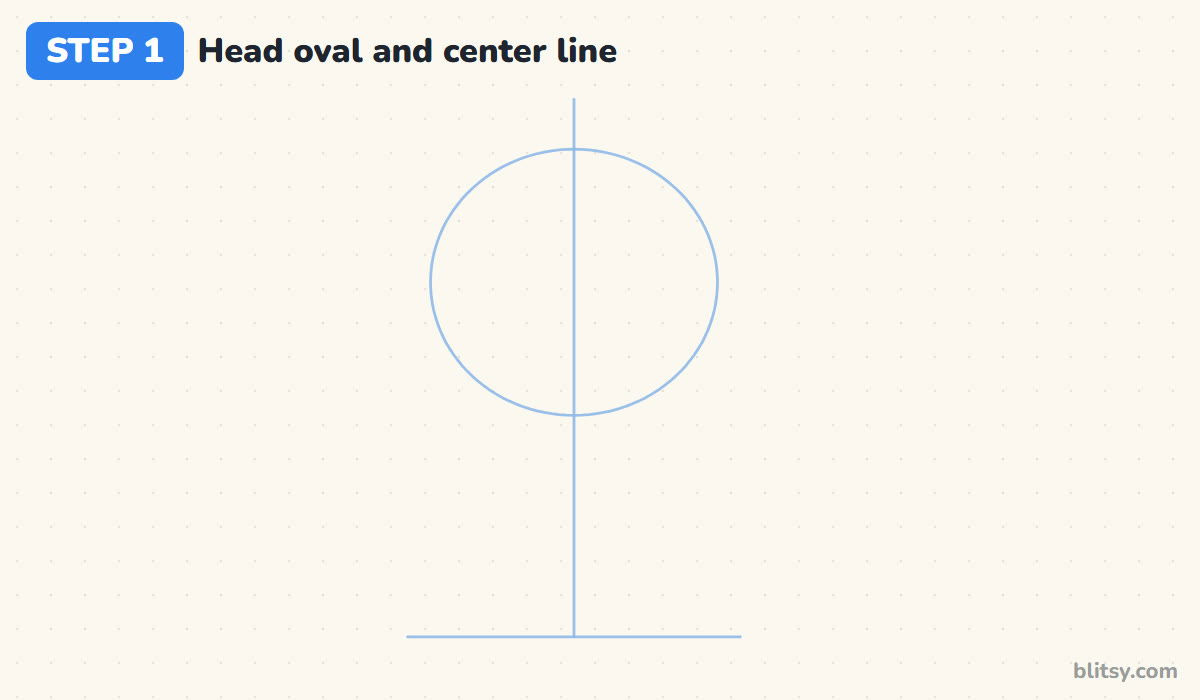
Start with a big oval in the top half of the page. In chibi style the head is almost as tall as the body, so don't shrink it. Run a light line down through the middle, and add a short flat line near the bottom where his shoes will stand.
💡 Tip: Leave a finger's width of space above the oval, because the hair grows taller than the head.
Step 2: Add a body oval and stick lines for the pose
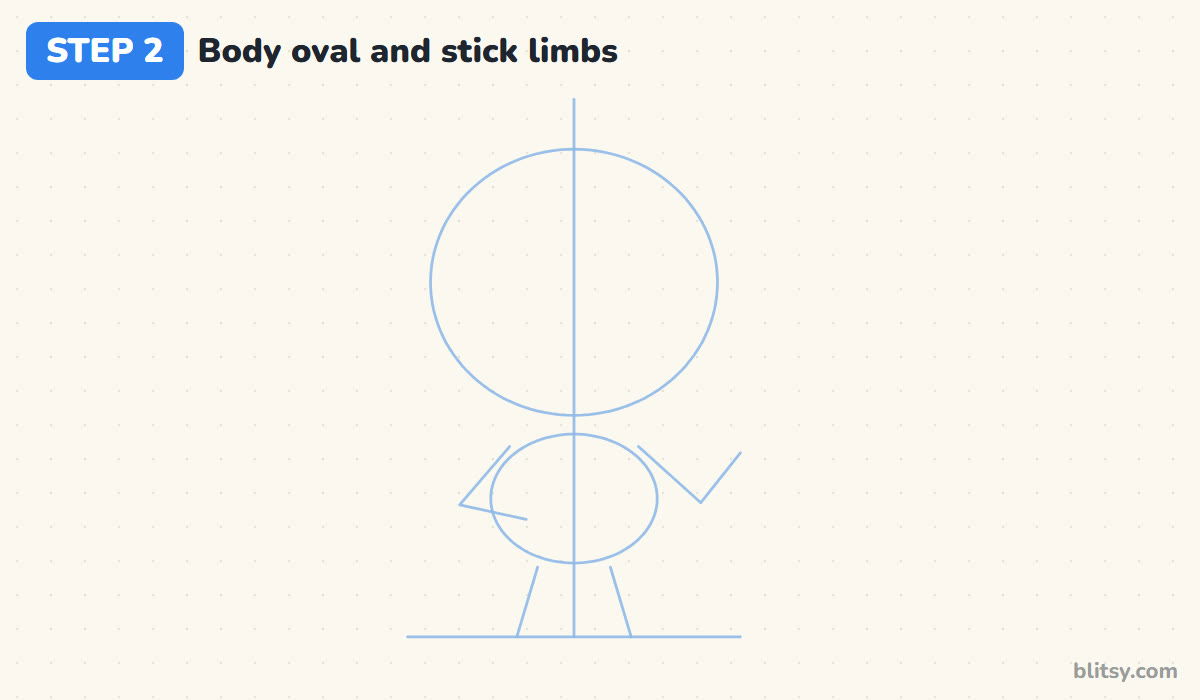
Below the head, sketch a smaller oval for the body, a bit more than half as wide as the head. Then plan the pose with sticks. The arm on your left bends out at the elbow and comes back to rest on his tummy. The other one bends up beside his face. Two short legs reach the ground.
💡 Tip: Bend the tummy arm into a clear V; if the elbow is too soft, the arm just looks like it's hanging.
Step 3: Sketch guides for the hair, card and eyes
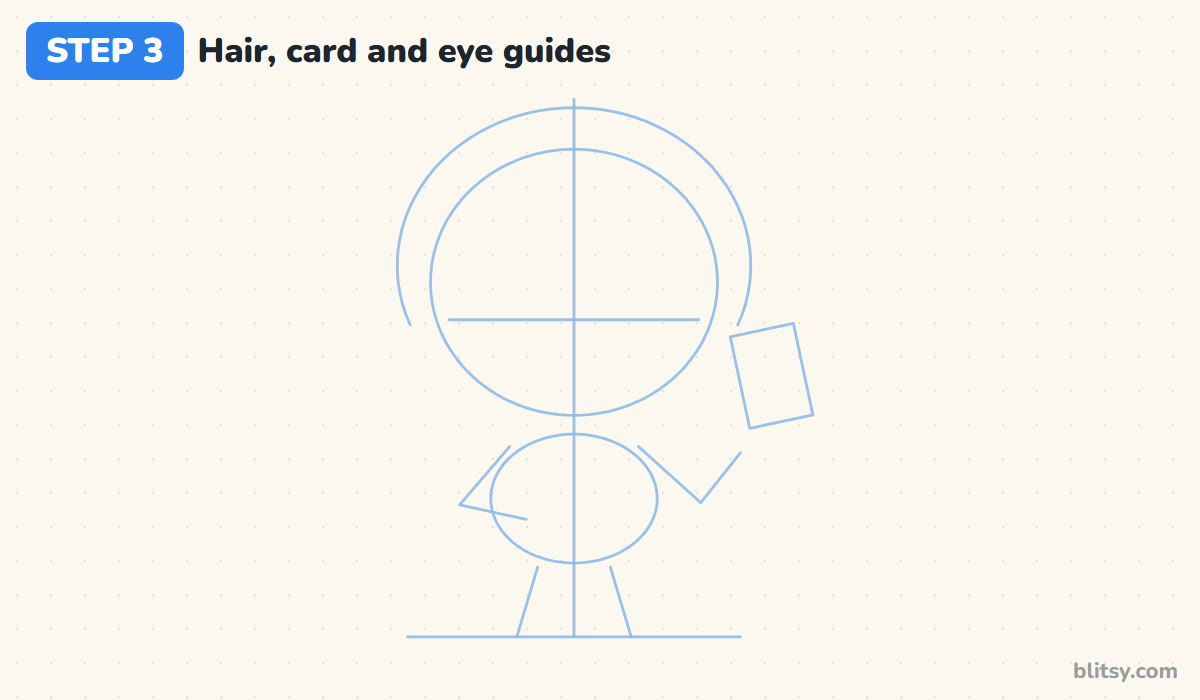
Draw a large arch around the top of the head, about a thumb's width outside it, stopping a little below the middle on both sides. The hair will fill that space. Beside his raised hand, add a small tilted rectangle for the card, then a level line slightly below the middle of the head for the eyes.

💡 Tip: Tilt the card so its top leans away from his head; an upright card looks stiff.
Step 4: Draw the lower face and the ears
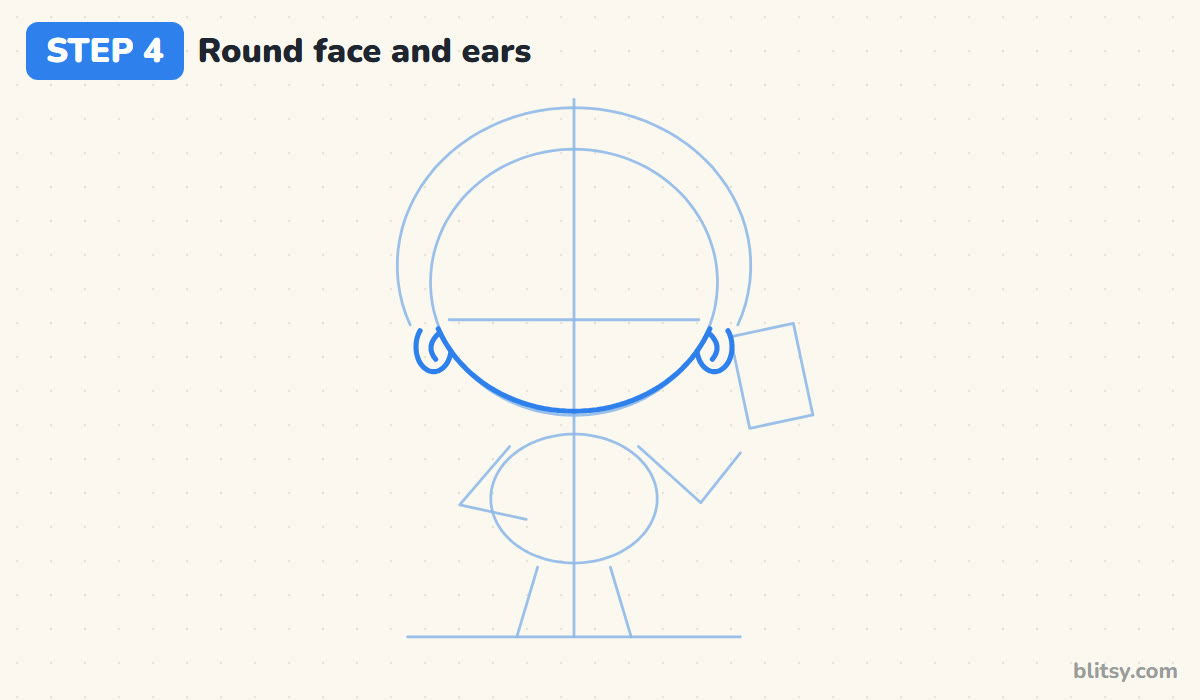
Trace the bottom half of the head oval, from one side of the hair arch around the chin to the other. Only this part of the face line stays, since the hair covers the top. Add a small C-shaped ear on each side with a little curve inside.
💡 Tip: Stop the face line at the hair arch now, so there's nothing extra to erase later.
Step 5: Draw the swept-back wavy hair
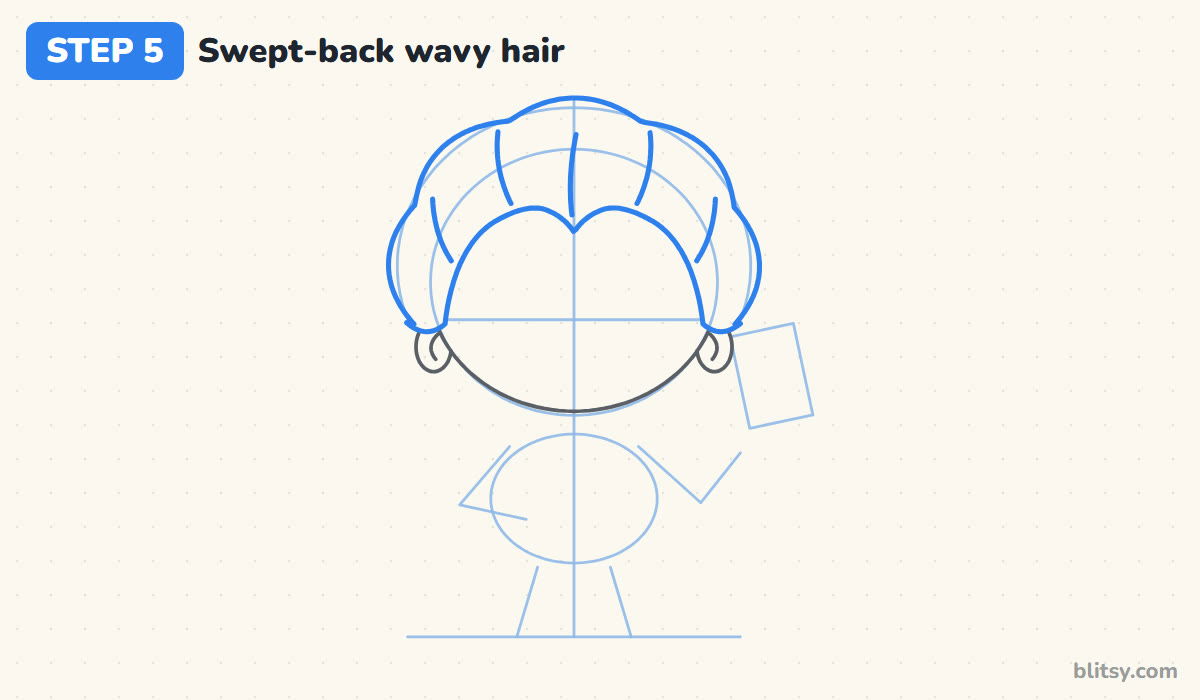
People recognise the hair first, so take your time. Inside the arch, draw a row of soft waves over the top, like a bumpy cloud edge. On the forehead, the hairline dips to a small point in the middle. Round off each side into a little curl near the ear, then add a few long strands sweeping up and back.
💡 Tip: Keep each wave about the same size; one oversized bump makes the head look lopsided.
Step 6: Draw the collar, the jacket and the arms
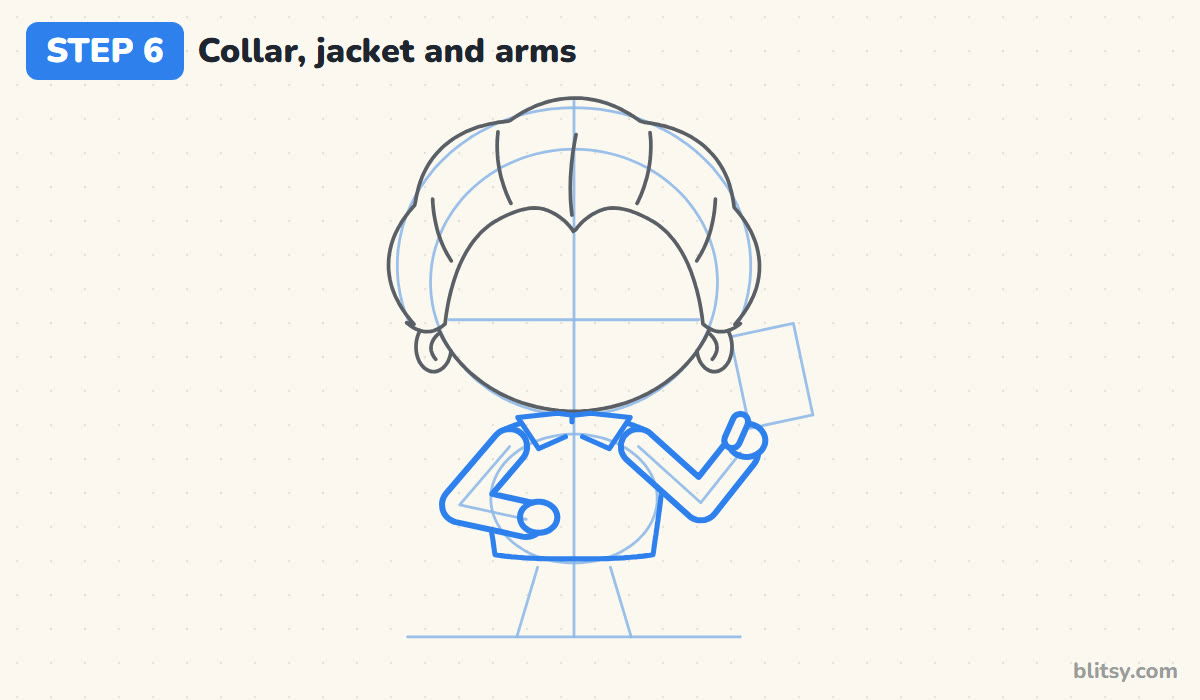
Start under the chin with a wide shirt collar shaped like two flat triangles. Below it, draw the jacket with round shoulders, getting slightly wider toward the hem. Build the arms around the sticks as thick, even tubes. I give each one a round mitten hand: one rests on his tummy, and the raised one curls a small thumb forward.
💡 Tip: Draw the arms as wide as the ears are tall; skinny arms make a chibi look like a puppet.
Step 7: Add the lapels, the tie and a button
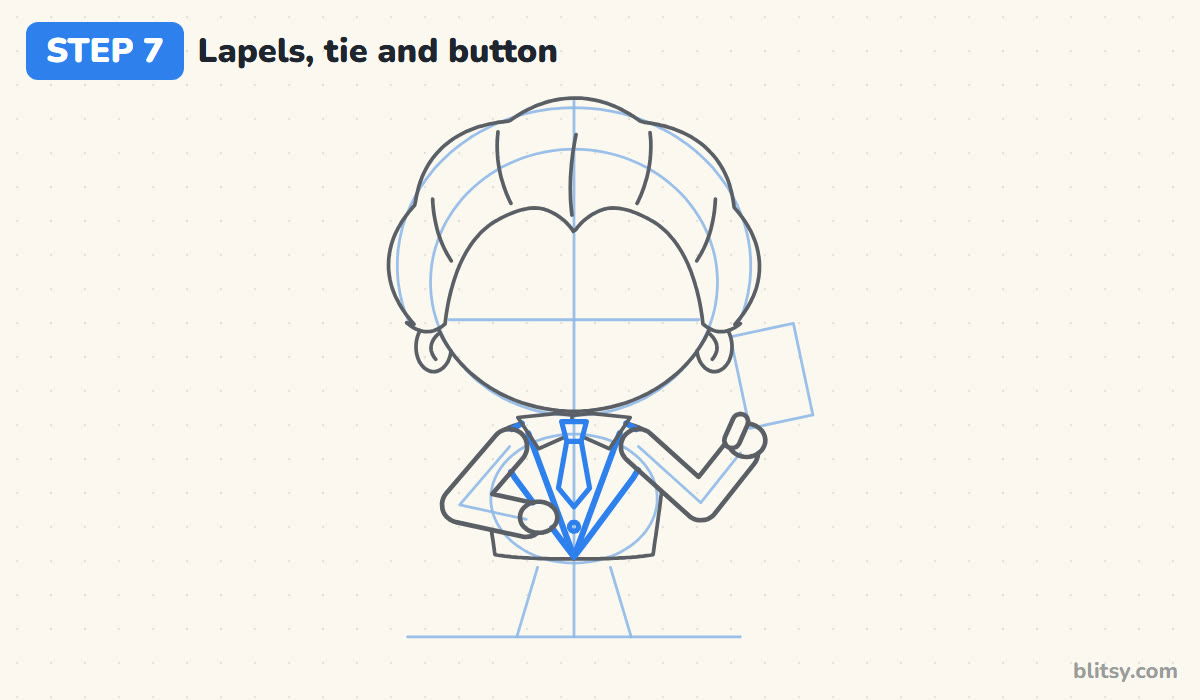
Draw a long V from the collar down to the bottom of the jacket; this opening shows his vest. Along each side, add a narrow lapel that starts wide at the shoulder and tapers to a point. In the middle goes a small tie knot, a slim tie and one tiny button.


💡 Tip: Draw the tie a bit shorter than you think; it should end well above the jacket hem.
Step 8: Draw the playing card in his hand
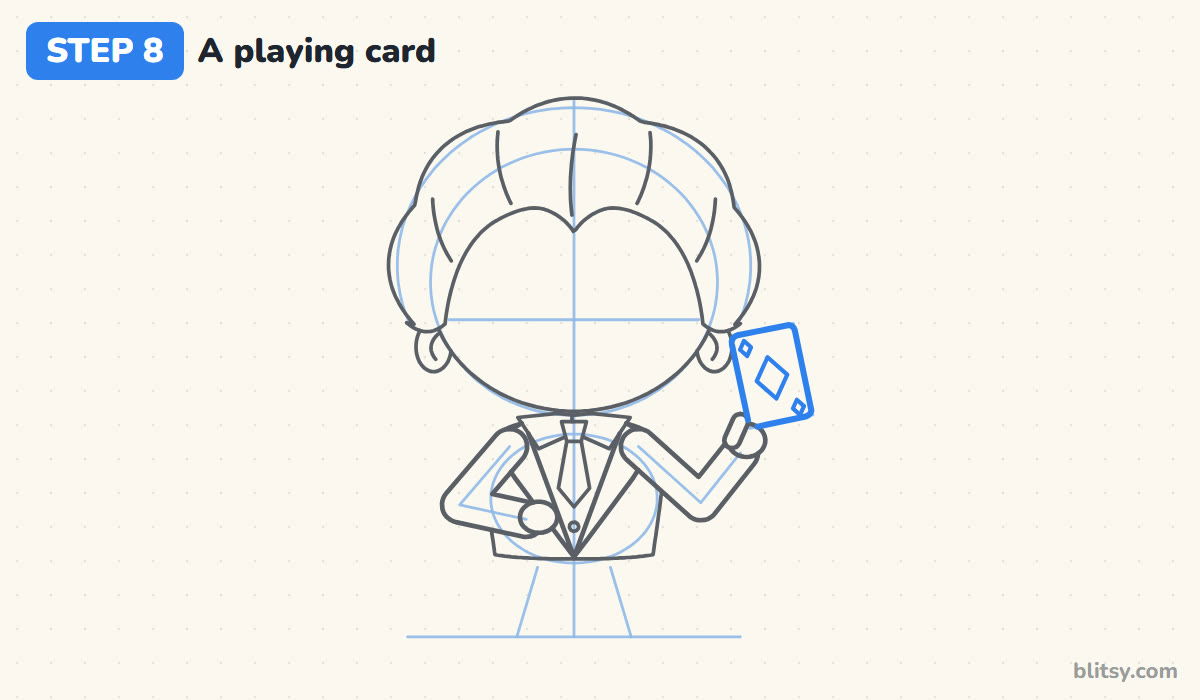
Go over the rectangle guide with a smooth line and round off the corners. The bottom edge tucks behind his raised hand, so stop the line at the fingers. Put one larger diamond in the middle and two tiny diamonds in opposite corners, like a real card.
💡 Tip: Draw each diamond as four short lines from a center dot; it keeps the points even.
Step 9: Add the coat tails, the pants and pointy shoes
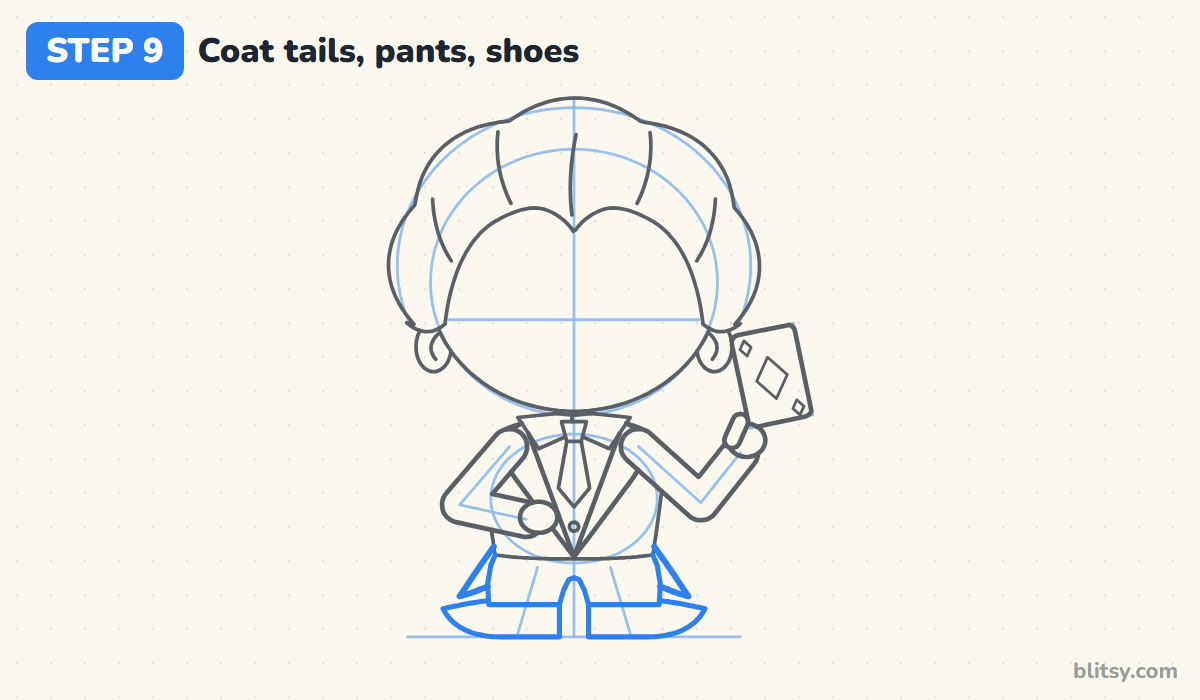
A tailcoat has two long tails at the back, and from the front you only see their tips. Draw two narrow points sticking out below the jacket. Then add short pants with a small notch between the legs. Each shoe comes to a point, turns slightly outward and sits flat on the ground line.
💡 Tip: Let the pant hems overlap the shoes a little, so the feet look attached.
Step 10: Draw arched brows and a closed grin
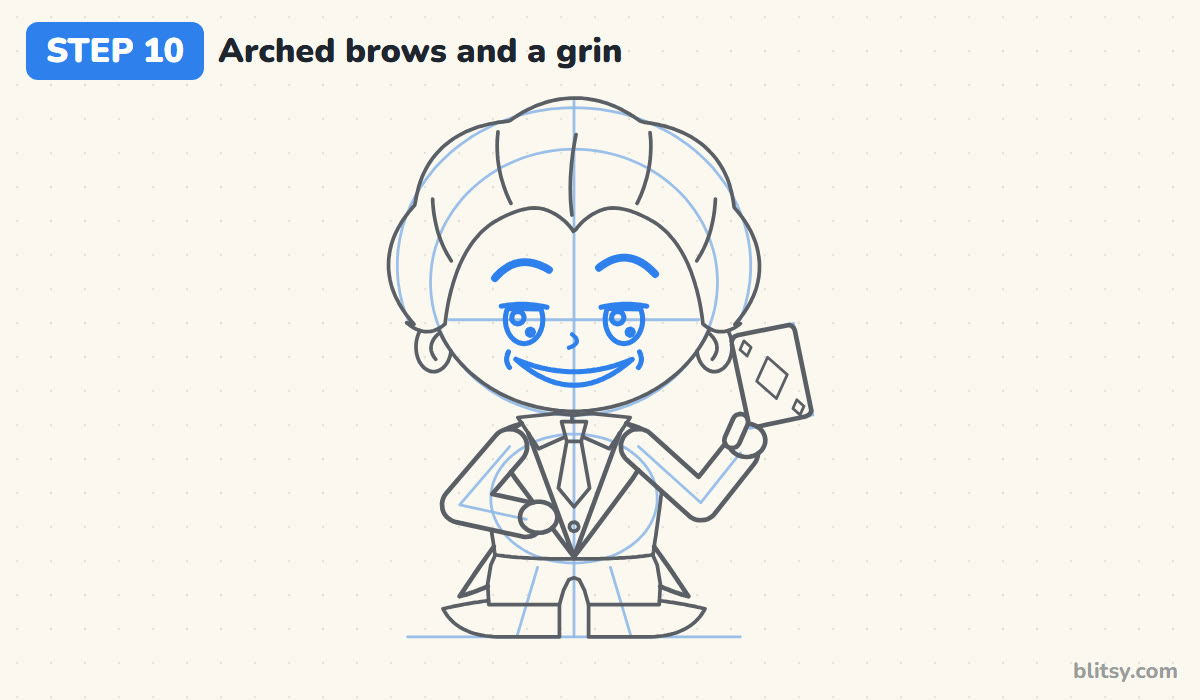
The eyebrows decide whether he looks fun or grumpy. Draw two high, round arches above the eye line. Place two dark ovals on the line, each with a flat lid across the top for a sly look and a white dot for shine. Add a tiny curved nose, then a wide crescent smile with a soft curl at each corner.
💡 Tip: Curve the brows upward in the middle; brows that slant down toward the nose look angry.
Step 11: Ink your lines and erase the guides
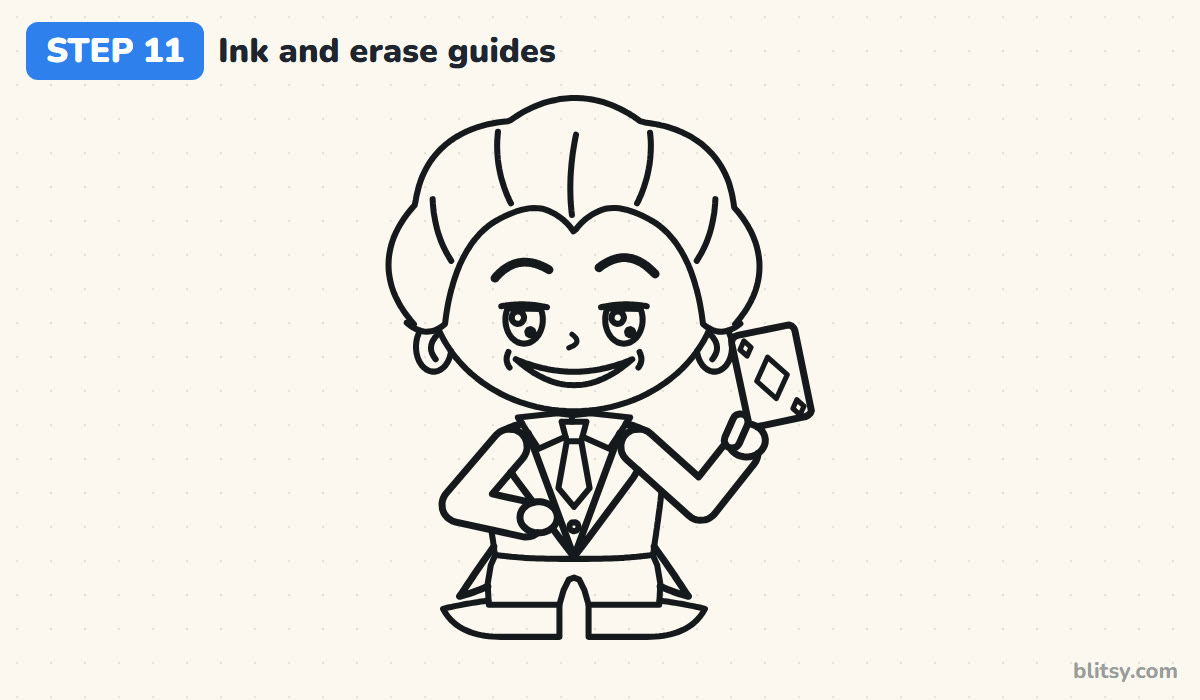
Trace every keeper line with your pen and leave the helper shapes in pencil. Most beginners rush the hair waves at this point. Draw each wave in one smooth stroke and lift the pen between them. Give the ink a minute to dry, then erase all the pencil underneath.
💡 Tip: Ink from the top of the page down, so your hand never rests on wet lines.
Step 12: Color your Joker
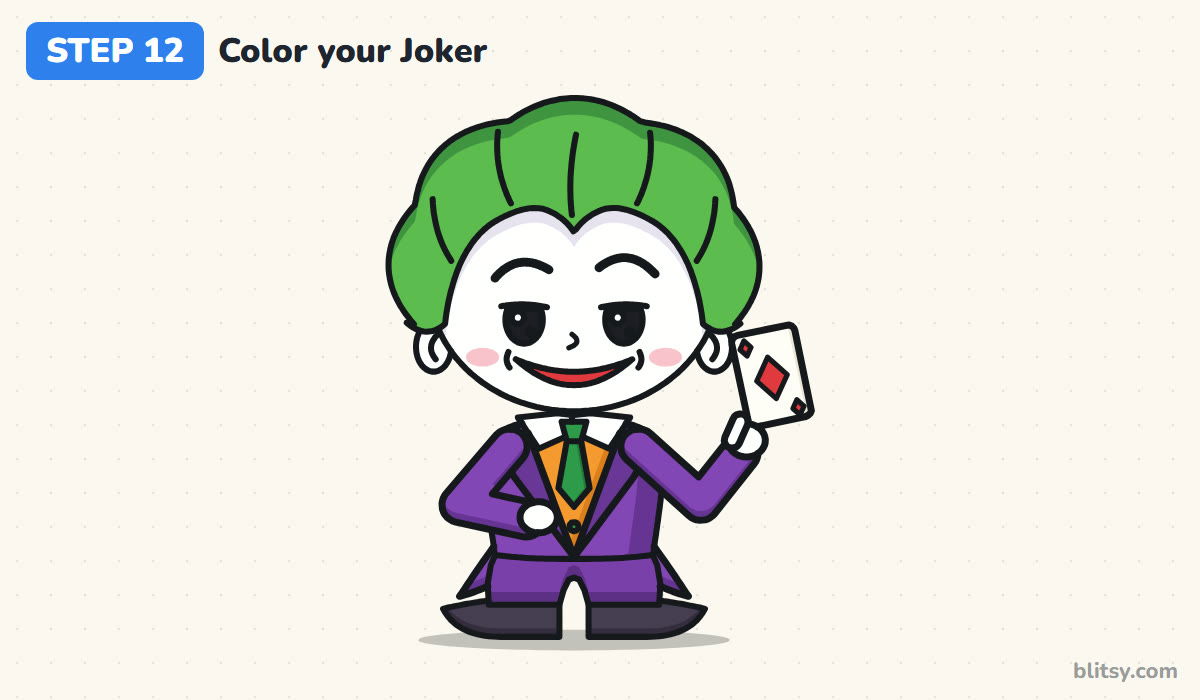
Color the hair bright green, darker along the bottom of the waves. The suit is purple, a little darker on the lapels and the right side of the jacket. The vest is orange, the tie and button dark green. Use red for the smile and the card diamonds, pink for two cheek spots and dark gray for the shoes. Face and hands stay white.
💡 Tip: Color the white face last and simply leave it blank, so no purple or green smudges onto it.
When a Chibi Joker Stops Looking Playful
- Thin, slanted eyebrows. They make him look cross. Draw thick, round arches set high on the face.
- A huge, toothy mouth. It can look scary to younger kids. A closed red crescent smile keeps him friendly.
- Flat hair with no waves. Smooth hair turns into a green helmet. Give the top at least five soft bumps.
- A tiny head. Then he's just a cartoon man. Keep the head nearly as tall as the body.
- Forgetting the vest. Without the orange V the suit is just purple. Leave a deep V open so the vest and tie show.
New Tricks for Your Pocket-Sized Prankster
Once you've drawn him once, swap the playing card for a fan of three cards or a bunch of balloons, or turn it around and invent your own card design. Younger kids can skip the coat tails and lapels; the green hair and purple suit still do the job. If you'd like to build a whole comic-book lineup, the Wonder Woman drawing tutorial and the Iron Man drawing tutorial fit nicely on the same page.
Joker Coloring Page and a Printable Step Booklet
Want to skip straight to the colors? The free Joker coloring page has the clean outline, a small colored example and a key showing which color goes where. The step-by-step guide PDF puts all 12 steps and tips on a few pages for Letter or A4 paper.
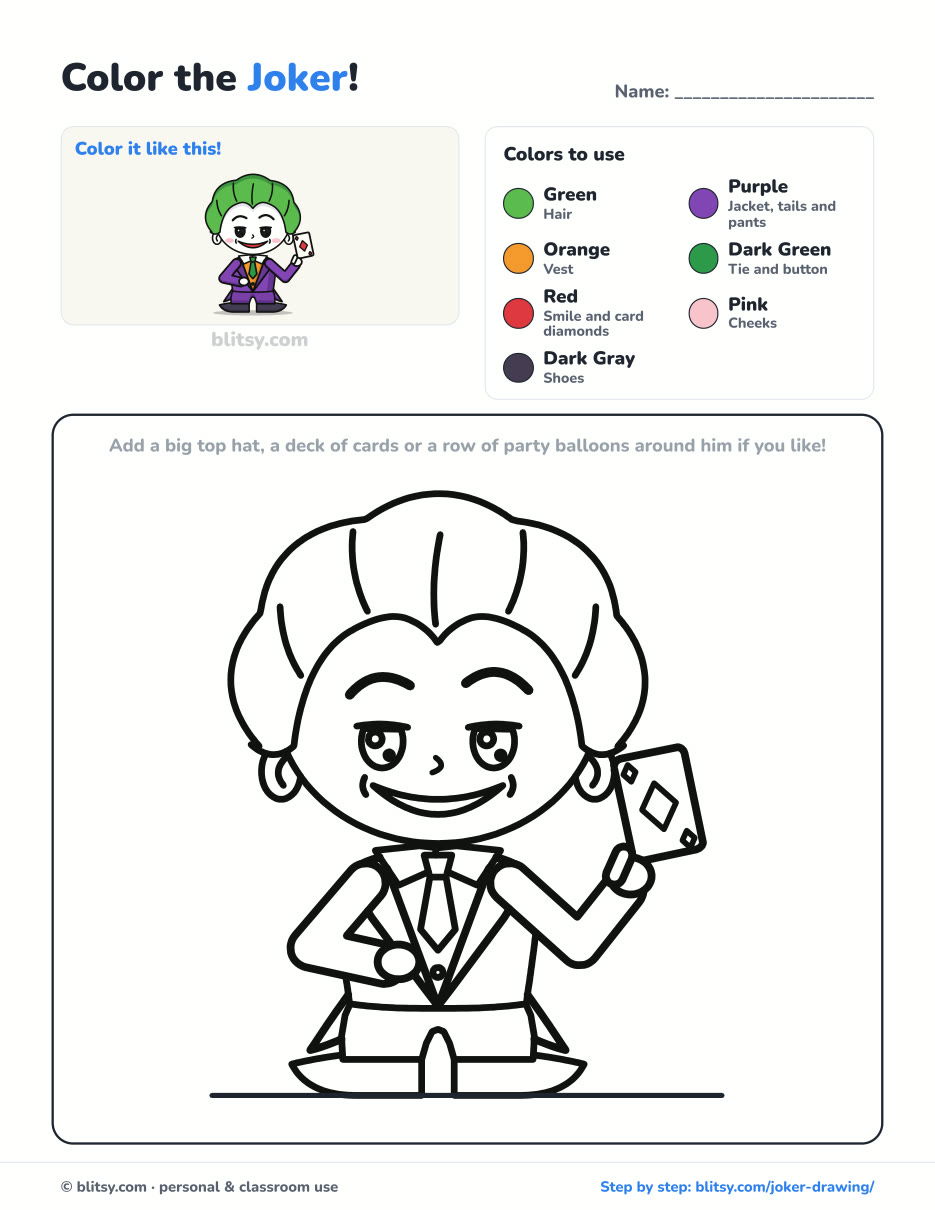
Black outlines with a colored example and the color names at the top. Ready to print and color.
⬇️ Download Coloring PageEvery step picture with its instructions and tips, to keep beside your paper while you draw.
⬇️ Download Drawing Guide📱 On a phone? Tap a download button, then open the file and choose Share → Save to Files or Print. On a computer, the PDF opens or saves straight to your Downloads folder.
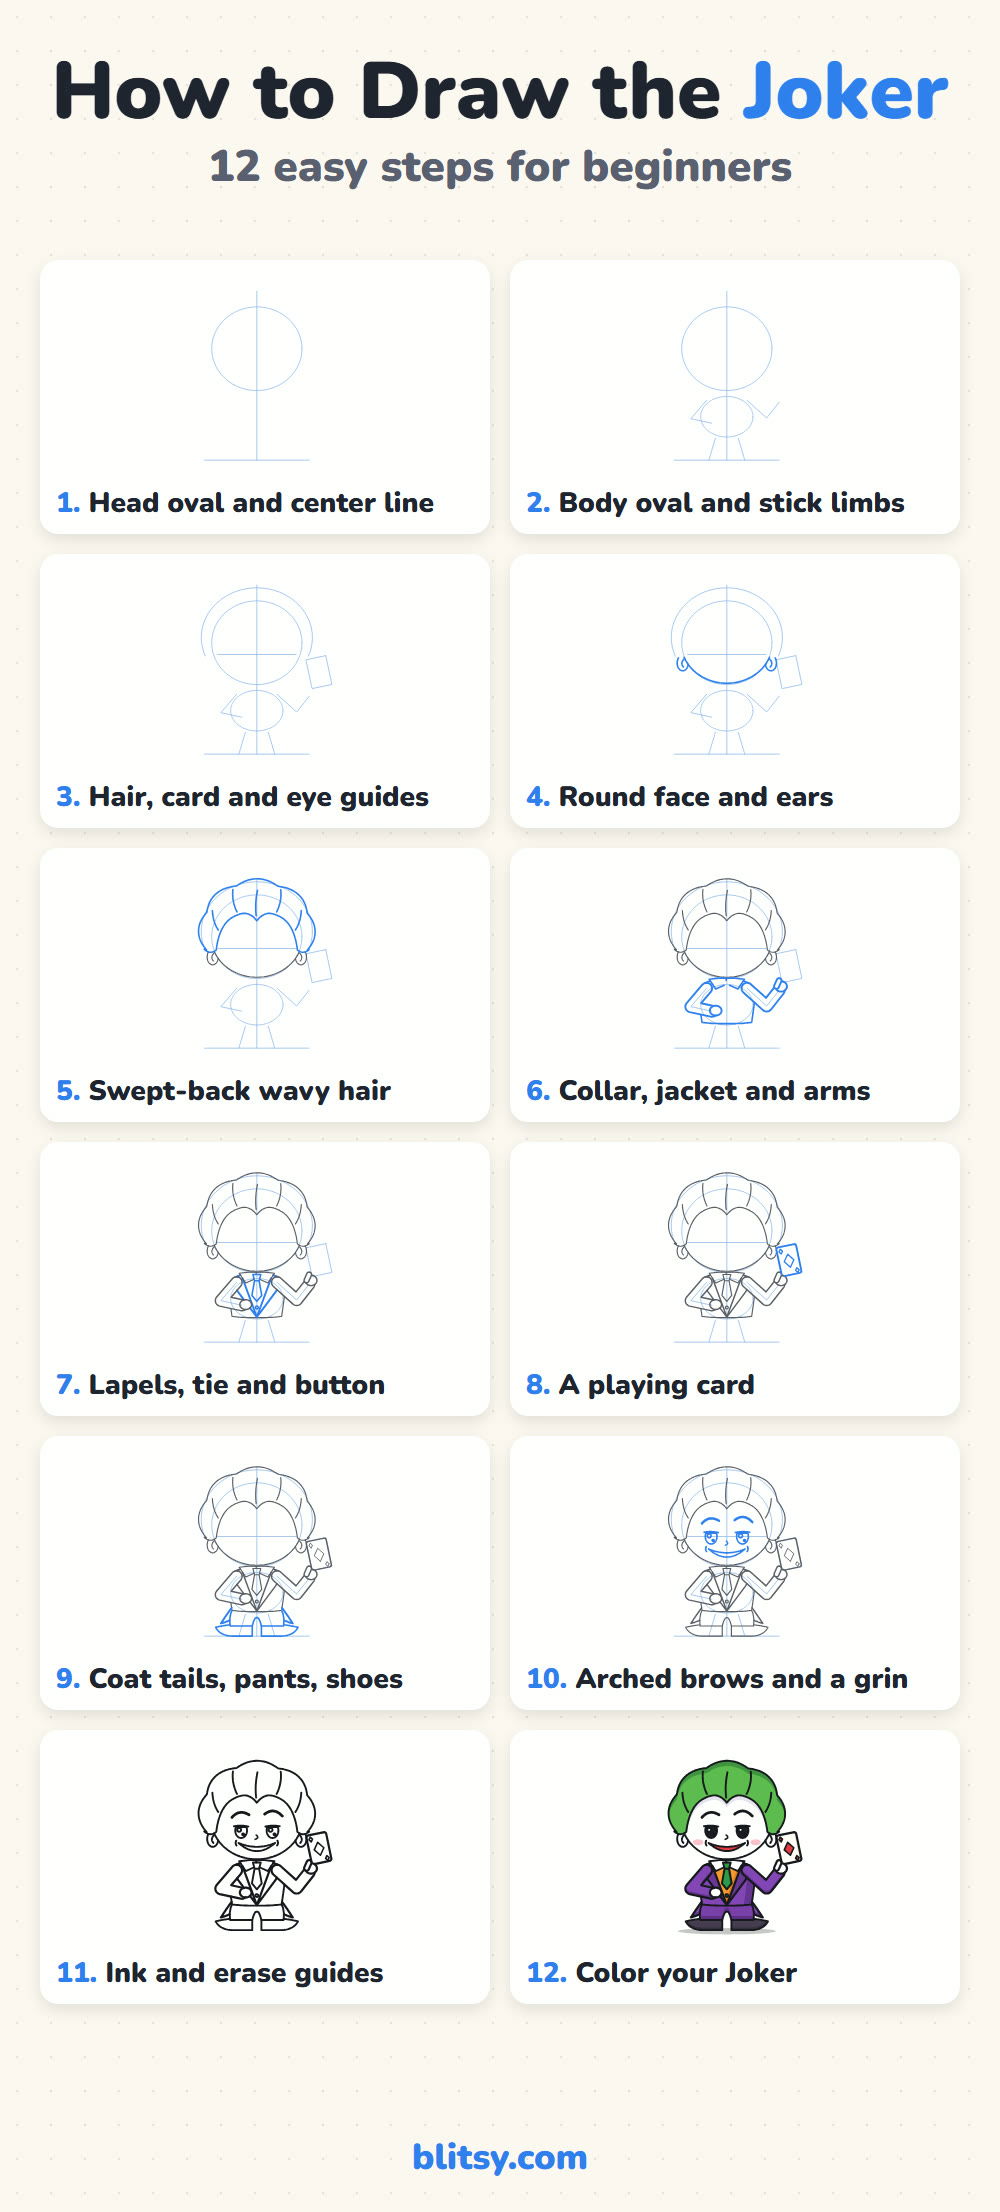
Twelve Joker Steps on One Tall Pin
Villain Drawn? More Characters to Try
Every link below opens one step-by-step tutorial, so you can keep going with characters, symbols and a few cozy scenes.
- Door Drawing: The cottage door drawing tutorial draws a teal door in a stone arch with a lantern and a plant.
- Chibi Drawing: Learn the 2-head method in the how to draw a chibi guide, the same style this Joker uses.
- Music Note Drawing: A purple treble clef and a ribbon of notes come together in the music notes drawing tutorial.
- Hello Kitty Drawing: Draw Hello Kitty in blue overalls with her red bow using this Hello Kitty drawing step by step lesson.
- Love Drawing: The love drawing tutorial shows two teddy bears hugging under a heart balloon.
- Demon Slayer Drawing: Tanjiro in his checkered haori is the goal of the Demon Slayer drawing tutorial.
- Dragon Head Drawing: Build a green dragon head from a circle and a long box in the dragon head drawing tutorial.
- Valentine's Day Drawing: A card, a box of chocolates and a rose make up the Valentine's Day drawing tutorial.
Joker Drawing Questions From Comic Fans
What is the easiest way to draw the Joker?
Draw him as a chibi with a big round head and a small body. The green hair, white face and purple suit already tell people who he is, so you can skip realistic features.
What colors do I need to draw the Joker?
Green for the hair, purple for the suit, orange for the vest and dark green for the tie. Red goes on the smile, pink on the cheeks and dark gray on the shoes. The face stays white.
Is this Joker drawing OK for kids?
Yes. This version has a closed smile, soft round eyebrows and a playing card as his only prop. I'd say it suits kids from about 6, with a grown-up helping on the hair if needed.
How long does it take to draw the Joker?
About 35 minutes for pencil and ink, and 15 more for coloring. Give the hair and the face a little extra time.
Pick a card, any card, and draw it into his hand. Then see if a friend can guess who he is! 🃏✏️
Related posts:
 How to Draw Nezuko Step by Step (Cute Chibi for Beginners)
 How to Draw Wonder Woman Step by Step (Chibi for Kids)
 How to Draw the Hulk Step by Step (Easy Chibi for Kids)
 How to Draw Iron Man Step by Step (Easy Chibi for Kids)
 How to Draw Kurama Step by Step (Easy Chibi Nine-Tails)
 How to Draw Cat Noir Step by Step (Easy Chibi Hero)
 How to Draw Goku Step by Step (Easy Chibi Version)
 How to Draw Freddy Krueger Step by Step (Cute Chibi Version)
 How to Draw Ariana Grande Step by Step (Cute Chibi Fan Art)
 How to Draw Master Chief Step by Step (Easy Chibi Armor)
 How to Draw Tinkerbell Step by Step (Easy Flying Chibi)
 How to Draw a Chibi Step by Step (Easy 2-Head Method)

