
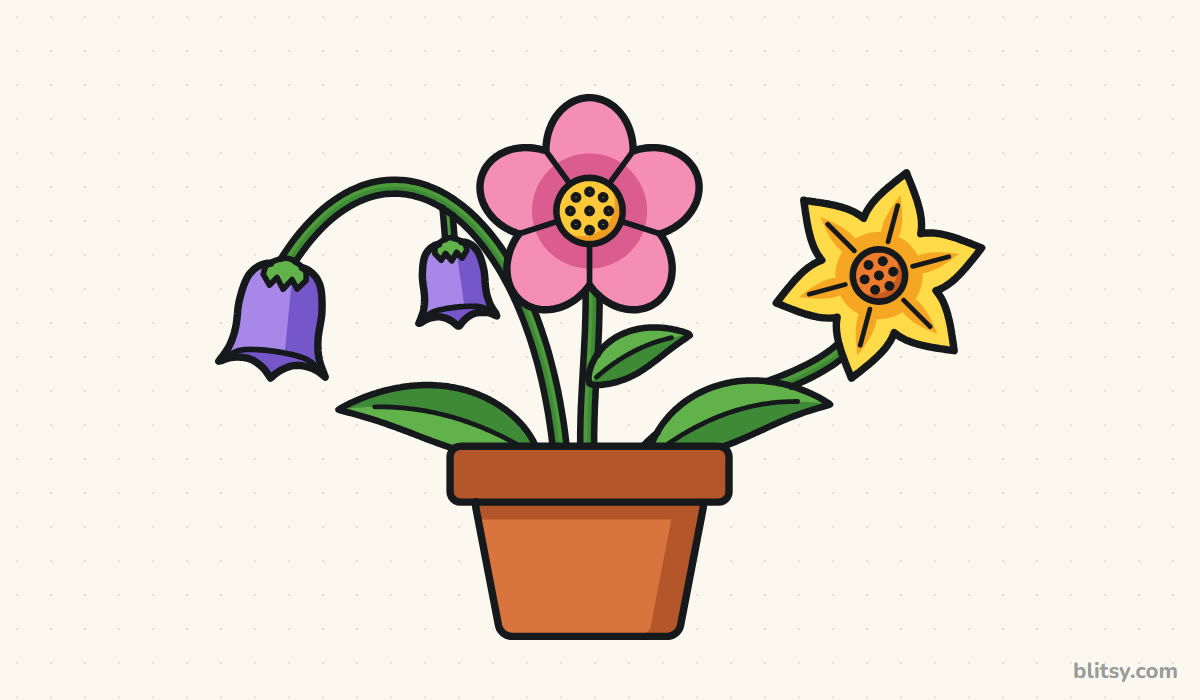
Almost every flower you will ever draw starts as one of three shapes: a ring of round petals, a hanging bell, or a star of pointed tips. Learn those three and you can invent a whole garden. Here I'll show you how to draw a flower step by step by putting all three into one small clay pot, so you practice each shape once without getting bored. You only need a pencil and a little patience; circles and curved lines do most of the work.
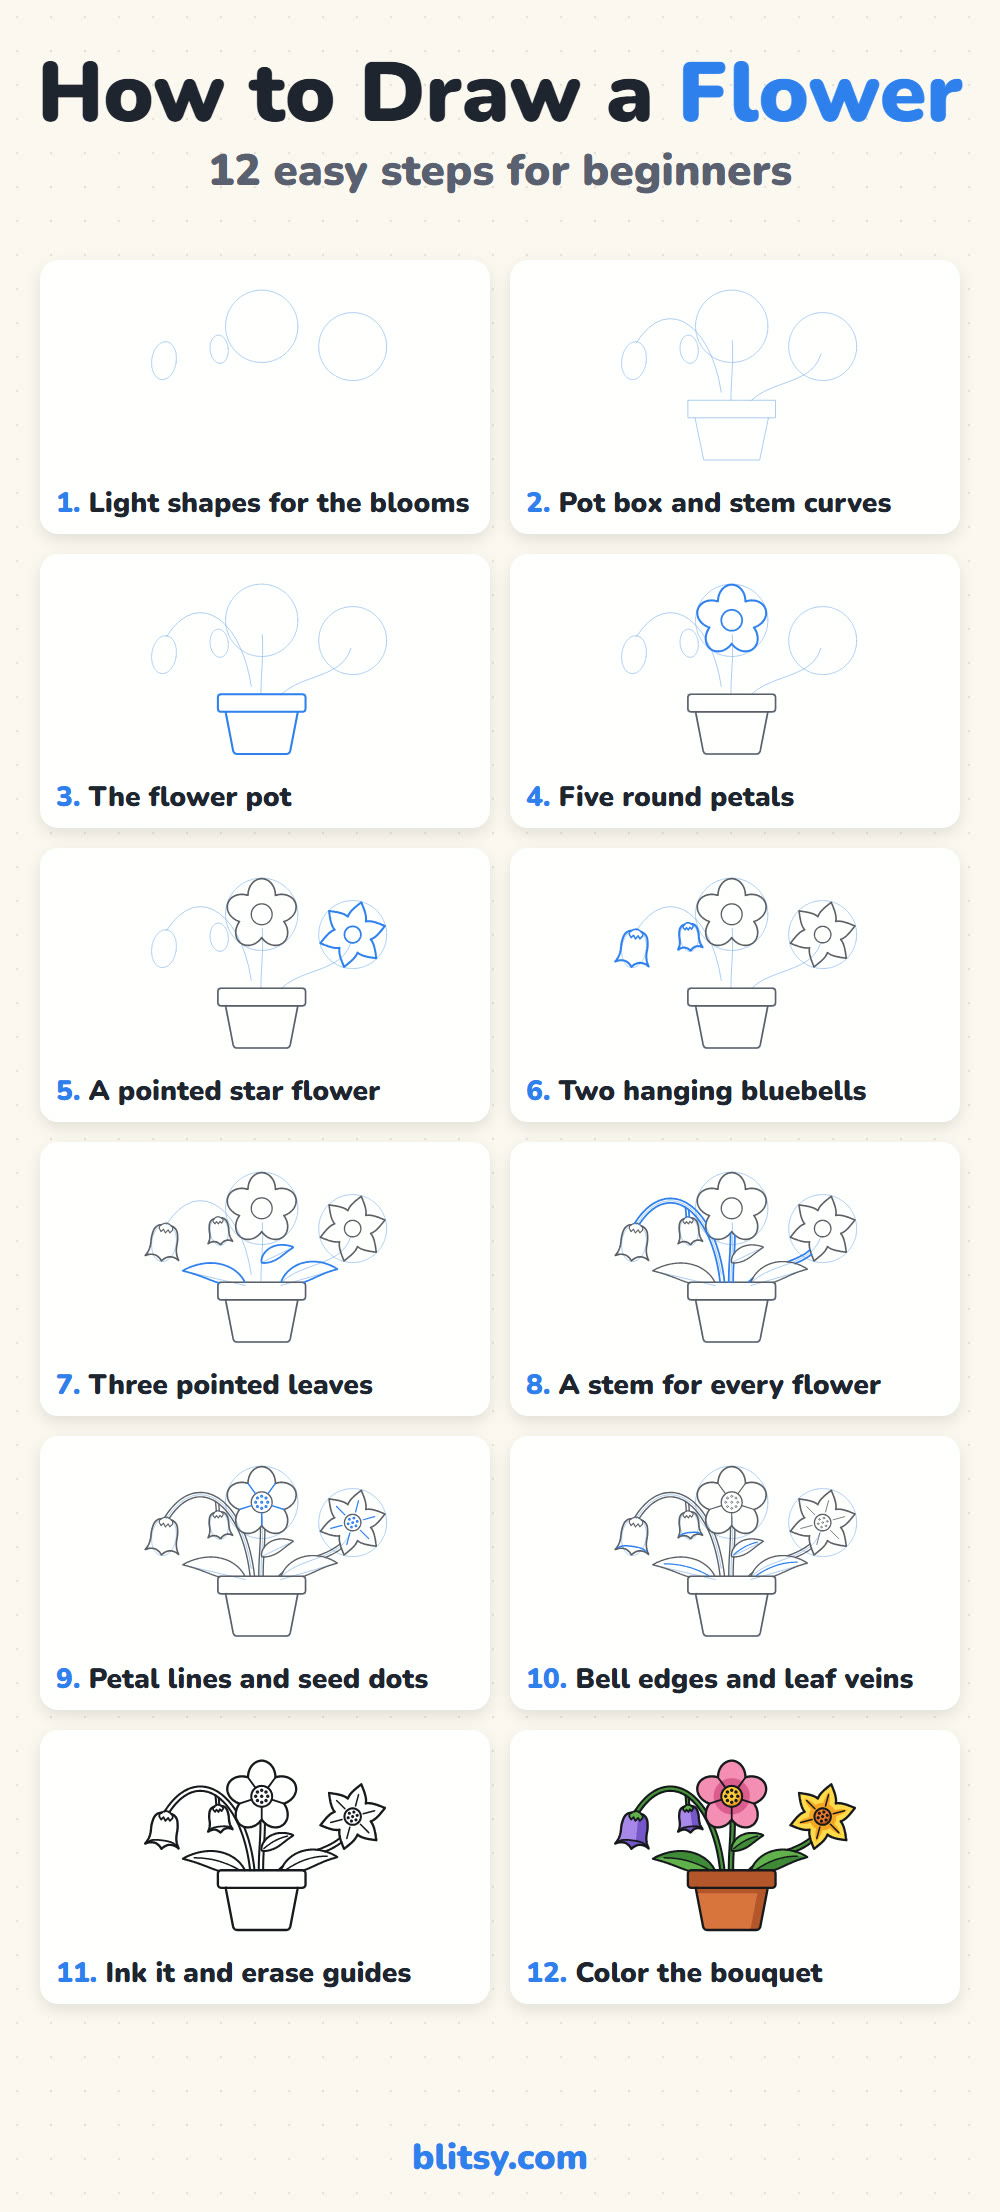
Watch the colors in each picture. Bright blue marks the lines you draw in that step, gray marks the lines already on your paper, and the pale blue circles and curves are helper guides. Keep those guides faint, because the eraser takes them away in step 11.
Quick overview
⏱️ Time: around 35 minutes with coloring
🎯 Level: easy; children from about 6 can follow along with a grown-up nearby
✏️ Steps: 12
🌸 You'll draw: a round pink flower, two bluebells and a star flower in a terracotta pot
Supplies for a Potted Flower Sketch
- An HB pencil for the light guides
- A soft eraser that won't smear
- A black fineliner or felt tip for inking
- Colored pencils or markers: pink, purple, yellow, orange, two greens and two browns
- Plain paper, held sideways
Printer paper is fine for practice; save thicker paper for a version you want to frame.
How to Draw a Flower Step by Step
Step 1: Sketch light shapes for the three blooms
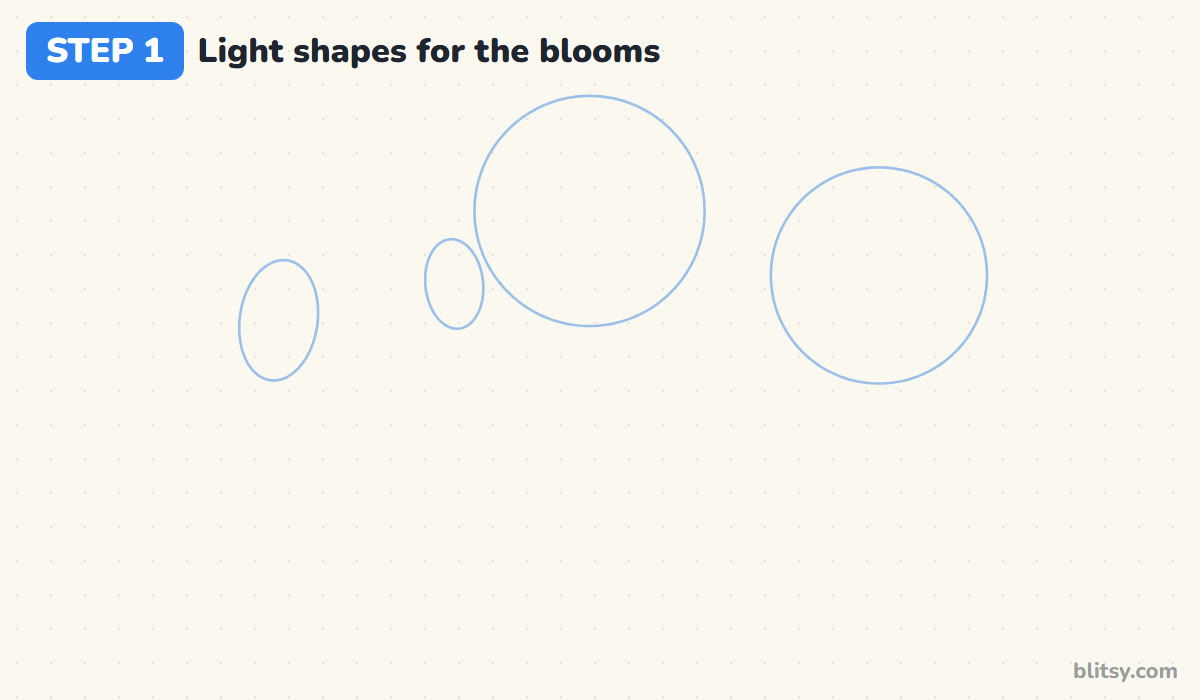
Start at the top of the page. Draw a large circle in the middle for the main flower and a slightly smaller circle to its right, set a bit lower. On the left, add two small upright ovals at different heights for the bluebells. Placing the flowers at three different heights gives the bouquet a relaxed look instead of a stiff row.
💡 Tip: Hold the pencil far back from the tip so your guides come out pale.
Step 2: Add a pot box and the stem curves
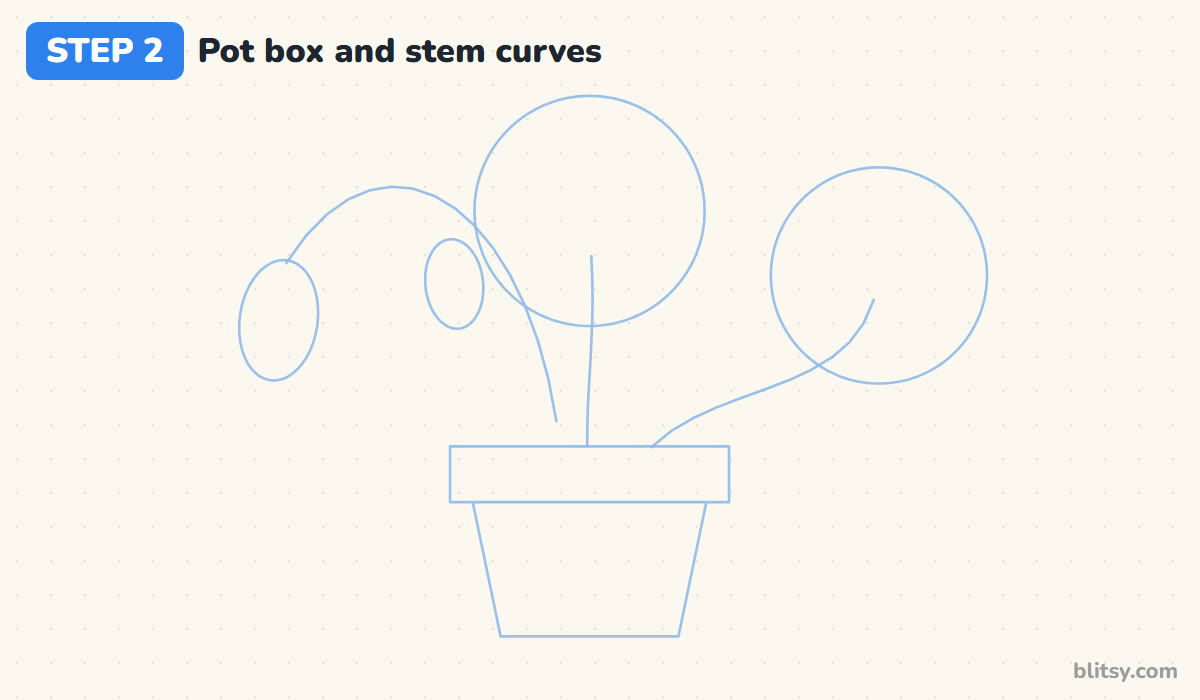
Below the circles, draw a long, flat rectangle for the pot rim and a tapered box under it. Then curve a line from the pot up to each flower. The bluebell stem rises high, arches over and drops down to the bigger oval like a shepherd's crook. I start all three stems close together so they seem to grow from the same soil.
💡 Tip: Check that the pot is about as wide as the middle circle; a tiny pot makes the flowers look top-heavy.
Step 3: Draw the flower pot
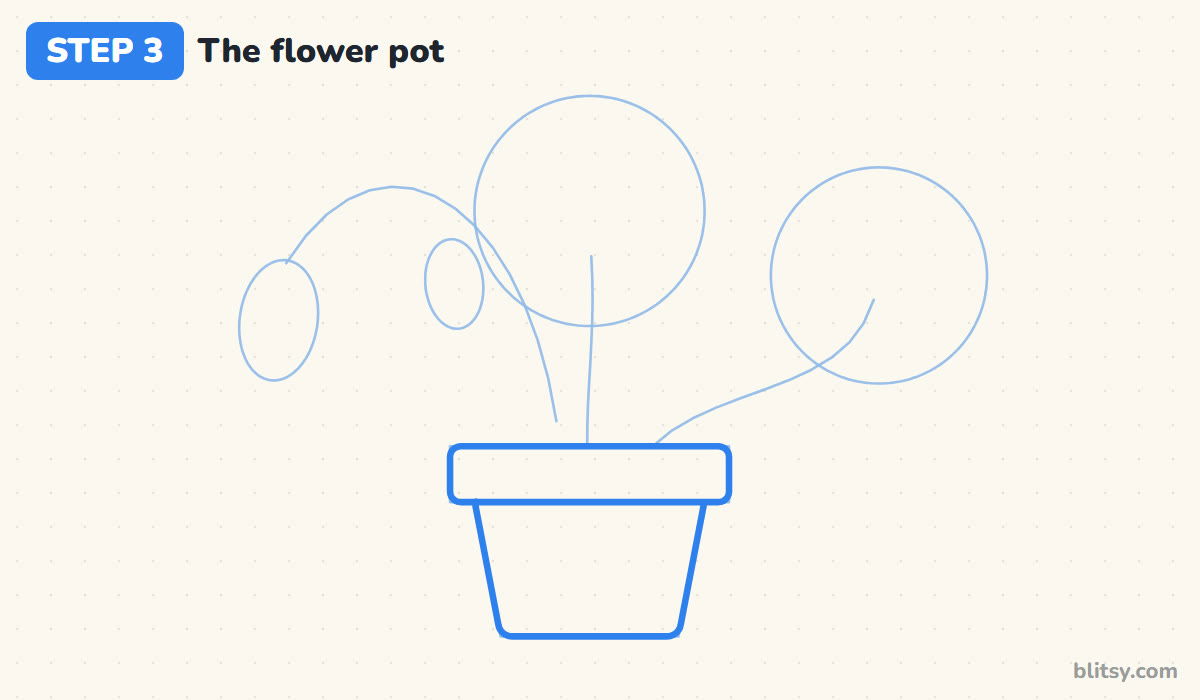
Trace the rim box with slightly rounded corners. Under it, draw the two slanted sides of the pot and a flat bottom with soft corners. The rim sticks out past the body on both sides, just like a real clay pot. Drawing the pot this early gives you a fixed base, so the flowers have something to line up with.

💡 Tip: Use a ruler for the rim if your straight lines wobble; nobody will know.
Step 4: Draw a round flower with five petals
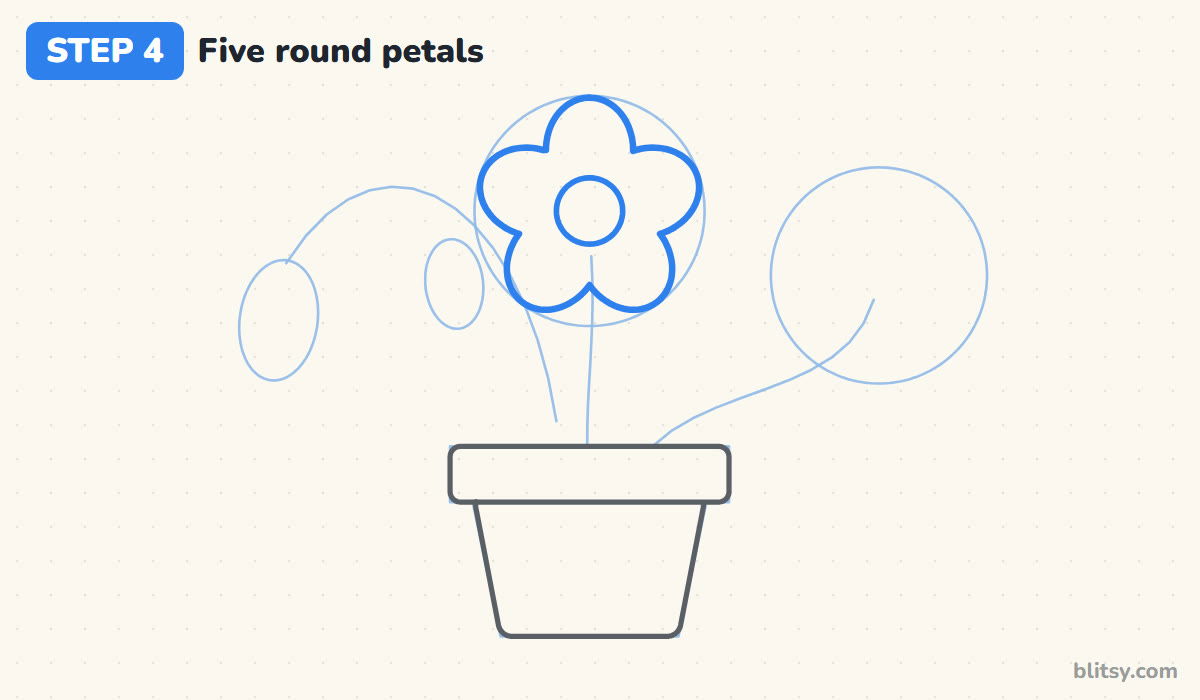
Put a small circle in the center of the big guide for the flower's middle. Then draw five rounded petals around it, one pointing straight up and the others spaced evenly. Neighboring petals should touch and make a small dip where they meet. Picture a clock face if the spacing feels hard.
💡 Tip: Place the top petal first and the two bottom petals last; spacing goes easier that way.
Step 5: Add the pointed star flower
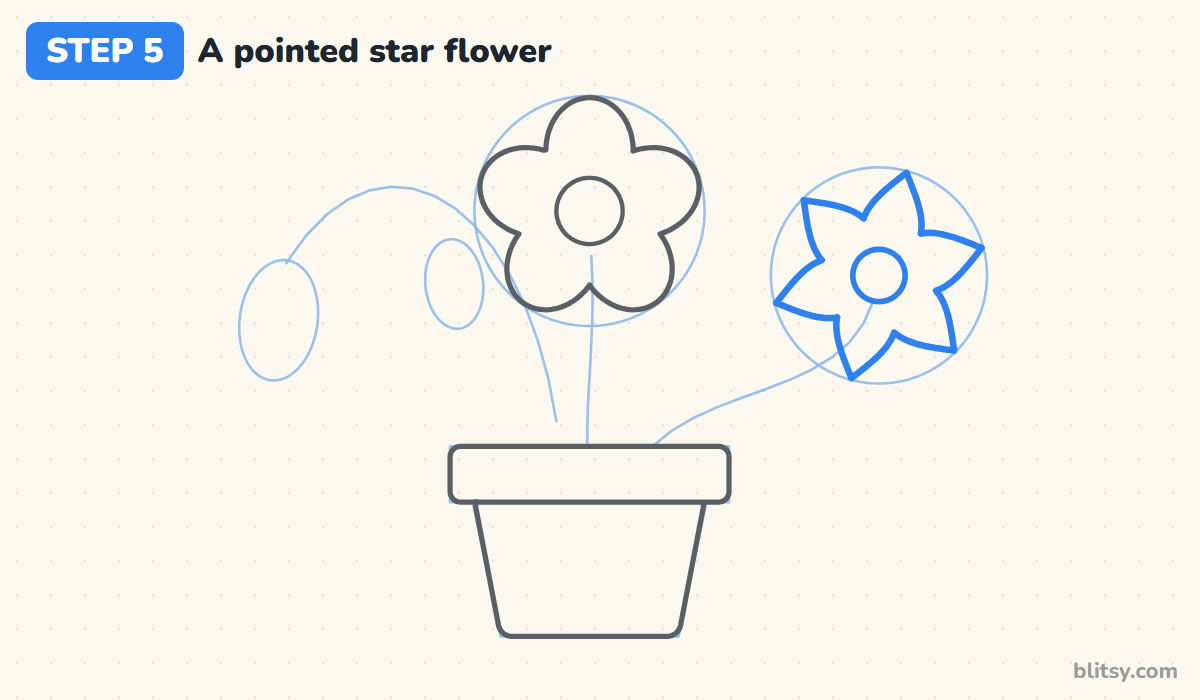
In the right-hand circle, draw a smaller center circle. Around it, draw six long petals that each come to a sharp point, tilting the whole flower a little. Each petal is widest near the middle and narrows to its tip. This shape is the opposite of the round flower, and that contrast keeps the pot interesting.
💡 Tip: Draw each petal as two curved lines that meet at the tip, not as one zigzag.
Step 6: Draw two hanging bluebells
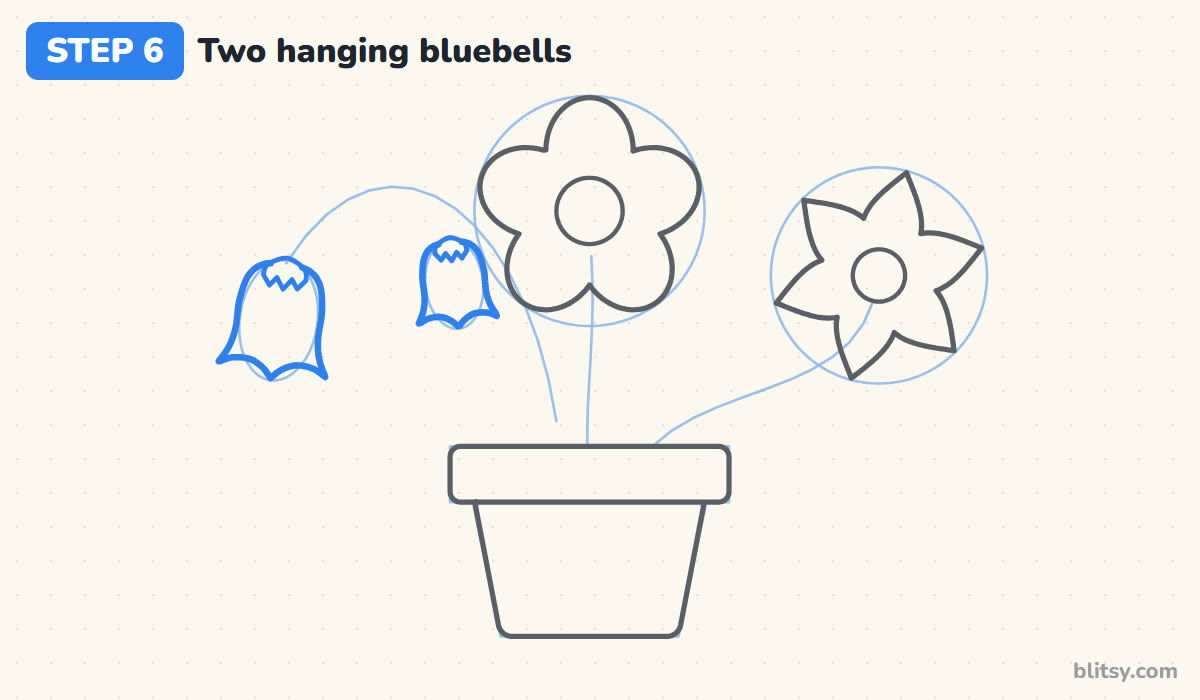
Turn each oval into a bell that hangs downward. Round the top, let the sides fall nearly straight, then flare them out near the bottom into three little pointed curls. Add a small green cap with jagged edges where each bell meets its stem. The left bell is bigger because it's the heavier flower at the end of the arch.
💡 Tip: Tip the bells slightly in different directions so they look like they sway.
Step 7: Draw three pointed leaves
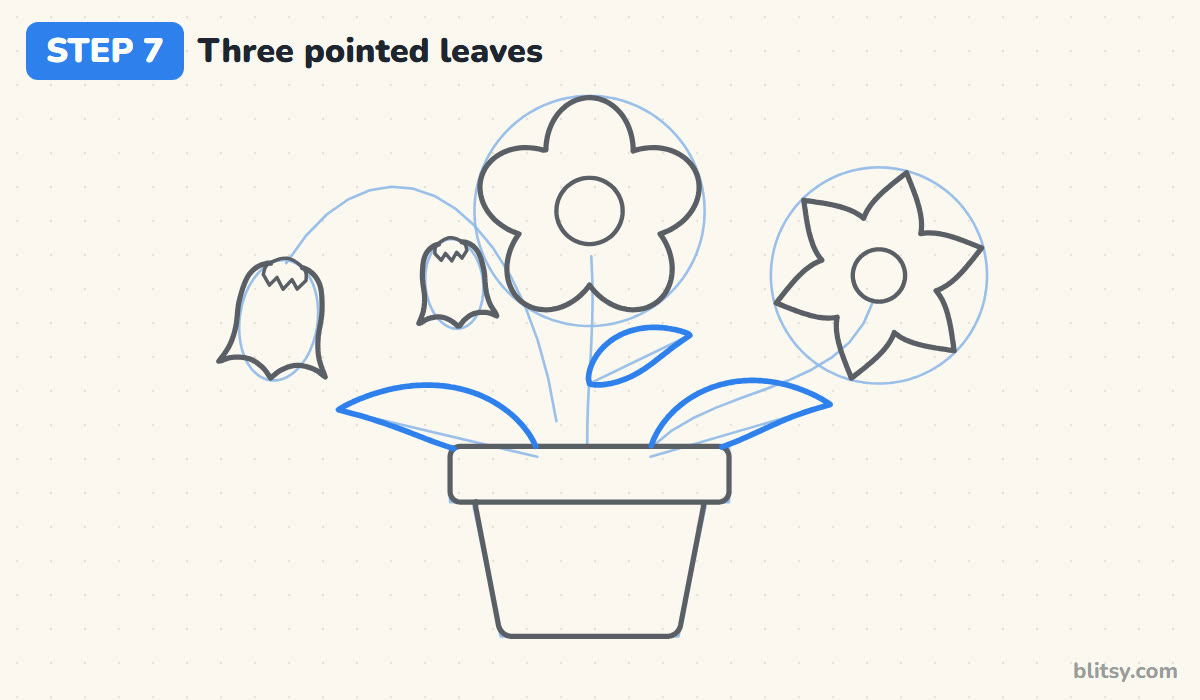
Leaves come before stems here, and there's a reason. Draw two long leaves leaning out from the rim, each wide in the middle and pointed at the tip. Add a smaller leaf beside the middle stem guide. Because the leaves sit in front, drawing them first shows exactly where each stem line should stop.


💡 Tip: Bend each leaf upward a little at the end so it looks alive rather than wilted.
Step 8: Draw a stem for every flower
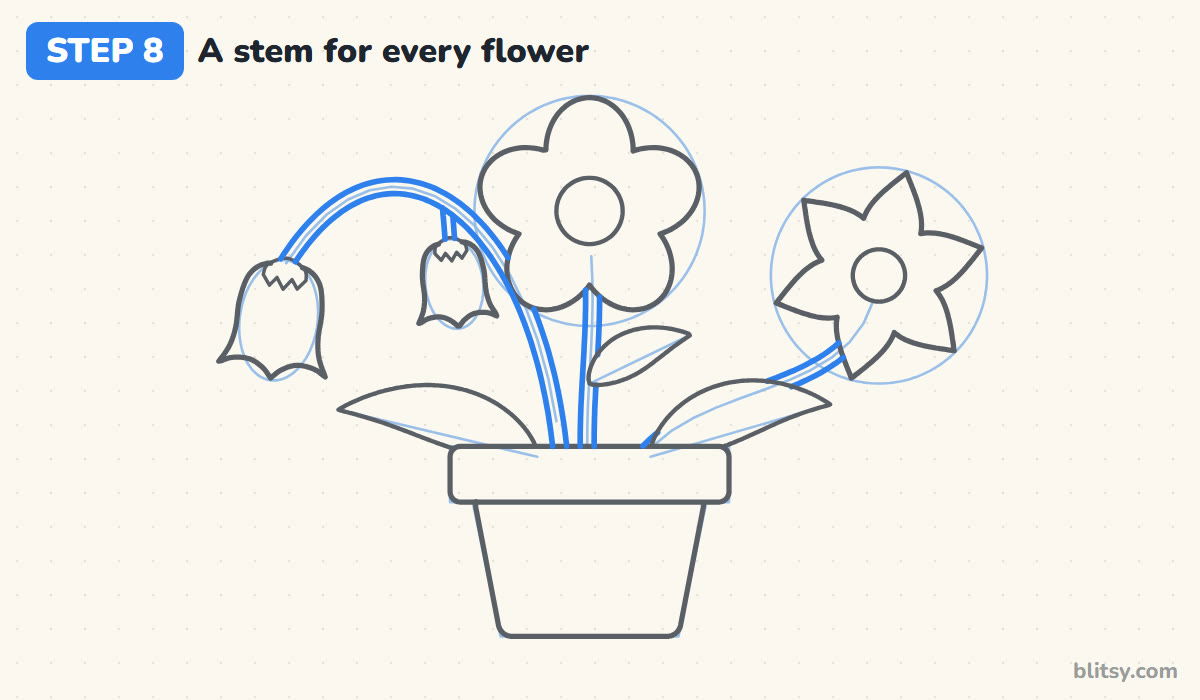
Go over each stem guide with two parallel lines to make a thin tube. Stop every time you reach a leaf, a flower or the rim, and pick the line up again on the other side. Give the small bluebell its own short stalk that hangs from the arch. Most beginners make stems too thin, so I leave enough room between the two lines to color a clear green stripe.
💡 Tip: Keep the two sides of a stem the same distance apart from start to finish.
Step 9: Add petal lines and seed dots
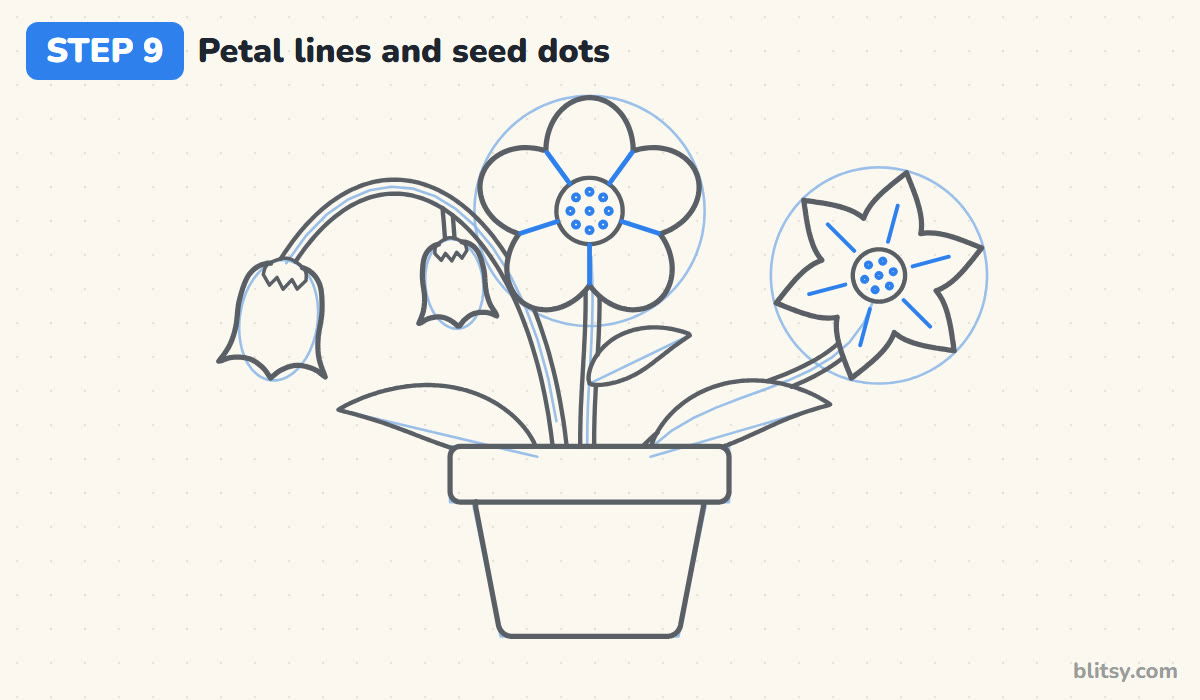
On the pink flower, draw a short line from each dip between petals in toward the center; now every petal reads as its own piece. On the star flower, draw a thin vein down the middle of each petal, stopping well before the tip. Fill both centers with small dots: a ring of dots plus one in the middle.
💡 Tip: Space the seed dots in a loose ring; three dots alone can look like a face.
Step 10: Add bell rims and leaf veins
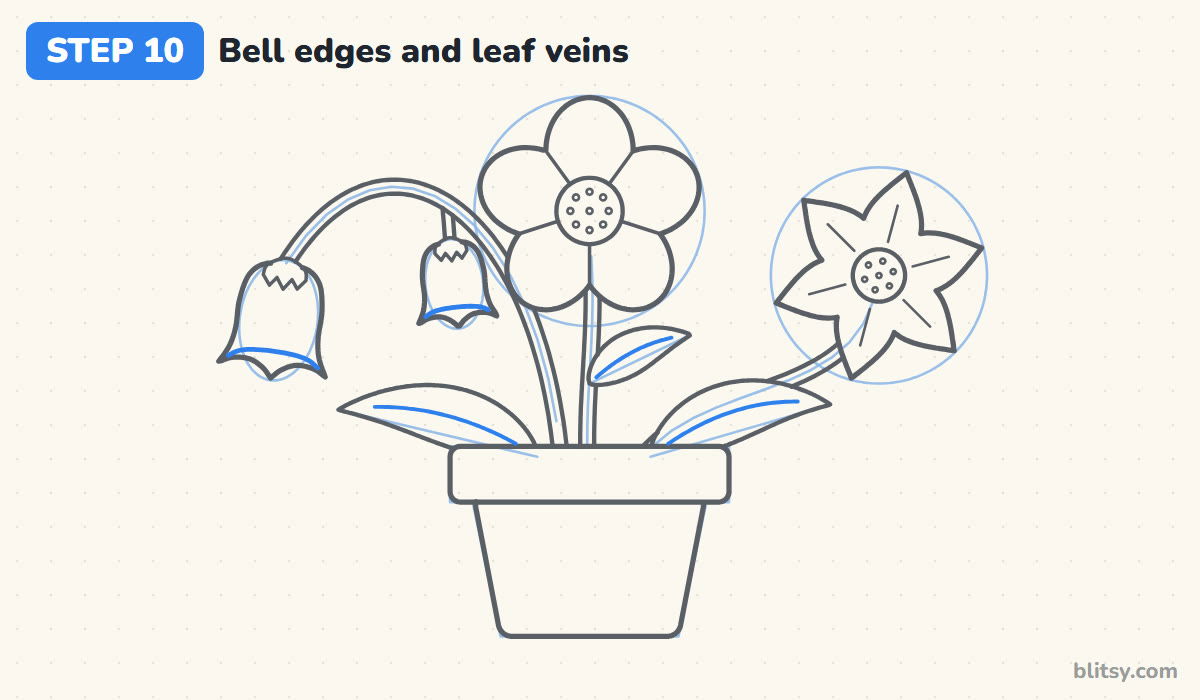
Inside each bluebell, near the bottom, draw a curved line from one side to the other. That curve shows the opening of the bell, as if you're peeking slightly under it. Then run a soft line along the middle of each leaf, starting near the stem and ending before the point.
💡 Tip: Lighten your hand as each vein ends so the line tapers out.
Step 11: Ink the lines and erase the guides
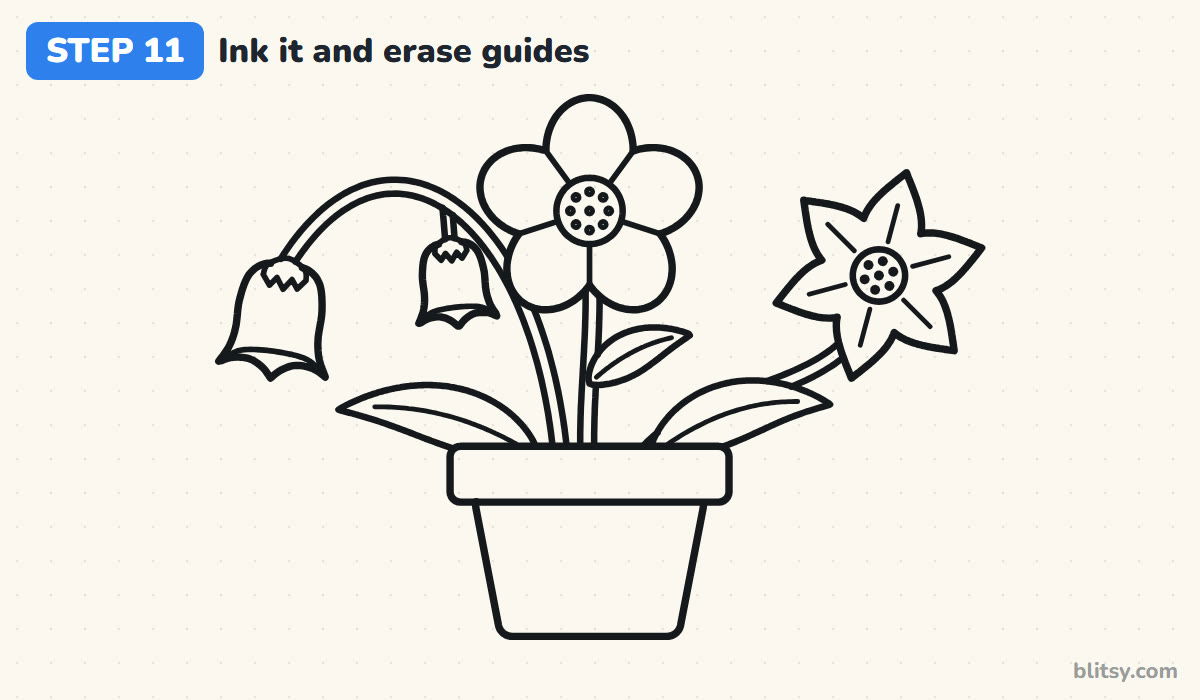
Trace every finished line with your black pen. I begin with the pot, move up to the flowers and leave the small dots for last, since they smudge easily. Skip the circles, ovals, pot box and stem guides. Wait until the ink is fully dry, then erase all the pencil.




💡 Tip: Rest your hand on a scrap of paper while inking to protect the wet lines.
Step 12: Color the potted bouquet
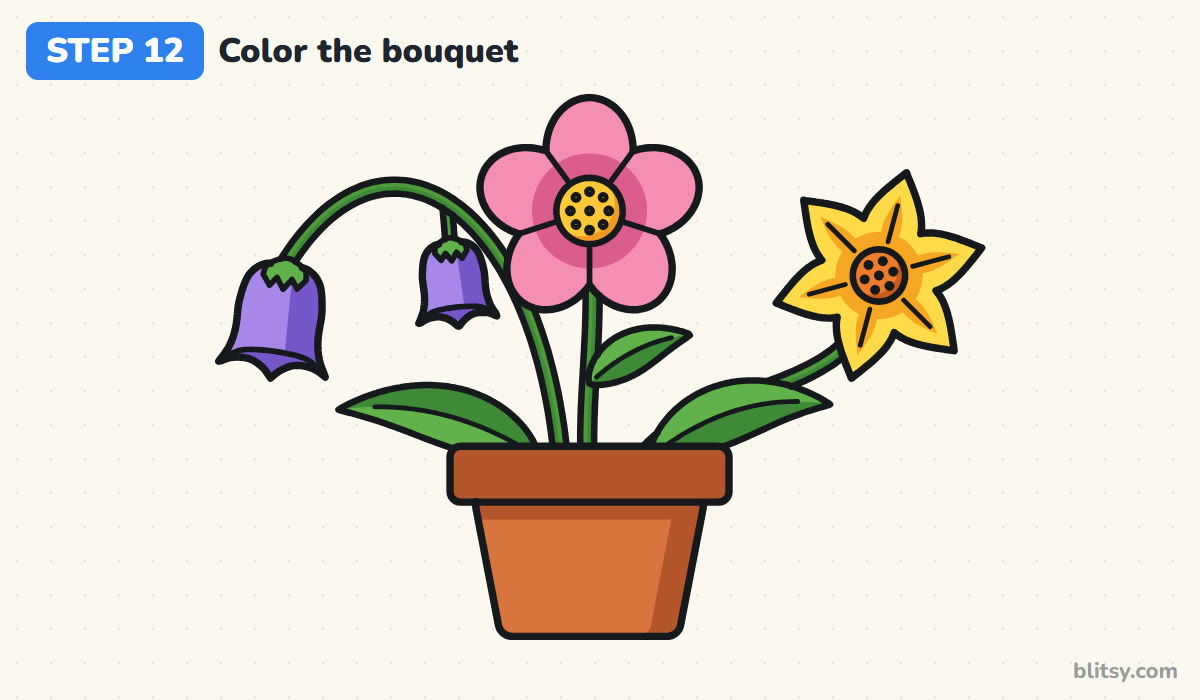
Color the round flower pink with a deeper pink ring around its yellow middle. Make the star flower yellow, with orange near the center. Bluebells get purple, darker on their right sides and in the openings. Use green for stems, caps and leaves, darkening one half of each leaf, then light brown for the pot and darker brown for its rim.
💡 Tip: Color in small circles inside large shapes like the pot to avoid streaky stripes.
Why Flower Drawings Sometimes Look Off
- Petals of very different sizes. The round flower looks lopsided. Sketch the guide circle first and let every petal touch its edge.
- Every flower facing the same way. The pot feels like a sticker sheet. Mix a front-facing bloom, a tilted one and hanging bells.
- Stems drawn right through the leaves. Lines that cross shapes in front make the drawing look see-through. Stop the stem where a leaf begins.
- A pot that is too small. The flowers seem ready to tip over. Make the rim at least as wide as the biggest flower.
- Pressing hard on the guides. Dark circles refuse to erase and leave gray halos. Keep guides faint until the inking step.
Swap the Blooms in Your Pot
Once the three basic shapes feel familiar, mix them however you like. Put a single tall round flower in the pot, try five bluebells along one long arch, or give the star flower white petals with a pink center. You could also move the bouquet into a glass jar and draw the stems showing through the water. For a single bloom with more character, try the rose drawing tutorial, or practice cup-shaped petals with this how to draw a tulip step by step lesson.
Flower Pot Coloring Page and Printable Steps
Prefer to start with coloring? The free flower coloring page has a small colored sample at the top and a key that names each color and where it goes, with the big outline waiting underneath. The PDF drawing guide collects all 12 steps with their tips and prints well on Letter or A4.
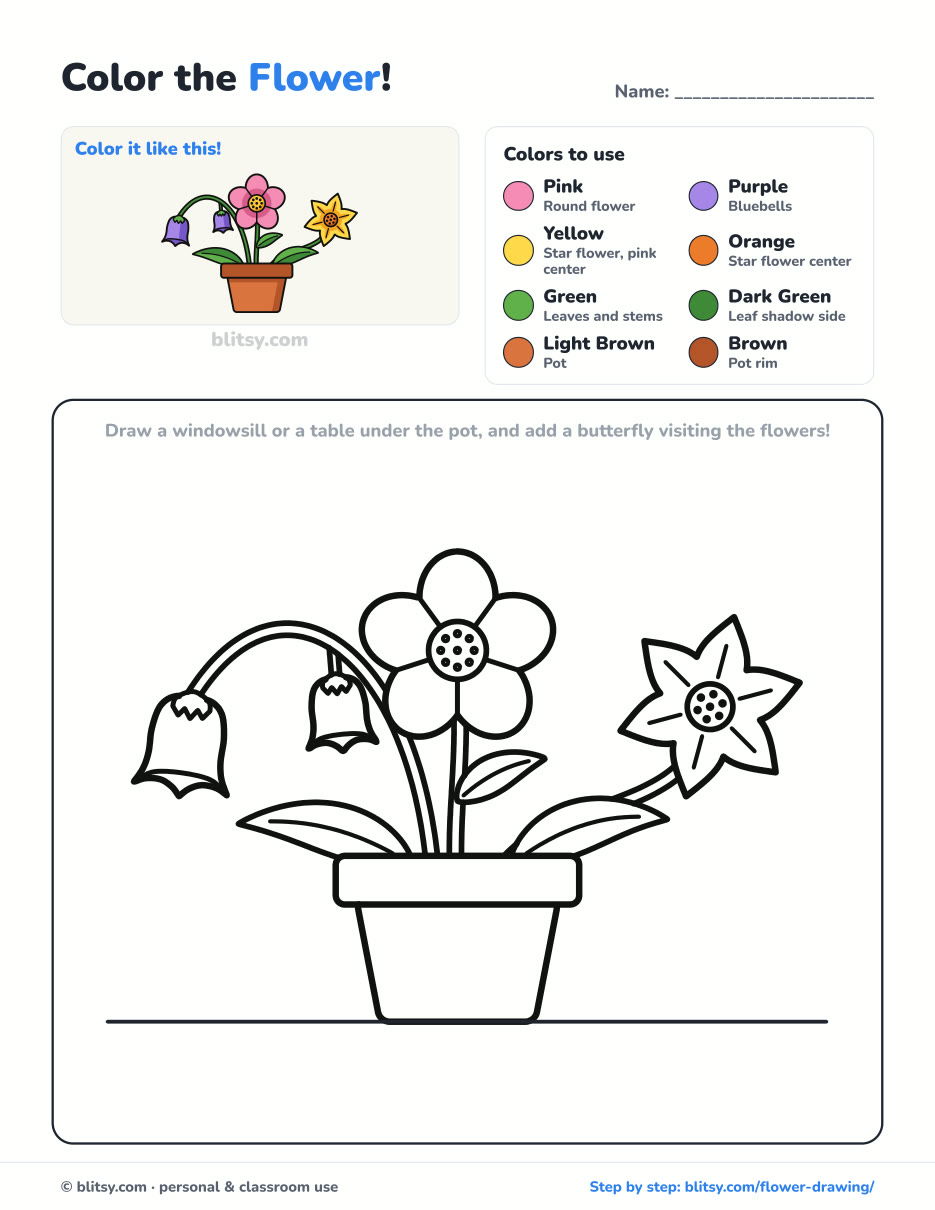
Black outlines with a colored example and the color names at the top. Ready to print and color.
⬇️ Download Coloring PageEvery step picture with its instructions and tips, to keep beside your paper while you draw.
⬇️ Download Drawing Guide📱 On a phone? Tap a download button, then open the file and choose Share → Save to Files or Print. On a computer, the PDF opens or saves straight to your Downloads folder.
Bookmark the Potted Bouquet Steps
Flower Drawing Questions From Beginners
What is the easiest flower to draw?
A round five-petal flower. Draw a small circle, place five rounded petals around it and add a stem. It takes a minute and still looks like a real bloom.
How do you draw a flower for kids?
Keep only the middle flower, the pot and two leaves. Skip the petal lines and seed dots, and let kids pick any colors they like.
How long does it take to draw this flower pot?
About 35 minutes with coloring for most beginners. The pencil drawing alone takes roughly 15 to 20 minutes.
What do I need to draw flowers?
A pencil, an eraser and paper are enough. A black pen and colored pencils make the finished drawing look sharper, but they're optional.
Show your pot to someone, then draw it again next week with three brand-new flower shapes of your own. 🌸
Related posts:
 How to Draw a Succulent Step by Step (Easy Potted Echeveria)
 How to Draw a Plant Step by Step (Easy Potted Monstera)
 How to Draw a Dandelion Step by Step (Flower + Seed Head)
 How to Draw a Garden Step by Step (Easy Flower Bed Scene)
 How to Draw a Hibiscus Step by Step (Easy Tropical Flower)
 How to Draw a Magnolia Flower Step by Step (Easy Guide)
 How to Draw a Whale Step by Step (Easy for Beginners)
 How to Draw Lungs Step by Step (Easy Science Diagram)
 How to Draw a Pineapple Step by Step (Easy Crown and Slice)
 How to Draw Iron Man Step by Step (Easy Chibi for Kids)
 How to Draw a Dress Step by Step (Easy Party Dress)
 How to Draw a Chicken Step by Step (Easy for Beginners)

