
Planes look tricky because of all those wings pointing in different directions, but a passenger jet is mostly one long tube with flat shapes stuck onto it. Here you'll learn how to draw an airplane step by step, starting with a tilted capsule and finishing with a blue tail and fluffy clouds. I'll tell you where each wing goes and why it leans the way it does. I've kept every step small, so nothing here needs a steady hand.

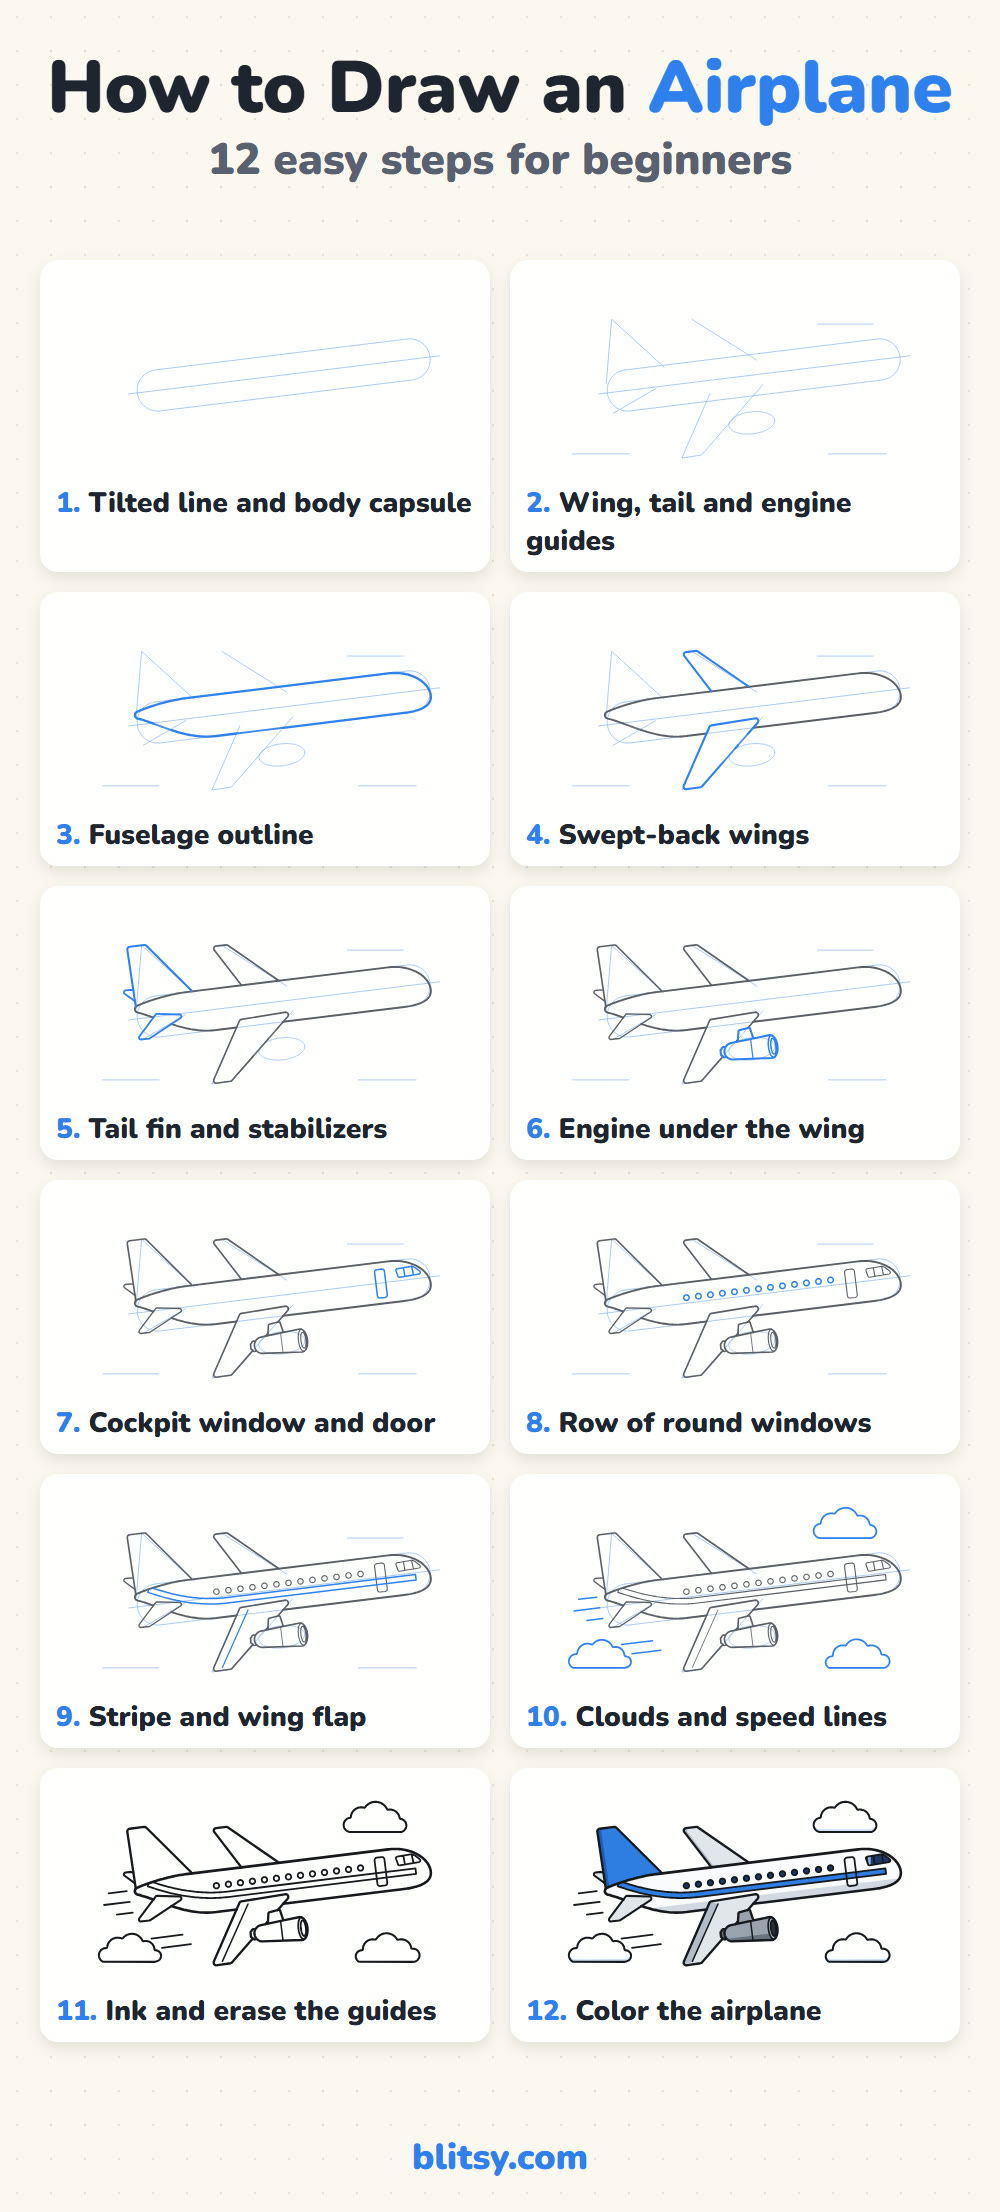
Each picture paints the new lines of that step blue, while gray shows work you've already done. Pale blue lines are helpers: sketch them faintly, because they get erased after inking.
Quick overview
⏱️ Time: about 30 minutes, coloring included
🎯 Level: easy to medium, good for ages 7 and up
✏️ Steps: 12
✈️ You'll draw: a passenger jet climbing through the sky
Gear for Your Jet Sketch
- A pencil you can press lightly with
- An eraser (a kneaded one is easiest on the paper)
- A black fineliner or thin marker
- Colored pencils: blue, dark blue, gray, light gray and light blue
- A sheet of paper turned sideways
- A ruler for the long body lines (optional)
No ruler? Freehand lines with a slight wobble suit a cartoon plane just fine.
How to Draw an Airplane Step by Step
Step 1: Sketch a tilted line and a long capsule
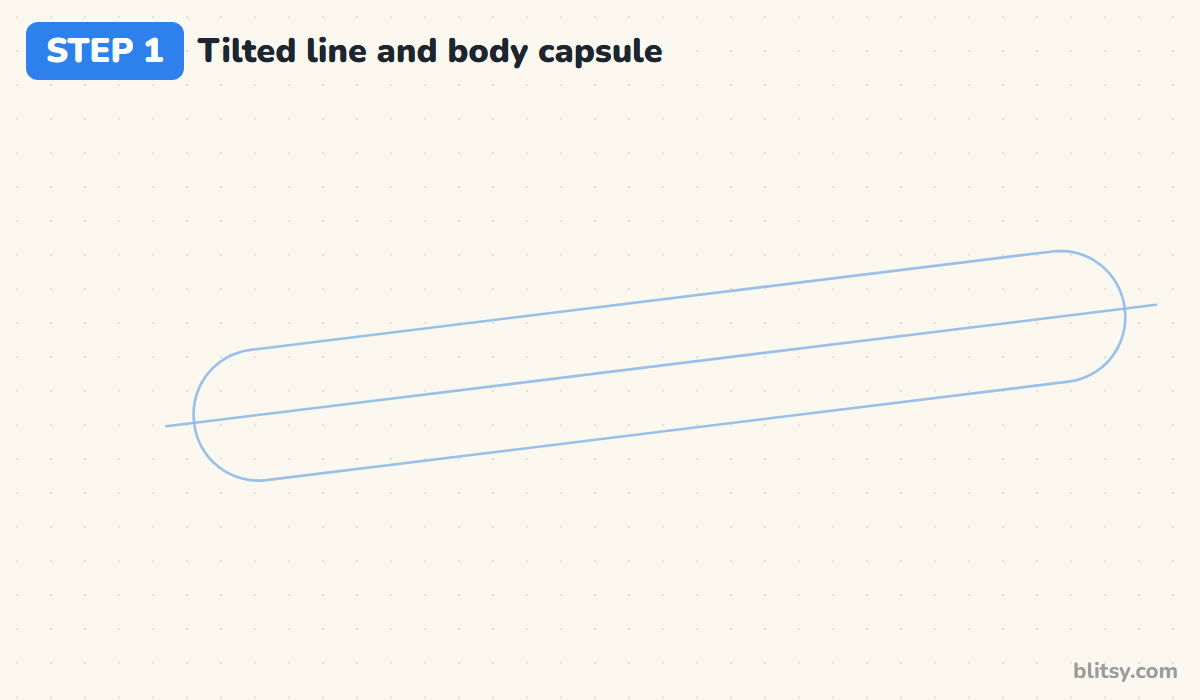
When I teach this plane, I start with the paper sideways and one straight line that climbs gently from lower left to upper right. Around it, draw a long capsule: two parallel lines with a round cap at each end. Make it roughly seven times longer than it is tall. That slight upward tilt is what makes the plane look like it's taking off rather than parked.
💡 Tip: Keep the tilt small; a steep line makes the jet look like it's falling.
Step 2: Add guides for the wings, tail and engine
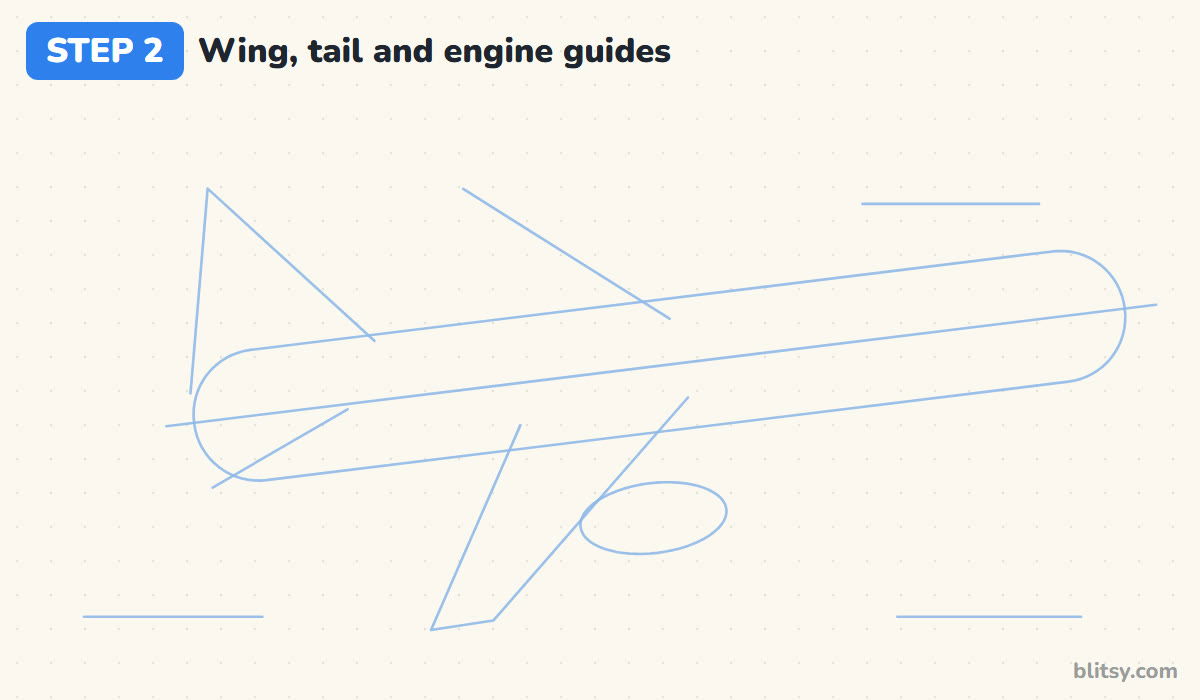
Below the middle of the capsule, draw a slanted four-sided shape that leans back toward the tail. This is the near wing, and a parallelogram is all it really is. Above the body, a single slanted line marks the far wing. At the back, sketch a tall triangle for the tail fin and a short line for the little tail wing. Add a flat oval under the wing for the engine and three short lines where clouds will sit.
💡 Tip: Both wings should lean back at the same angle, like arrows pointing at the tail.
Step 3: Draw the fuselage outline
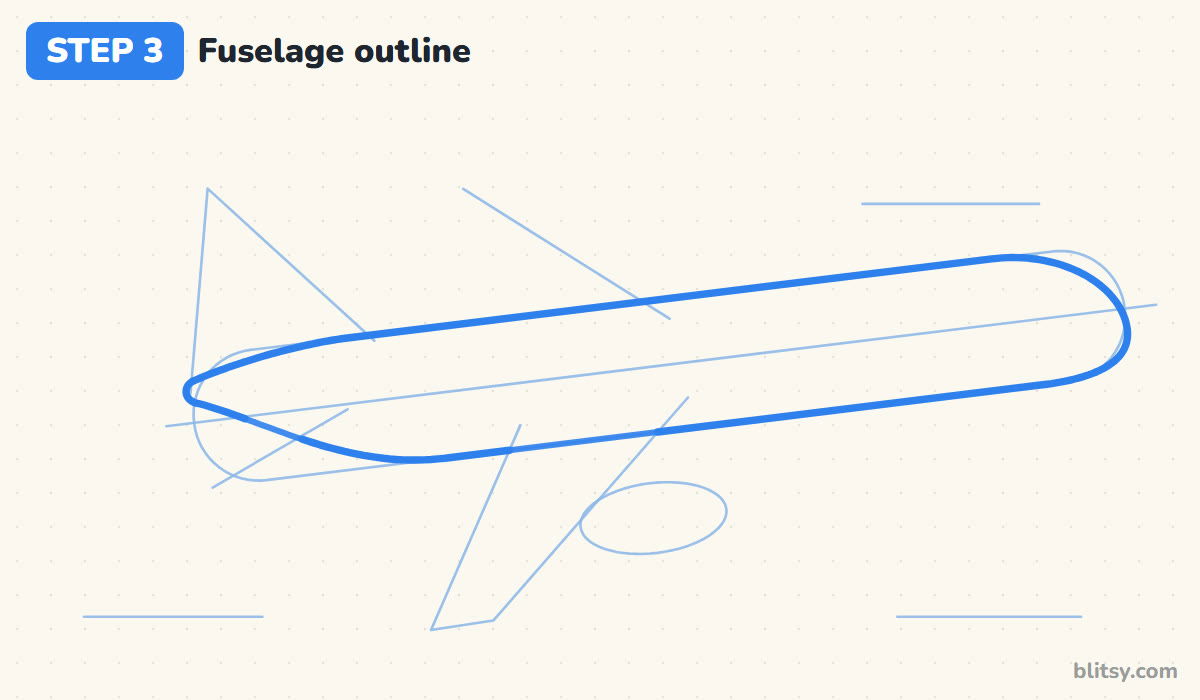
Now the real body. Follow the top of the capsule in one long, nearly straight line. At the front, round the nose like the end of a thumb. Underneath, run the belly straight until about a quarter from the back, then sweep it up toward a small, blunt tail tip. That upward curve under the tail is what makes it look like a jet instead of a sausage.



💡 Tip: Draw long lines in two or three strokes rather than one shaky pull.
Step 4: Shape the swept-back wings
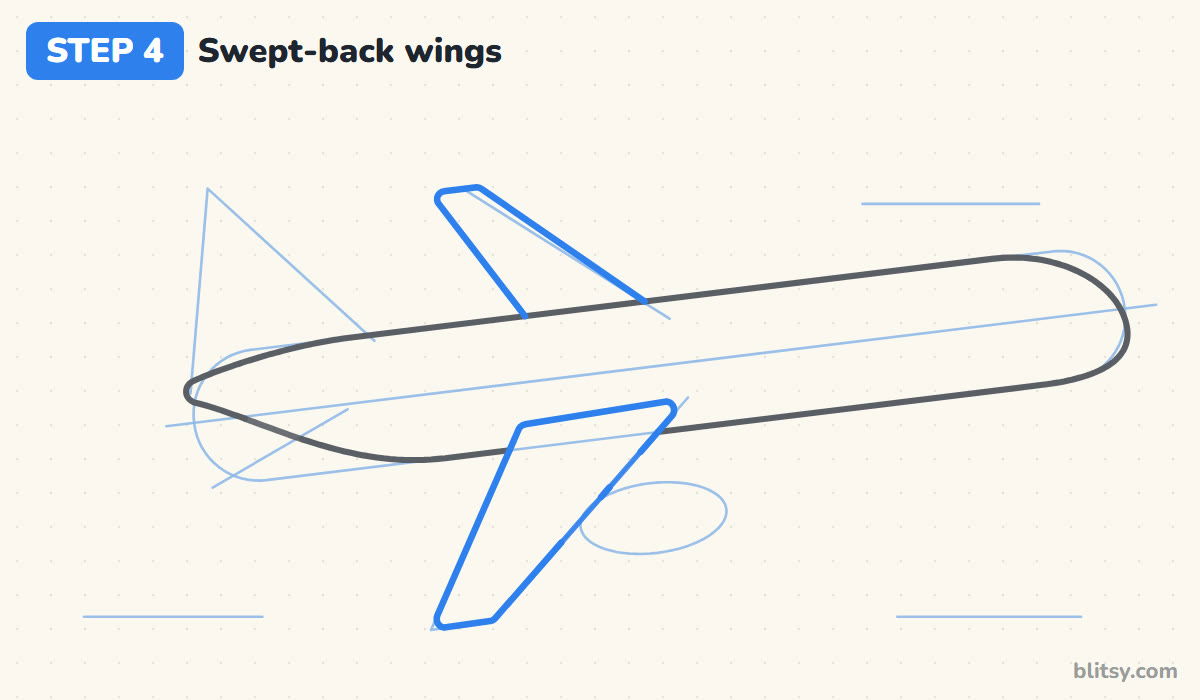
Trace the parallelogram guide for the near wing, rounding its far corners slightly. It's big because it points toward you, so let its tip reach well below the body. Most beginners make this wing too short. Erase the body line inside it. For the far wing, draw a much shorter, narrower shape poking out above the body, ending where it meets the top line.
💡 Tip: Make the far wing smaller; that size difference creates depth.
Step 5: Build the tail fin and stabilizers
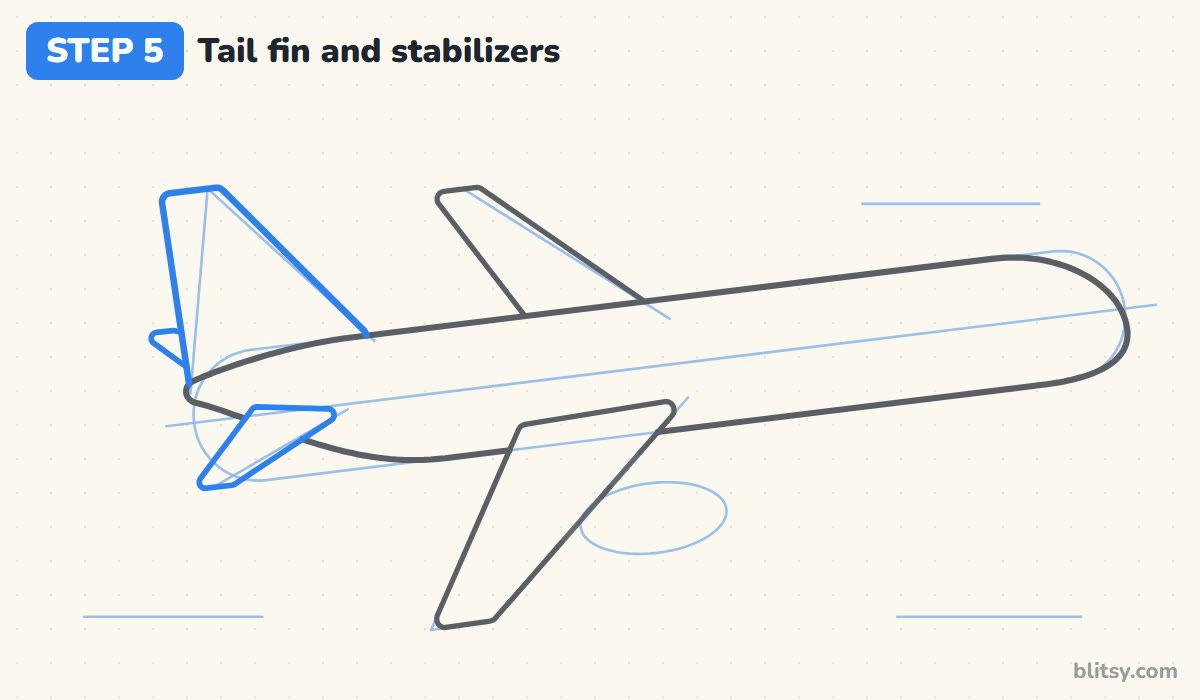
Use the triangle guide to draw the tail fin: a slanted front edge, a short flat top and a back edge that drops almost straight down to the tail tip. Then add the small horizontal wing near the tail, pointing down and back like a mini copy of the main wing. A tiny sliver of the far one can peek out behind the fin.
💡 Tip: Keep the stabilizers about a third the size of the main wing.
Step 6: Hang the engine under the wing
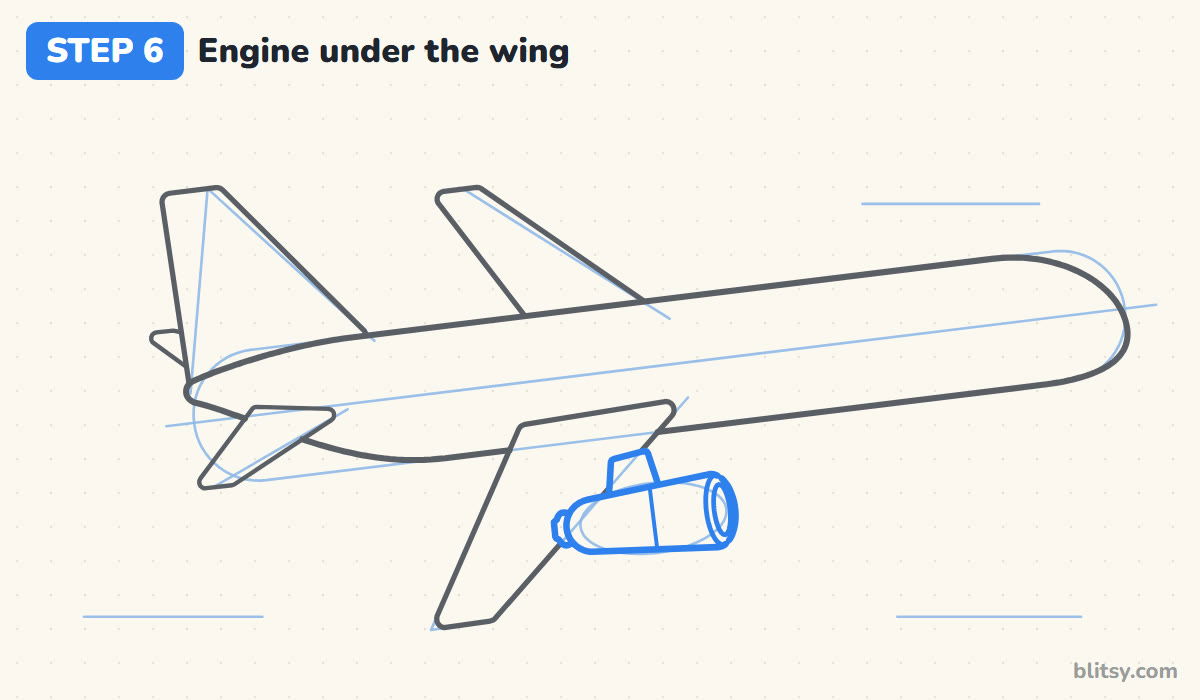
Turn the oval guide into a short, fat cylinder that hangs below the wing and sticks out ahead of its front edge. Give the front a round lip with a smaller oval inside for the intake, and add a little cone at the back for the exhaust. A short block on top, called the pylon, holds it to the wing; erase the wing edge behind the engine.
💡 Tip: The intake ovals are narrow because you see them from the side.
Step 7: Add the cockpit window and the door
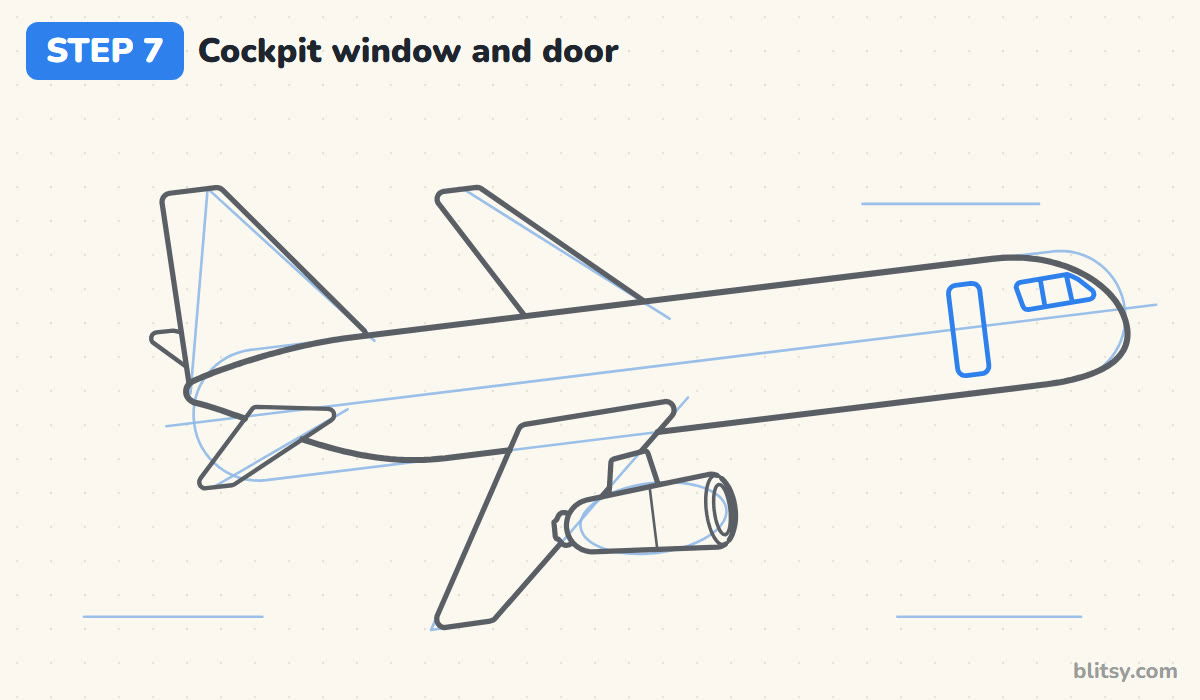
Near the top of the nose, draw a short window strip that slants down at the front, then split it into three panes with two small lines. Behind it, a tall rounded rectangle makes the front door. I place the door about one door width behind the cockpit, which keeps the nose from looking crowded.
💡 Tip: Tilt the door slightly so it lines up with the climbing body.
Step 8: Draw a row of round windows
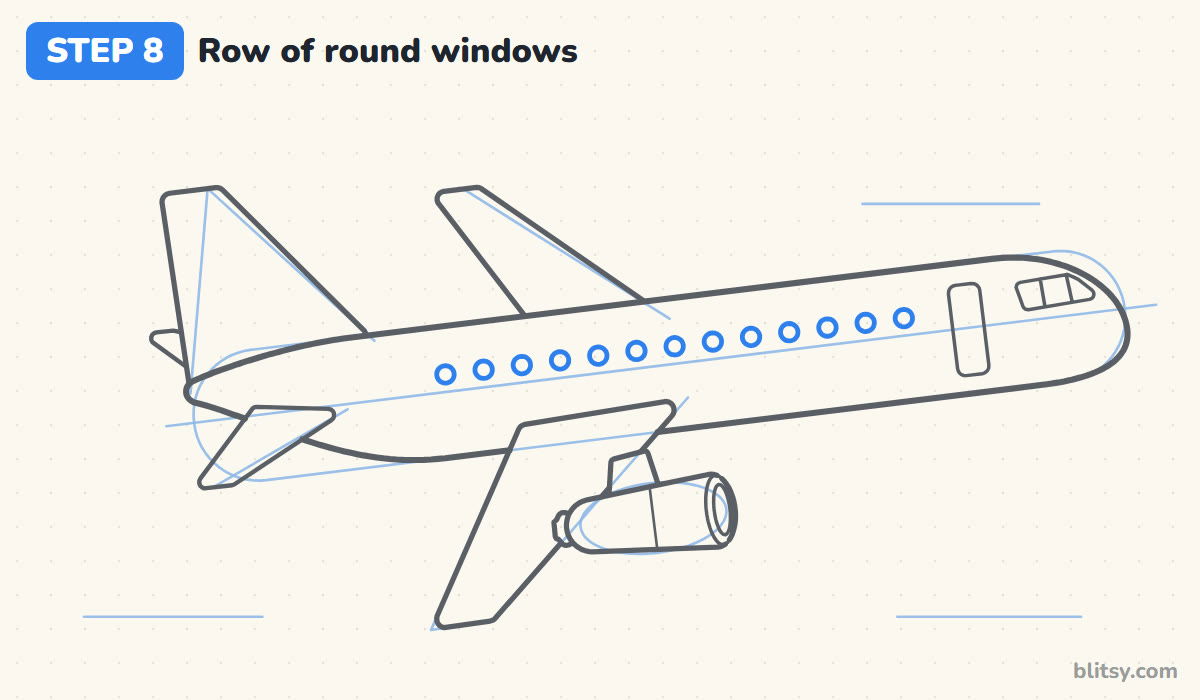
Along the upper half of the body, draw small circles in a straight row from behind the door toward the tail. Space them evenly, roughly three window widths apart. Follow your tilted center line so the row climbs with the plane. I never fuss over perfect circles here; once they're colored, small size differences vanish.
💡 Tip: Mark the first and last window, then fill in the middle.
Step 9: Add the body stripe and a wing flap
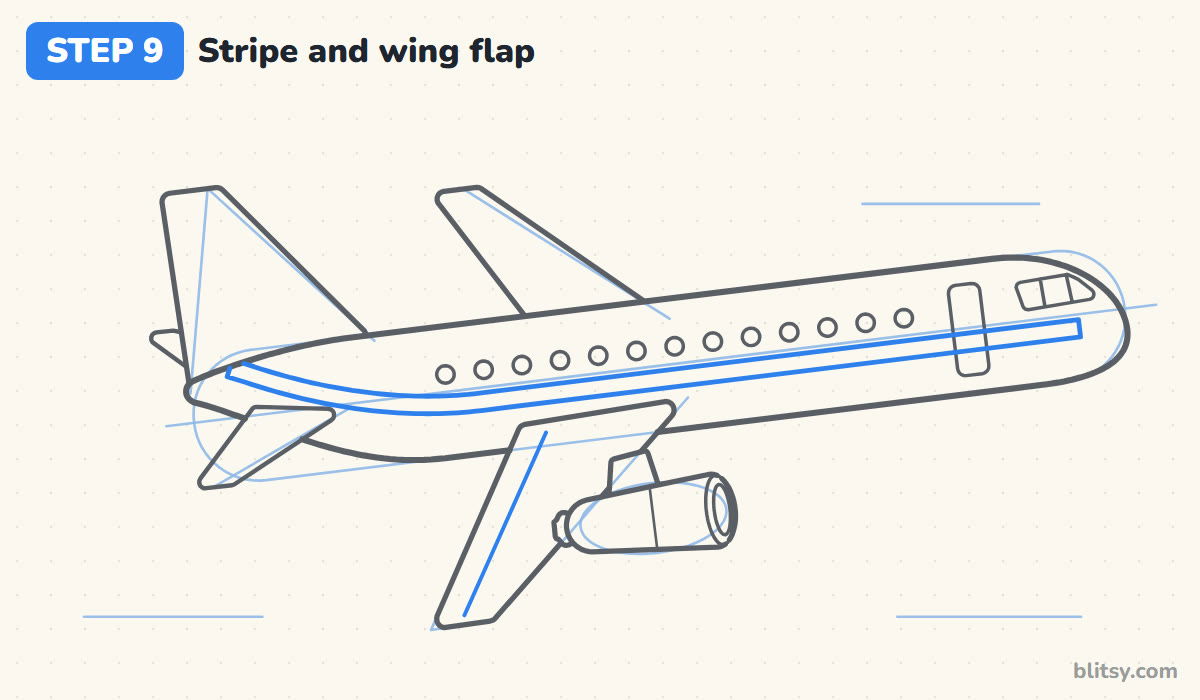
Under the windows, draw two close parallel lines from just behind the nose all the way back. Near the tail, curve them upward so the stripe sweeps into the fin. On the near wing, add one line parallel to its back edge for the flap. Real flaps slide out to help the wing make extra lift at low speed.
💡 Tip: Draw the top stripe line first, then copy its curve just below.
Step 10: Draw clouds and speed lines
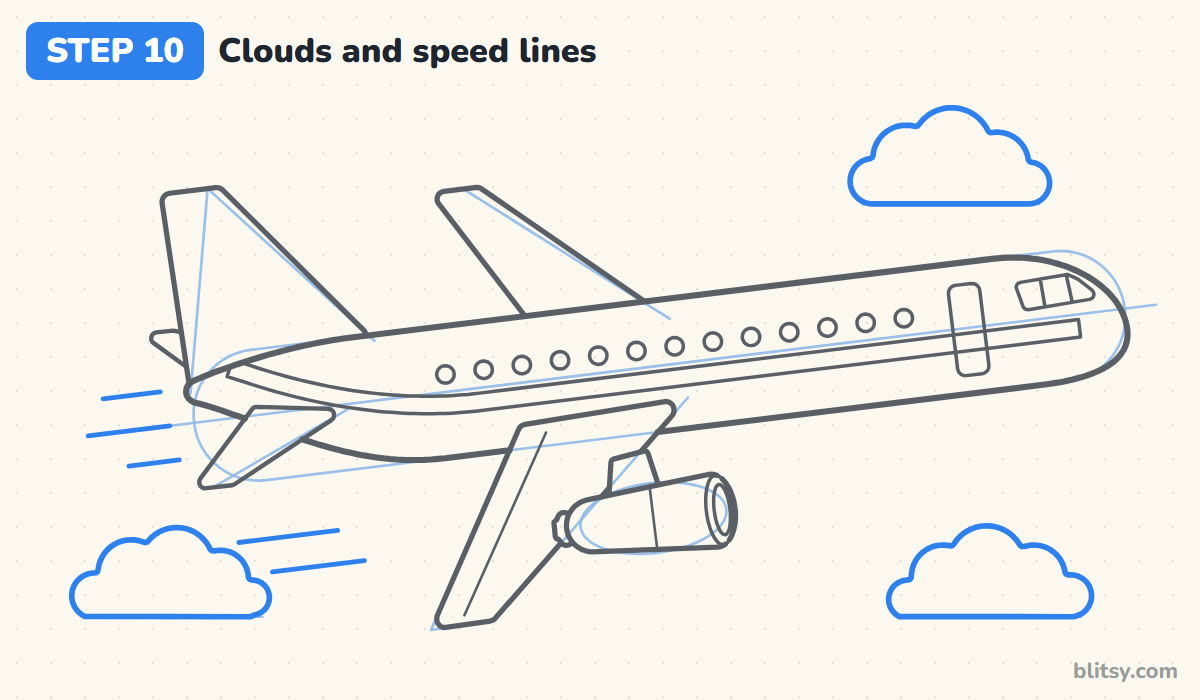
Sit three bumpy clouds on their flat guide lines: one high on the right and two low. Each one is a row of half circles, biggest in the middle. Then draw a few short dashes trailing behind the tail and the wing tip. Put them behind the plane only, never in front, or it will look like the jet is flying backward.
💡 Tip: Leave gaps between the speed lines; three or four strokes are plenty.
Step 11: Ink the plane and erase the guides
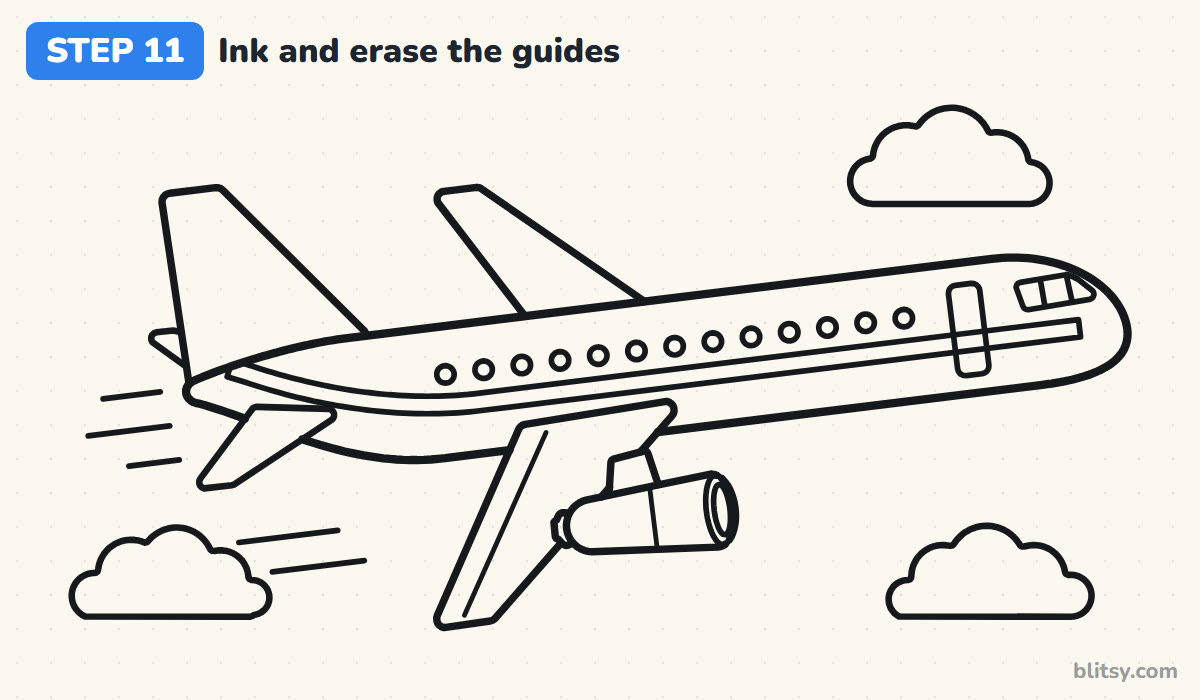
Go over every line you want to keep with the black pen: body, wings, tail, engine, windows, stripe, flap, clouds and speed lines. Then, once the ink is dry, erase the capsule, the center line, the wing and tail guides, the engine oval and the cloud lines.

💡 Tip: Ink the windows last so your hand doesn't smudge the long lines.
Step 12: Color the airplane
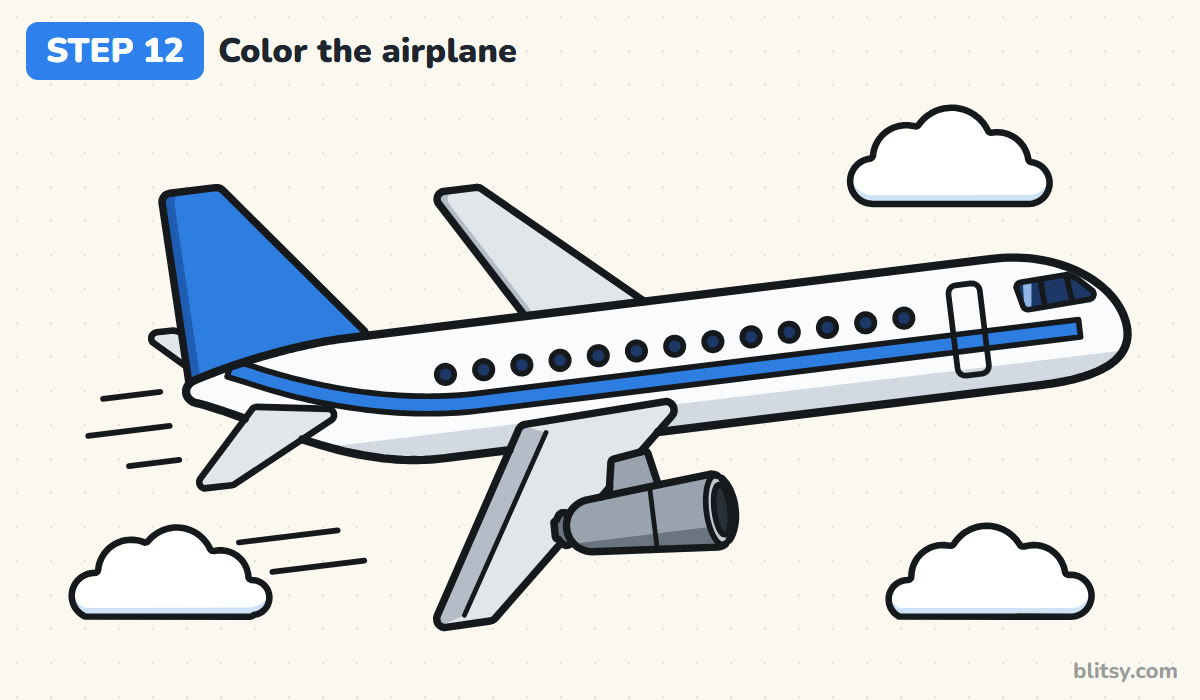
Leave the body white and shade the belly with light gray, which makes the tube look round. Color the stripe and tail fin blue, adding a darker blue edge on the fin. Fill the windows and cockpit with dark blue. The wings and stabilizers get light gray with a darker strip along the back edge, and the engine is gray with a nearly black intake. I leave the clouds white with a light blue line underneath.
💡 Tip: Color the dark windows first, before your hand rests on the body.
Why Airplane Sketches Sometimes Look Off
- Wings sticking straight out. Flat, sideways wings make a jet look like a toy cross. Lean both wings back toward the tail at the same angle.
- A body that's too short. A stubby fuselage turns the plane into a fish. Keep it at least six or seven times longer than it is tall.
- Both wings the same size. That flattens the picture. The near wing should be big and reach down; the far wing stays small and peeks above.
- The engine floating in the sky. Without a pylon, it looks lost. Tuck the engine right under the wing and join them with a short block.
- Windows wandering up and down. A crooked row makes the body look bent. Follow the tilted center line from step 1.
Repainting and Restyling Your Jet
Once the jet feels easy, play with the paint job. Swap the blue for red or green, add a second thin stripe, or paint a sun shape on the tail fin. You can also put a smiling face on the nose and turn it into a cartoon character. Want a fuller sky? The cloud drawing tutorial shows how to build soft shapes from guide circles, and if you'd rather fly higher, try how to draw a rocket.
Airplane Coloring Page and Free Step Guide PDF
Print the airplane coloring page for a quiet afternoon. A small colored example and a color key sit at the top, with a big bold outline below and plenty of space for a sky. The step-by-step guide PDF collects all 12 steps and tips on a few pages. Both print on Letter or A4.
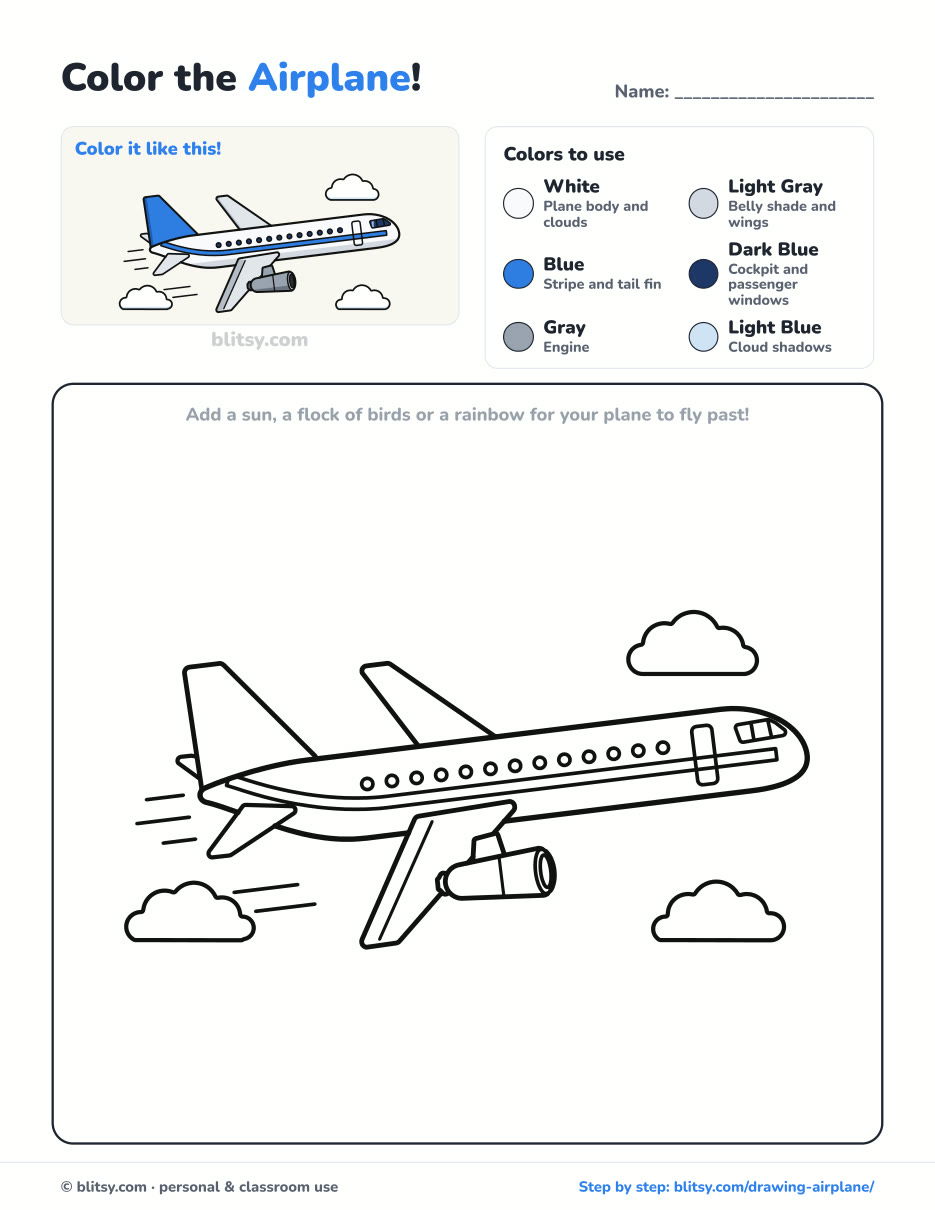
Black outlines with a colored example and the color names at the top. Ready to print and color.
⬇️ Download Coloring PageEvery step picture with its instructions and tips, to keep beside your paper while you draw.
⬇️ Download Drawing Guide📱 On a phone? Tap a download button, then open the file and choose Share → Save to Files or Print. On a computer, the PDF opens or saves straight to your Downloads folder.
Pin the Airplane Steps to Your Board
Airplane Drawing Questions From Young Pilots
What is the easiest way to draw an airplane?
Start with a long capsule for the body, then add one slanted parallelogram for a wing and a triangle for the tail. Windows and an engine are extras you can add once the shape looks right.
How do you draw an airplane for kids?
Keep the shapes big and skip the far wing, the flap and the stabilizers. A tube, one wing, a tail and a row of circles is already a clear plane.
Why do airplane wings lean back?
Jets fly fast, and swept-back wings handle high speed better. In a drawing, the backward lean also shows which way the plane is moving. The wings make lift as air flows over and under them.
When was the first airplane flight?
The Wright brothers made the first powered airplane flight in 1903, near Kitty Hawk, North Carolina.
Ready for the next flight? Draw a second jet heading the other way and let the two of them cross between the clouds. ✈️
Related posts:
 How to Draw a Car Step by Step (Easy Drawing for Beginners)
 How to Draw Godzilla Step by Step (Easy Kaiju for Beginners)
 How to Draw a Whale Step by Step (Easy for Beginners)
 How to Draw a Rat Step by Step (Easy for Beginners)
 How to Draw an Arctic Fox Step by Step (Easy for Beginners)
 How to Draw a Shark Step by Step (Easy for Beginners)
 How to Draw a Dog Step by Step (Easy Side View for Beginners)
 How to Draw a Chicken Step by Step (Easy for Beginners)
 How to Draw a Fish Step by Step (Easy Goldfish for Beginners)
 How to Draw a Snowman Step by Step (Easy for Beginners)
 How to Draw a Crow Step by Step (Easy for Beginners)
 How to Draw Hands Step by Step (Easy Palm View for Beginners)

