
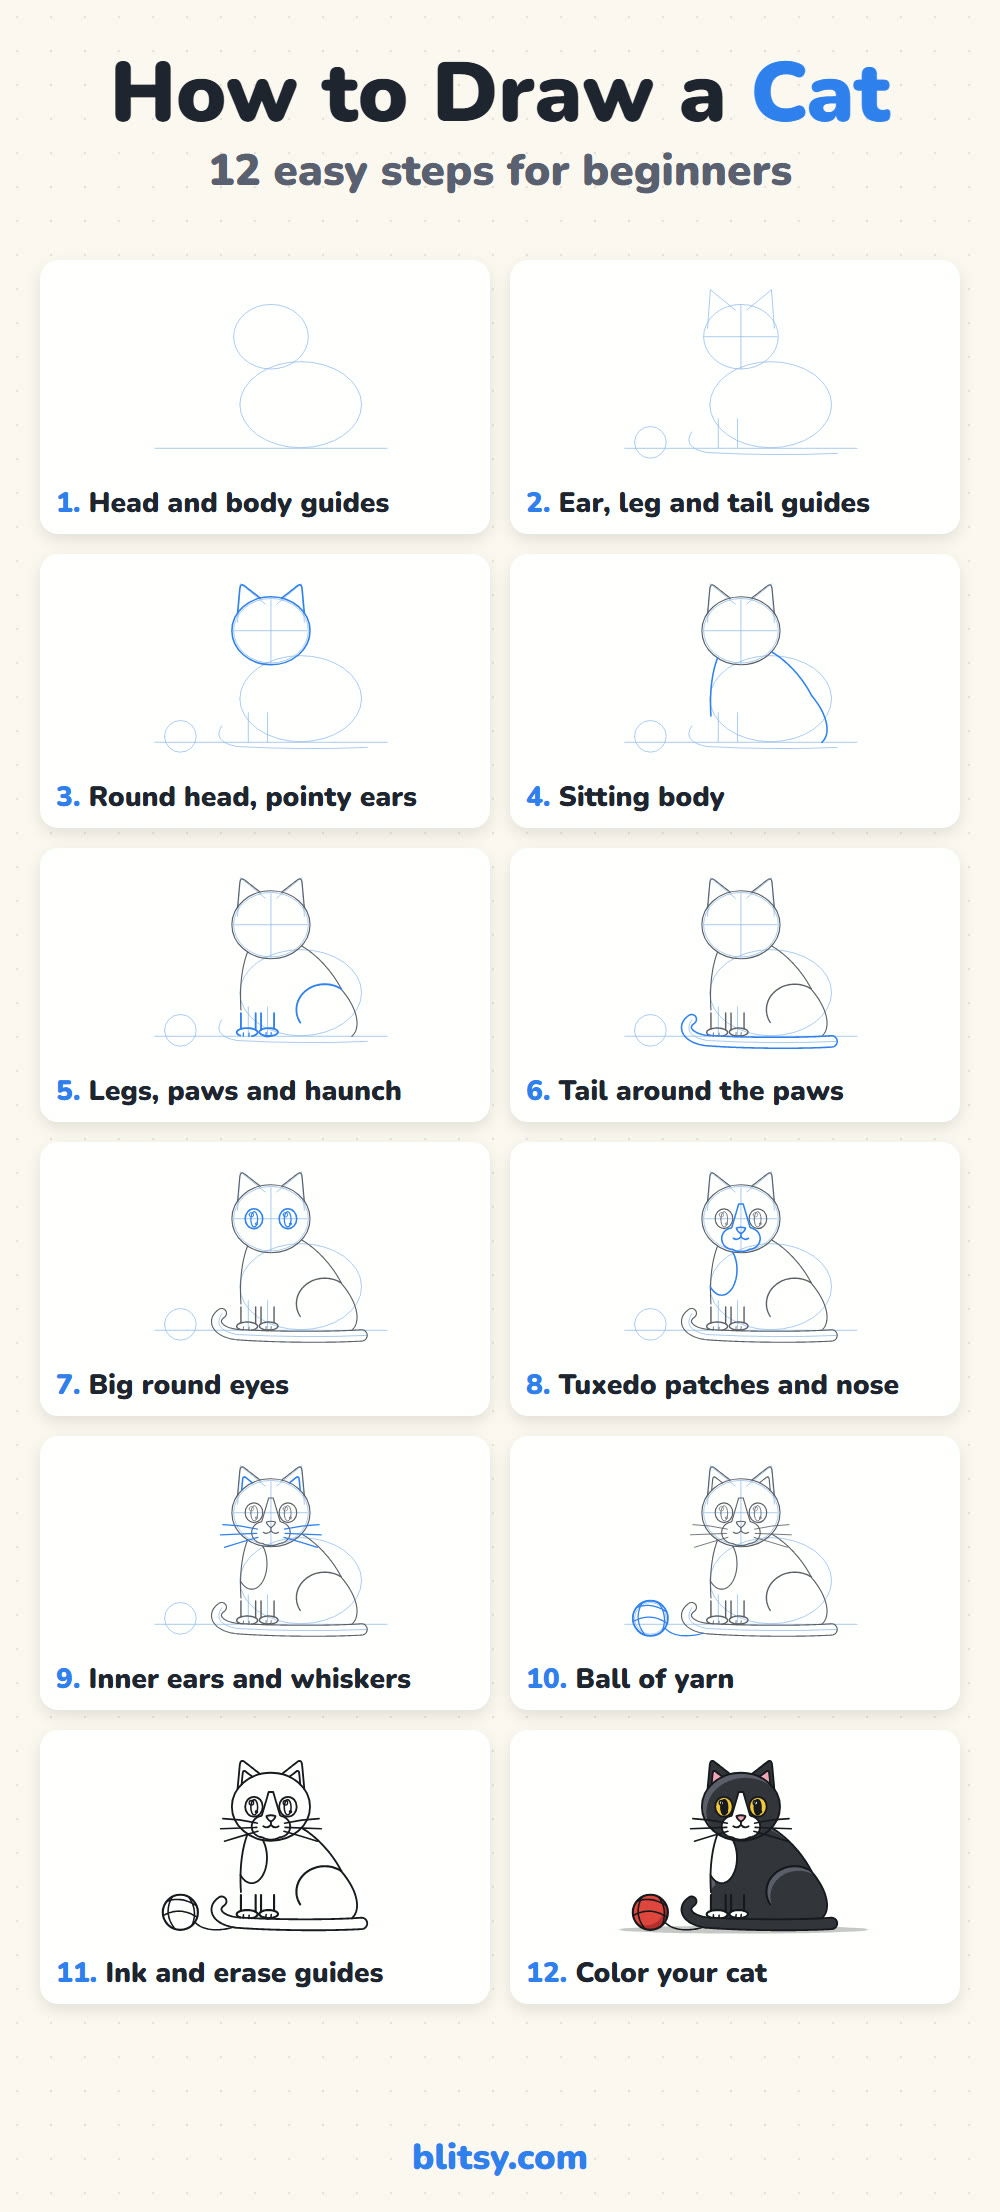
Cats sit like little loaves of bread with a face on top, which is easier to draw than it looks. Here I'll walk you through how to draw a cat step by step: a tuxedo cat sitting sideways, turning its head to look straight at you, with its tail curled round the front paws. A red ball of yarn waits on the floor beside it. If you can draw an oval and a triangle, you already have the skills this one needs.
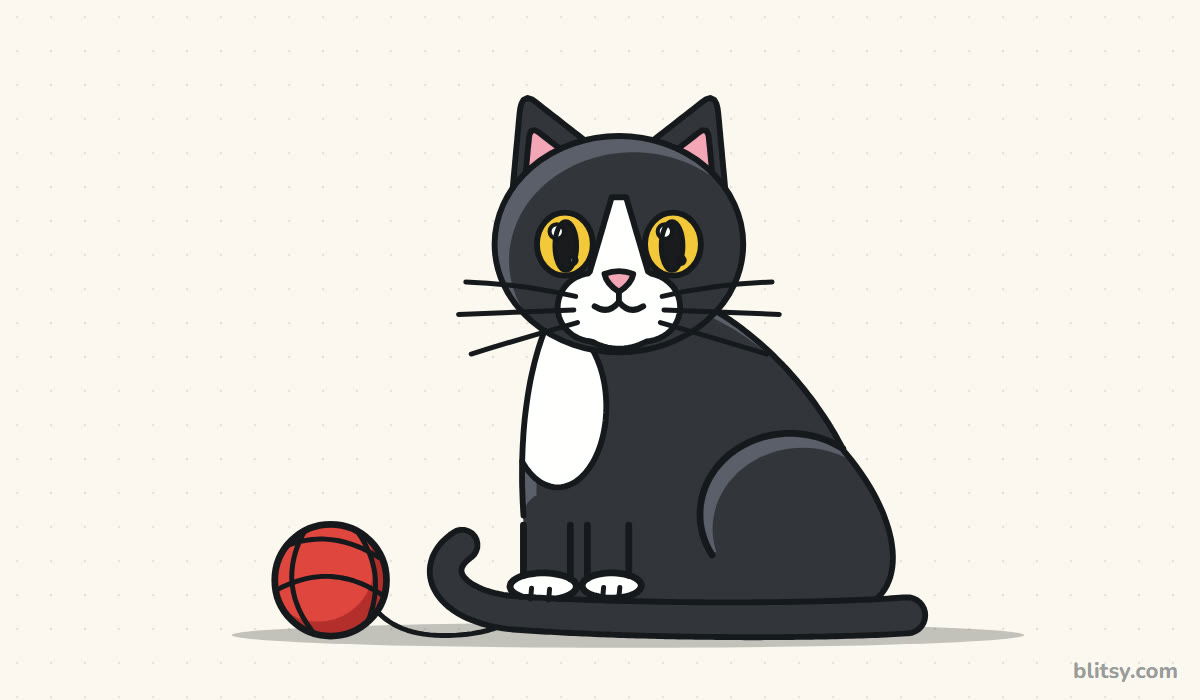
Each picture shows the lines for that step in blue. Everything you drew before is gray, so it's easy to spot what's new. Draw only the blue lines, then go to the next picture.
Quick overview
⏱️ Time: about 35 minutes with coloring
🎯 Level: easy, good for kids from about 7
✏️ Steps: 12
🐱 You'll draw: a sitting tuxedo cat with its tail round its paws and a ball of yarn
Tools for Your Tuxedo Cat Sketch
- A pencil (an HB works fine)
- A soft eraser that won't smear
- A black fineliner or thin marker
- Colored pencils or markers: black, dark gray, pink, yellow and red
- A sheet of white paper, turned sideways
The paper itself gives you the white patches, so skip the white pencil.
How to Draw a Cat Step by Step
Step 1: Sketch the head and body guides
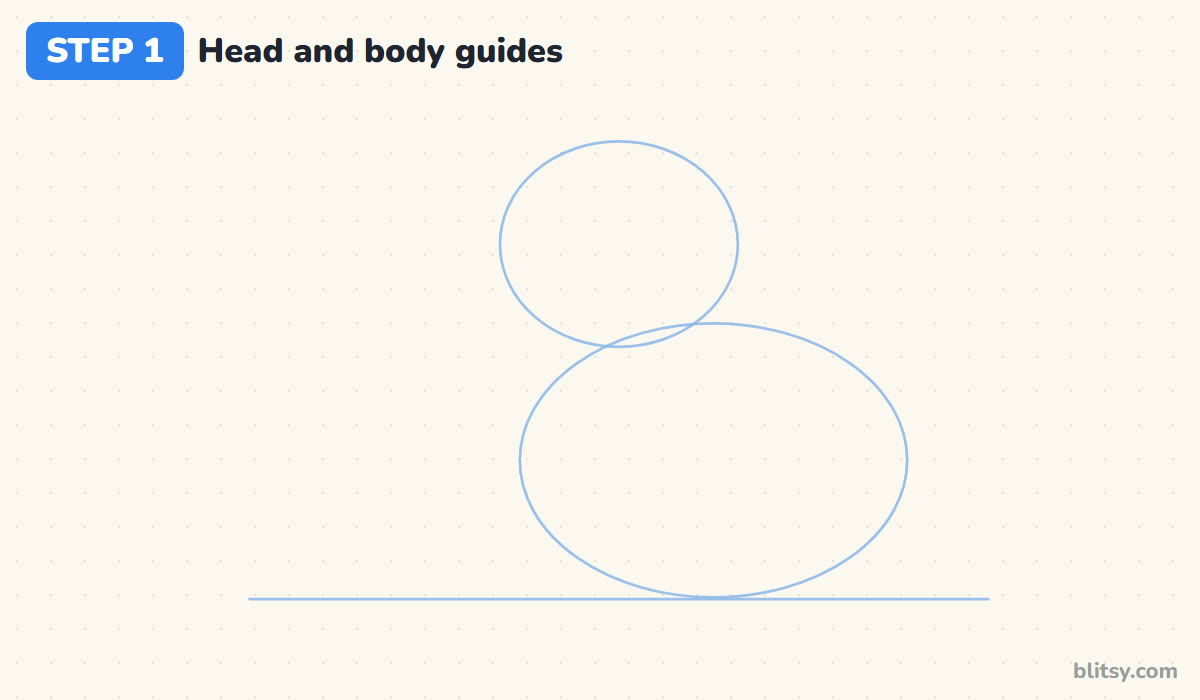
Start with a straight ground line low on the page. Above it, draw a big oval for the body, wider than it is tall, resting on the line. Then place a smaller oval for the head on top, toward the left, so it overlaps the front of the body a little. I make the head about two thirds as wide as the body; a big head keeps a cartoon cat looking friendly.
💡 Tip: Hold the pencil near the back end. You'll press lighter without trying.
Step 2: Add guides for the ears and tail
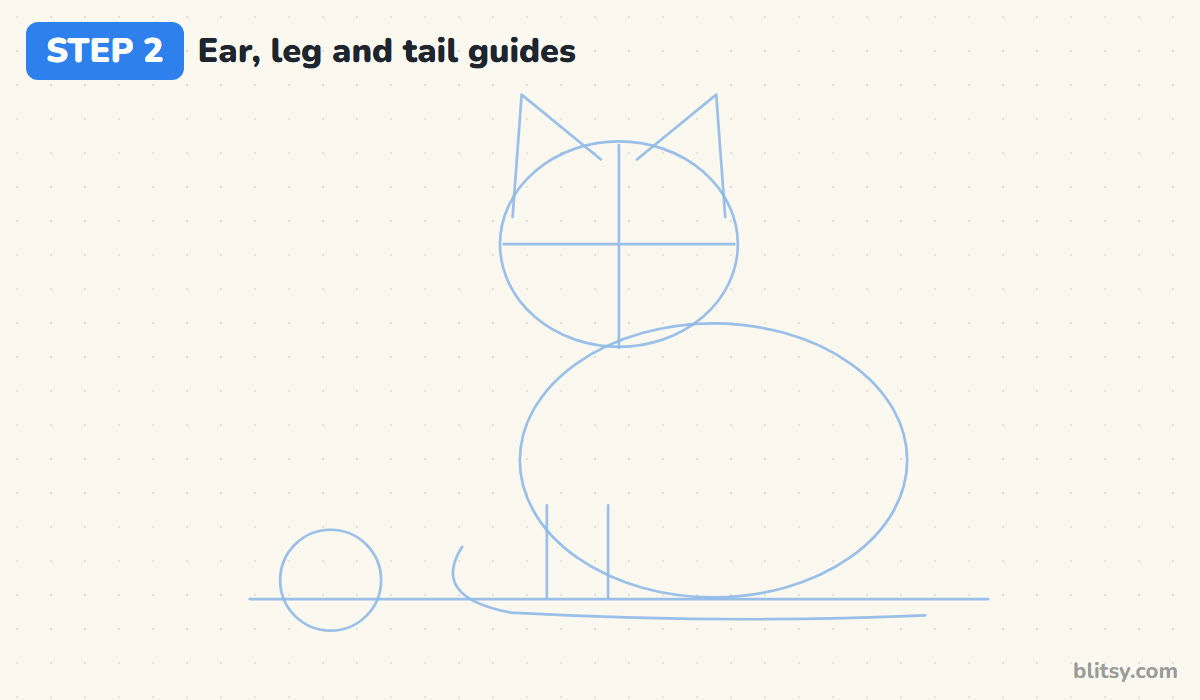
Draw two tall triangles on top of the head for the ears. Cross the head with one vertical and one horizontal line; the eyes will sit on the horizontal one. Below the chest, drop two short straight lines for the front legs. Add a long ground curve that hooks up at the left for the tail, plus a small circle for the yarn.
💡 Tip: Keep the face cross centred. If it leans, the eyes will end up crooked.
Step 3: Draw the round head and pointy ears
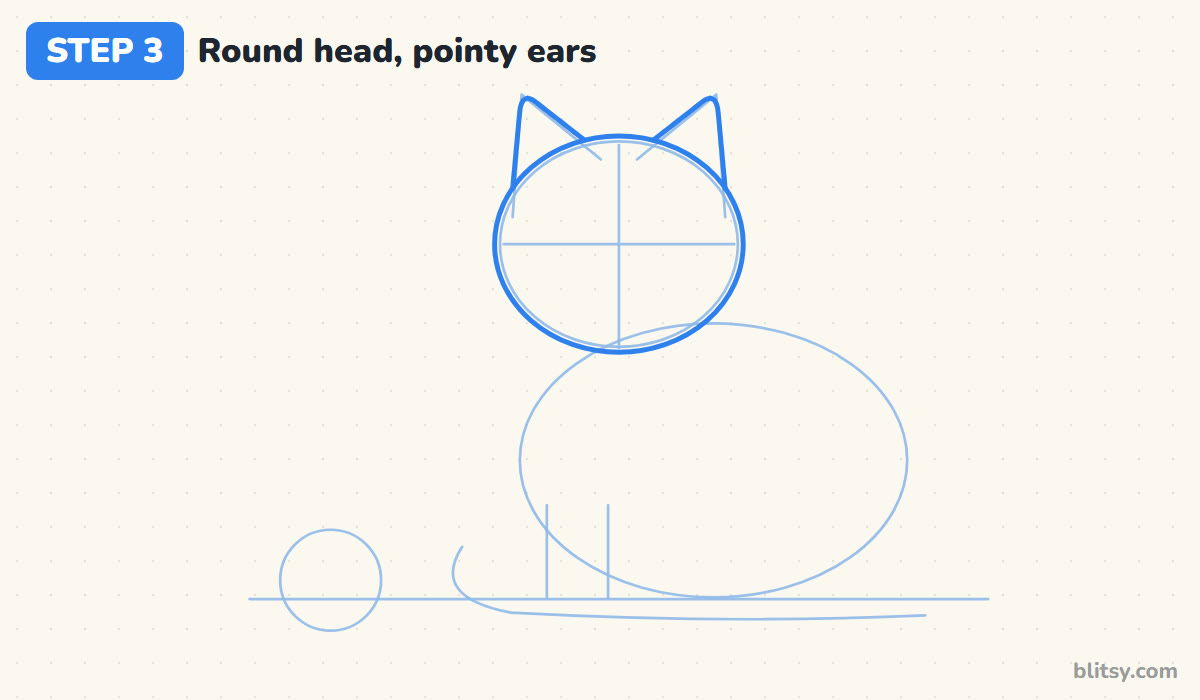
Go over the head oval with a firm, smooth line. Next, draw each ear as a triangle with a slightly rounded tip, standing on the top of the head. They lean outward a little. Stop each ear line where it meets the head, so the head outline stays whole and the ears tuck behind it.




💡 Tip: Rounded ear tips read as cute. Sharp ones make the cat look grumpy.
Step 4: Shape the sitting body
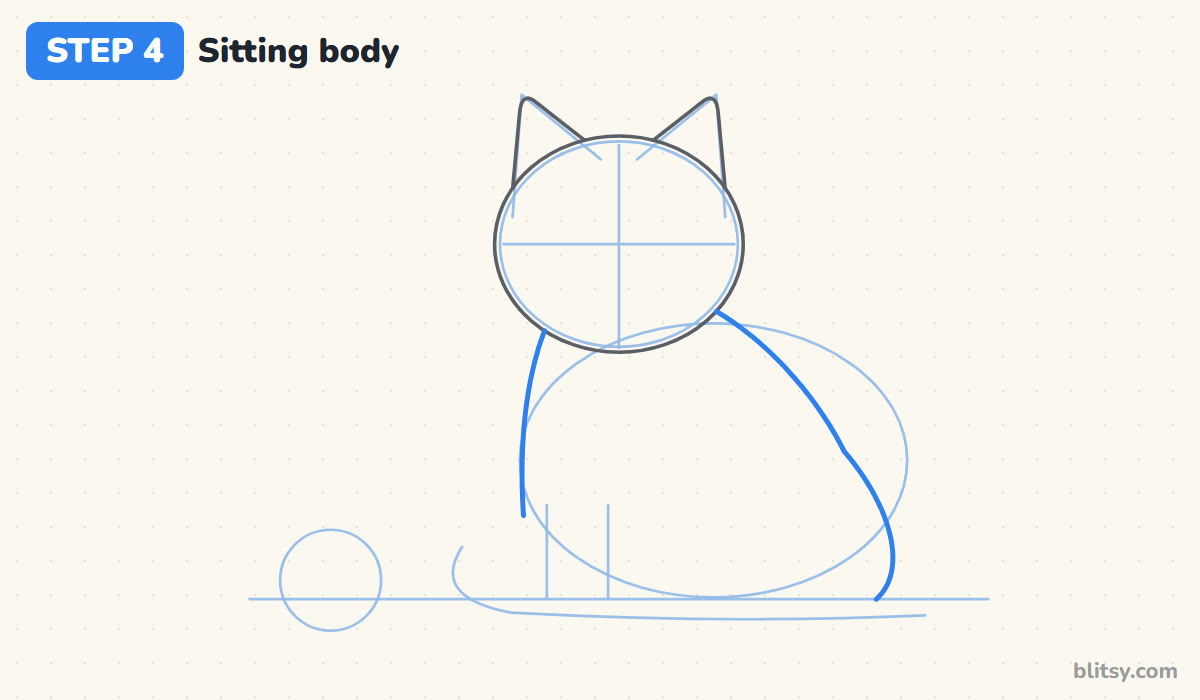
From the back of the head, run a line down over the back and swell it out into a round rump near the ground. Then go to the front and draw the chest, dropping almost straight down from under the chin. Most beginners make the back too flat. A sitting cat's back slopes like a slide, high near the head and wide at the bottom.
💡 Tip: Look at the space between head and rump. It should be a smooth diagonal, no bumps.
Step 5: Add the legs and the haunch
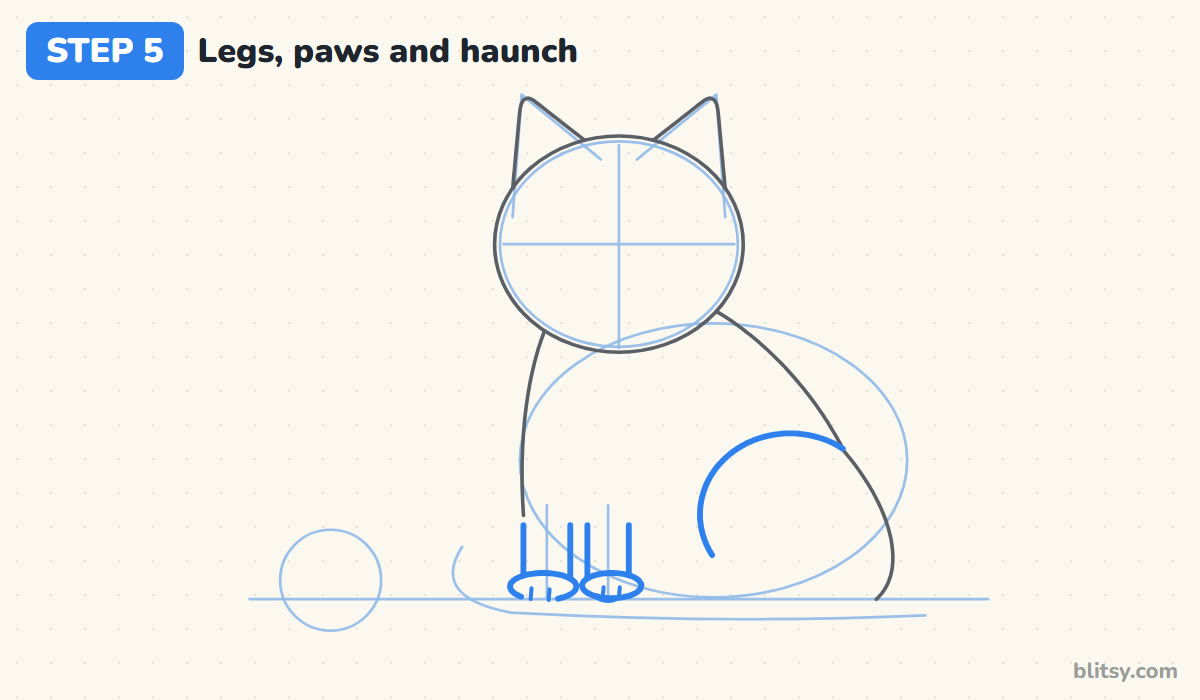
Inside the body, draw a big curved line for the back leg, the haunch, starting low and arching up toward the rump. At the front, trace the two leg guides as pairs of straight lines, then finish each with a small flat oval for a paw. I leave the tops of the legs open so they blend into the chest.
💡 Tip: Keep the front paws close together. Spread apart, they make the cat look wobbly.
Step 6: Curl the tail around the paws
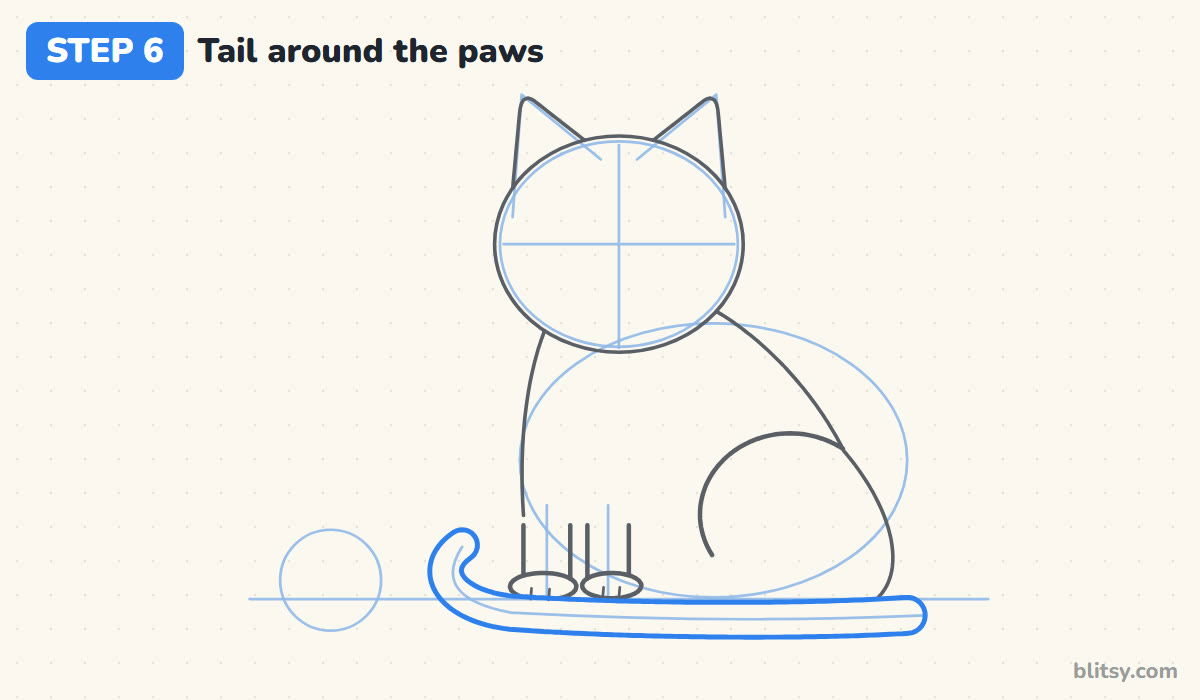
Start the tail behind the rump with a rounded end, then let it run along the ground in front of the paws. At the far left, curve it up into a little hook. Since the tail lies in front, its top edge should cover the bottom of the body line.
💡 Tip: Draw the top edge first, then follow it with the bottom edge, like train tracks.
Step 7: Give the cat big round eyes
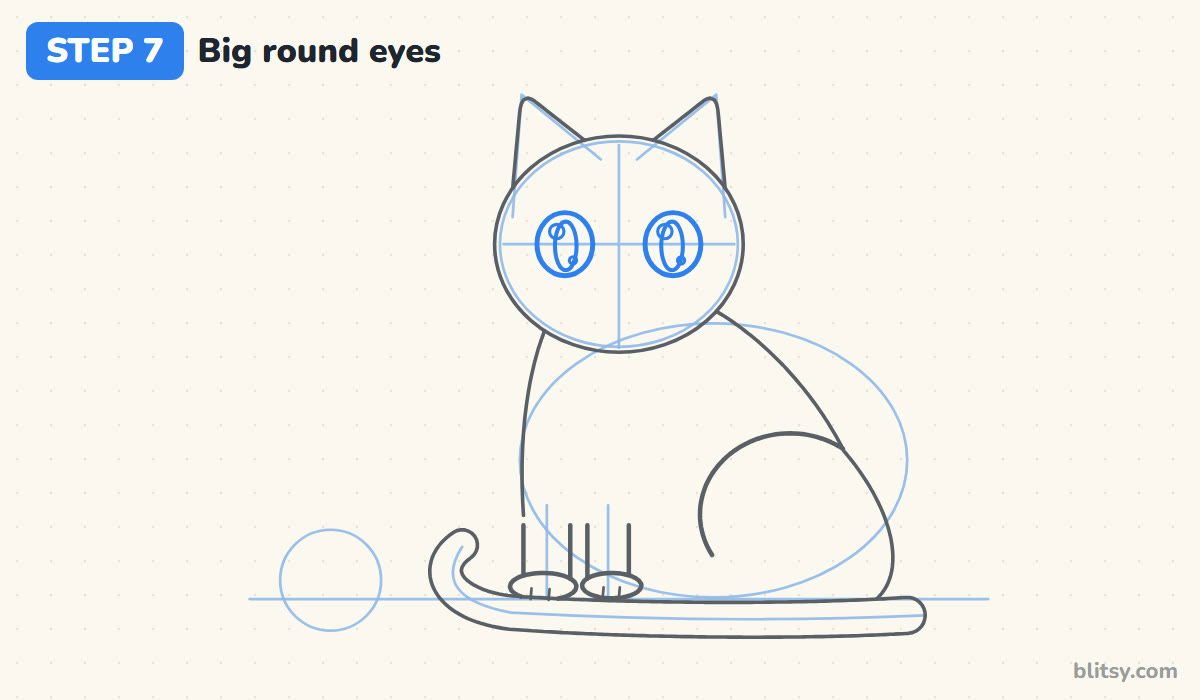
Sit two tall ovals on the horizontal face line, one on each side of the vertical line. Leave a gap between them about as wide as one eye. Inside each, draw a narrow upright oval for the pupil, then two shine circles: a bigger one at the top left and a small one lower down. Match the shines in both eyes.



💡 Tip: Tall pupils look calm and curious. Round ones make it look surprised.
Step 8: Draw the tuxedo patches and the nose
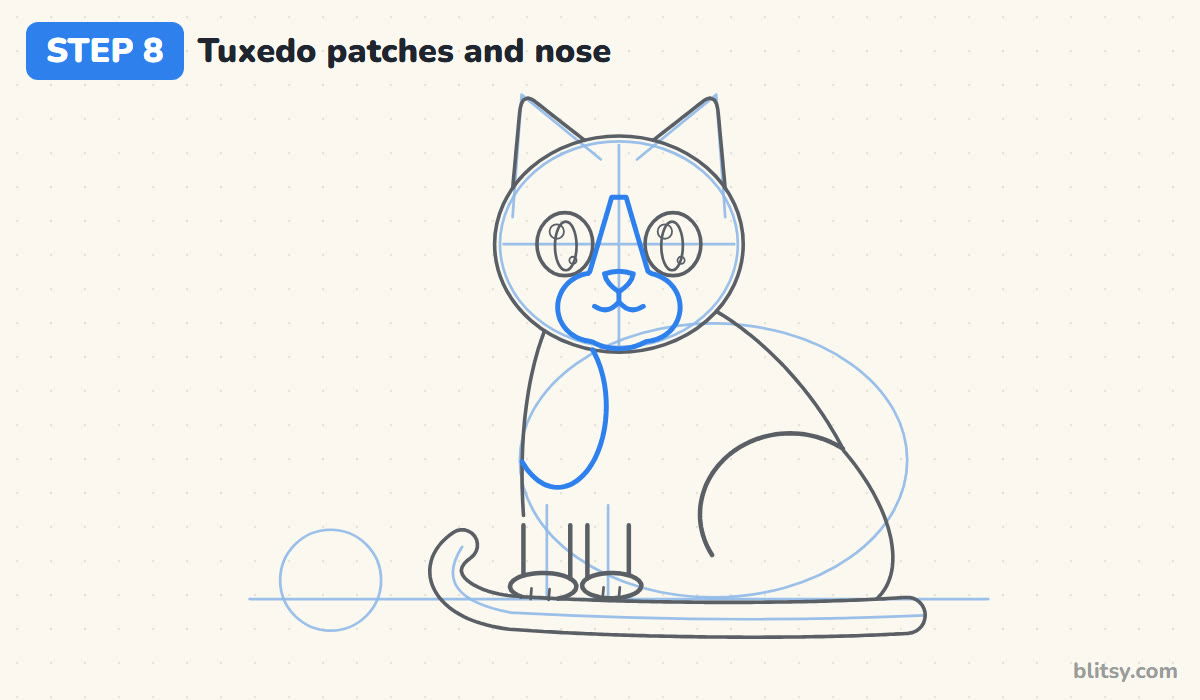
Here's what turns a plain black cat into a tuxedo. Draw a white blaze: a thin strip starting between the eyes that widens as it comes down, then puffs out into two round cheeks around the mouth. Below the head, add a tall rounded patch for the white chest. Finish with a small pink nose and a short line down to a curly mouth shaped like a soft letter w.
💡 Tip: Make the cheek puffs match in size, or the face will look lopsided.
Step 9: Add the inner ears and whiskers
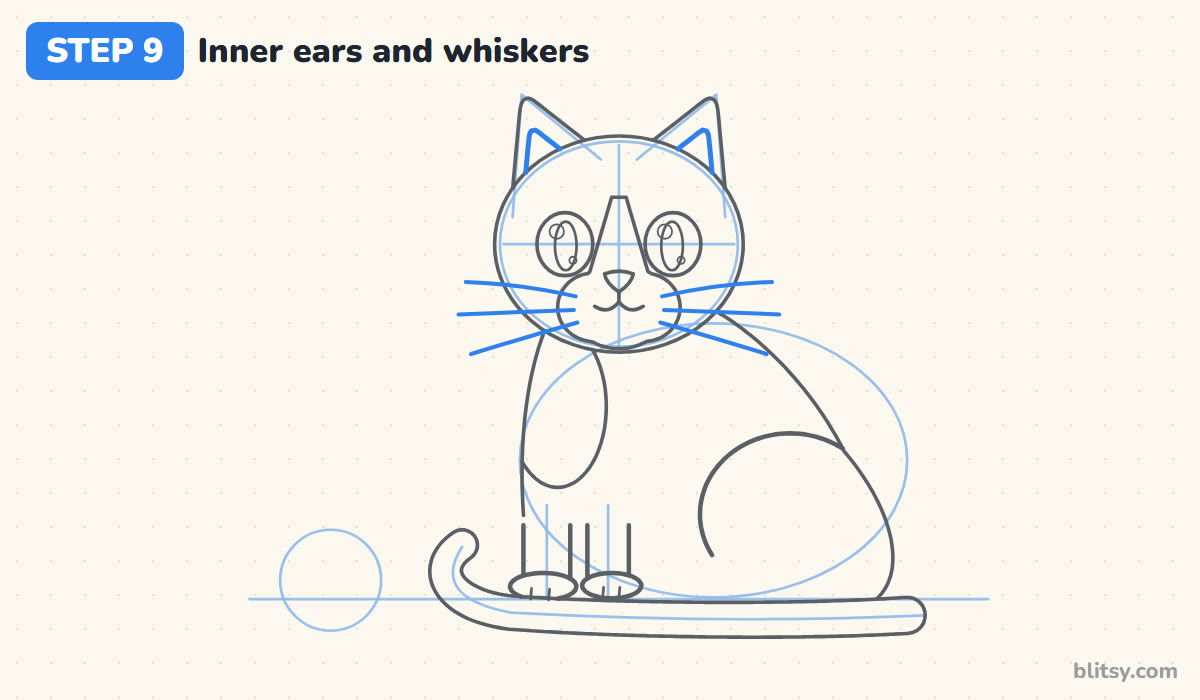
Inside each ear, draw a smaller triangle for the pink part, leaving a band of fur all round it. Then pull three whiskers out from each cheek. Fan them slightly so the top one tilts up and the bottom one tilts down. Long whiskers stay easier to see on a dark cat.
💡 Tip: Flick each whisker outward from the cheek in a single quick motion.
Step 10: Draw the ball of yarn
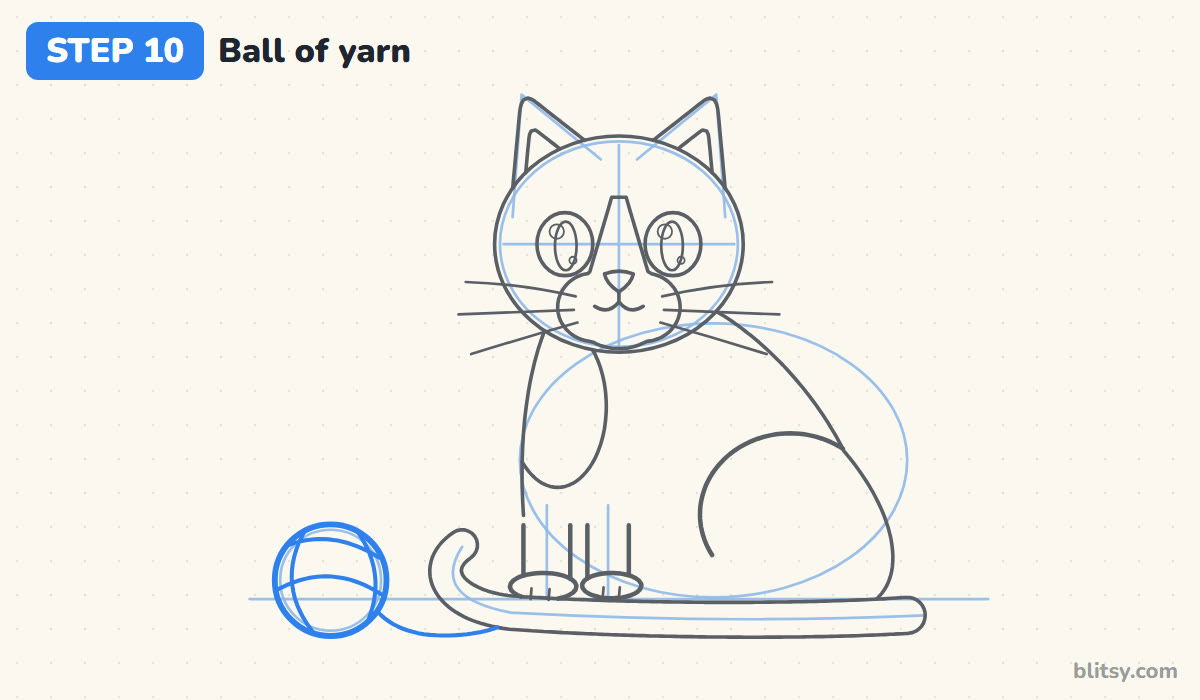
Trace over the circle on the left to make the ball. Inside it, draw four curved lines that cross each other, a couple going across and a couple going up and down, like a wrapped parcel. Then pull a loose strand out from the bottom of the ball and let it wander toward the cat's tail.
💡 Tip: Curve every yarn line like it's hugging the ball, never straight across.
Step 11: Ink your lines and erase the guides
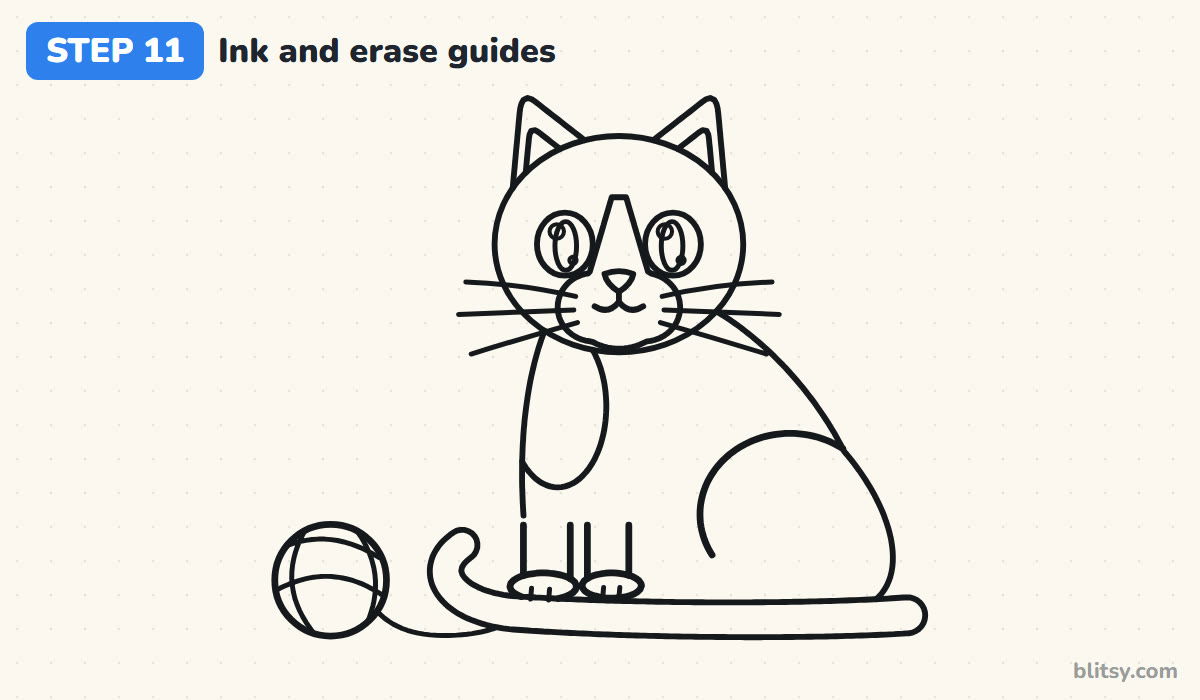
Trace every keeper line with the black pen. Skip the ovals, the face cross, the leg lines and the tail guide. When the ink has dried properly, erase all the pencil. I go slowly around the eyes, since a wobble there changes the whole expression.




💡 Tip: Turn the paper as you ink, so your hand always pulls the pen toward you.
Step 12: Color your tuxedo cat
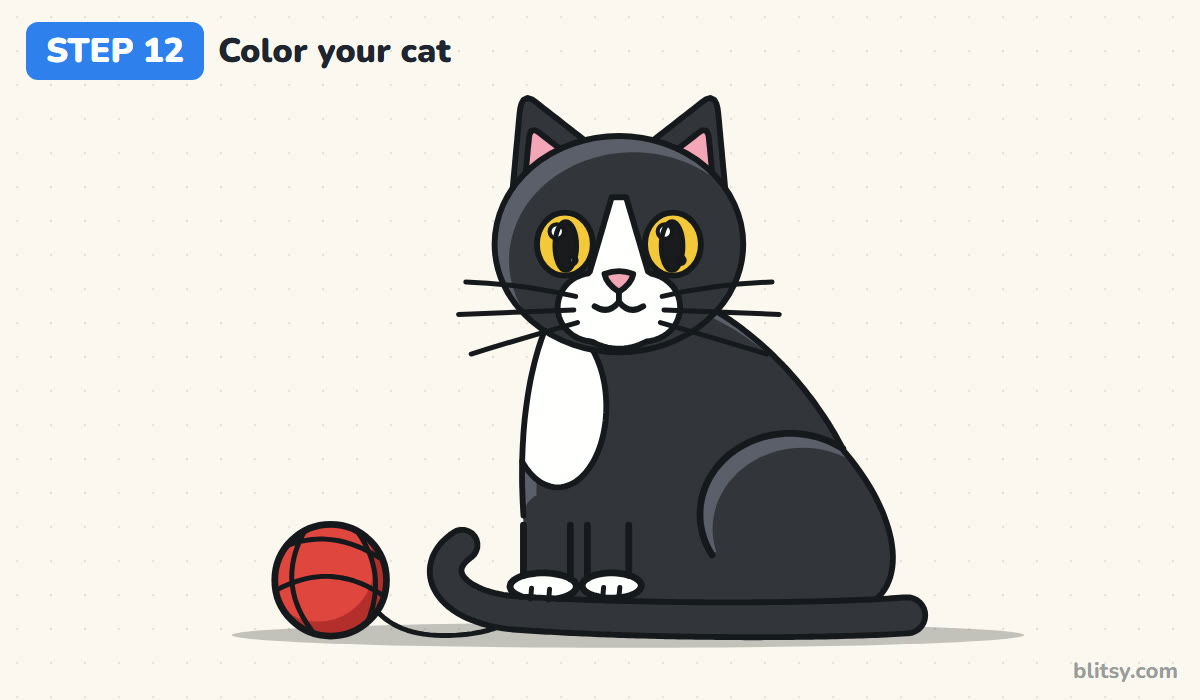
First add a curve of dark gray along the top of the head, the back and the haunch. Then color the rest of the fur black around it, steering round the white patches. Fill the eyes yellow around the black pupils, with the shines left white. Pink goes in the ears and on the nose. Finish the yarn in red with a darker red on its lower right side.
💡 Tip: With markers, let the gray dry before the black goes next to it, so the two don't bleed.
Tuxedo Cat Trouble Spots and Quick Fixes
- A head that's too small. A small head makes the cat look like a grown-up statue. Keep the head big, about two thirds the width of the body.
- Coloring the black right over the lines. On a dark cat the pencil lines vanish. Ink first, then color, and add the dark gray shine so the shapes still show.
- A tail stuck on the back like a stick. Let it wrap forward along the ground instead. A curled tail makes the pose look settled and relaxed.
- Eyes placed too high. Keep them on the middle line of the head. Too high, and the forehead shrinks while the chin gets heavy.
- Uneven white patches. Draw the blaze and cheek puffs lightly first and check both sides match before inking.
Swap the Coat: Ginger, Calico or Gray Tabby
Once you're happy with the pose, the coat is easy to change. Color it orange with darker stripes for a ginger cat, or patch it with orange and black on white for a calico. A gray cat with an M marked on its forehead turns into a tabby. Younger kids can leave out the haunch line and the gray shine and still finish with a sweet result. If you want a younger cat next, the easy kitten drawing tutorial is a good match, and the cat face drawing step by step lesson helps you practise expressions up close.
Tuxedo Cat Coloring Page and Printable Step Guide
Print the cat coloring page for a clean outline of the tuxedo cat, with a colored example and a color key. The step-by-step PDF guide holds all 12 steps and tips and fits Letter or A4 paper.
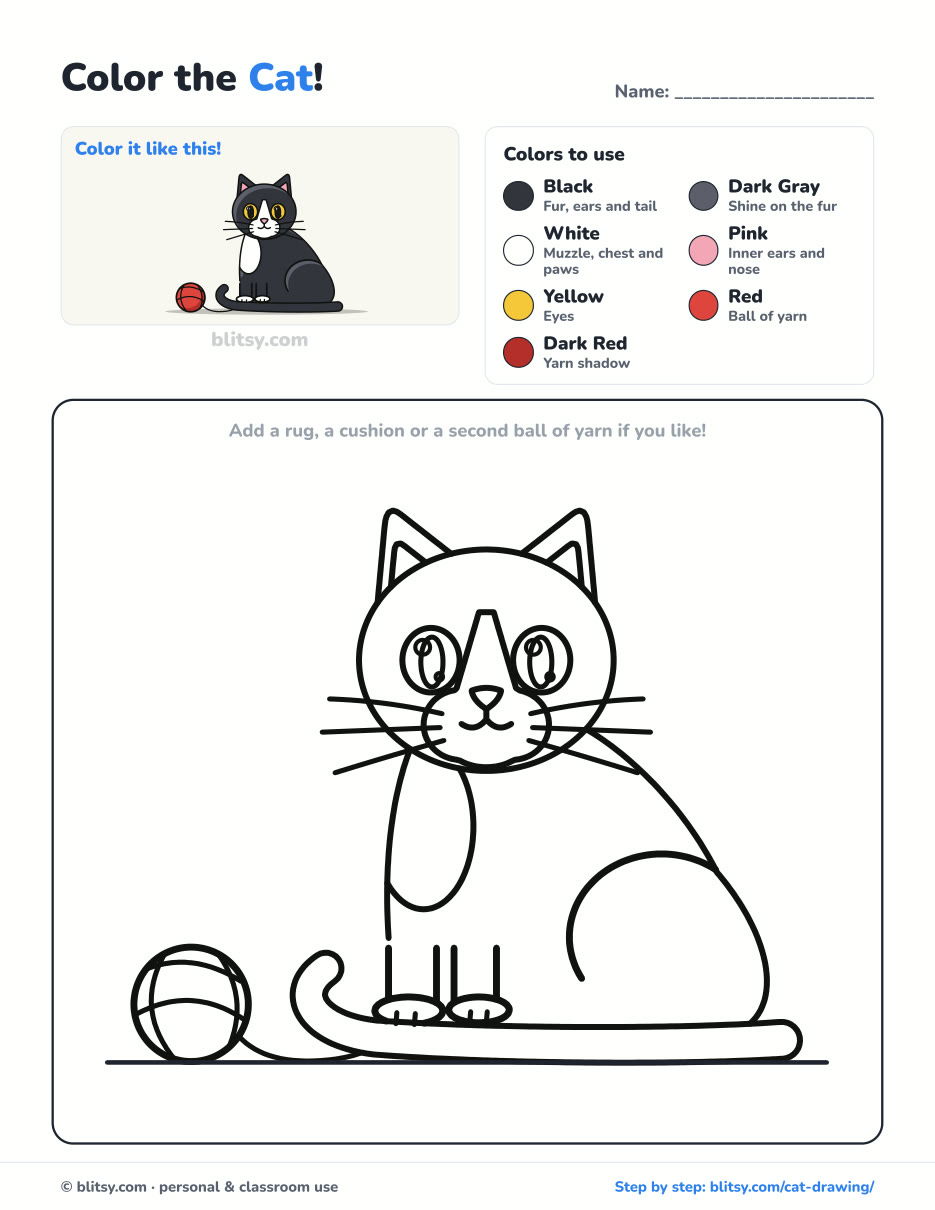
Black outlines with a colored example and the color names at the top. Ready to print and color.
⬇️ Download Coloring PageEvery step picture with its instructions and tips, to keep beside your paper while you draw.
⬇️ Download Drawing Guide📱 On a phone? Tap a download button, then open the file and choose Share → Save to Files or Print. On a computer, the PDF opens or saves straight to your Downloads folder.
Pin the Tuxedo Cat Steps
Cat Drawing Questions From Beginners
What is the easiest way to draw a cat?
Begin with a small oval for the head on top of a bigger one for the body. Add triangle ears and a curled tail before any details.
How do you draw a cute cat for kids?
Make the head big and round, the eyes large with white shines, and keep the body simple. Kids can draw the outline with a thick marker and skip the gray shine.
How long does it take to draw a cat?
The sketch takes about 15 minutes. Inking and coloring add another 20 or so, mostly because of the black fur.
How do I draw a black cat so the lines still show?
Ink all the lines first, then color with a black that's a touch lighter than your pen, and add dark gray highlights on the head and back. The outline stays visible that way.
Grab that pencil, sketch the first oval, and your tuxedo cat will be sitting on the page before long. 🐱🧶
Related posts:
 How to Draw a Paw Print Step by Step (Dog and Cat)
 How to Draw a Cat Face Step by Step (Easy Tabby Guide)
 How to Draw a Cat Eye Step by Step (Slit and Round Pupil)
 How to Draw Cat Noir Step by Step (Easy Chibi Hero)
 How to Draw Cute Animals Step by Step (Cat, Bear & Bunny)
 How to Draw a Sad Cat Step by Step (Easy Sad Face Lesson)
 How to Draw a UFO Step by Step (Cute Alien Saucer)
 How to Draw Flames Step by Step (Easy Campfire Drawing)
 How to Draw a Crow Step by Step (Easy for Beginners)
 How to Draw a Tiger Step by Step (Easy Walking Pose)
 How to Draw a Heart Step by Step (Even, Symmetric Shape)
 How to Draw a Jellyfish Step by Step (Cute, Easy Guide)

