
Stripes scare people off tigers, but they're simply narrow pointed shapes, and you only add them once the animal underneath is finished. This lesson shows you how to draw a tiger step by step, from an oval and a circle to a cheerful tiger walking across the page with its head turned to say hello. I picked a side view so you can see all four legs in a stride.
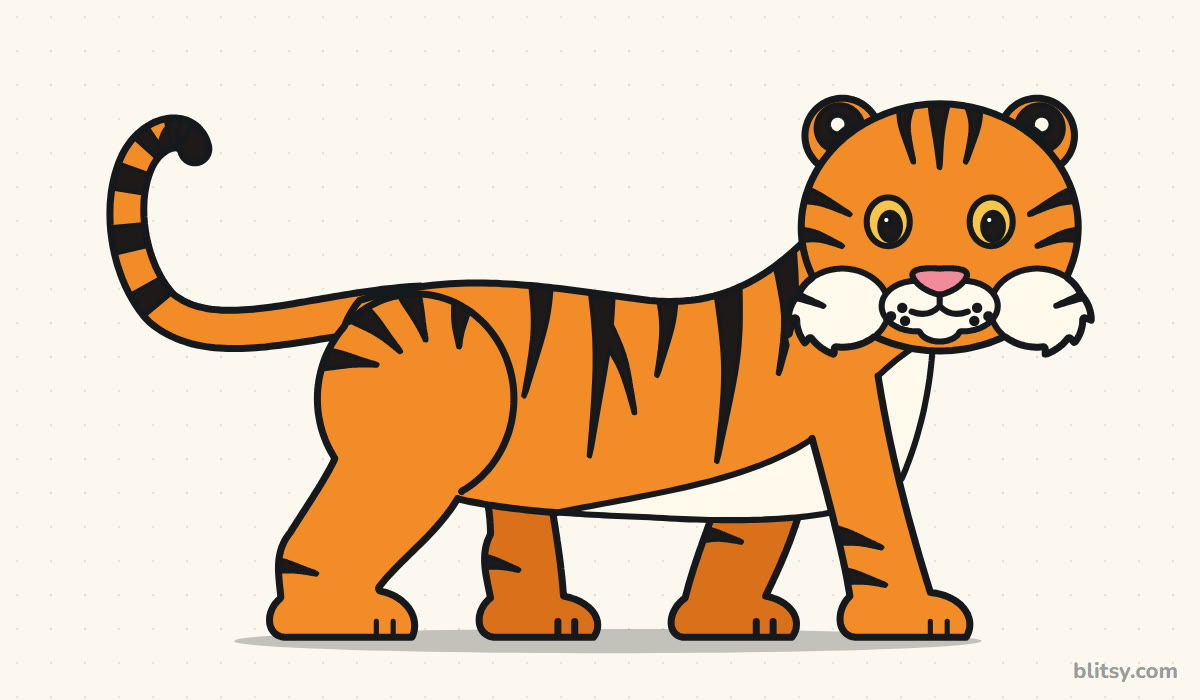
Copy only the blue lines in every picture. Gray marks the work you already did in earlier steps.
Quick overview
⏱️ Time: roughly 40 minutes, coloring included
🎯 Level: easy to medium; the walking legs take some care
✏️ Steps: 12
🐯 You'll draw: a cartoon tiger walking in side view, face turned toward you
Supplies for a Striped Tiger Sketch
- A pencil you can press lightly (HB or 2B works well)
- A soft eraser
- A black fineliner or felt-tip pen for the final lines
- Coloring pencils or markers in orange, dark orange and black, plus pink and yellow
- A sheet of plain paper turned sideways
A single orange plus a black marker will still give you a very convincing tiger.
How to Draw a Tiger Step by Step
Step 1: Sketch a long body oval and a head circle
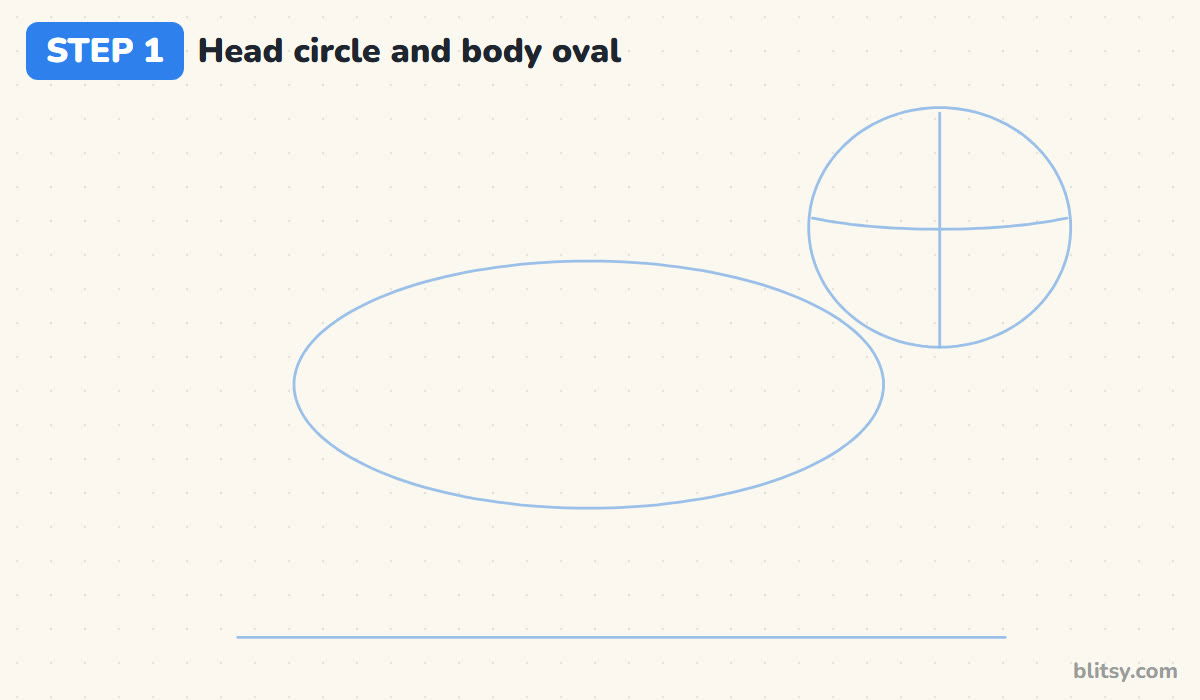
Draw a flat ground line low on the page. Above it, sketch a long, wide oval for the body. Put a big circle up on the right, overlapping the front end of the oval, and cross it with a vertical line and a gently curved one for the eyes. A big head keeps a cartoon tiger friendly instead of fierce.
💡 Tip: Hold the pencil near its far end. Your guide lines come out pale without any extra effort.
Step 2: Add the hip circle, leg lines and tail curve
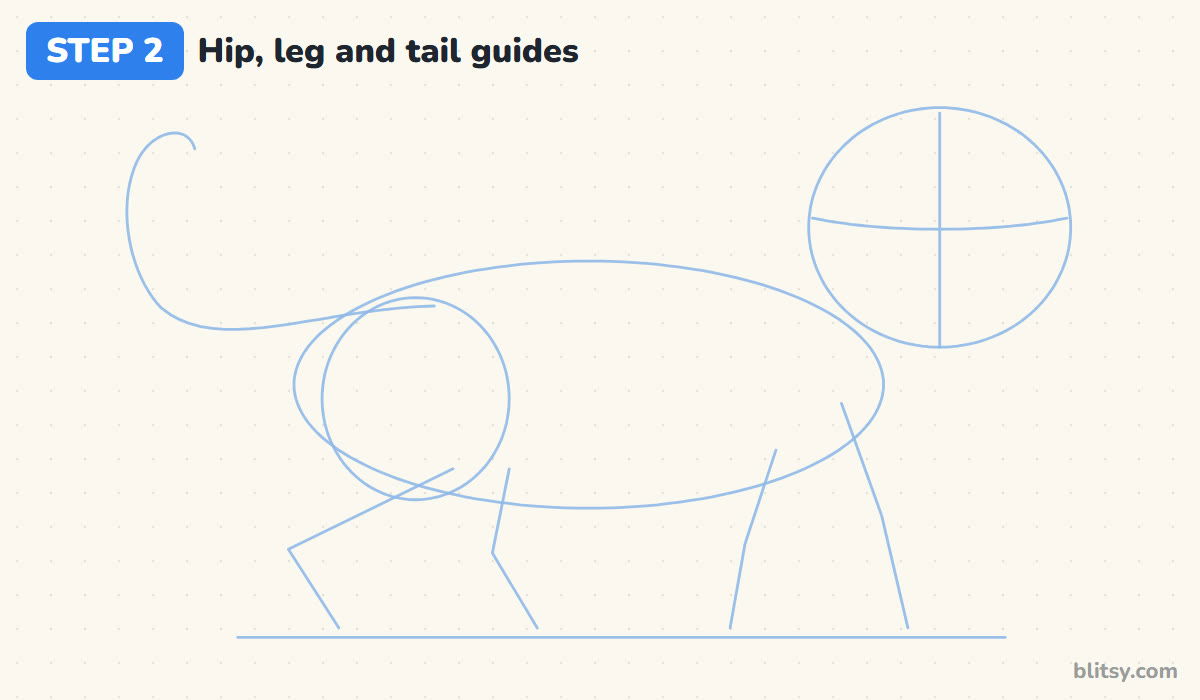
Place a circle over the back end of the oval for the hip. Now draw four leg lines down to the ground: the near front leg leans forward, the far front leg leans back, and the near back leg bends backward at the heel before dropping to the ground. Add one long tail curve that dips, rises and hooks over.
💡 Tip: Check that two legs lean forward and two lean back. That alone makes the tiger look like it's walking.
Step 3: Draw the head with ears and fluffy cheek ruffs
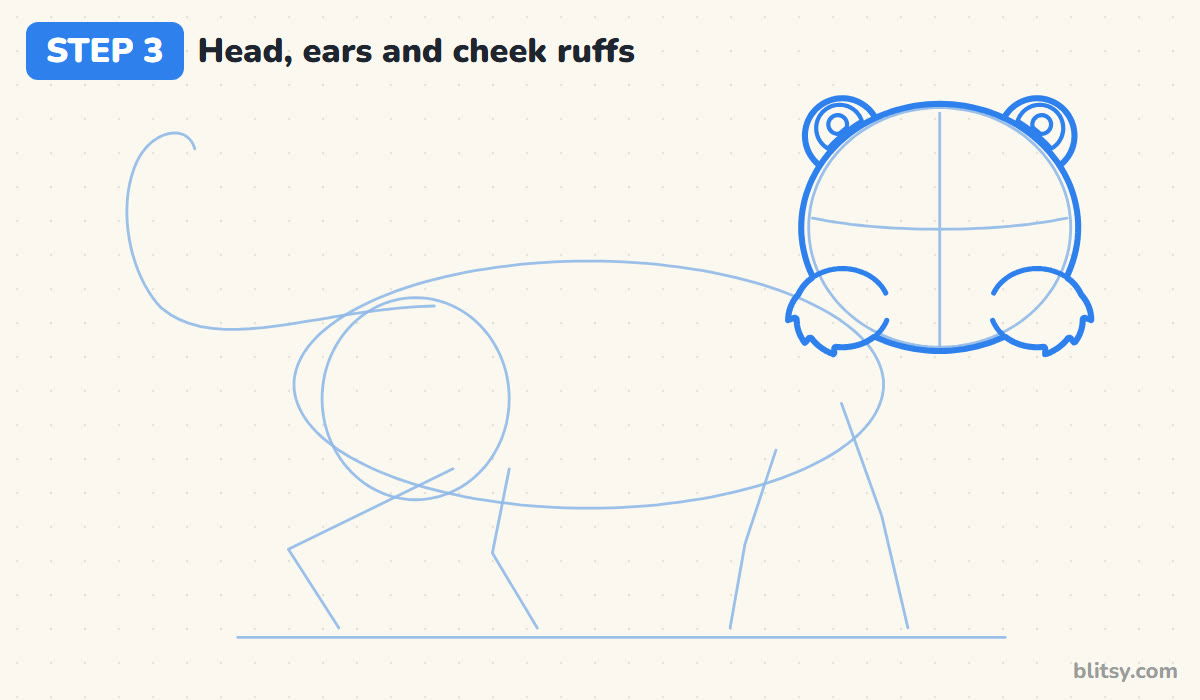
Go over the head circle with a firmer line. Two small round ears sit on the top corners, each with a smaller circle inside and a tiny spot in the middle. Low on each cheek, let the head outline bulge out into three small pointed tufts, then draw a curve inside to mark the white cheek. Those fluffy cheeks say tiger faster than anything else.




💡 Tip: Let the tufts point down and outward, like fur pulled by gravity, never straight up.
Step 4: Outline the body and the two near legs
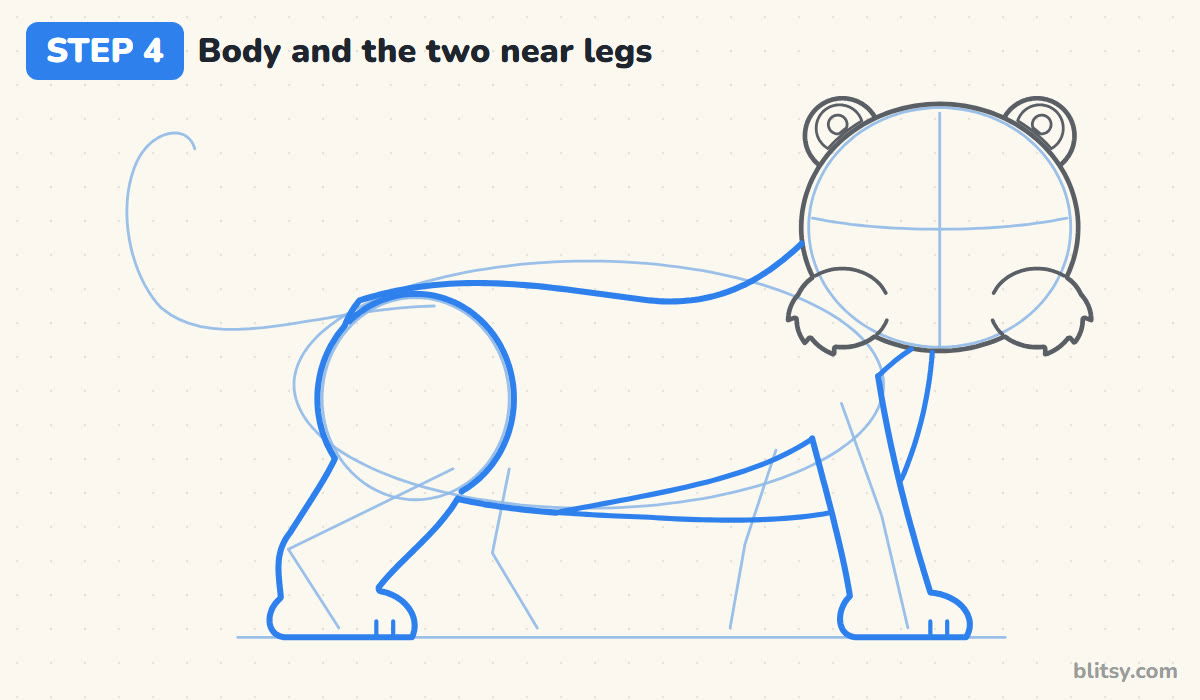
Run the back line from the round haunch over a slight dip, then up the neck into the back of the head. Bring the back leg down to a bump at the heel and a wide paw. The near front leg starts under the cheek and reaches forward. A curved line from the belly up to the chin marks the white fur.
💡 Tip: Make the paws wider than the legs. Big paws read as strong and a little bit cute.
Step 5: Tuck the far legs behind the body
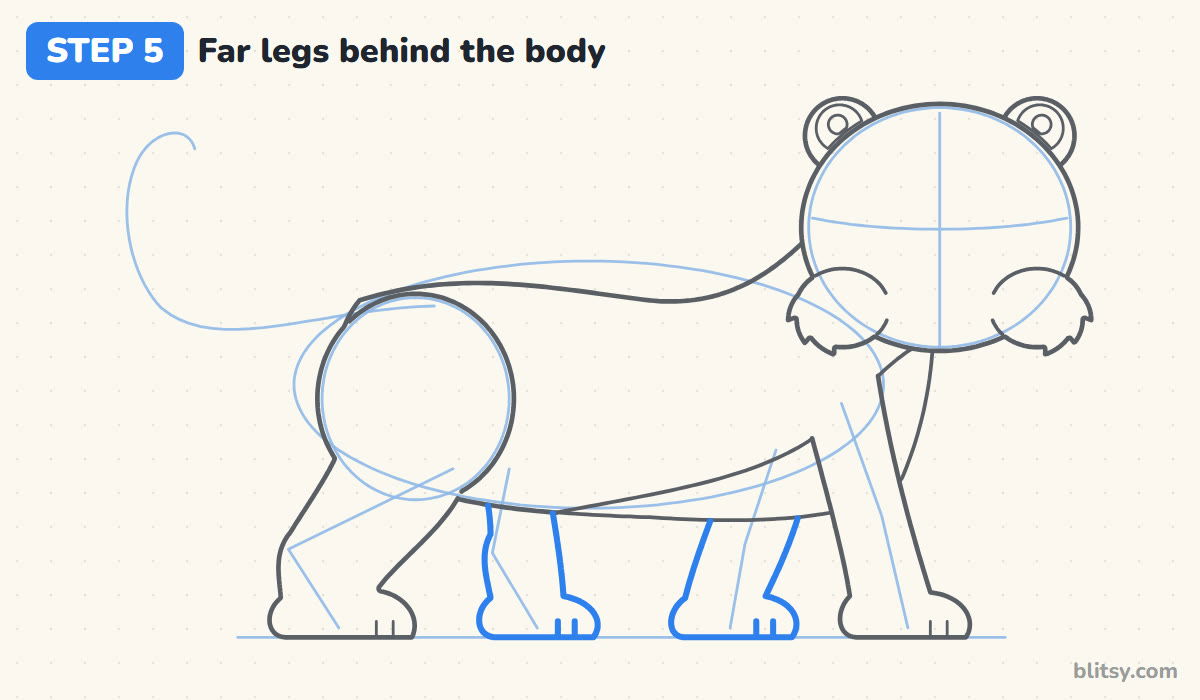
The other two legs are farther away, so you only see their lower halves between the near legs. Draw the far back leg swinging forward under the belly and the far front leg angled back. Most beginners draw all four legs in a neat row, and the tiger ends up looking like a table.
💡 Tip: Keep the far paws on the same ground line as the near ones, or the tiger seems to float.
Step 6: Draw the long tail with a curl
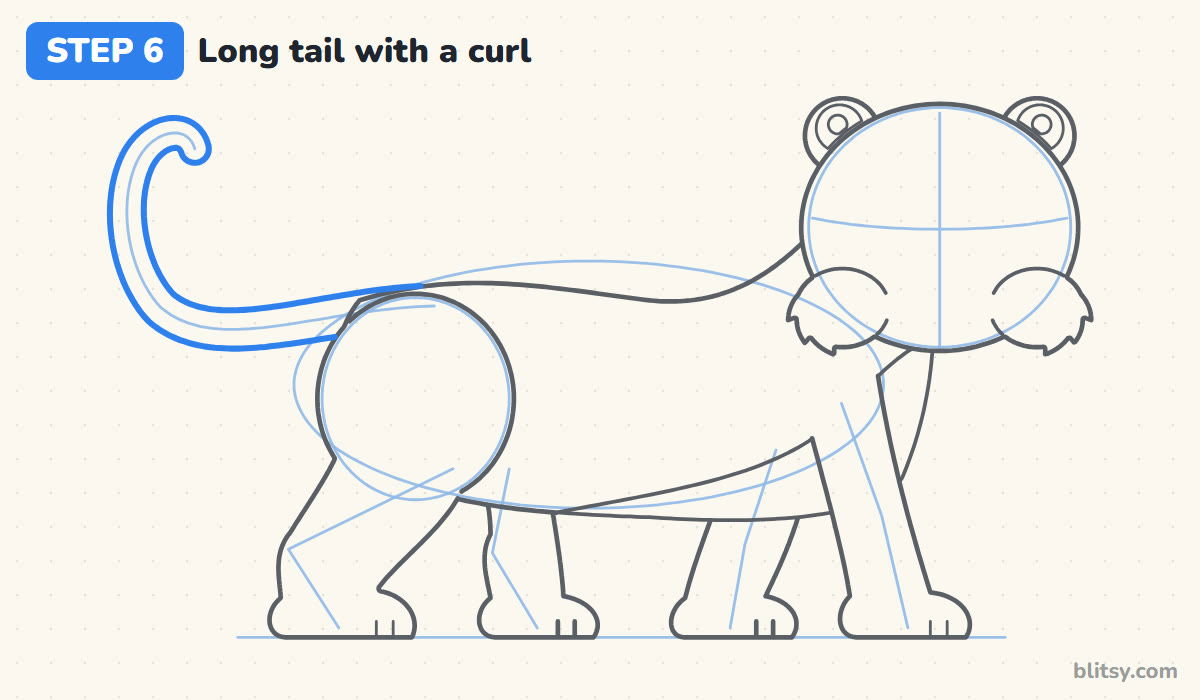
Follow your tail curve with two lines about a finger width apart. The tail dips a little, sweeps up and rolls over at the tip like a question mark. Real tigers have long tails that help them balance, so give yours plenty of room on the left side.
💡 Tip: Draw the outer line of the curl first and the inner one second. Matching the gap is easier that way.
Step 7: Add a muzzle with a pink nose and a smile
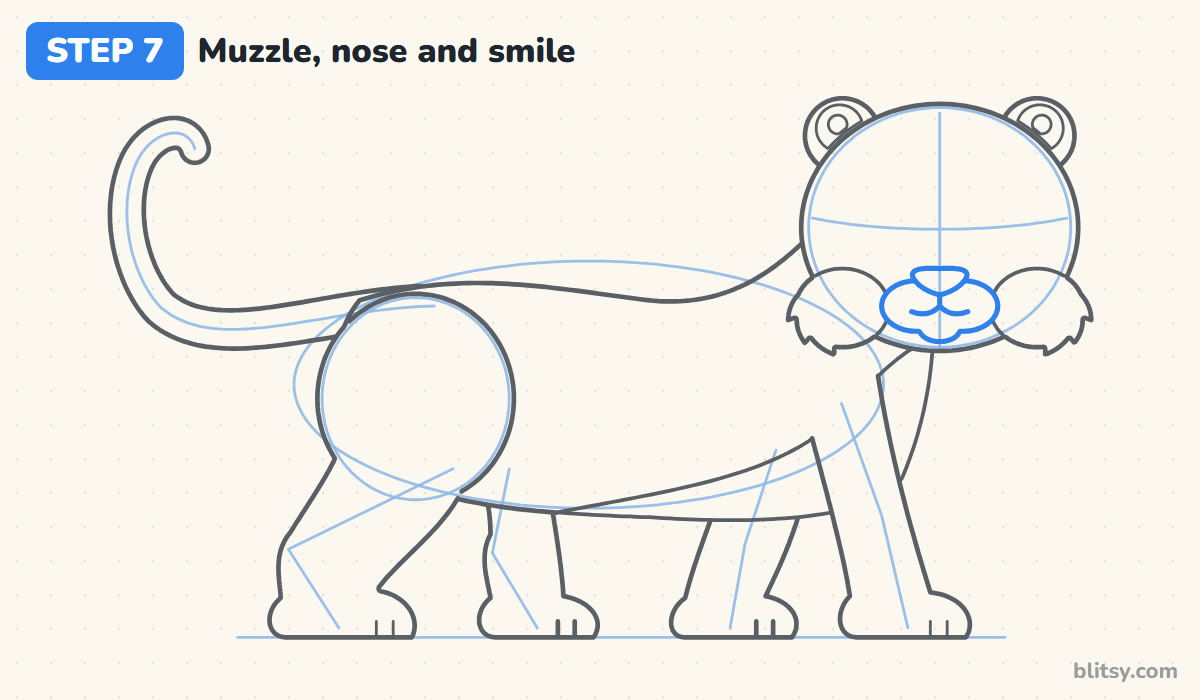
Between the cheek ruffs, draw two round muzzle puffs side by side with a small chin bump below. A wide, rounded triangle nose sits right on top where the puffs meet. A short line under it splits into two soft curves for the smile. I keep the muzzle low, because a muzzle placed too high pushes the eyes up into the forehead.



💡 Tip: Draw the nose wider than it is tall. A tall nose makes the face look long and dog-like.
Step 8: Give it kind eyes and whisker dots
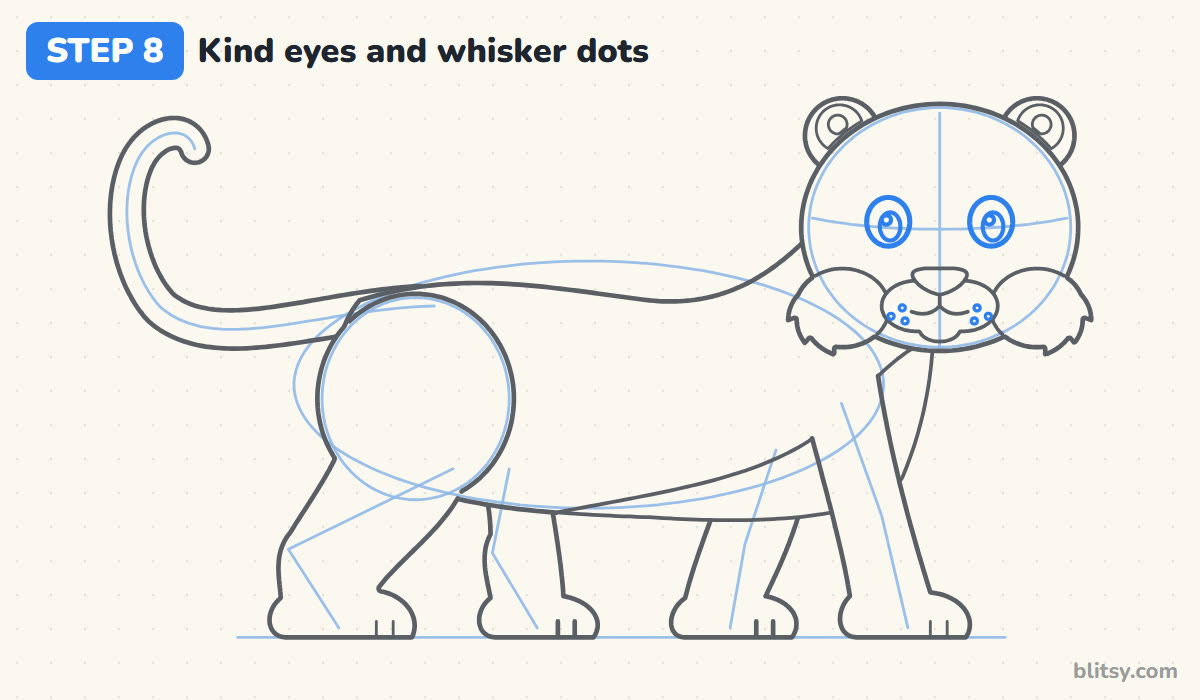
Put two round eyes on the curved guide line, with a gap about the width of the nose between them. Inside each one, draw a dark oval pupil and a tiny shine circle near the top. Finish with three small dots on each muzzle puff where the whiskers grow.
💡 Tip: Place both shine circles on the same side, or the eyes will look like they point different ways.
Step 9: Draw the stripes on the face
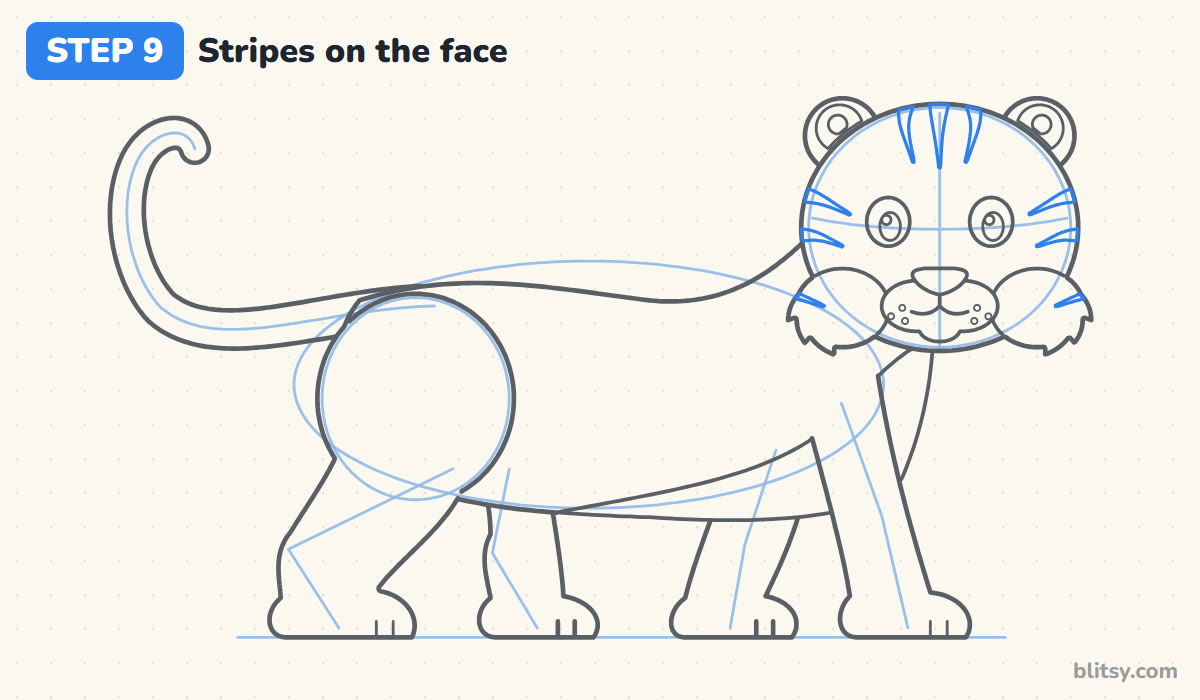
Here's the trick: a stripe is a narrow pointed shape, wide where it starts at an edge and thin at the other end. Draw three on the forehead pointing down, the middle one a bit longer. Then add two on each side of the head, starting at the outline and pointing in toward the eyes. Give each ruff one small stripe.
💡 Tip: Draw each stripe as two lines that meet in a point, then you can fill it in later.
Step 10: Wrap stripes around the body, legs and tail
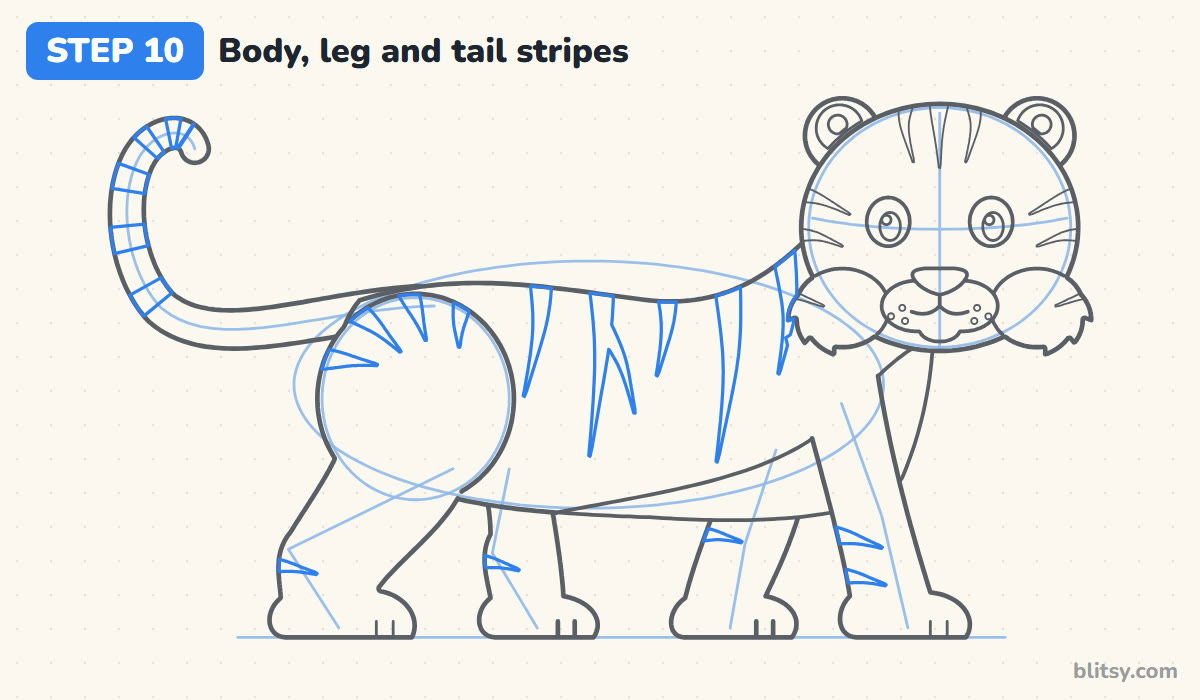
Start each body stripe at the back line and let it curve down the side, the way a ribbon would wrap around a barrel. Vary the lengths and give one stripe a little fork. On the haunch, point the stripes toward the middle of the hip circle. Legs get short stripes from the back edge; the tail gets bands all the way across.
💡 Tip: Never draw two stripes the same length side by side. Uneven stripes look natural; even ones look like a barcode.
Step 11: Ink the keeper lines and erase the guides
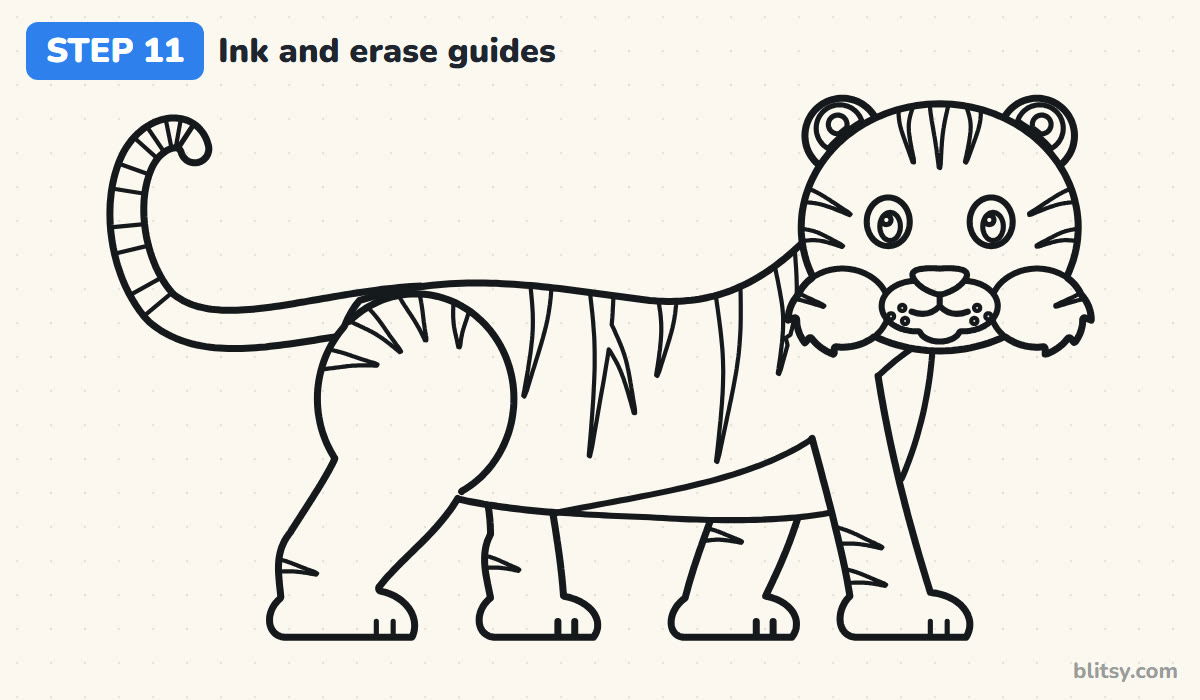
Trace over every line you want to keep with the fineliner. I do the face first while my hand is fresh, then the body, and the stripes last with short, slow strokes. Wait a minute or two so the ink can dry. Then erase the oval, the circles and all the guide lines.




💡 Tip: Turn the paper as you ink the curved stripes, so your hand always pulls the pen toward you.
Step 12: Color your tiger
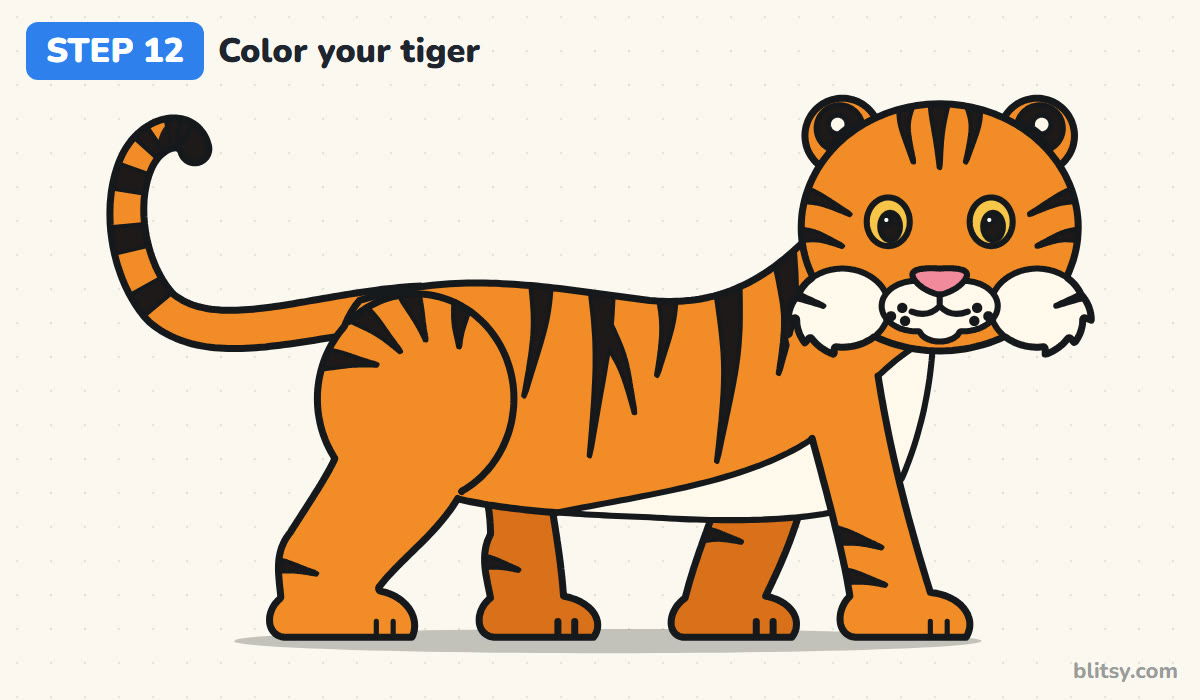
Fill the head, body, near legs and tail with orange. Use dark orange for the two far legs, which pushes them back in space. Leave the cheeks and muzzle white, along with the chest, belly and ear spots. The nose is pink and the eyes yellow. Last of all, fill the stripes, tail rings, tail tip and the patches inside the ears with black.
💡 Tip: Do the orange before the black, so the dark color isn't smeared across the light one.
Where Tiger Drawings Start Looking Like Zebras
- Stripes drawn as plain lines. Thin lines of the same width look like scratches. Make every stripe a narrow shape that tapers to a point.
- Straight up-and-down stripes. A body is round, so stripes should bend with it. Curve each one slightly as it runs down the side.
- All four legs standing in a row. That reads as a statue, not a walk. Lean one front leg forward and the other back, and do the same with the back legs.
- A back leg with no heel. Big cats have a backward bump halfway down the hind leg. Leave it out and the leg looks like a front leg on the wrong end.
- Stripes painted over the white parts. Keep the belly and muzzle mostly clean so the face stays easy to read.
Twists on This Striped Walker
Swap the orange for white and use dark brown stripes to draw a white tiger, a real color variation with the same stripe pattern. For a cub, shrink the body, keep the head the same size and shorten the legs. To practice a different big cat next, try the lion drawing tutorial, or trade stripes for spots with this leopard drawing tutorial.
Tiger Coloring Page and a Printable Steps PDF
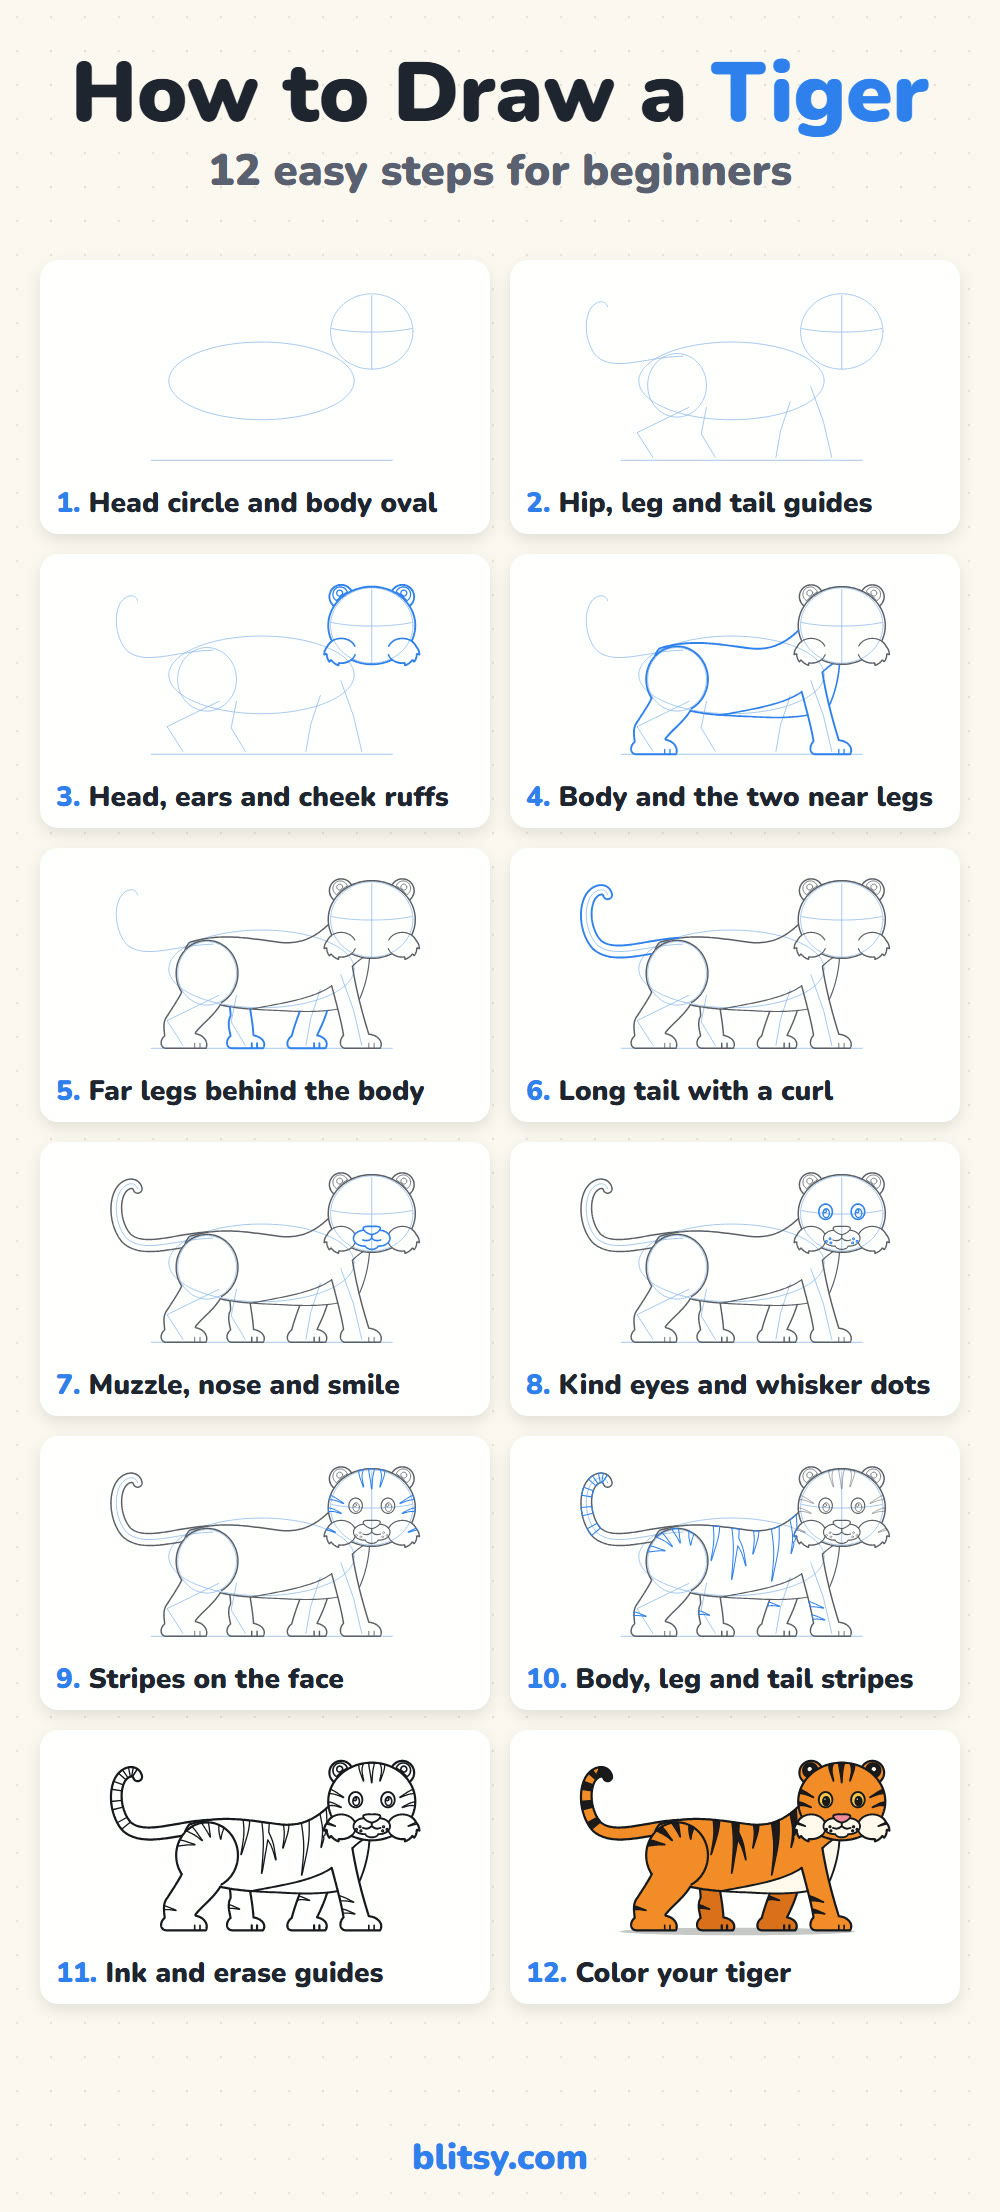
The free tiger coloring page shows a colored tiger at the top to copy, a key with each color and the part it belongs to, and a big clean outline with room for grass or a jungle. The step-by-step PDF holds all 12 steps with their pictures and tips. Both print on Letter or A4.
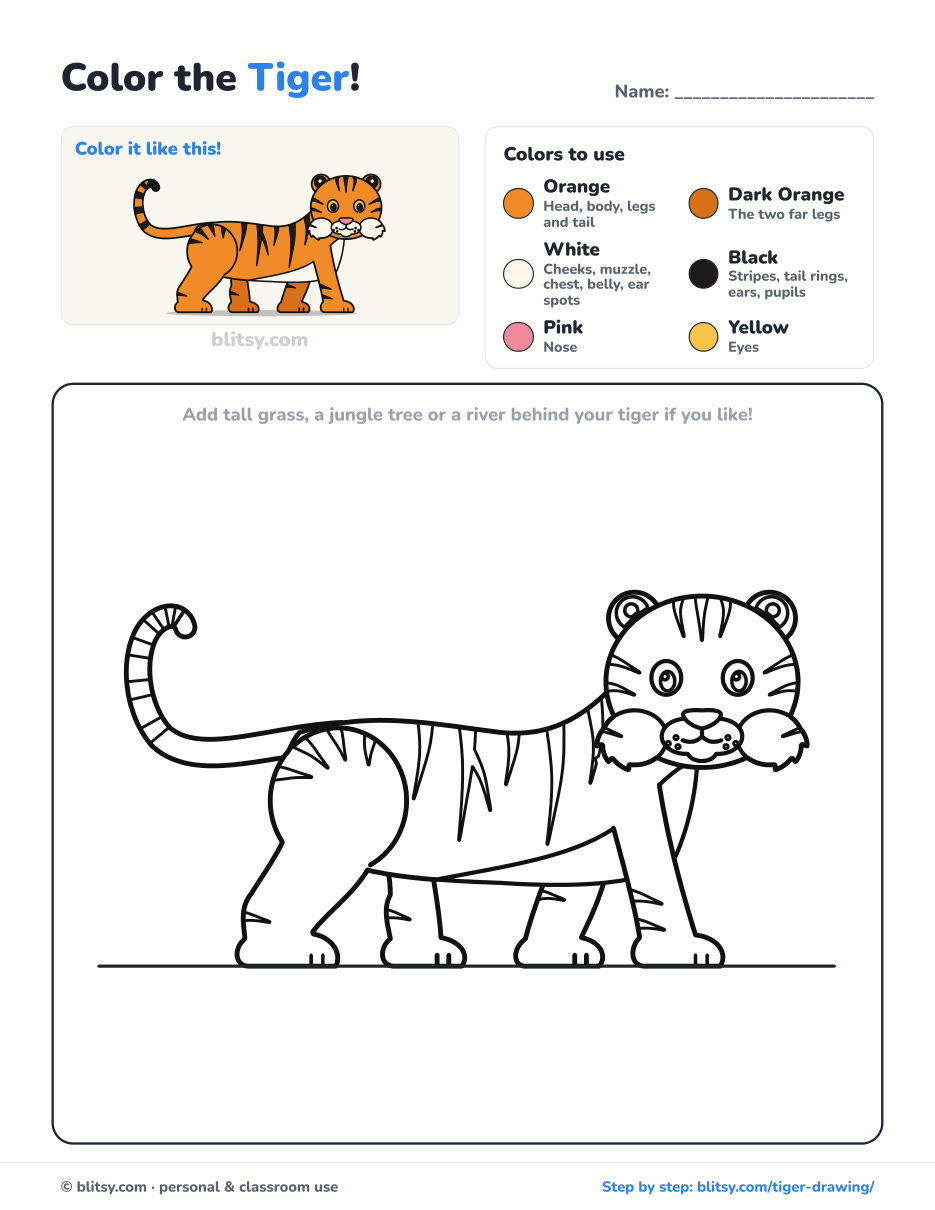
Black outlines with a colored example and the color names at the top. Ready to print and color.
⬇️ Download Coloring PageEvery step picture with its instructions and tips, to keep beside your paper while you draw.
⬇️ Download Drawing Guide📱 On a phone? Tap a download button, then open the file and choose Share → Save to Files or Print. On a computer, the PDF opens or saves straight to your Downloads folder.
A Tiger Cheat Sheet to Save
Tiger Drawing Questions Beginners Ask
What is the easiest way to draw a tiger?
Start with an oval for the body and a circle for the head, then add the legs and tail. Save the stripes for the very end, once the shape looks right.
How do you draw tiger stripes?
Draw each stripe as a narrow pointed shape, wide at the edge of the body and thin at the tip. Curve it with the body and vary the lengths so no two neighbors match.
Do all tigers have the same stripes?
No. Every tiger's stripe pattern is unique, so there's no wrong way to place yours as long as they follow the body's curve.
How long does it take to draw a tiger?
About 25 minutes for the drawing and another 15 for coloring. The stripes take the longest, so slow down there.
Sharpen your pencil, sketch that first light oval, and send your tiger off on its walk. 🐯✏️
Related posts:
 How to Draw a Whale Step by Step (Easy for Beginners)
 How to Draw Lungs Step by Step (Easy Science Diagram)
 How to Draw a Pineapple Step by Step (Easy Crown and Slice)
 How to Draw Iron Man Step by Step (Easy Chibi for Kids)
 How to Draw a Dress Step by Step (Easy Party Dress)
 How to Draw a Chicken Step by Step (Easy for Beginners)
 How to Draw a UFO Step by Step (Cute Alien Saucer)
 How to Draw Flames Step by Step (Easy Campfire Drawing)
 How to Draw a Moon Step by Step (Sleepy Crescent + Phases)
 How to Draw a Sunflower Step by Step (Big and Bright)
 How to Draw a Heart Step by Step (Even, Symmetric Shape)
 How to Draw a Jellyfish Step by Step (Cute, Easy Guide)

