
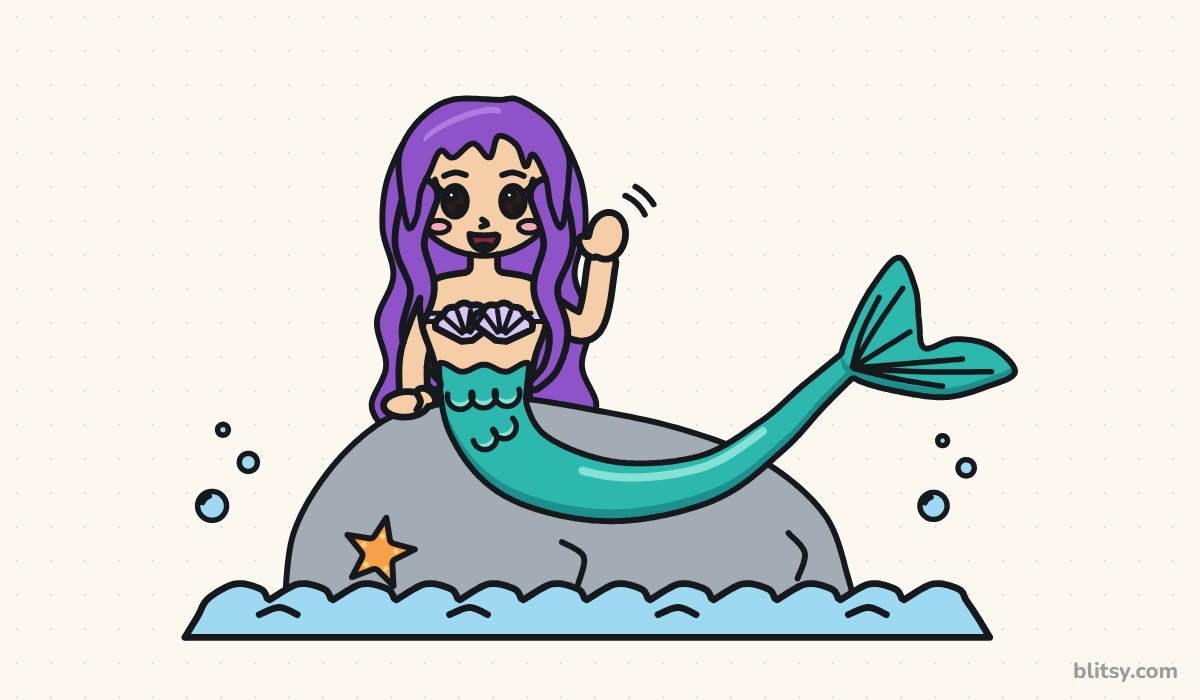
Sailors told stories about mermaids for hundreds of years, and kids still ask for them at the drawing table more than almost anything else. This lesson shows you how to draw a mermaid step by step, starting with a single curved line for the tail so she never ends up stiff or lopsided. I'll walk you through the hair, the seashell top and the big fan fin one easy shape at a time.
Fresh lines show up blue in every picture, and earlier work turns gray. The pale construction lines stay light until you erase them in step 10.
Quick overview
⏱️ Time: about 30 to 45 minutes, coloring included
🎯 Level: beginner, with a little extra care for the hair
✏️ Steps: 11
🧜 You'll draw: a smiling mermaid with long wavy hair, sitting on a sea rock and waving, with a starfish and small waves
Mermaid Sketch Kit for Paper and Pencil
- A light pencil, such as an HB, for the guide lines
- A soft eraser that lifts pencil cleanly
- A black fineliner or felt pen for the final outline
- Colored pencils or markers, including purple, teal, lavender, gray and light blue
- A peach or tan pencil for the skin (or any skin tone you like)
- Paper turned sideways, because the tail stretches out wide
Hair and tail colors are completely up to you, since nobody has ever seen a real mermaid to check.
How to Draw a Mermaid Step by Step
Step 1: Draw a head circle, a body line and stick arms
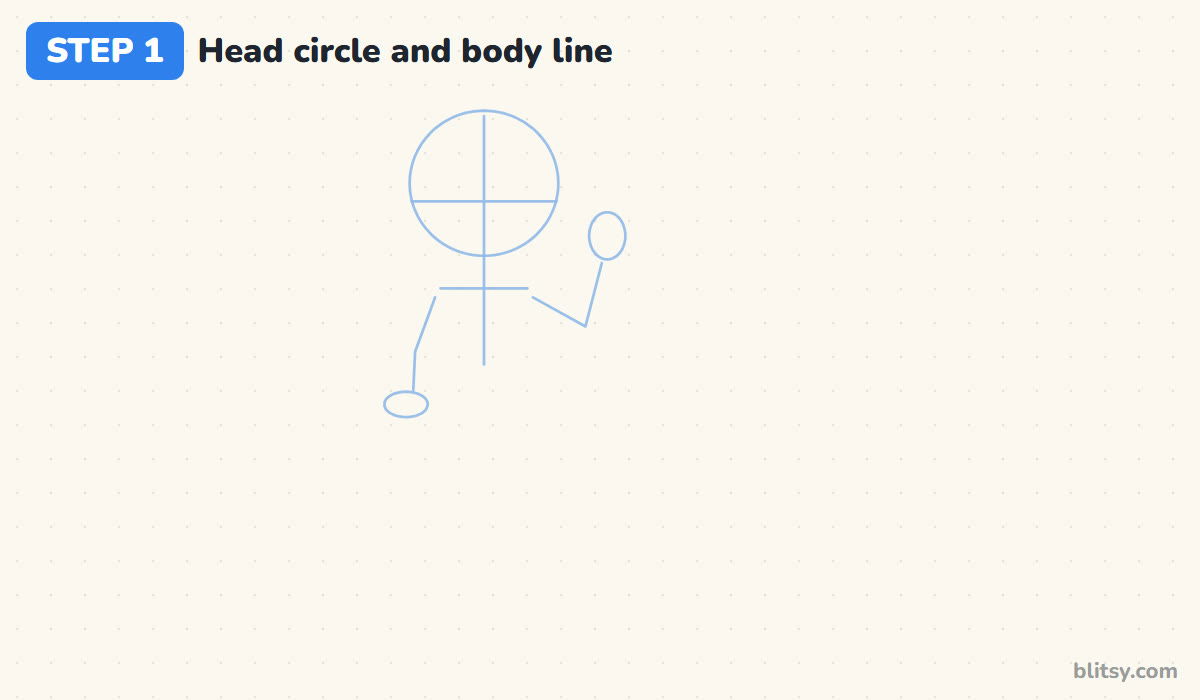
Start on the left half of the page and draw a circle for the head, crossed by a short vertical line and a level eye line. Below the chin, run the body line down about one and a half heads and add a short shoulder line. One stick arm hangs down to a small oval hand; the other bends up beside the head.
💡 Tip: Leave the whole right half of the paper empty for now, because the tail needs that space later.
Step 2: Sketch the S-curve tail line and the rock
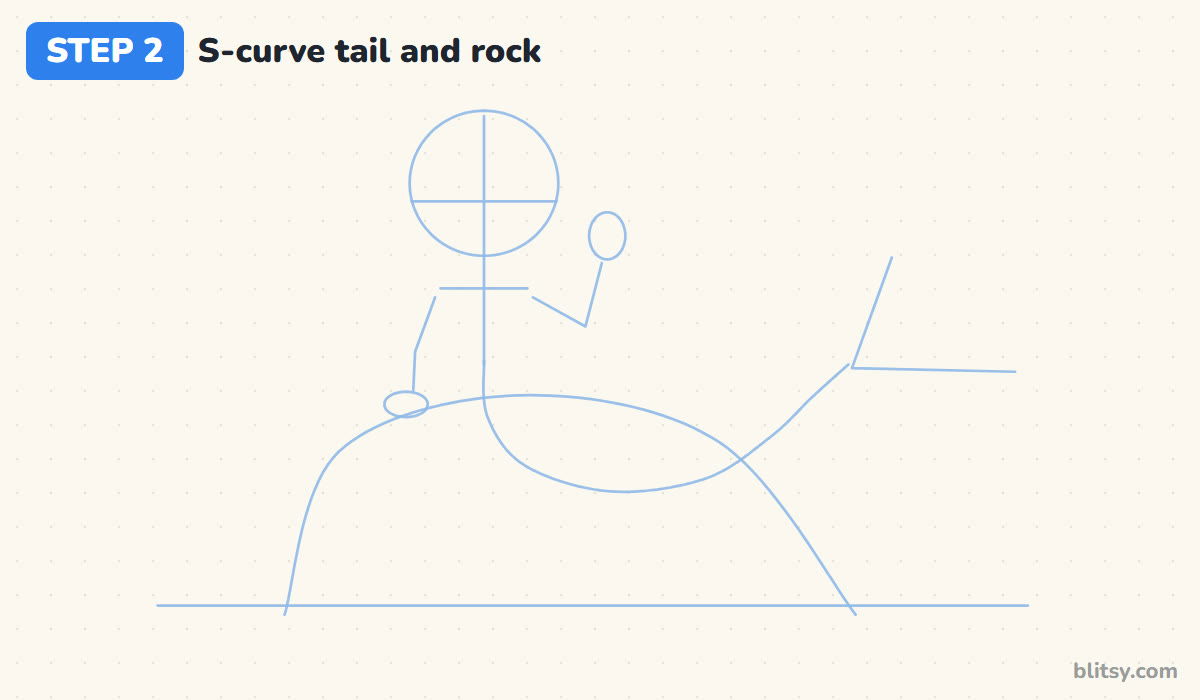
This line makes or breaks a mermaid. From the bottom of the body line, swing a long curve down and to the right, let it rise again and flick outward at the end, like a stretched S lying on its side. Mark the fin with two short lines from the tip. Then draw a big dome under her for the rock and a flat line for the sea.
💡 Tip: Draw the tail curve in one relaxed sweep from your elbow; several short strokes make it wobble.
Step 3: Draw the face, the bangs and two front locks
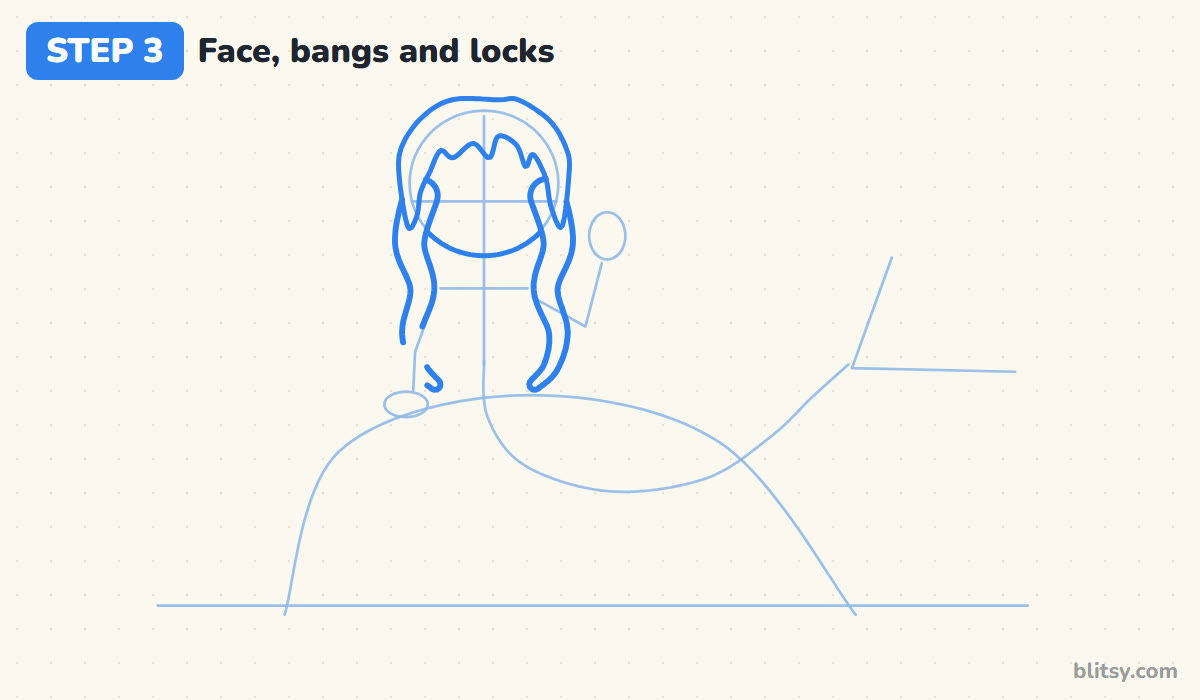
Trace the lower half of the head circle for her cheeks and chin. Above the eye line, draw the bangs as a cap that sits a little outside the circle, with a wavy lower edge made of small rounded clumps. Then let one lock of hair fall from each temple over the shoulders. Each lock wiggles left and right and ends in a soft curl.



💡 Tip: Think of each lock as a thick ribbon; both edges wave together, so they never pinch into a point halfway down.
Step 4: Add the neck, the body and the arms
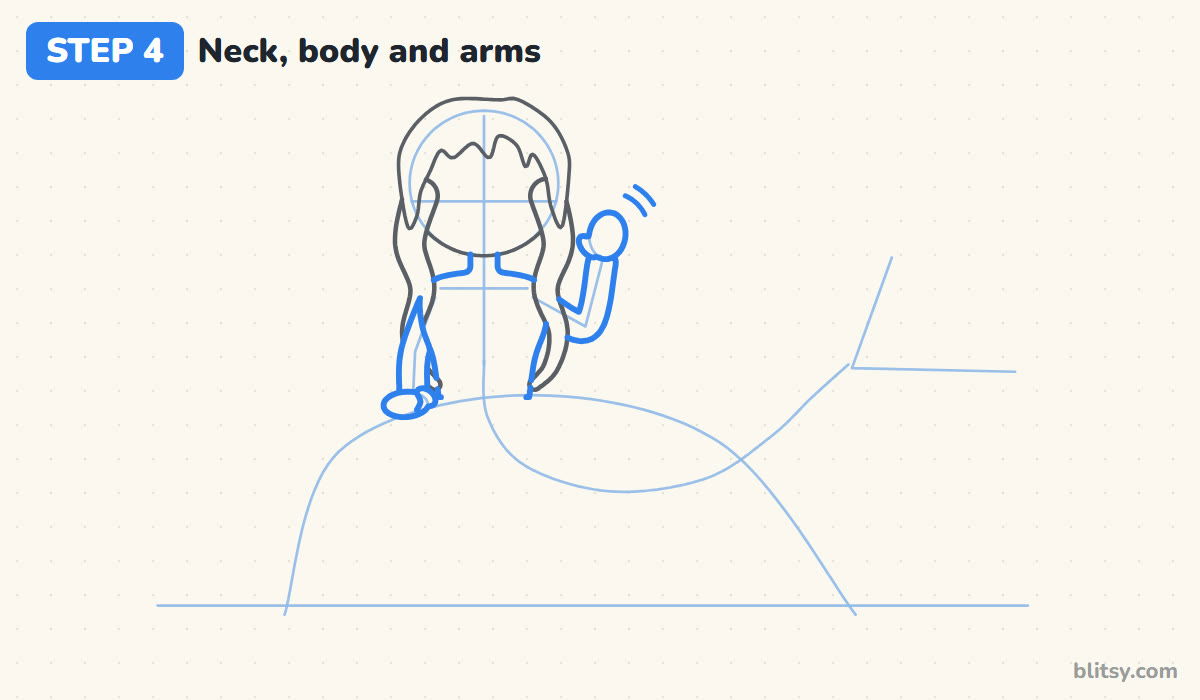
Two short curves make the neck and flow into rounded shoulders. The sides of the body run down gently and stop at the hips. I keep a cartoon mermaid's body short, because the big head and long tail carry the character. Give each arm soft width, draw a mitten hand lying flat on the rock, and give the raised hand a thumb and wave marks.
💡 Tip: Let the resting arm cross in front of the lock of hair; it tells the eye the hair falls behind her shoulder.
Step 5: Draw the long wavy back hair
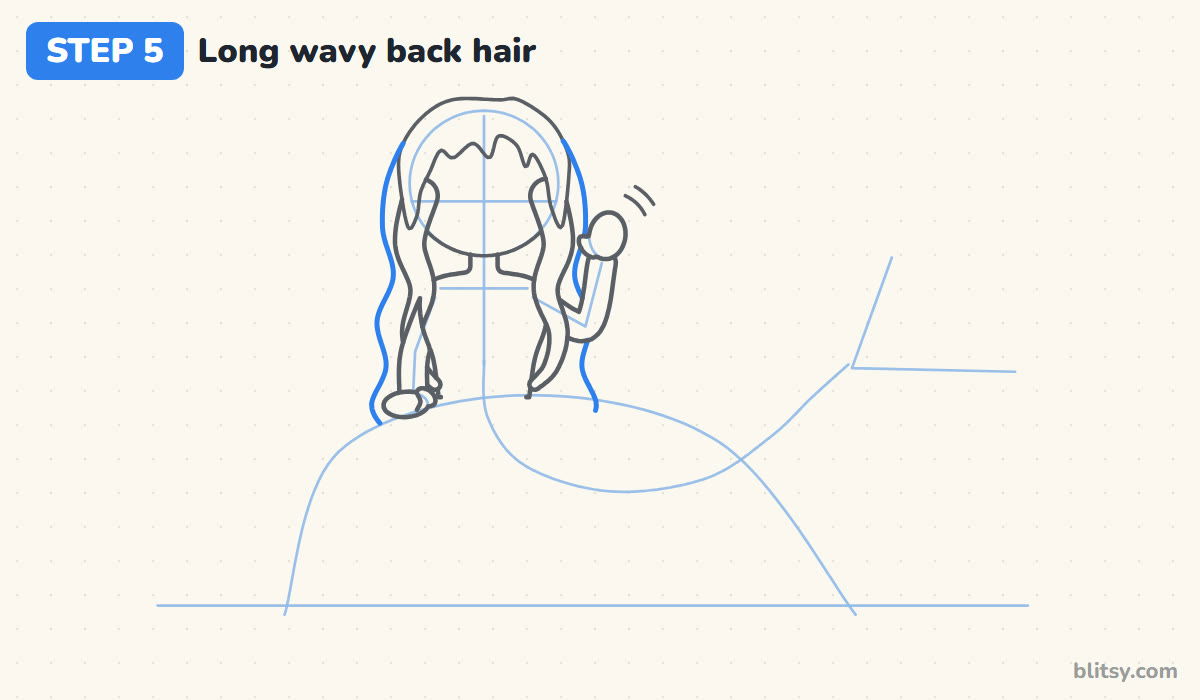
Now draw the hair that hangs behind her. Start at the top of the bangs, go wider than the head on both sides, and let the outline wave down past the shoulders to the rock. Keep the waves loose and uneven. Where the hair meets her arm or the rock, stop the line and pick it up on the other side.
💡 Tip: Make the outer waves bigger than the ones near her face, so the hair looks like it swings out as it falls.
Step 6: Draw the seashell top
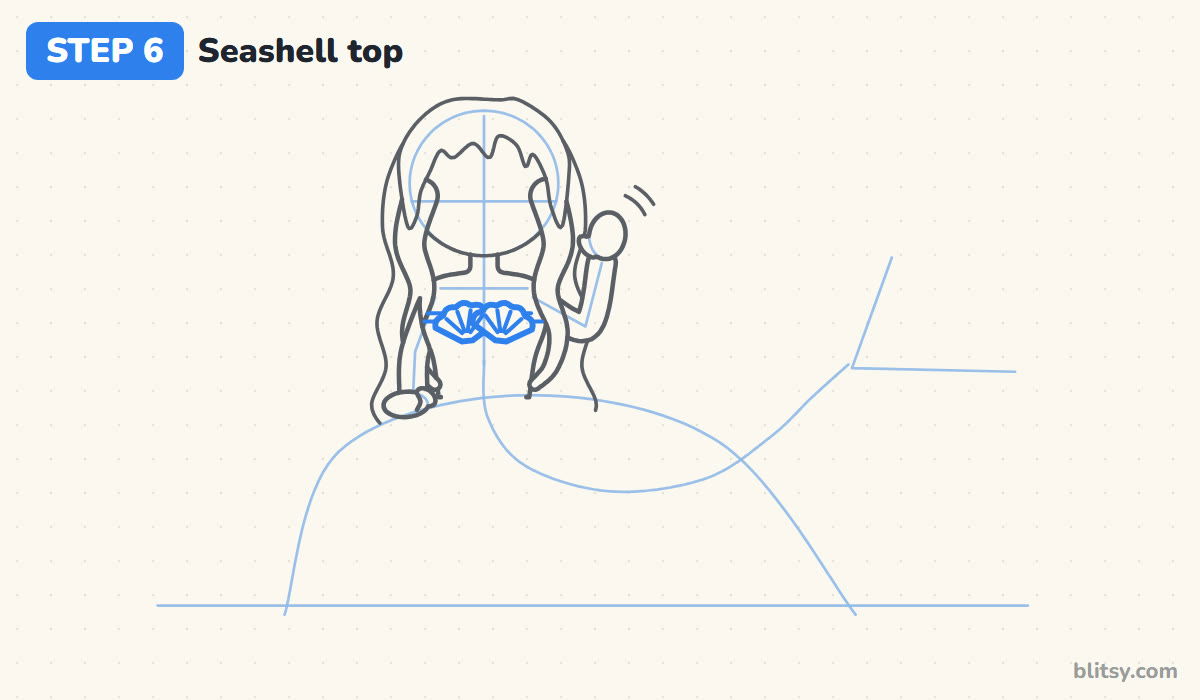
Place two big fan-shaped scallop shells side by side across the chest, with their top edges about level with the armpits and the narrow end of each shell at the bottom. Tilt them slightly apart. Add four short rib lines inside each shell, spreading out like fingers. One thin band runs straight across behind the shells to the sides of the body.
💡 Tip: Make the two shells together almost as wide as the chest; shells that are too small look lost on the body.
Step 7: Shape the tail, the fin and a few scales
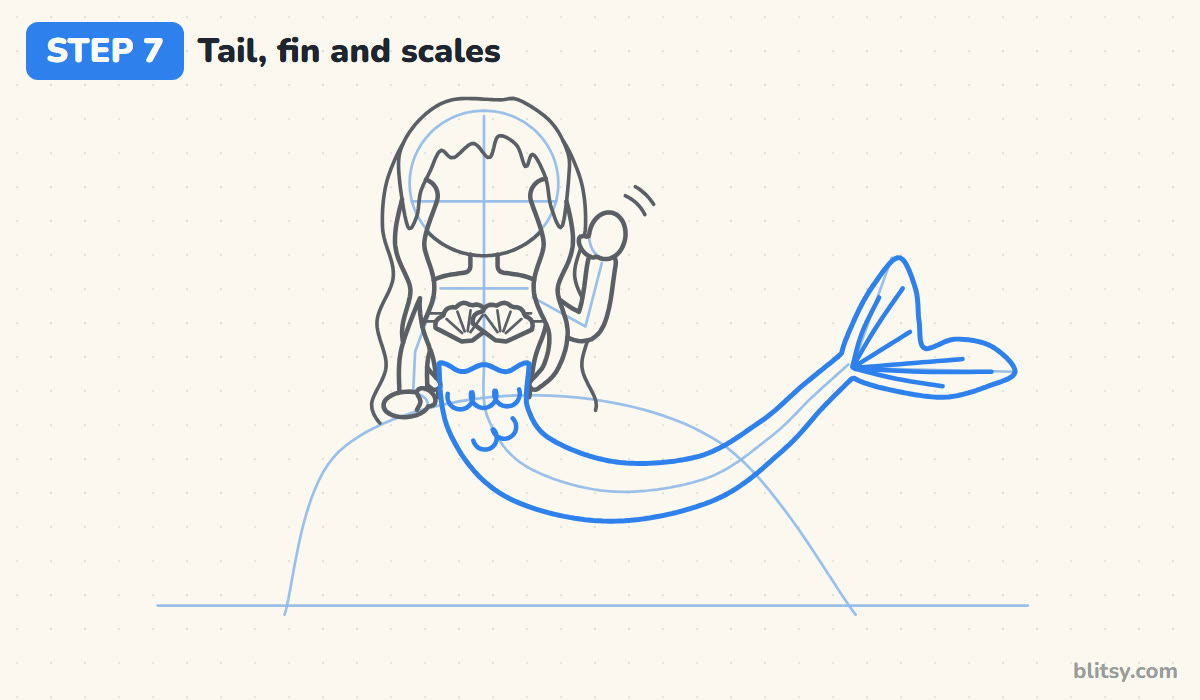
Follow your S-curve and draw a line on each side of it. The tail is widest at the hips and gets steadily thinner toward the end. Draw a wavy waistline where skin meets tail. At the tip, add a fin with two big rounded lobes and a notch between them, plus rib lines fanning from the base. Finish with two short rows of U-shaped scales near the hips.



💡 Tip: Check the tail width in three places: hips, middle and tip. Each one should be clearly thinner than the one before it.
Step 8: Give her big eyes and a happy smile
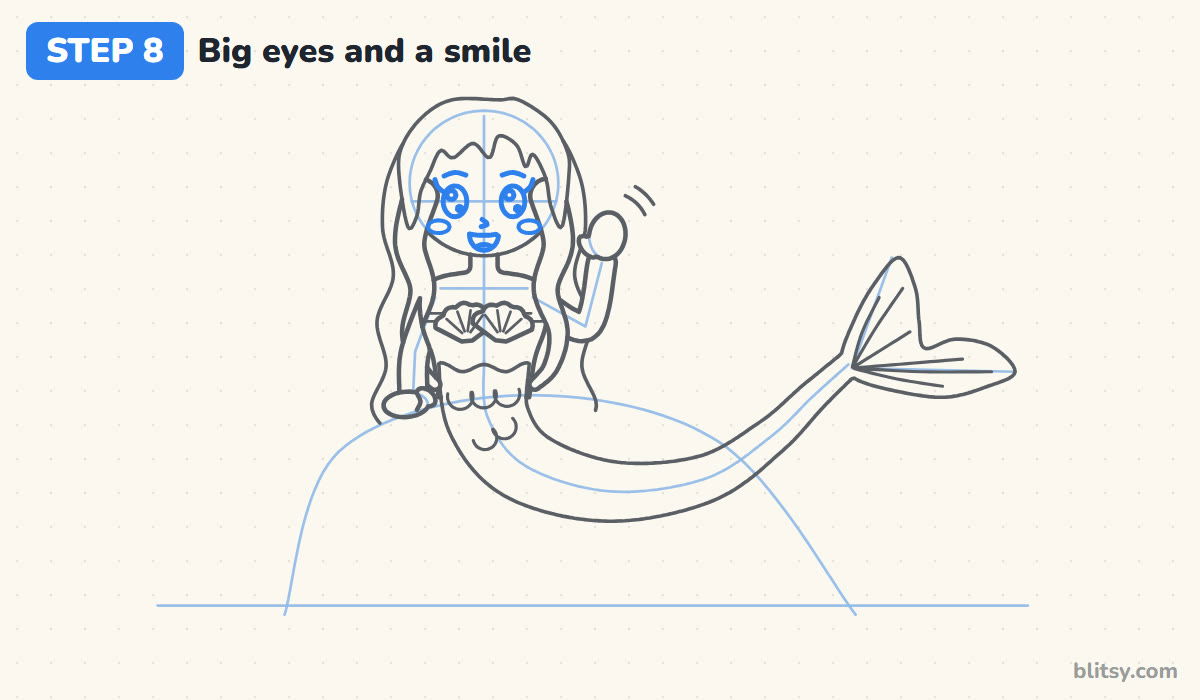
Put two tall ovals on the eye line, about one eye-width apart. Inside each, save a round white shine near the top and a tiny one lower down. A lash flick at the outer corner and a thin brow make her look friendly. Add a tiny hook for the nose, an open smile with a little tongue, and a blush on each cheek.
💡 Tip: Place the mouth closer to the nose than to the chin, and the face instantly looks younger.
Step 9: Add the rock, a starfish and the waves
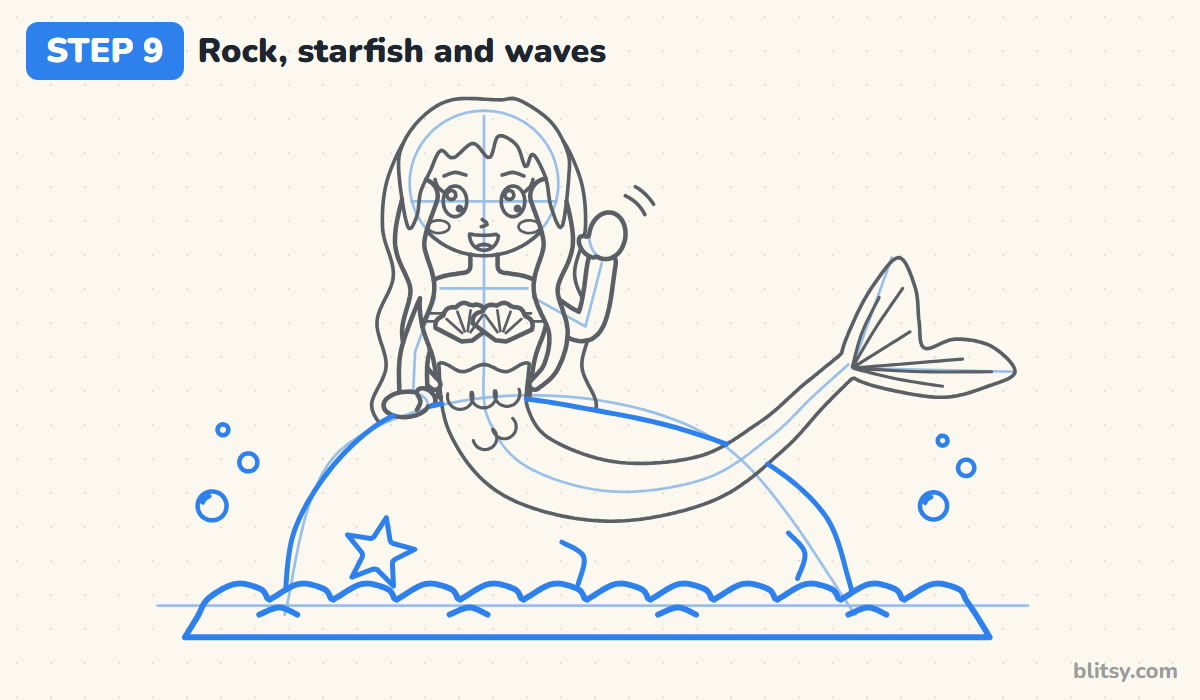
Go over the rock guide with a rounded outline that disappears behind the tail and sinks into the water. Two short crack lines make it look like stone. Draw a five-armed starfish on the left side of the rock. Along the bottom, draw a row of rounded wave tops with a few splash marks, then float some bubbles near the edges.
💡 Tip: Round off the starfish points slightly; sharp points look more like a Christmas star than a sea animal.
Step 10: Ink the drawing and erase the guides
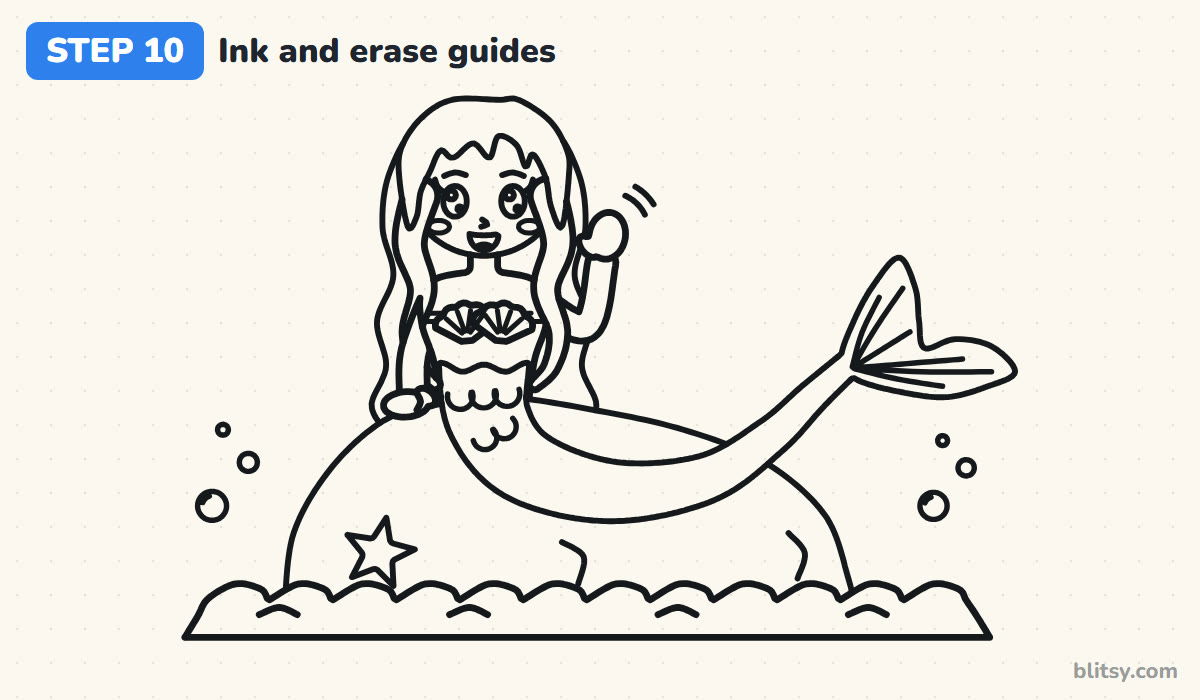
Trace all the keeper lines with a black pen: hair, face, body, shells, tail, fin, rock and waves. Skip the head circle, the body line, the S-curve and the rock dome. I ink the face first while my hand is fresh, then move outward. Wait a minute for the ink to dry before you erase the pencil underneath.
💡 Tip: If the ink smears when you erase, it wasn't dry yet; give gel pens an extra minute.
Step 11: Color your mermaid
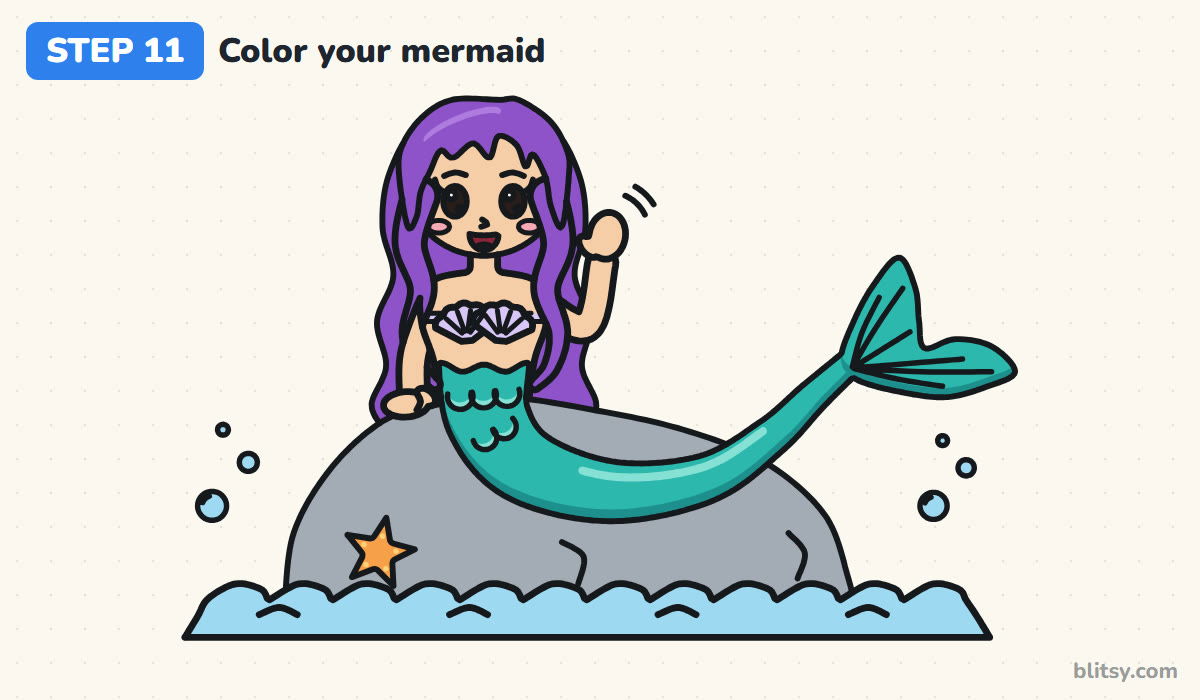
Color the hair purple, pressing a little harder near the ends. Skin gets a soft peach and the cheeks a touch of pink. Make the tail and fin teal with a dark teal strip along the underside, and leave the scales and one long streak a lighter mint. The shells are lavender, the rock gray, the starfish orange and the water and bubbles light blue.



💡 Tip: Put the darker teal on the same lower edge all along the tail, so the light seems to come from above.
Tail and Hair Trouble in Mermaid Drawings
- A tail that stays the same width. It ends up looking like a hose. Taper it steadily from the hips to the fin.
- A stiff, straight tail. Without the S-curve she looks like she's standing on one leg. Bend the guide line before you add any width.
- A tiny fin. A small fin makes the whole tail look unfinished. Make it at least as wide as her head.
- Hair drawn as one solid helmet. Long hair needs a wavy outline and separate locks. Break it into a back mass and two front pieces.
- Covering the face with hair. Bangs that drop below the eyebrows hide the eyes. Stop them just above the brows.
Mermaid Makeovers You Can Try Next
Once the S-curve feels easy, change it. Flip the tail so the fin points left, curl it into a loop, or put her underwater. Swap the shells for starfish or give her short curly hair. You can add a sea friend from the octopus drawing tutorial, or give her a crown borrowed from how to draw a princess.
Mermaid Coloring Page and Printable Step Sheet
Would you rather color first? The free mermaid coloring page has the bold outline, a small colored example and a key showing which color goes on each part. The step-by-step guide PDF keeps all 11 steps and tips on a few pages for Letter or A4 paper.
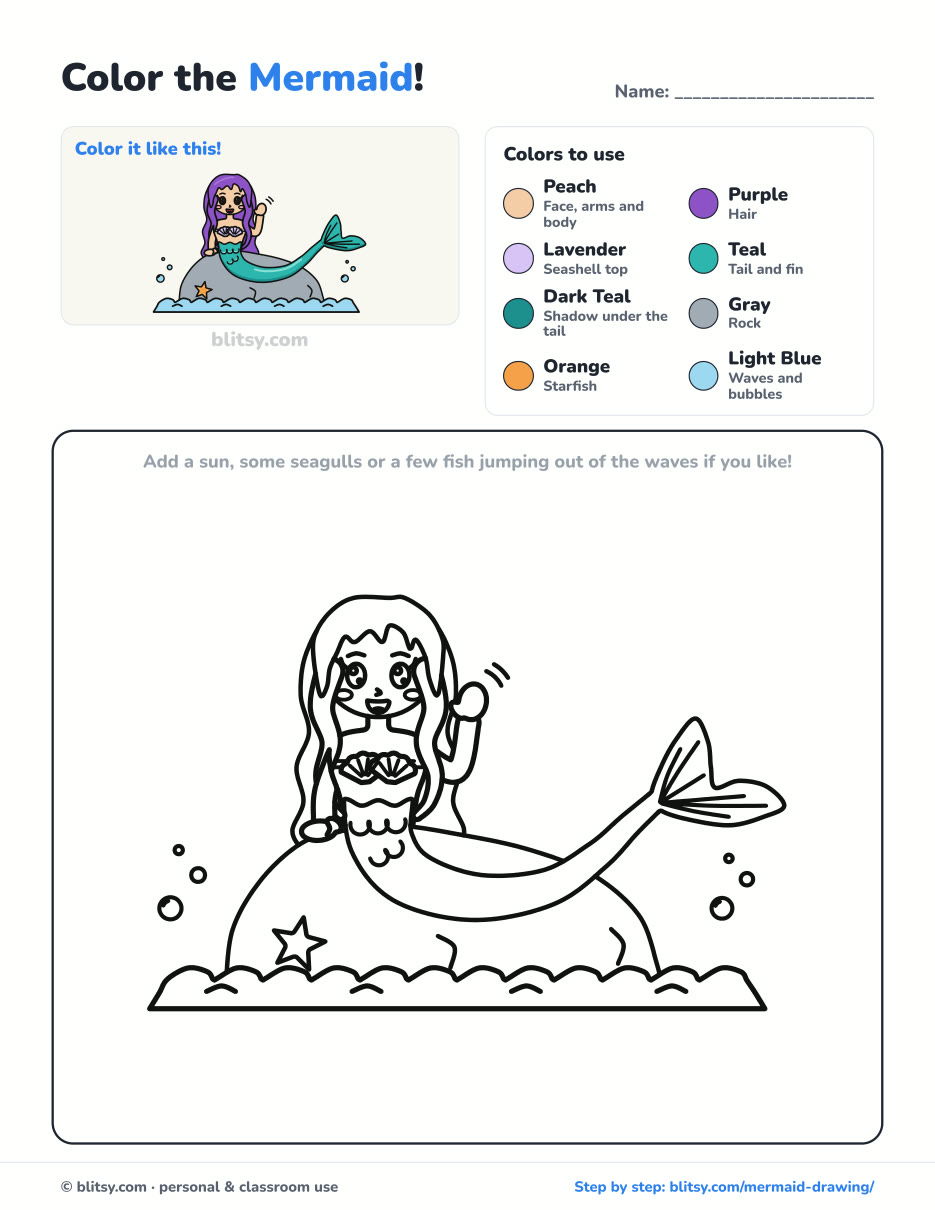
Black outlines with a colored example and the color names at the top. Ready to print and color.
⬇️ Download Coloring PageEvery step picture with its instructions and tips, to keep beside your paper while you draw.
⬇️ Download Drawing Guide📱 On a phone? Tap a download button, then open the file and choose Share → Save to Files or Print. On a computer, the PDF opens or saves straight to your Downloads folder.
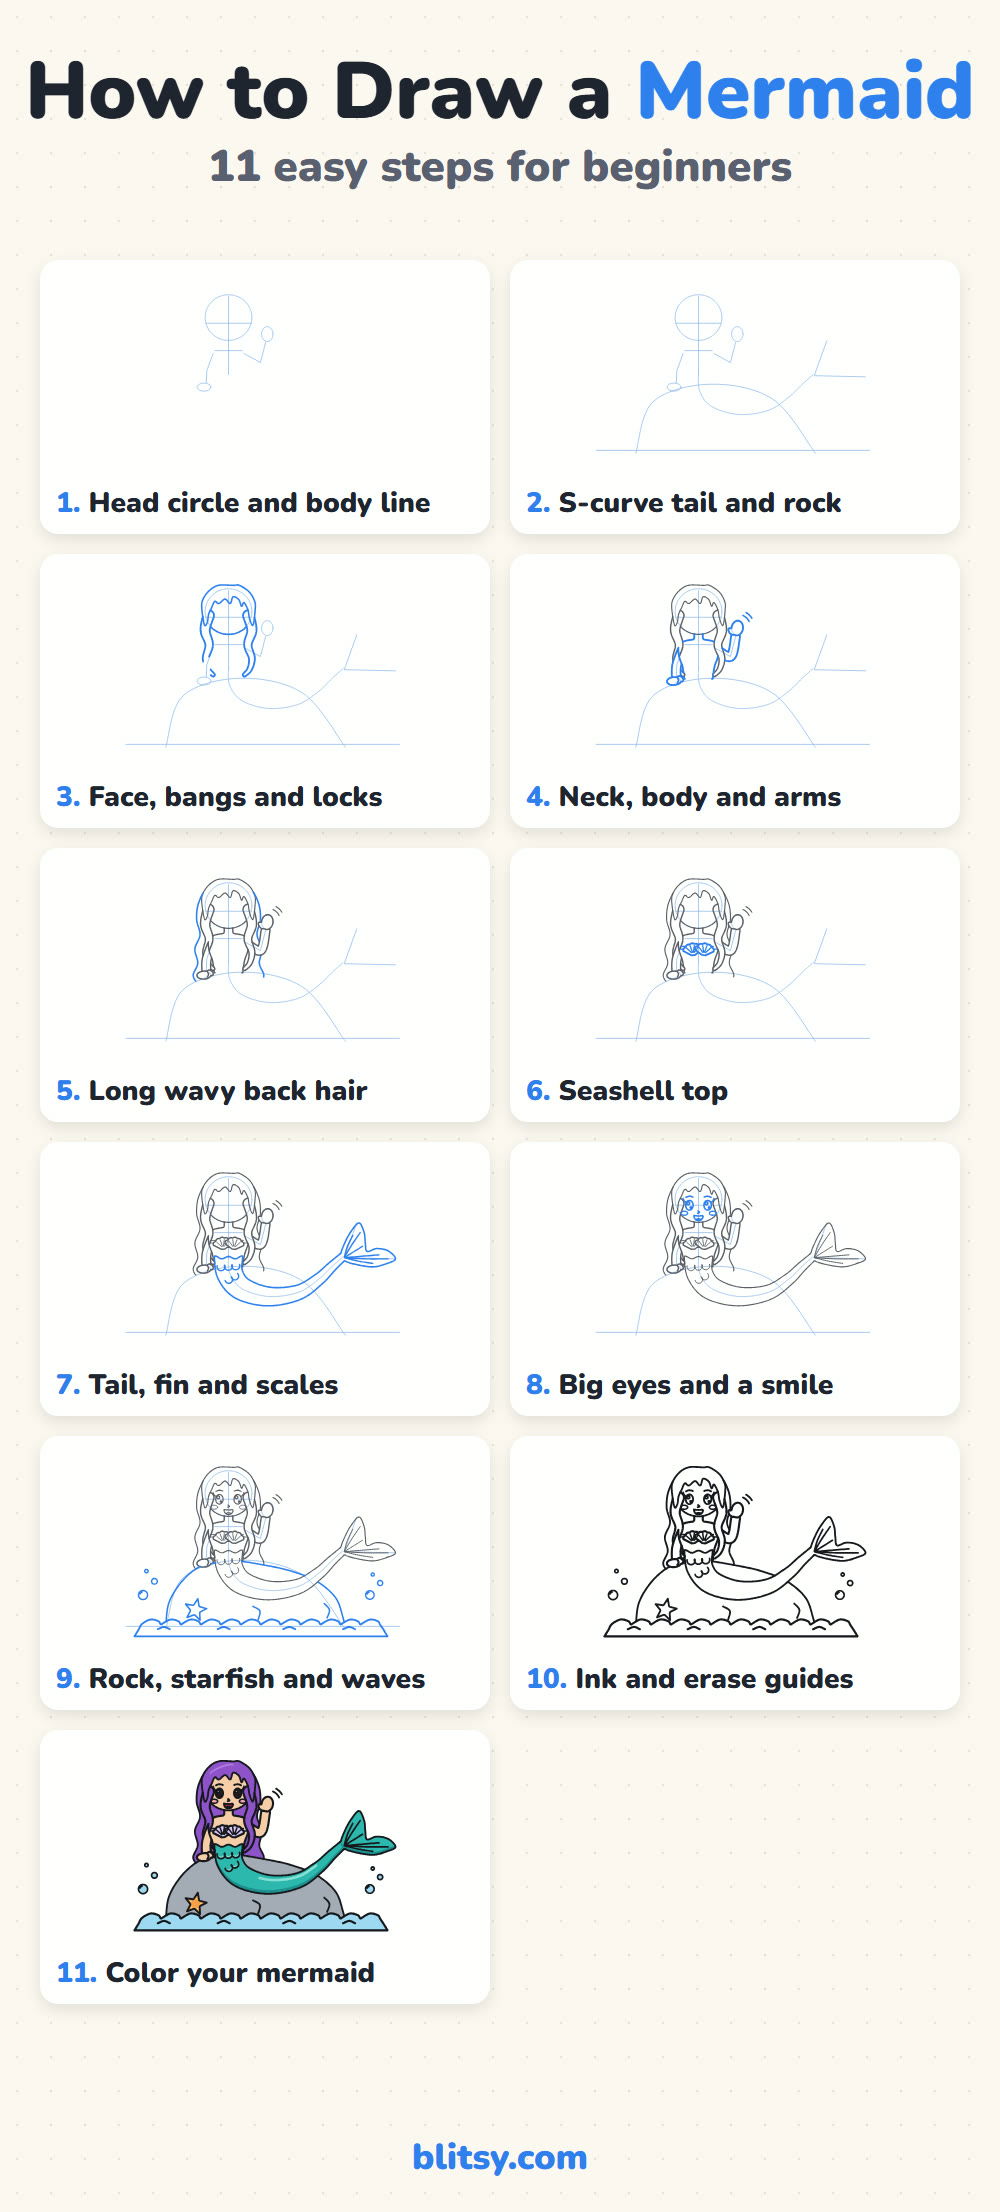
Pin the Mermaid Lesson for Your Next Art Day
Mermaid Swimming? A Cute Witch Is Next
One more character lesson, laid out step by step like this one.
- Witch Drawing: In how to draw a witch step by step, the hat tip bends in the wind, her hair streams back and a cat rides along.
Mermaid Drawing Questions from Young Artists
What is the easiest way to draw a mermaid?
Start with a head circle and one long curve for the tail. When the curve looks right, everything else is just shapes wrapped around it.
Are mermaids real?
No, mermaids are creatures from myths and old sea stories. Sailors told tales about them for centuries, which is why they show up in so many books and drawings.
How do you draw a mermaid tail that looks natural?
Draw the center line first as a gentle S, then add width that tapers from the hips to the fin. A big fan fin with a notch in the middle finishes it.
Is this mermaid drawing easy enough for kids?
Yes, children from about 6 can follow it. The wavy hair takes the most patience, so younger kids can draw shorter hair and skip the scales.
Give your mermaid a name and a sea of her own to wave from. 🧜♀️🌊
Related posts:
 How to Draw Bart Simpson Step by Step (Easy Cartoon)
 How to Draw a Tank Step by Step (Easy Cartoon Tank)
 How to Draw a Bee Step by Step (Easy Cartoon Bee)
 How to Draw a Boy Step by Step (Easy Full-Body Cartoon)
 How to Draw a Family Step by Step (Easy Cartoon Portrait)
 How to Draw a Princess Step by Step (Easy Ball Gown Cartoon)
 How to Draw a Cowboy Step by Step (Easy Cartoon Kid)
 How to Draw Wonder Woman Step by Step (Chibi for Kids)
 How to Draw Iron Man Step by Step (Easy Chibi for Kids)
 How to Draw a Boat Step by Step (Easy Sailboat for Kids)
 How to Draw a Care Bear Step by Step (Cute Fan Art for Kids)
 How to Draw Hello Kitty Step by Step (Easy for Kids)

