
Tentacles look easy until you draw eight of them and they start crossing like spaghetti. I solve that with one idea: every tentacle follows the same gentle S-curve, so they hang side by side and never tangle. This tutorial shows how to draw a jellyfish step by step, starting with a simple dome and ending with a see-through bell, frilly ribbon arms and a little baby jelly floating nearby. If you can draw a wavy line, you can do this.

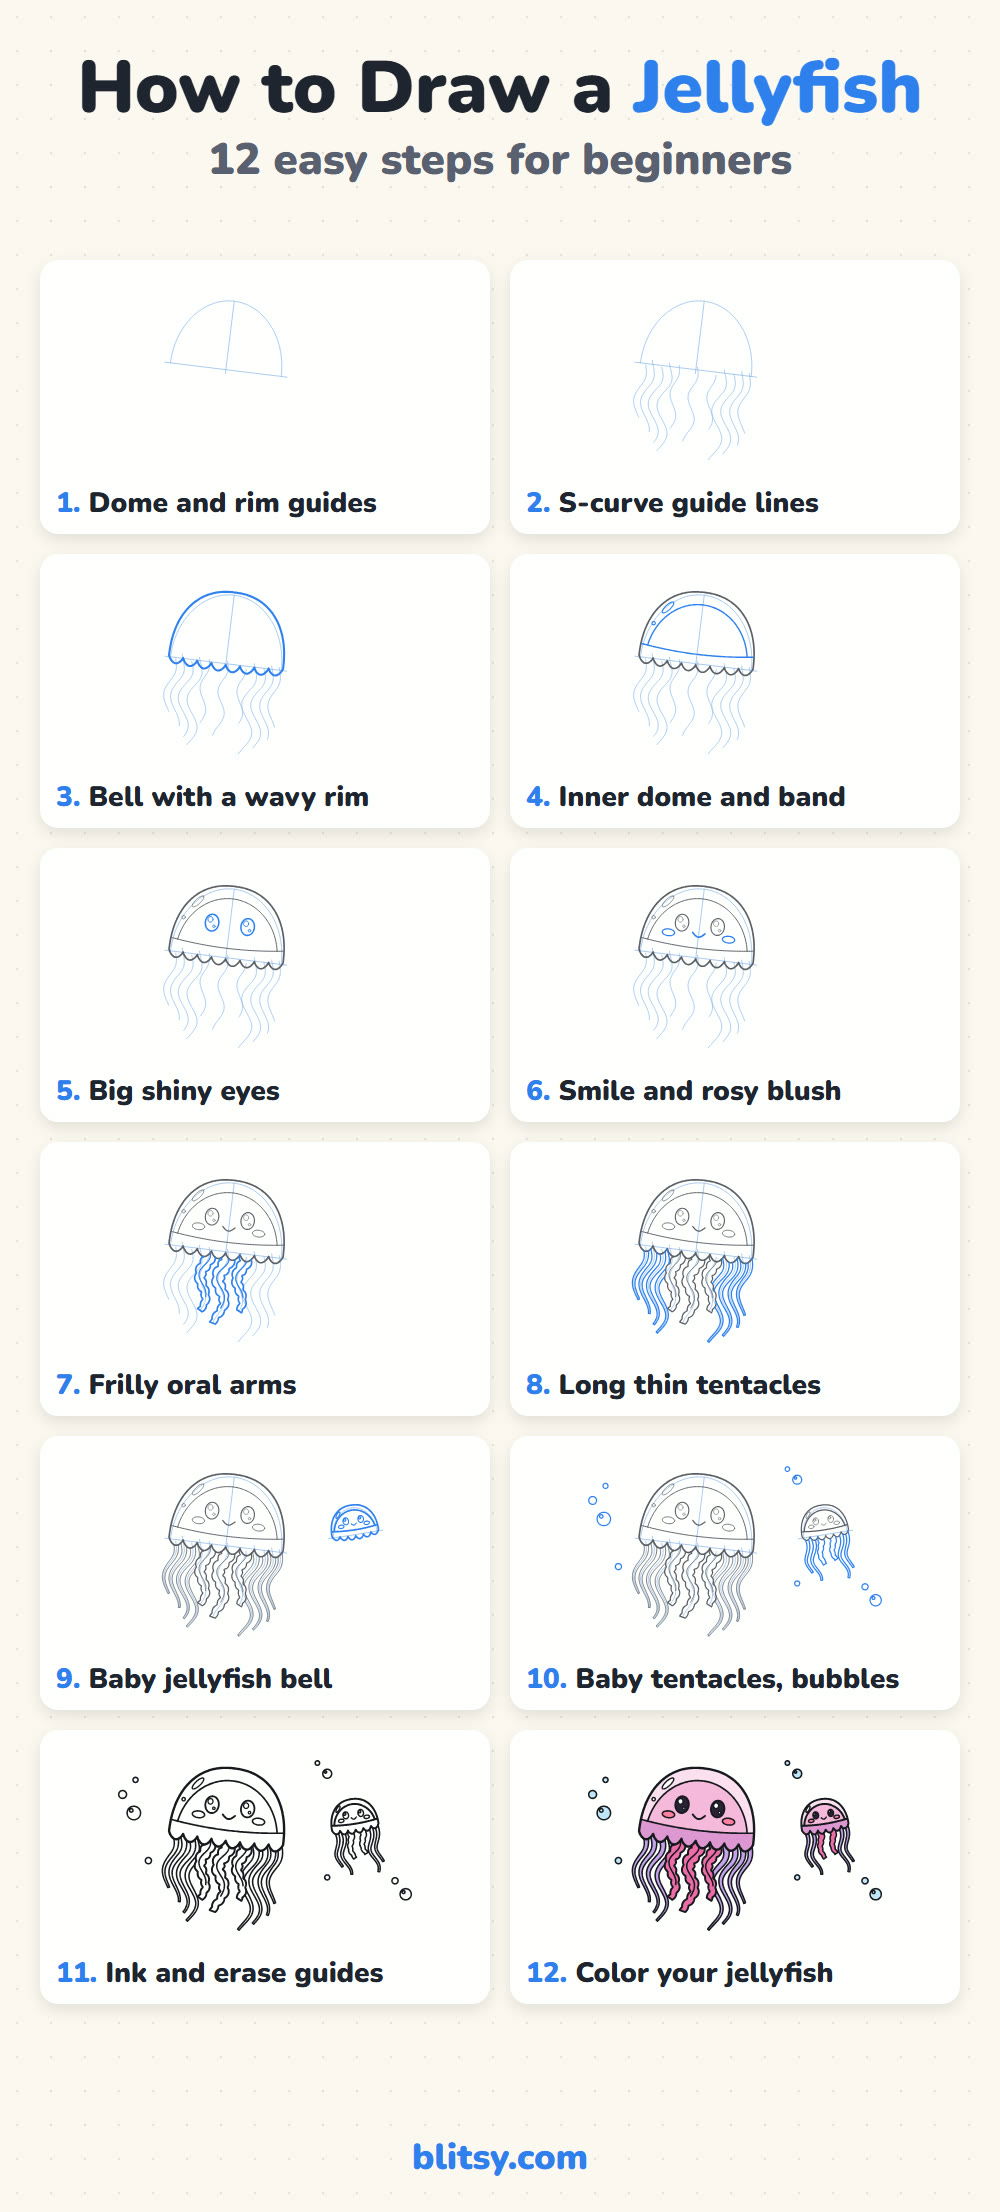
Every jellyfish picture below uses bright blue for the lines you add in that step, while older work fades to gray. Pale blue lines are guides only; they get erased in step 11.
Quick overview
⏱️ Time: about 30 minutes, a bit more with coloring
🎯 Level: easy; the frilly edges need a slow hand
✏️ Steps: 12
🌊 You'll draw: a smiling jellyfish, a baby jellyfish and a few bubbles
Gear for a Floaty Jellyfish Sketch
- A pencil (HB or 2B) that erases cleanly
- A soft eraser
- A black fineliner or marker for the final lines
- Colored pencils or markers in light pink, lilac, hot pink, light purple, rosy pink and light blue
- Plain paper turned sideways, so the baby jelly fits next to the big one
No lilac in the box? Layer light purple over pink and you'll get close.
How to Draw a Jellyfish Step by Step
Step 1: Sketch the dome and rim guides
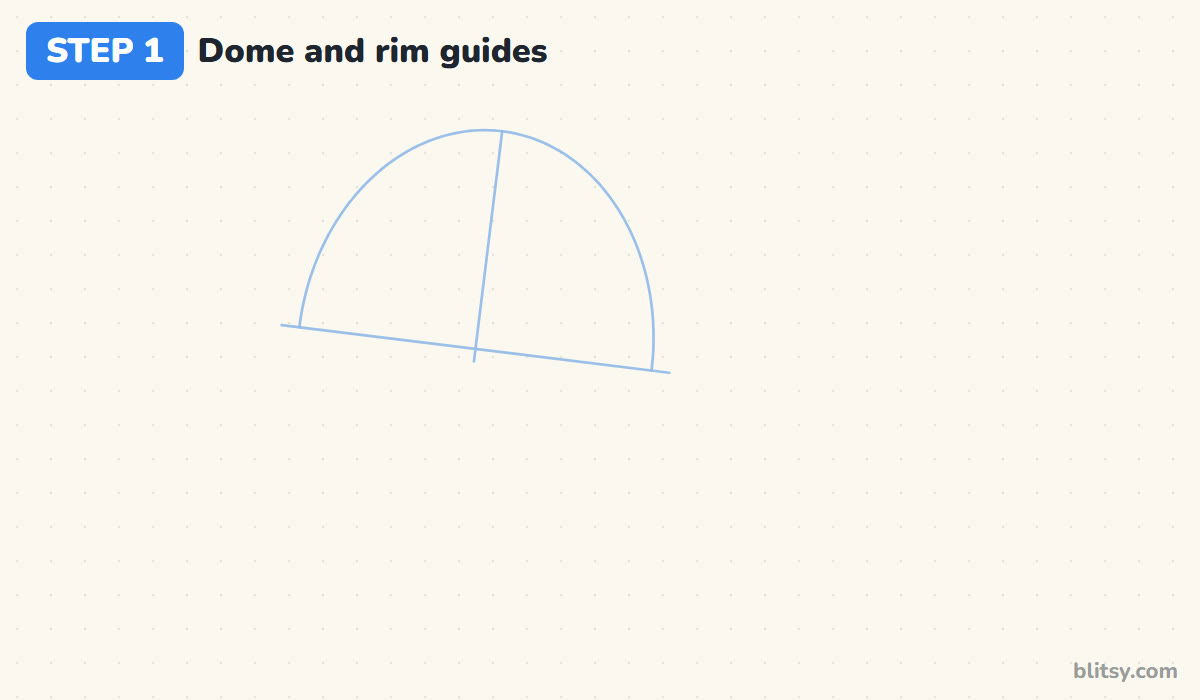
Draw a tall rounded arch on the left half of your page, like the top of an umbrella. Close it with a straight line underneath that pokes out a little on both sides. I tilt the whole thing slightly, top leaning right, because a leaning jellyfish looks like it's swimming upward. Add a light center line through the dome.
💡 Tip: Keep the arch about as tall as it is wide for a chubby, cute bell.
Step 2: Plan the S-curve guide lines
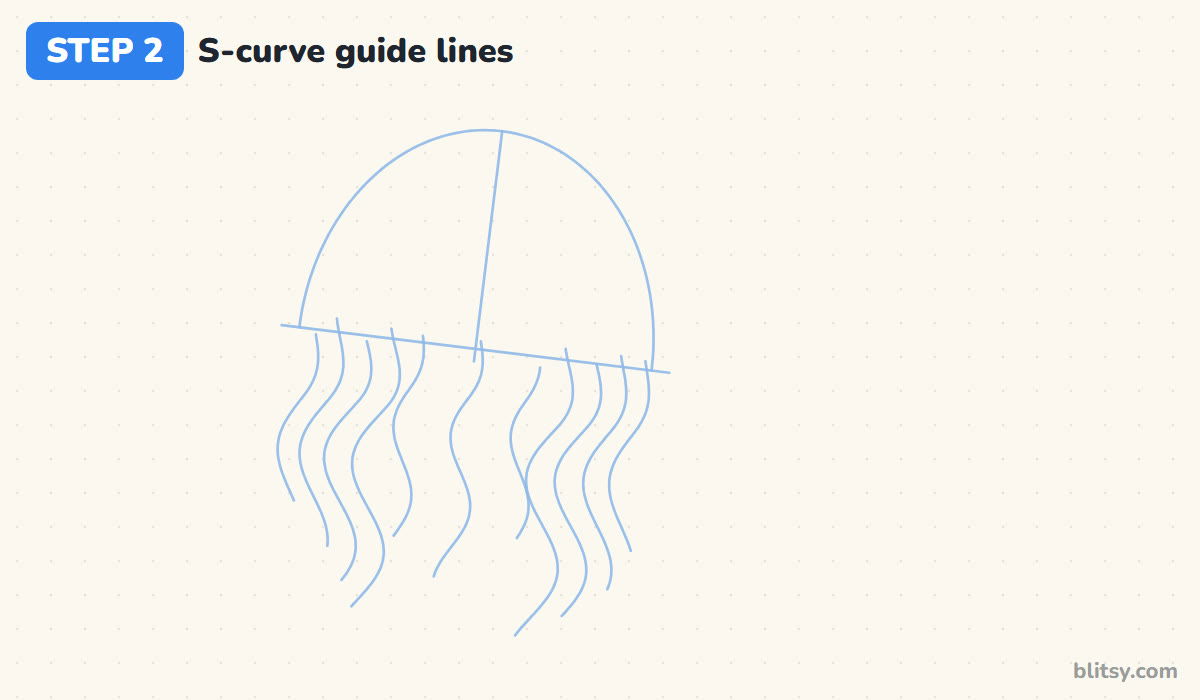
Here's the secret step. Hanging from the rim, draw eleven light wavy lines: three short ones in the middle for the frilly arms and four on each side for the tentacles. Make every line swing left, then right, then left again, all at the same moment. When the waves line up, the lines stay parallel and never cross. Let the outer ones be shorter than the inner ones.
💡 Tip: Draw the first wave, then copy its rhythm for every line after it.
Step 3: Draw the bell with a wavy rim
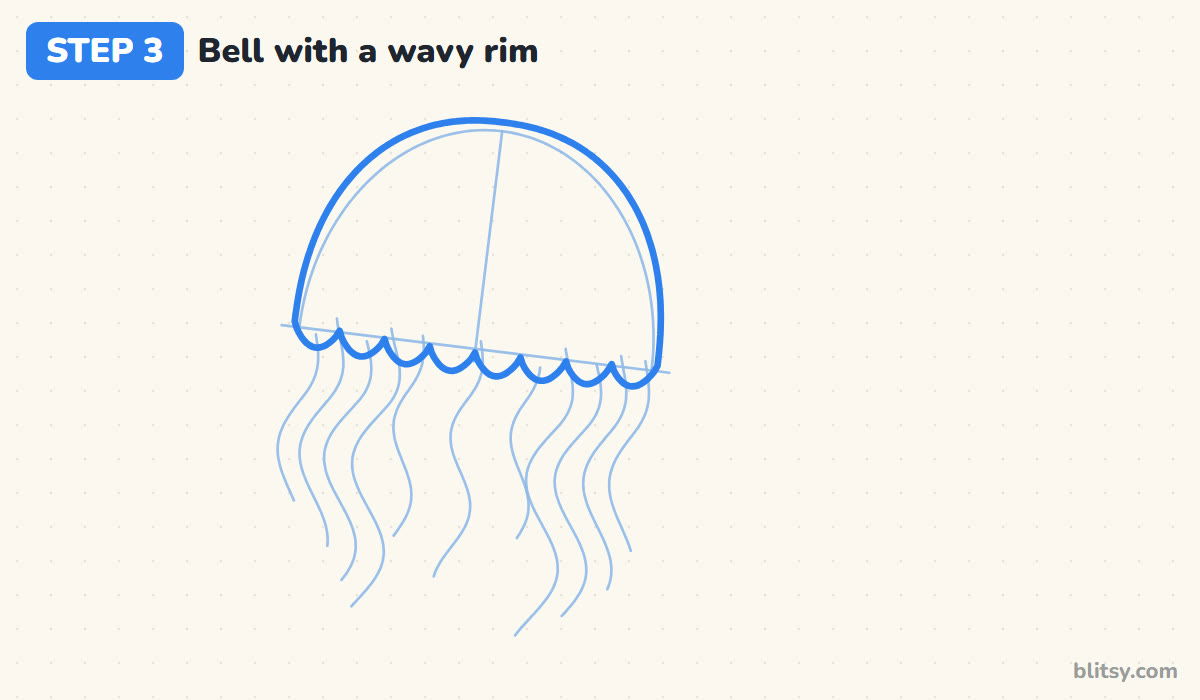
Trace over the dome guide with a darker line, staying just outside it. At the bottom, swap the straight guide for a row of small bumps that bulge downward, like the edge of a cupcake wrapper. I fit eight bumps across. Fewer, bigger bumps look cartoony; many tiny ones get fussy and are harder to color.




💡 Tip: Sketch light dots where each bump meets the next, then join them.
Step 4: Add the inner dome and lower band
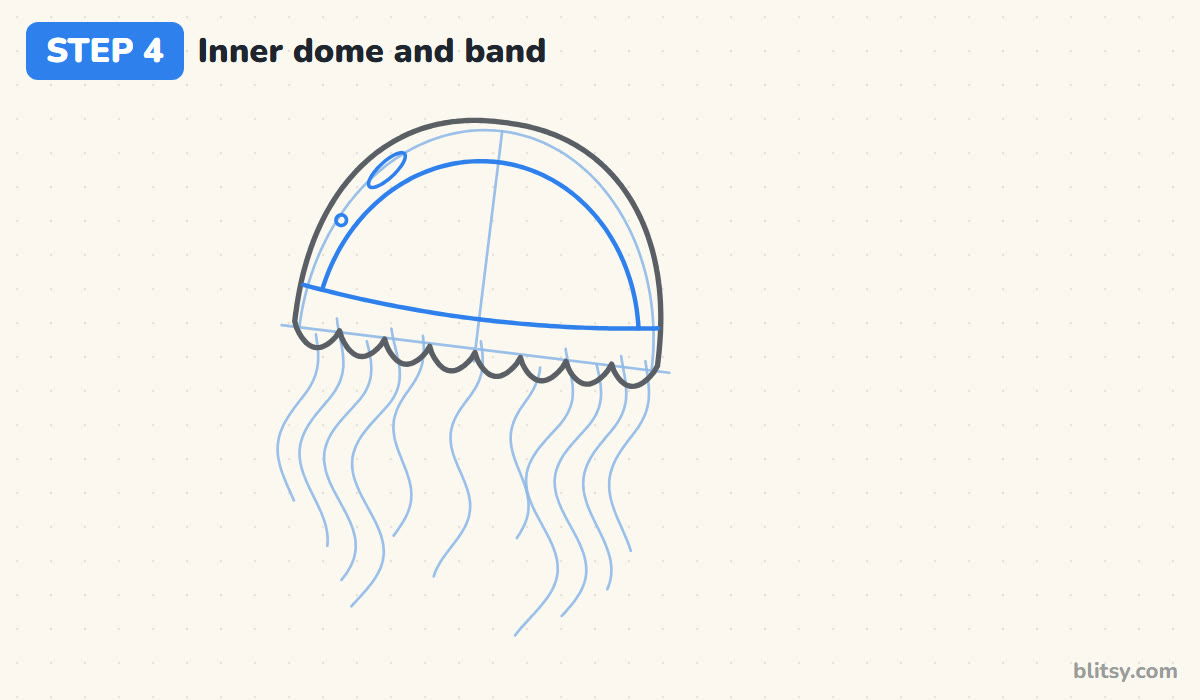
Inside the bell, draw a second, smaller arch that follows the outer one, leaving a gap that's wider at the top than at the sides. That gap is what makes the jelly look see-through. Next, draw a gently curved line across the bell just above the bumps to make a band. In the top gap, put a thin oval shine and a tiny dot.
💡 Tip: Leave the shine shapes empty now; they stay white when you color.
Step 5: Give it big shiny eyes
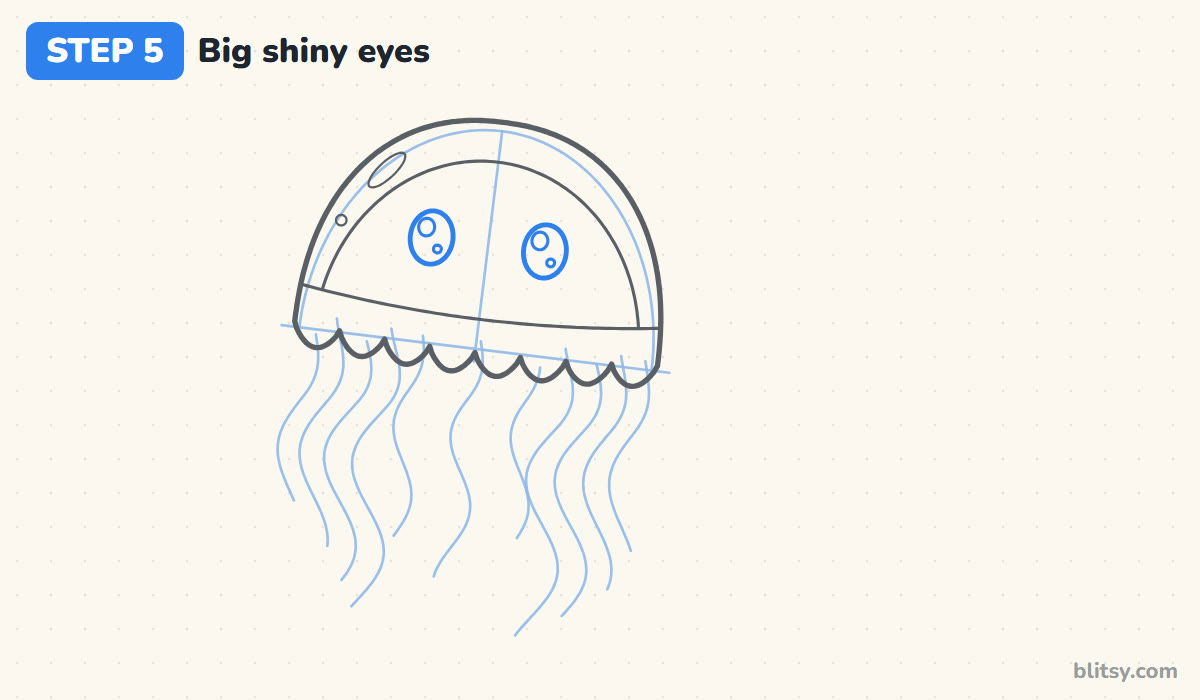
Place two tall ovals in the middle of the inner dome, one on each side of the center line, with about two eye widths between them. Low eyes look younger and sweeter, so keep them below the halfway mark. Inside each oval, draw a medium circle near the top and a small one lower down. Those become the sparkles.
💡 Tip: Put both sparkles on the same side in each eye so the gaze matches.
Step 6: Draw a smile and rosy blush
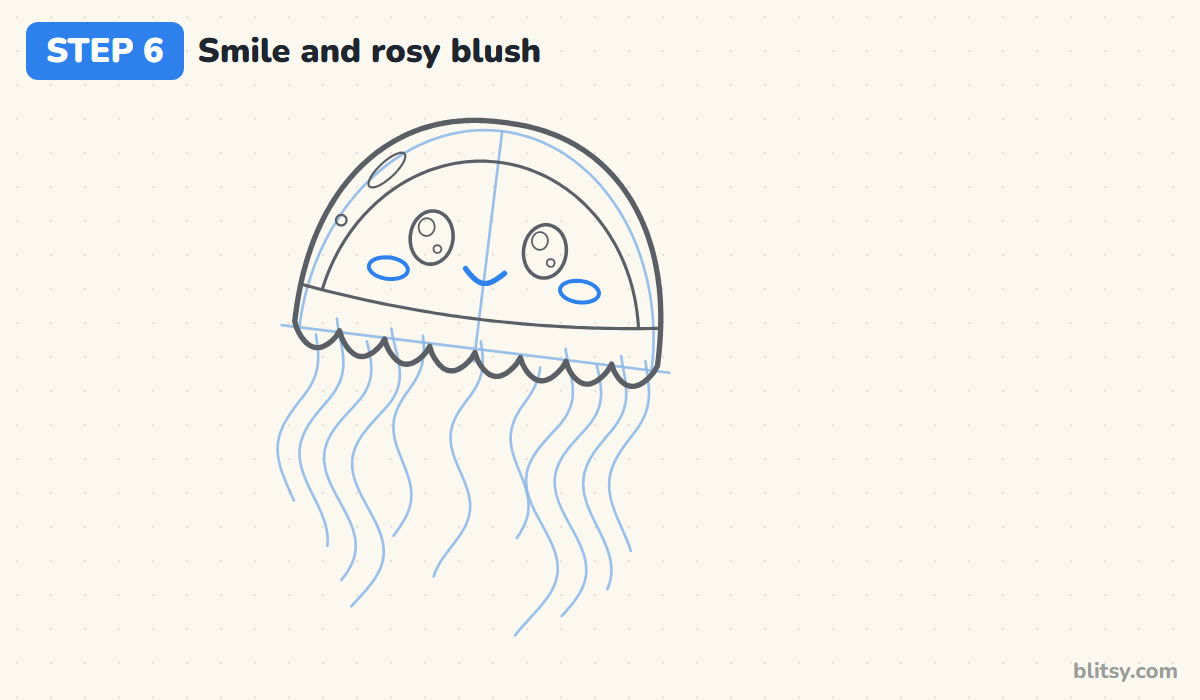
A tiny U-shaped smile goes between the eyes and slightly lower. I keep it no wider than one eye; a big grin takes over the face. Then add a flat oval under each eye, toward the outside of the face. Check that the cheeks stay above the band line, or the face looks squashed.
💡 Tip: Draw the smile in one quick flick so it stays smooth.
Step 7: Draw the frilly oral arms
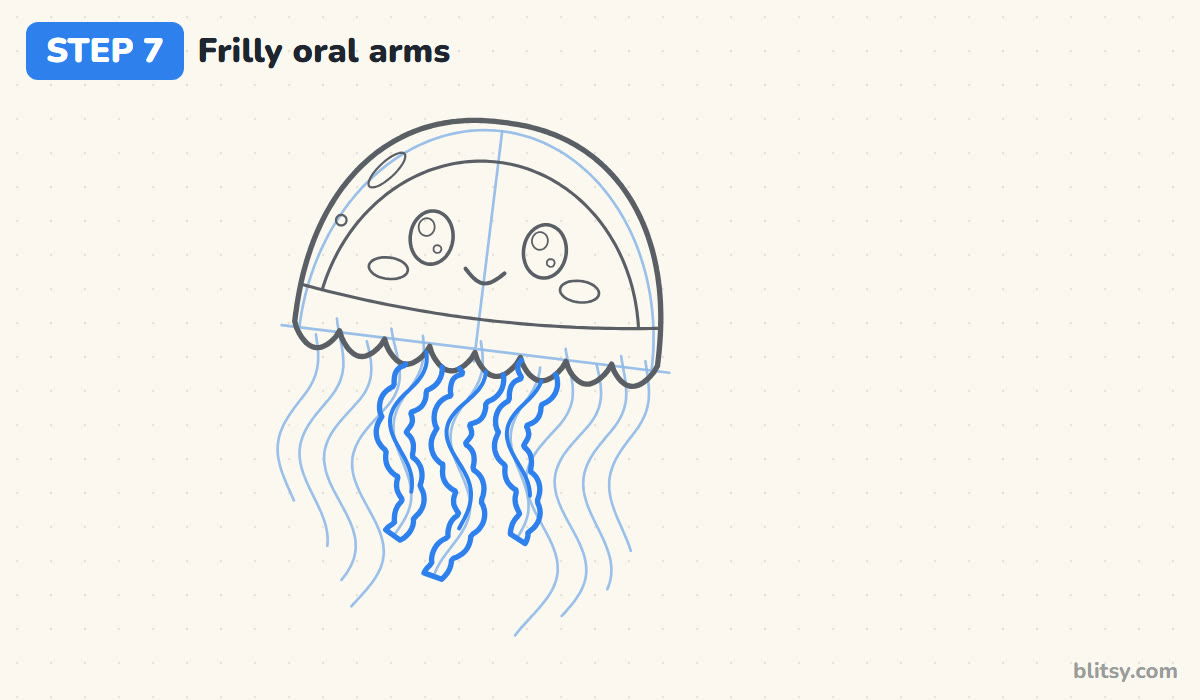
Real jellyfish have frilly arms around their mouth, and these three ribbons copy that look. Follow the three middle guides and draw a bumpy edge on both sides of each, wide at the top and narrowing toward a soft point. Make the bumps on one side sit between the bumps on the other side. Add a wavy fold line inside each ribbon, and finish the middle ribbon first, since it hangs in front.


💡 Tip: Small, rounded bumps read as ruffles; sharp spikes look like a saw.
Step 8: Add the long thin tentacles
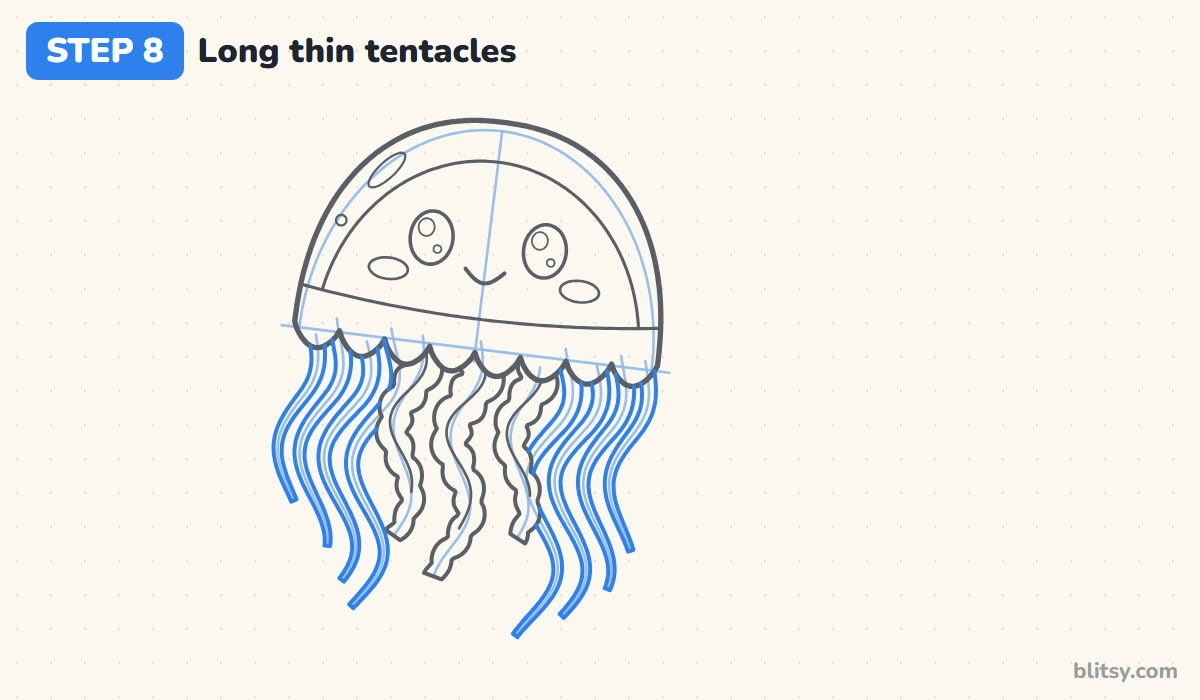
Now the eight outer guides become tentacles. Draw a thin line on each side of a guide, slightly wider under the rim and pinching to a narrow tip. Stop each line where it reaches a frilly arm. This takes patience, and it's where your parallel guides pay off: just follow the curve you already planned.
💡 Tip: Turn the paper so you always pull the pen down along the curve.
Step 9: Sketch a baby jellyfish bell
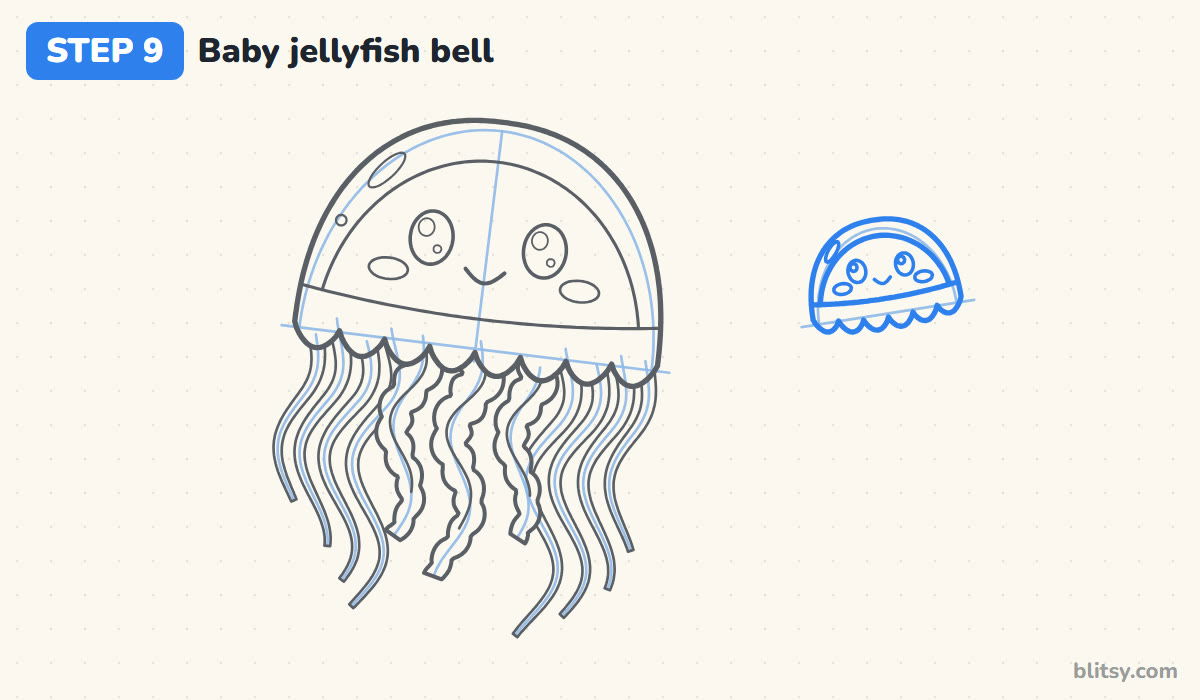
On the right side, a little higher than the big jelly, draw a mini version of steps 1 to 6: a small arch, a straight rim guide, a bumpy edge, an inner arch, a band, tiny eyes, a smile and blush. Tilt the baby the opposite way. Two jellies leaning toward each other look like they're chatting.
💡 Tip: Make the baby about half as wide as the big bell.
Step 10: Add baby tentacles and bubbles
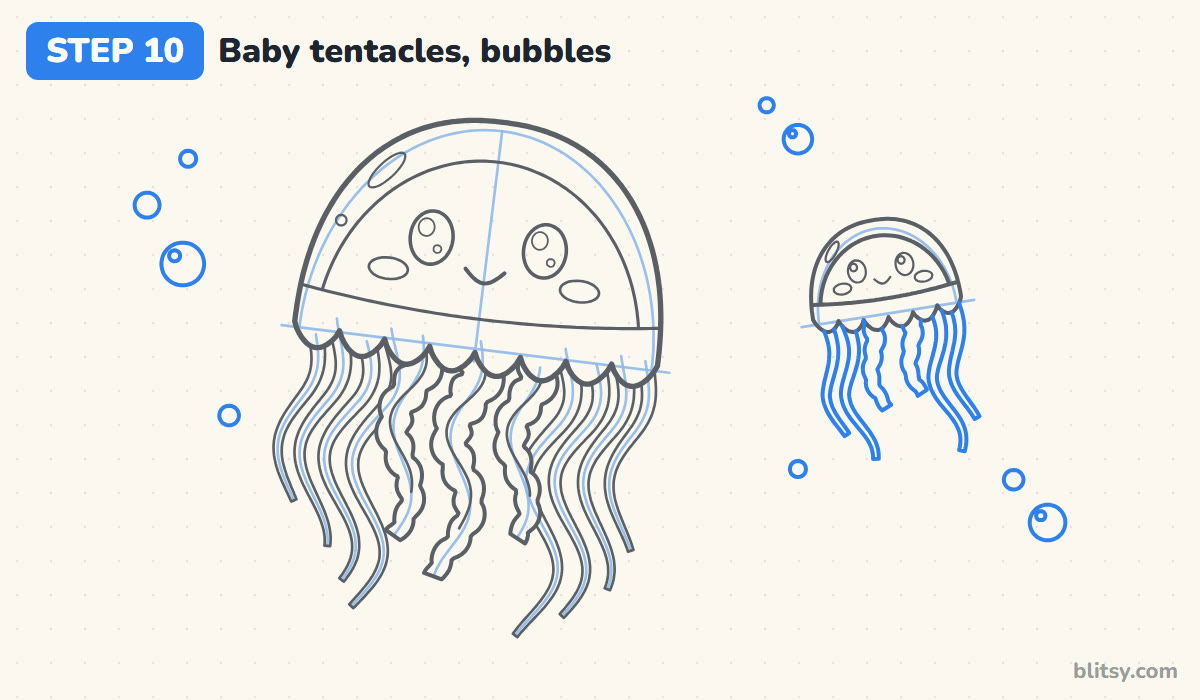
Give the baby two short frilly arms and four thin tentacles, using the same S-curve rhythm on a smaller scale. Then scatter bubbles: a cluster on the left, a pair above the baby and a few lower down on the right. Mix big and tiny circles, and draw a small shine circle inside the larger bubbles.
💡 Tip: Group bubbles in threes so they look like they're rising together.
Step 11: Ink the lines and erase the guides
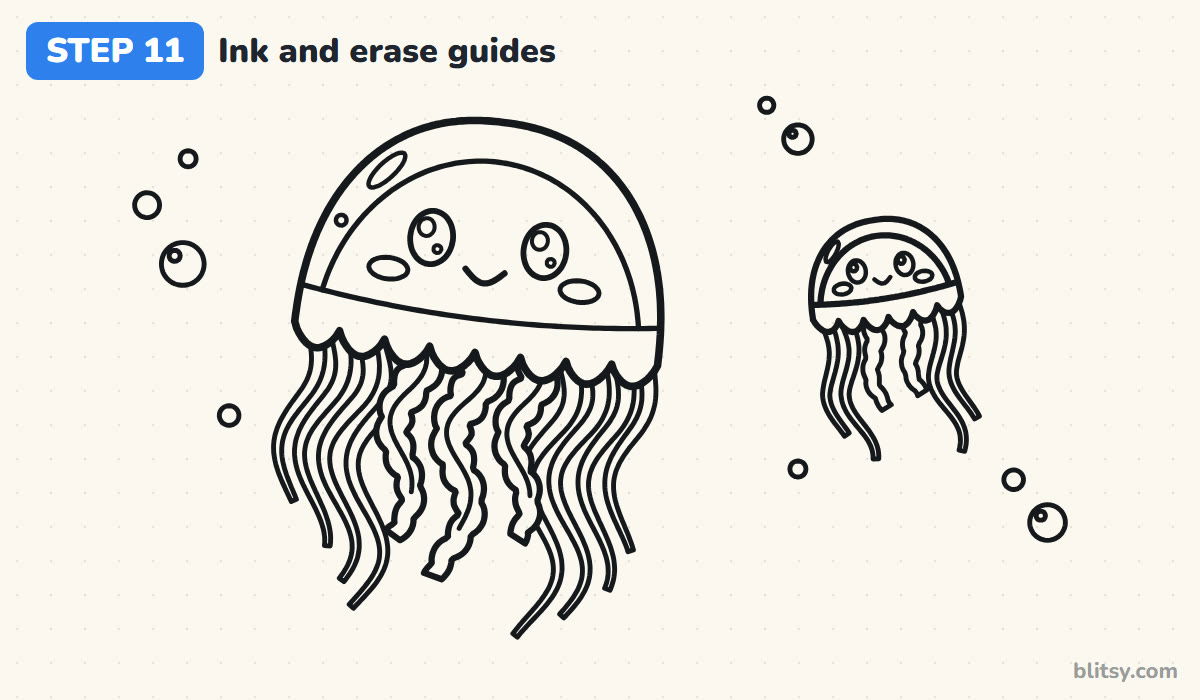
Go over every keeper line with your black pen. I ink the bell first, then the face, then the arms and tentacles, finishing with the baby and the bubbles. Wait until the ink is completely dry, then erase the dome guide, the rim lines, the center line and all eleven S-curves. Clean outlines are much nicer to color.




💡 Tip: Rest your hand on a scrap of paper so it doesn't smudge wet ink.
Step 12: Color your jellyfish
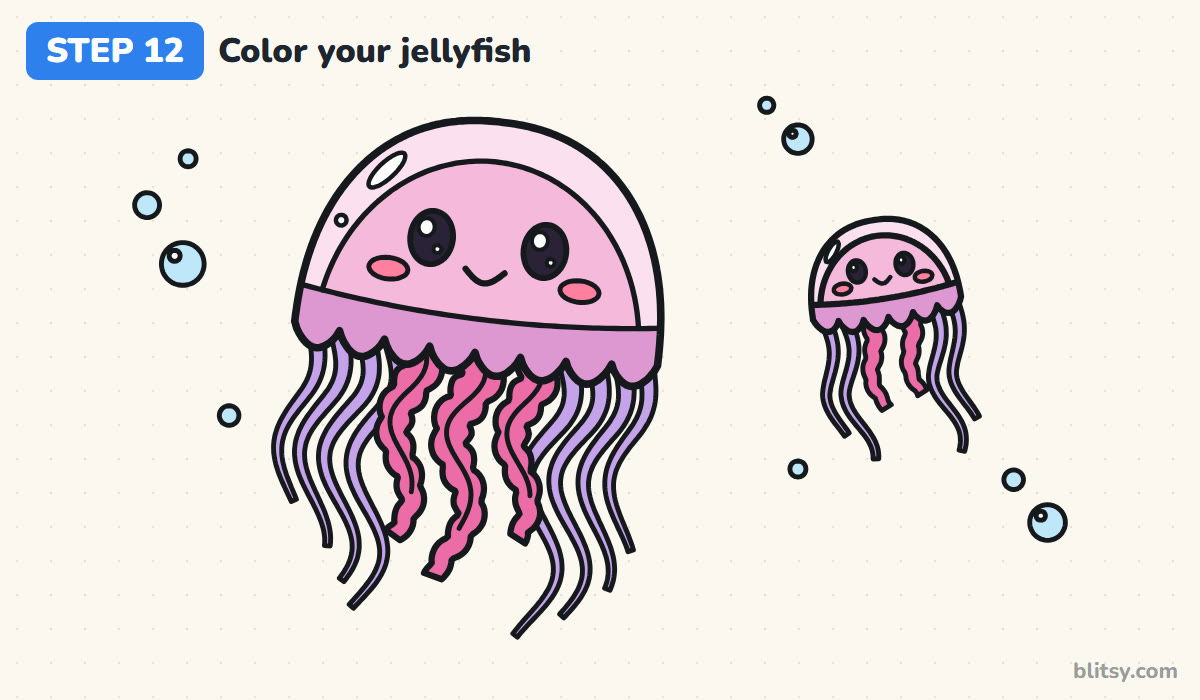
Fill the inner dome light pink and the outer gap an even paler pink, pressing very lightly so it looks clear. Color the band lilac. The frilly arms get hot pink and the tentacles light purple. Fill the eyes dark, keeping the sparkles white, then add rosy cheeks and light blue bubbles. Color the baby the same way.
💡 Tip: Color the tentacles along their curves, not straight across.
Why Jellyfish Tentacles Get Messy
- Waves that don't match. If each tentacle wiggles at its own pace, they cross and knot. Draw all the guide waves with the same rhythm in step 2.
- Tentacles the same width all the way down. They turn into noodles. Start a bit wider under the rim and pinch toward the tip.
- A flat, wide bell. It reads as a mushroom cap. Keep the dome roughly as tall as it is wide.
- Ink lines crossing in front. Tentacle lines drawn over the frilly arms make the jelly look flat. Stop every back line where it meets a front shape.
- Coloring too hard. Heavy pink hides the see-through effect. Press softly on the bell and save the strong color for the arms.
Jellyfish Swaps for Your Next Page
Once you know the S-curve trick, play with it. Try a moon jelly in pale blue with four pink circles on the bell, a glowing jellyfish on black paper with white gel pen, or a whole family of jellies of different sizes drifting in a line. You can also stretch the tentacles twice as long for an elegant, dreamy look. A curly friend from the octopus drawing tutorial fits the same sea, and the goldfish in the fish drawing tutorial is great for filling the water around your jellies.
Jellyfish Coloring Page and PDF Steps to Print
Want it on paper? The jellyfish coloring page has a colored example and a color key at the top, so kids can match the shades, and a big clean outline below. The step-by-step PDF guide includes all 12 steps with pictures and tips. Both print on Letter or A4.
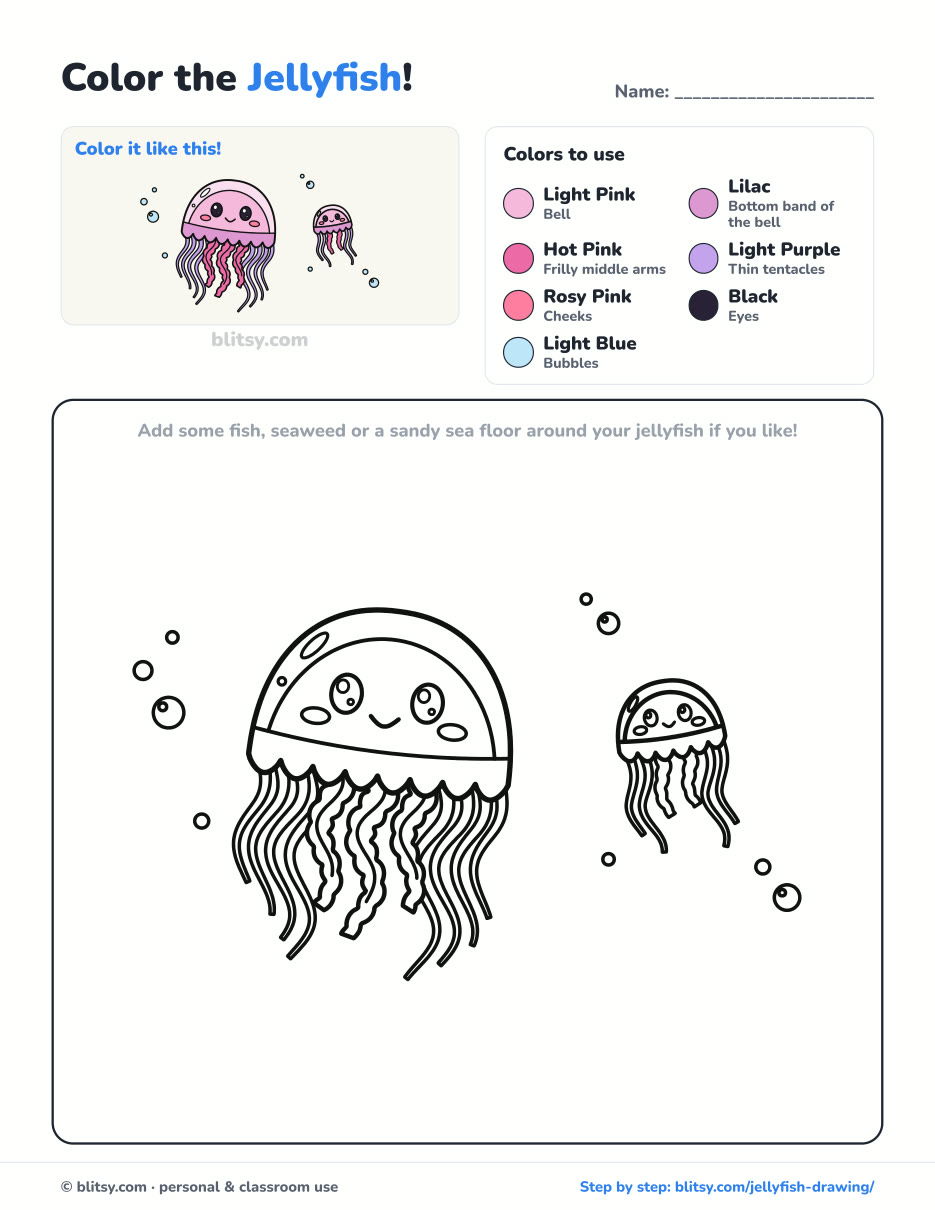
Black outlines with a colored example and the color names at the top. Ready to print and color.
⬇️ Download Coloring PageEvery step picture with its instructions and tips, to keep beside your paper while you draw.
⬇️ Download Drawing Guide📱 On a phone? Tap a download button, then open the file and choose Share → Save to Files or Print. On a computer, the PDF opens or saves straight to your Downloads folder.
Twelve Jellyfish Steps on a Single Pin
Jellyfish Drawing Questions from Curious Kids
What is the easiest way to draw a jellyfish?
Start with a dome, give it a bumpy bottom edge, then hang wavy lines underneath. If all the wavy lines follow the same rhythm, the tentacles look neat even when you're new to drawing.
Is this jellyfish drawing easy enough for kids?
Yes. Children from about five can manage the bell, face and simple wavy tentacles. Younger kids can skip the frilly edges and the double tentacle lines and just draw single wiggly lines.
What are jellyfish really like?
They have no brain, no heart and no bones, and they're about 95% water. Many can sting, so never touch one, even a jellyfish lying on the beach.
How long does it take to draw a jellyfish?
Around 30 minutes, plus extra time for coloring. The frilly arms and the tentacles in steps 7 and 8 take the longest, so give them your full attention.
Give your jellyfish a name, add a few more bubbles, and see if the baby needs a sibling. 🌊
Related posts:
 How to Draw an Anime Girl Step by Step (Easy Face Guide)
 How to Draw Luffy Step by Step (Easy Straw Hat Guide)
 How to Draw Todoroki Step by Step (Easy Fire and Ice Guide)
 How to Draw a Snow Leopard Step by Step (Easy Guide)
 How to Draw a Cat Face Step by Step (Easy Tabby Guide)
 How to Draw a Face Step by Step (Easy Proportions Guide)
 How to Draw a Side Profile Step by Step (Easy Head Guide)
 How to Draw a Magnolia Flower Step by Step (Easy Guide)
 How to Draw a UFO Step by Step (Cute Alien Saucer)
 How to Draw an Astronaut Step by Step (Cute and Easy)
 How to Draw a Care Bear Step by Step (Cute Fan Art for Kids)
 How to Draw Cerberus Step by Step (Cute and Easy)

