
Hair is where a lot of nice drawings fall apart. You draw a sweet face, then pile hundreds of single lines on top, and it ends up looking like straw or a helmet. In this lesson on how to draw hair step by step, I work from big to small: hairline and part first, then one large outer shape, then wavy clumps, and only at the end a few strand lines. We'll practise on a girl with long, wavy hair.
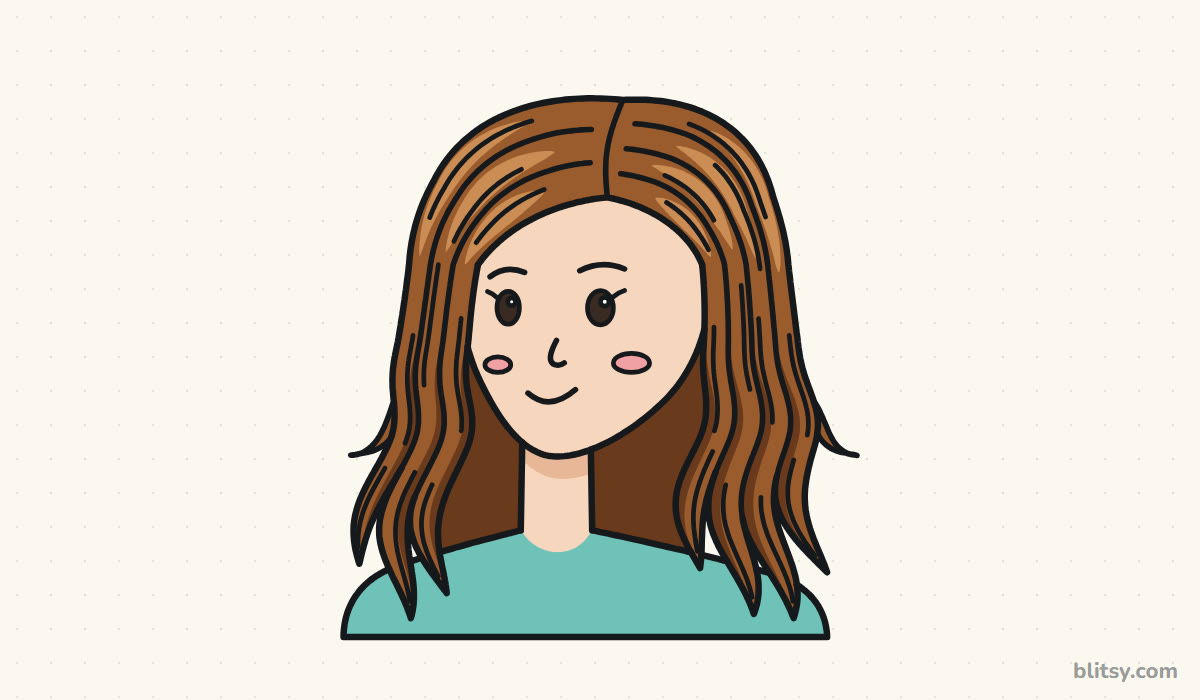
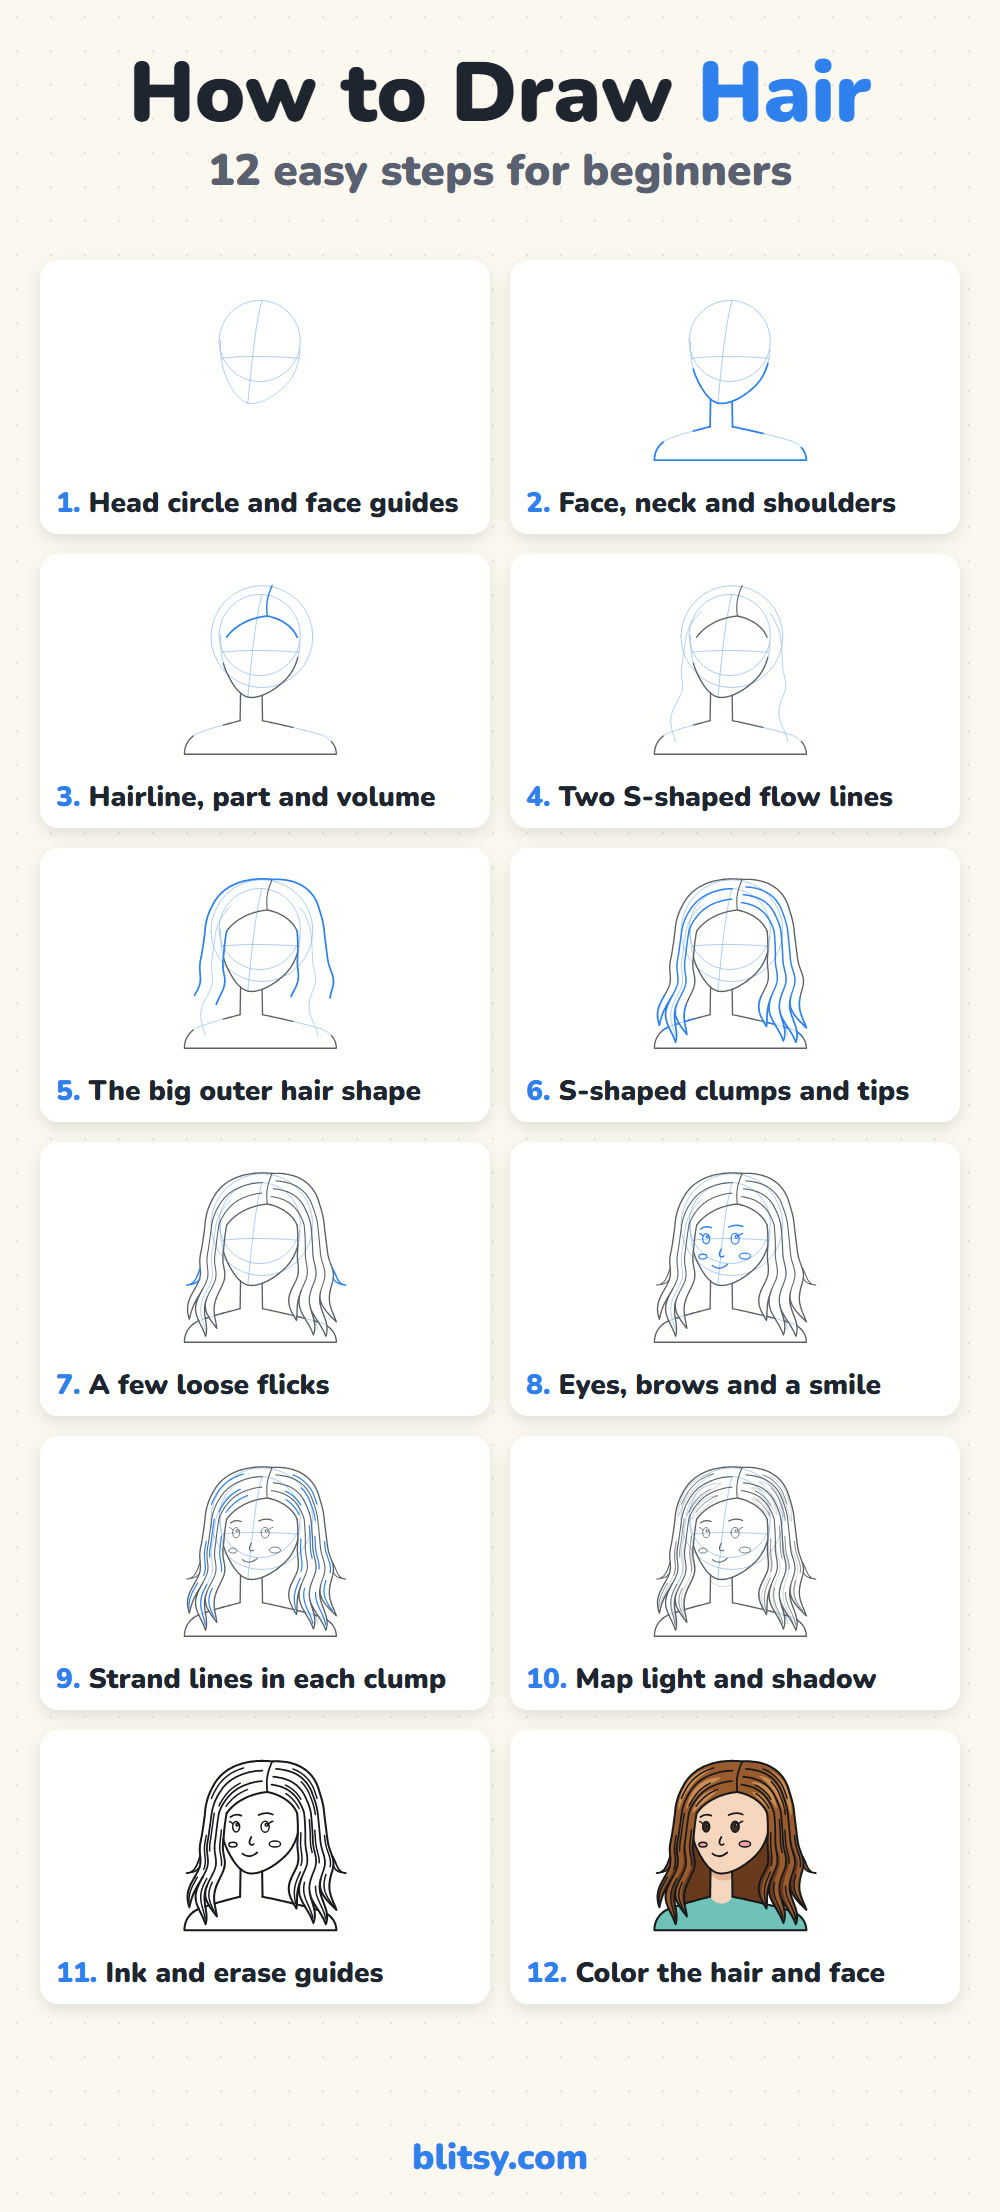
Read the pictures from top to bottom: blue marks the lines for that stage, gray shows everything finished before it, and the pale blue helpers disappear in step 11.
Quick overview
⏱️ Time: about 35 minutes, plus 15 for coloring
🎯 Level: easy to medium, good for ages 9 and up
✏️ Steps: 12
💇 You'll draw: a smiling girl with long, wavy, side-parted brown hair
Tools That Help Hair Flow on Paper
- An HB pencil for the light planning lines
- A soft eraser (a kneaded one lifts guides cleanly)
- A black fineliner or felt-tip pen
- Colored pencils: three browns (medium, dark, light) plus peach, pink and teal
- Plain white paper, held upright
A single brown pencil is enough for the hair if that's all you've got: press harder for the dark parts and barely touch the paper for the shine.
How to Draw Hair Step by Step
Step 1: Draw the head circle and face guides
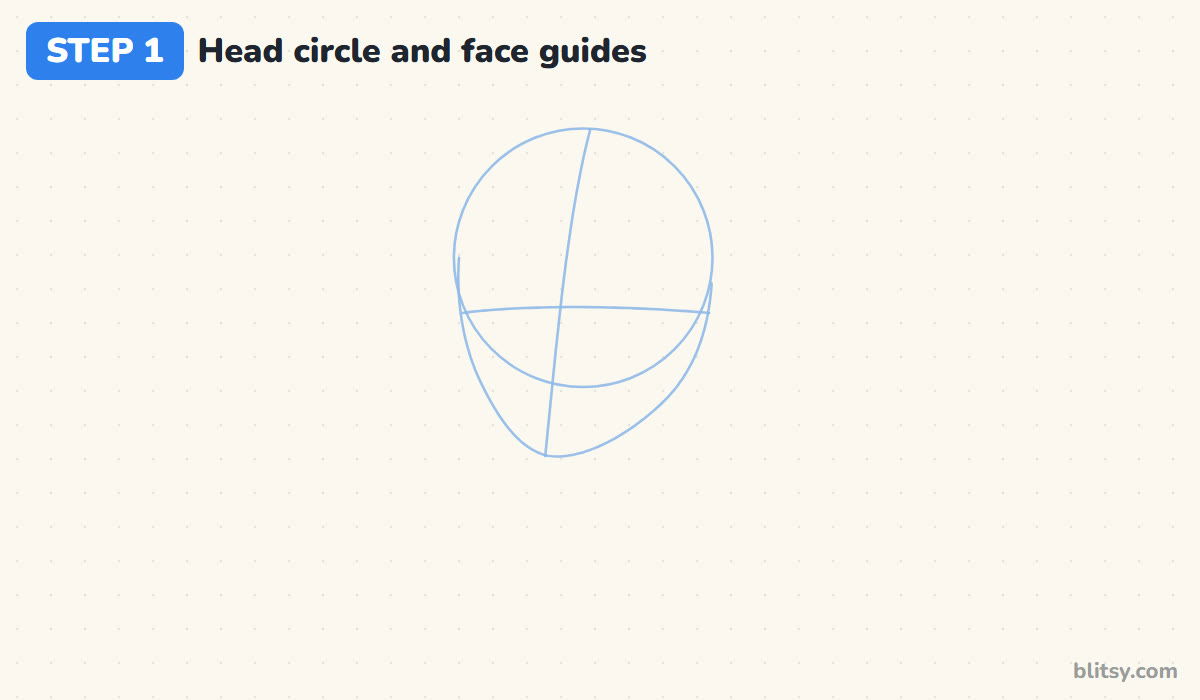
Start with a circle a little above the middle of your page. Run a gently curved line down through it, slightly left of center, so the face turns a touch to the side. Add a level eye line across the lower half, then hang a soft jaw from the circle down to a chin.
💡 Tip: Keep these lines faint. If you can read them from across the room, you're pressing too hard.
Step 2: Outline the face, then the neck and shoulders
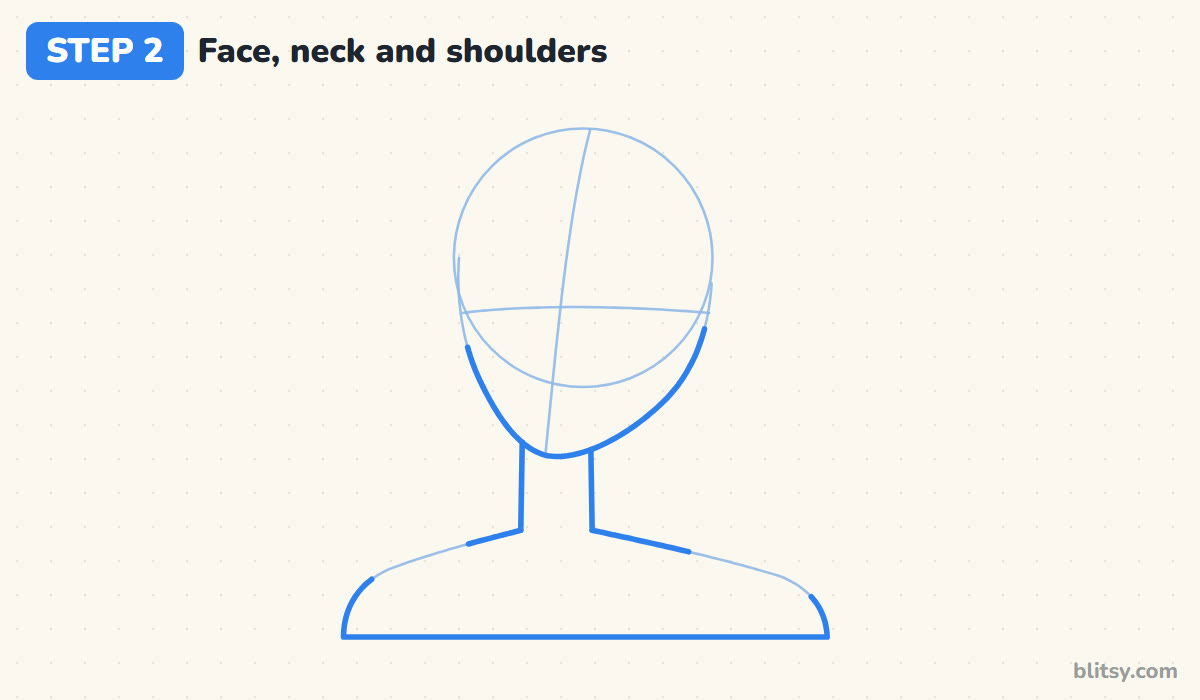
Trace the lower cheeks and chin over your jaw guide; hair will cover the rest. Drop two straight lines for the neck, then sweep the shoulders out wide with a little scoop for the neckline. Where hair will hang over the shoulders, keep the line extra light.
💡 Tip: Make the shoulders about twice as wide as the head. Narrow shoulders leave long hair nowhere to fall.
Step 3: Place the hairline, the part and the volume
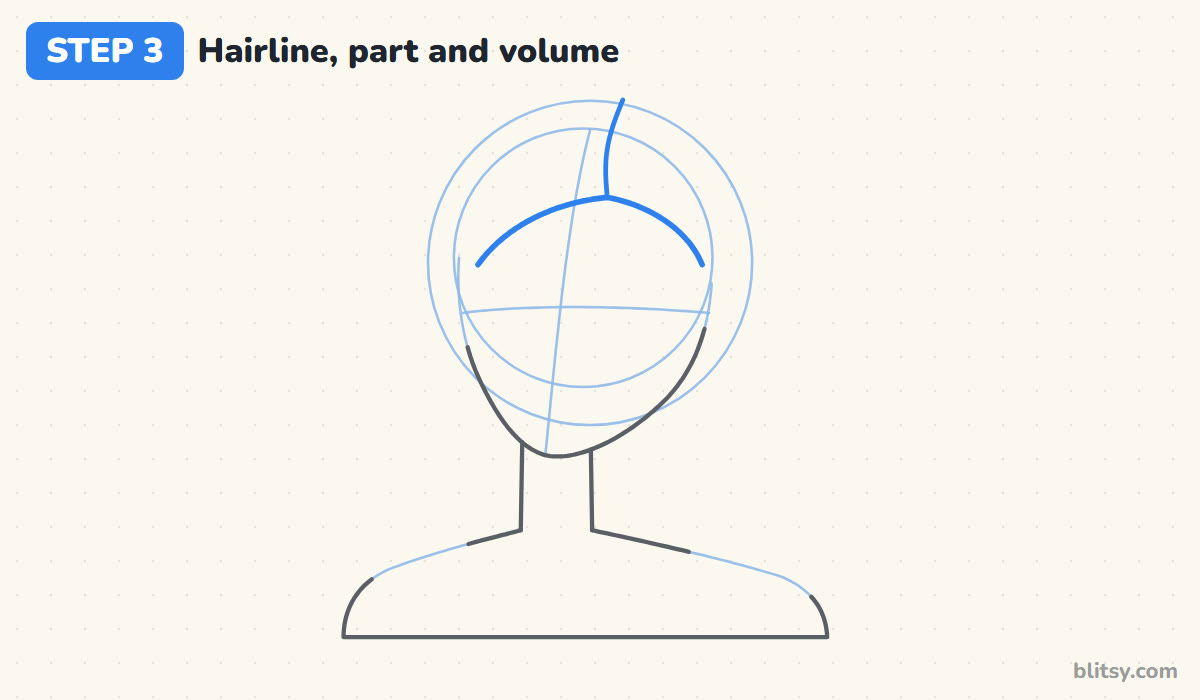
Draw the hairline as an arch across the forehead, from temple to temple, peaking a bit right of center. From that peak, run a short curved part line up and back. Then add a second, bigger circle around the head. Hair sits on top of the skull, so I let its outline float about a finger's width above it.



💡 Tip: Leave a gap between the two circles on top. Hair drawn tight to the skull is what makes the helmet look.
Step 4: Sketch two S-shaped flow lines
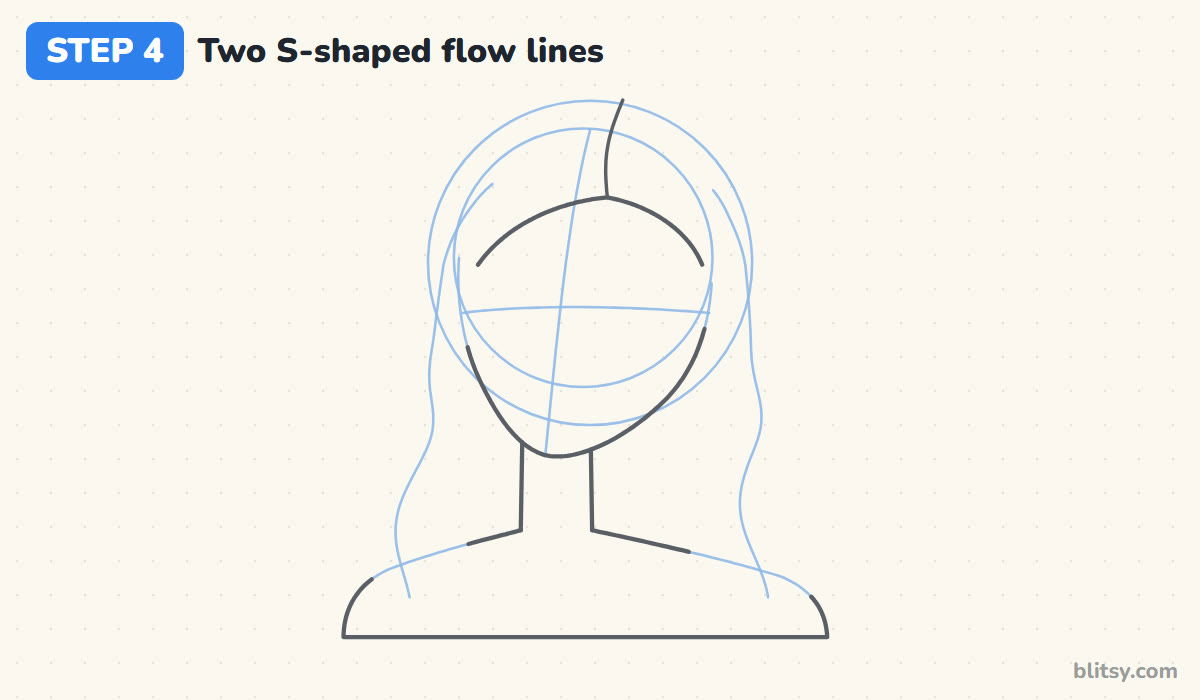
Before any real hair, show yourself where it goes. Start each line near the part, curve it over the head, then let it fall past the face in a lazy S down to the shoulders. One line per side is plenty. Tighter S shapes give curlier hair, straighter ones give smooth hair.
💡 Tip: Draw the flow lines with your whole arm, not just your fingers. The curves come out smoother.
Step 5: Draw the big outer hair shape
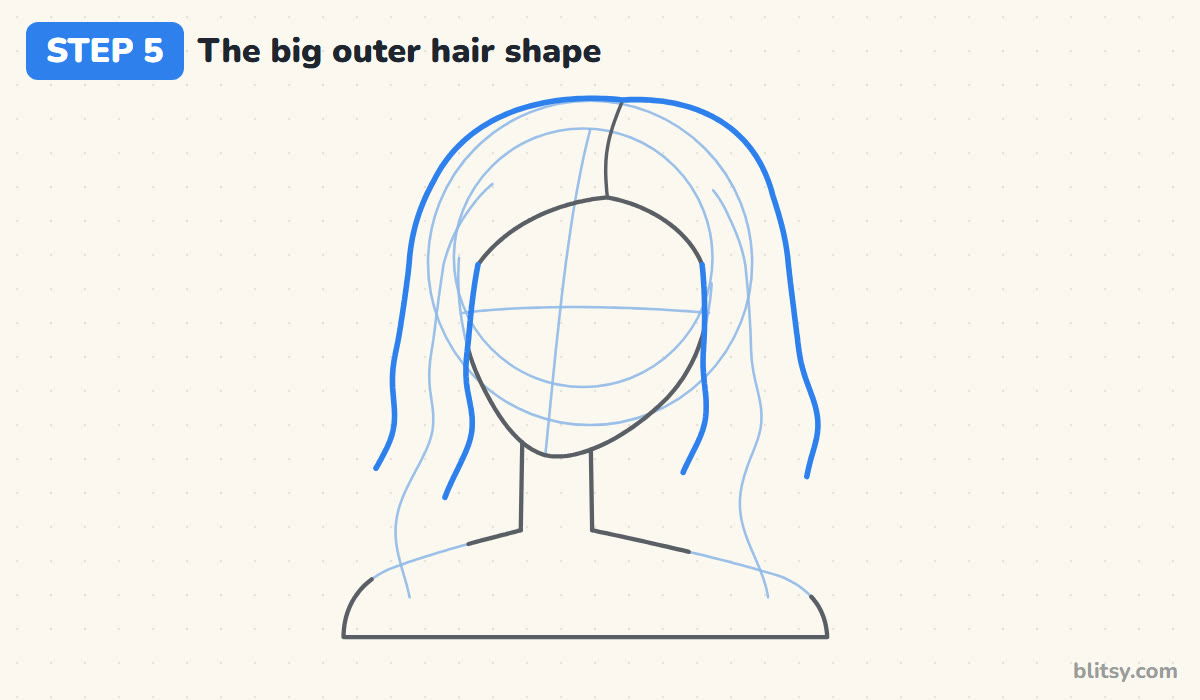
Starting at the part, follow the bigger circle around the head and carry the line down each side, echoing your flow lines. Then draw the inner edges, from each temple down beside the cheeks and past the neck. Leave the bottom open for now. I think of this stage as drawing one big wavy sack of hair.
💡 Tip: Let the near side (on the right here) look wider than the far side. That small difference sells the turn of the head.
Step 6: Split it into S-shaped clumps with pointed tips
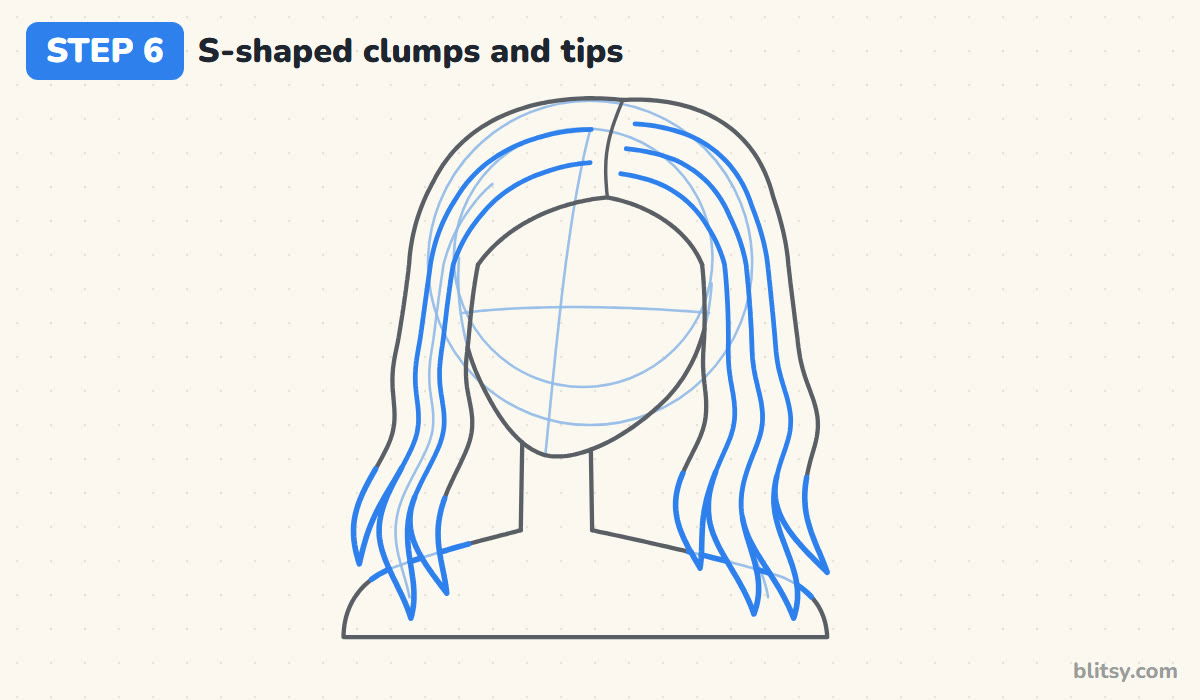
Now cut the big shape into clumps. Draw two or three long curves inside each side, starting near the part and following the same S-wave. Close every clump at the bottom with a pointed tip, and make the tips different lengths so the ends don't look trimmed with a ruler. Finish the bits of shoulder line that show between tips.
💡 Tip: Real hair rarely splits into equal pieces. Make one clump fat and the next one thin.
Step 7: Add a few loose flicks
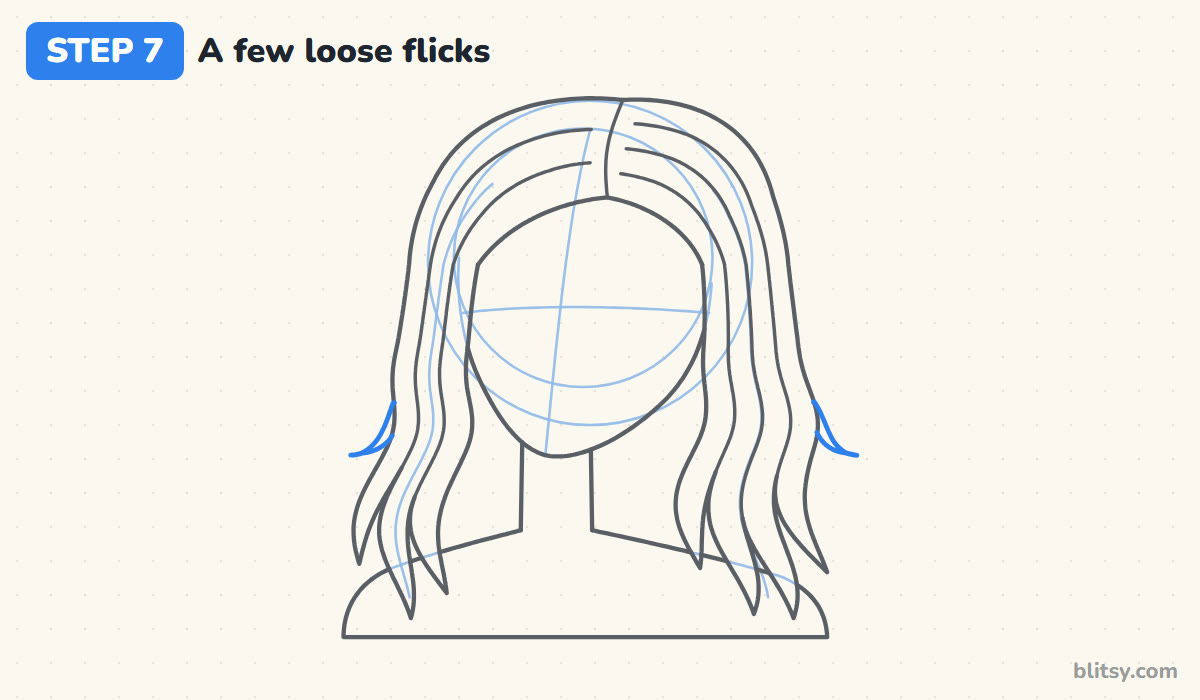
Pick two spots on the outside edges, around shoulder height. From each, let a slim leaf shape peel away from the hair and curl outward. Flicks break up the outline and make the hair feel light. Two or three are enough; more starts to look messy.

💡 Tip: Start each flick by following the edge for a moment, then bend it away. Sharp corners look like thorns.
Step 8: Draw the eyes, brows and a closed smile
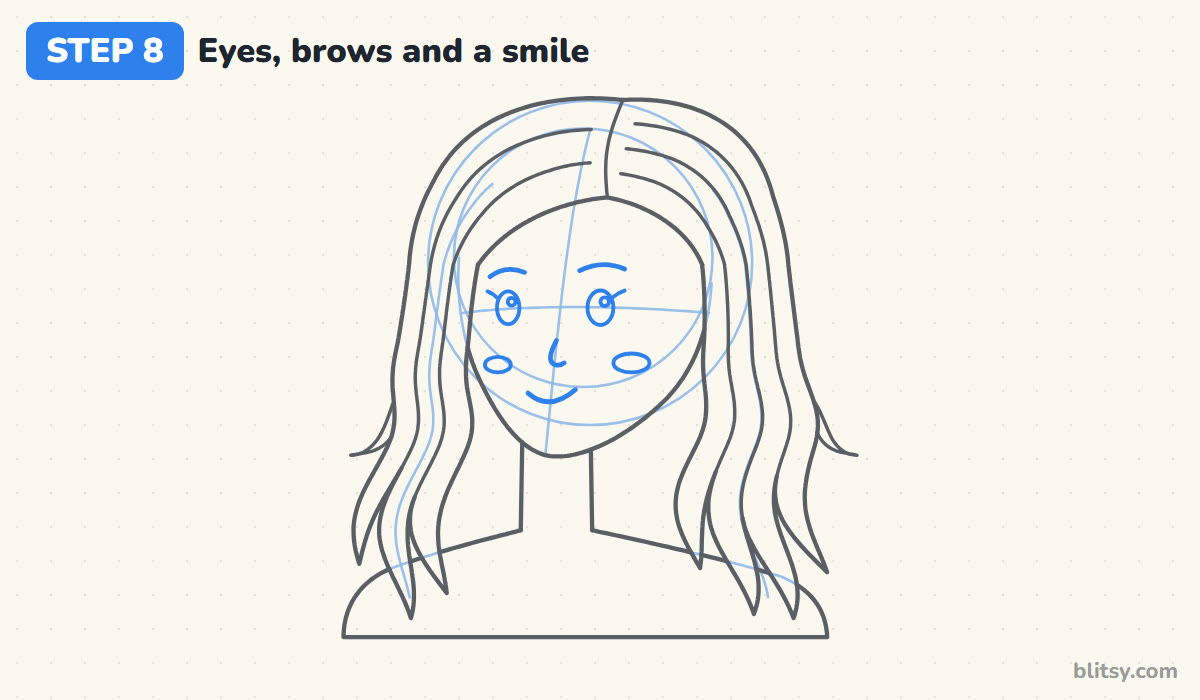
Put two tall ovals on the eye line, the far one a little smaller, with a lash flick at each outer corner and a small circle for shine. Arch the eyebrows just above them. A little hook makes the nose; add a gentle smile and two oval cheeks. Keep the face simple, because today the hair is the star.
💡 Tip: Leave a full eye's width between the two eyes. Close-set eyes make faces look worried.
Step 9: Add strand lines inside each clump
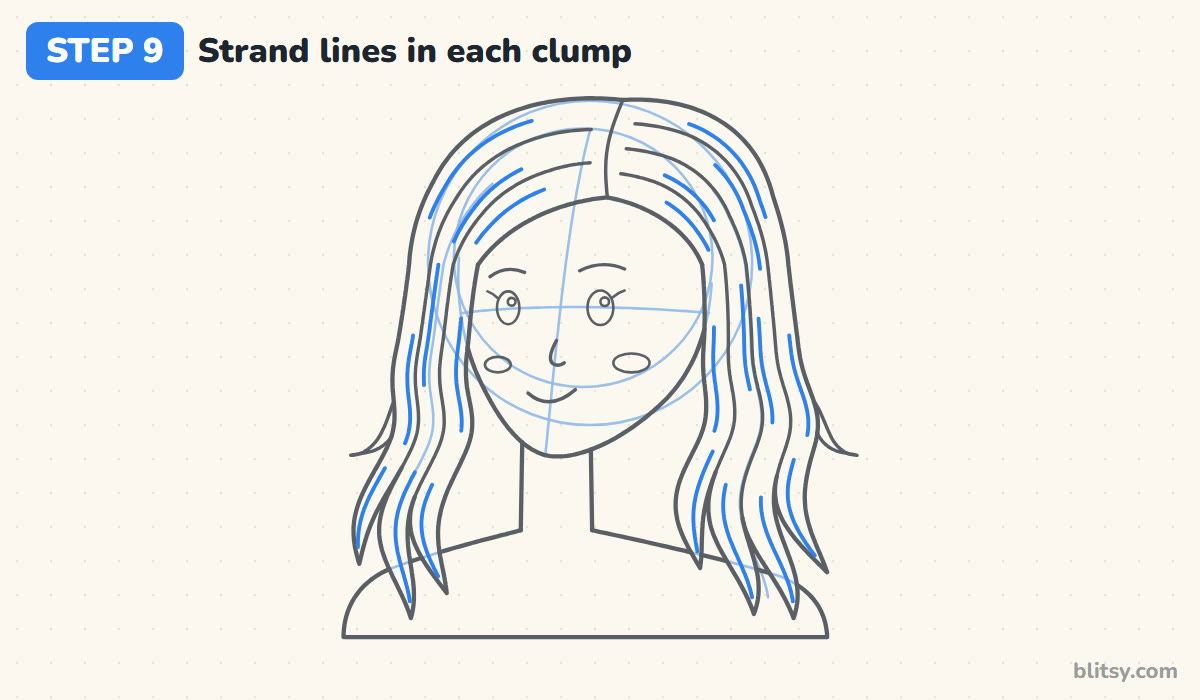
Here's where most beginners overdo it. Give each clump just three short lines that follow its curve: one near the top, one in the middle, one running into the tip. Start and stop them at different spots, and keep them off the clump edges. Gaps are what let hair look soft.
💡 Tip: If you can't decide whether to add another strand line, don't. Fewer lines look shinier.
Step 10: Map out the light and shadow shapes
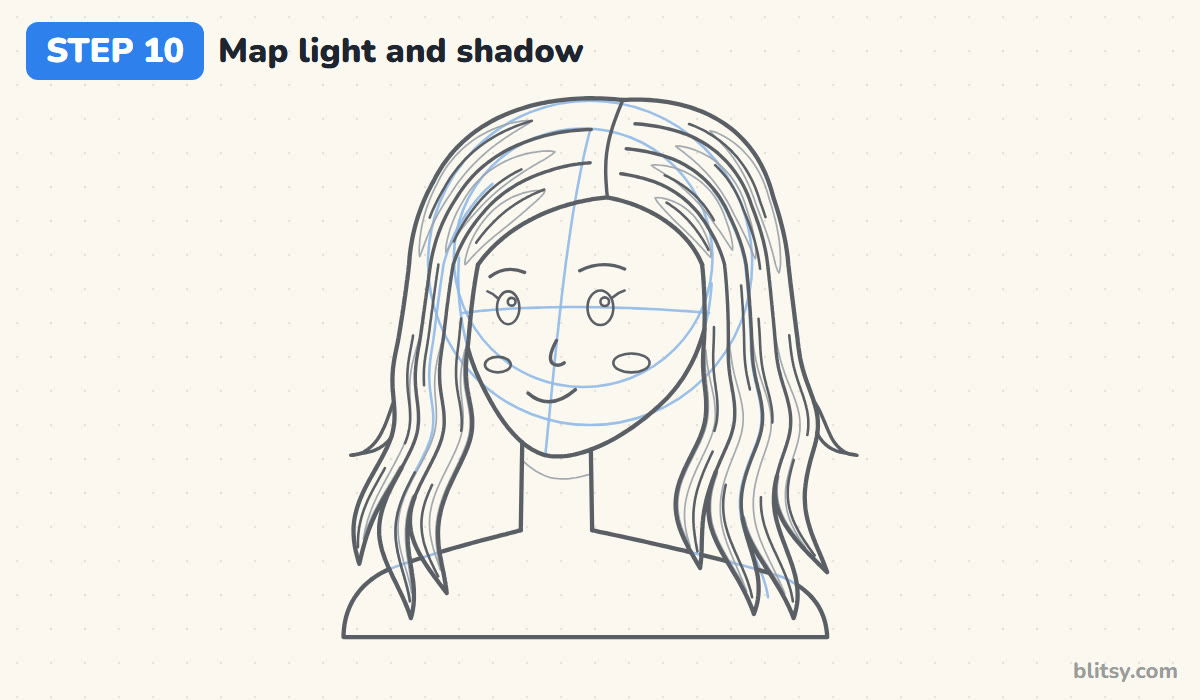
Lightly outline where the color will change. On top of the head, draw a long almond shape in each clump, all at about the same height, so together they form one shiny band around the crown. Lower down, mark a thin strip along one side of each clump, plus a small shadow on the neck under the chin.
💡 Tip: The shine band goes on the roundest part of the head, never right at the part line.
Step 11: Ink the lines and erase the guides
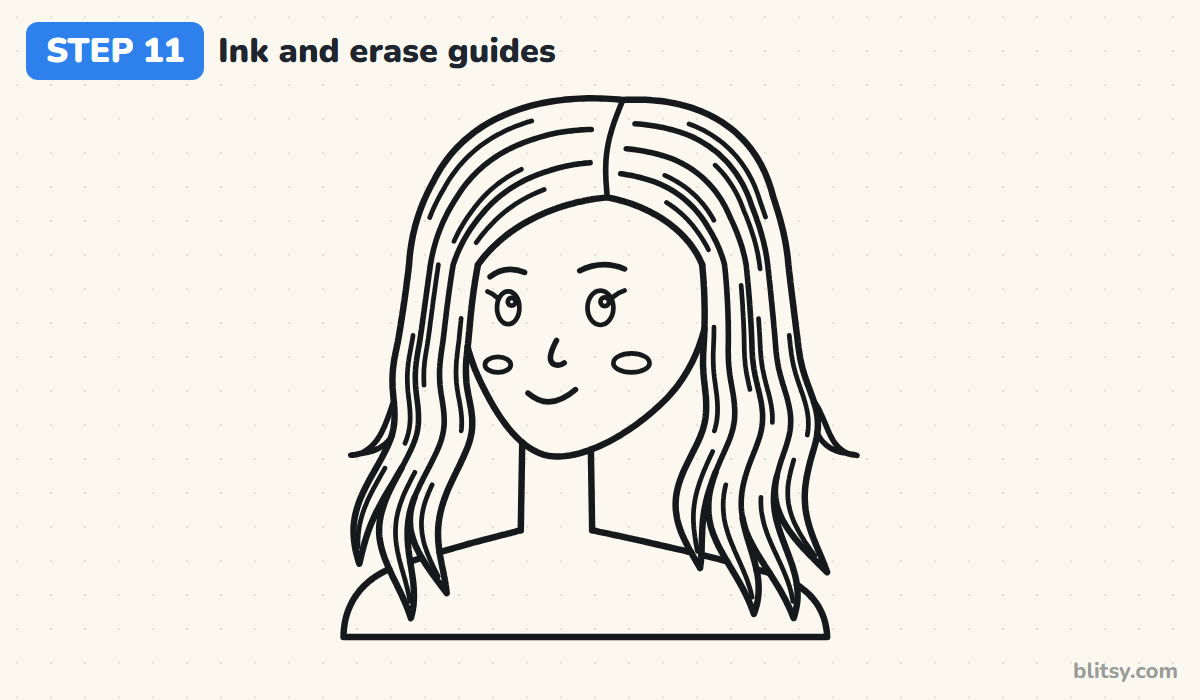
Go over every keeper line with your black pen: the face and neck, the shoulders, the whole hair outline with every clump, tip and flick, the strands and the face details. Skip the circles, flow lines and the light map. Give the ink a minute, then erase all the pencil.

💡 Tip: Ink the long hair curves in one smooth pull from root to tip. Stopping halfway leaves a blob.
Step 12: Color the hair and the rest
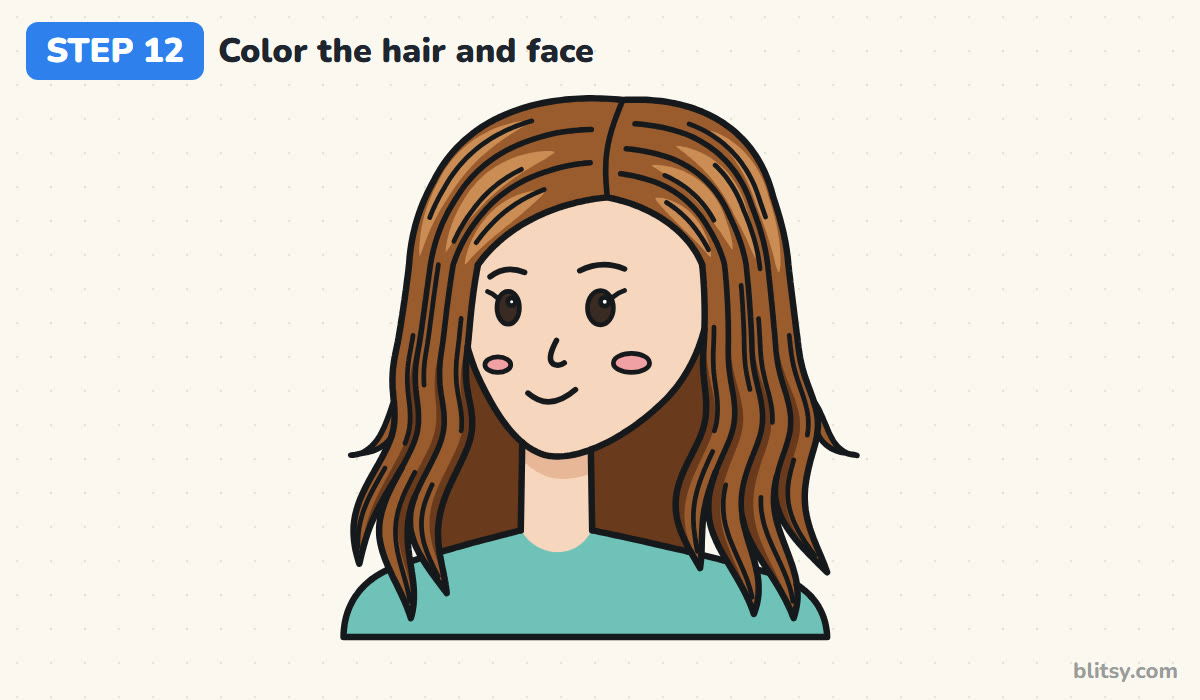
Fill the face and neck with peach and the shirt with teal. Color the hair in warm brown, always stroking the way it grows. Layer dark brown into the shadow strips, the hair behind the neck and the shadow under the chin. My last touch is light brown in the shine band, pink cheeks and dark eyes, leaving the white dots empty.
💡 Tip: Color the light shine band last and softly, so the brown underneath doesn't smudge into it.
Why Hair Drawings Turn Stiff or Messy
- Drawing every single strand. Hundreds of lines read as straw. Build the big shape and the clumps first, then add only three strand lines per clump.
- Hair glued to the skull. Leave room above the head circle so the hair has thickness. The bigger volume circle in step 3 takes care of it.
- Clumps all the same size. Equal stripes look like a curtain. Mix wide clumps with narrow ones and give the tips different lengths.
- Strand lines touching the edges. Lines that run edge to edge chop the hair into tubes. Keep them inside each clump with gaps at both ends.
- Coloring across the flow. Back-and-forth strokes sideways fight the waves. Always color hair from root to tip.
New Hairstyles to Try With the Same Method
Once this feels easy, keep the head and change only the hair. For a short bob, stop the outer shape at the chin and curl the tips inward. A ponytail is the same idea with every clump flowing back to one tie, and tight curls swap the S-waves for small stacked C-shapes. The braid drawing tutorial breaks a plait into simple shapes too, and how to draw a face step by step helps when you want a more detailed face under all that hair.
Free Hair Coloring Page and Printable Lesson
Prefer pencil and paper? The free hair coloring page has the finished girl in bold outlines, a colored example and a key for every shade. The step-by-step PDF guide holds all twelve steps with their tips, two to a page, so you can draw along without a screen.
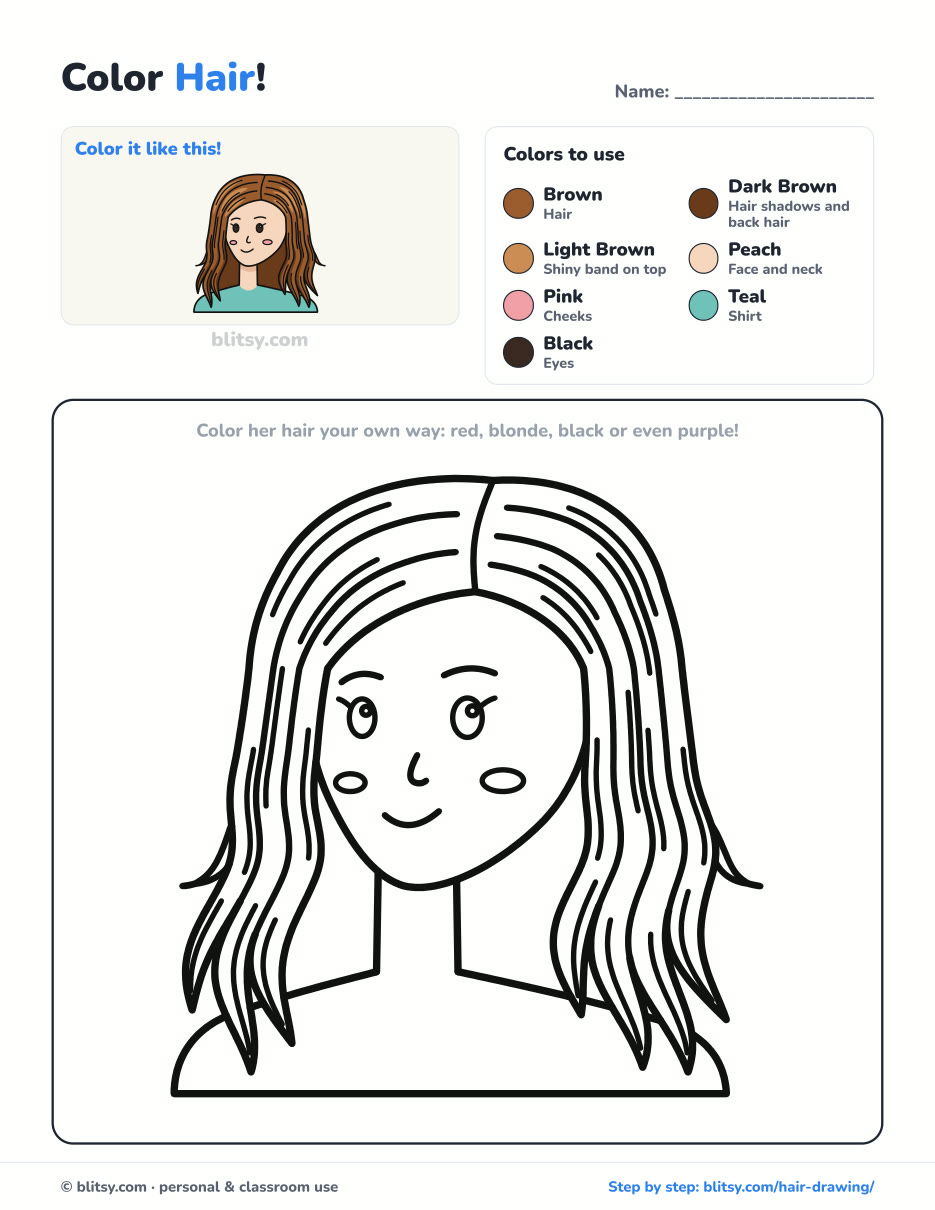
Black outlines with a colored example and the color names at the top. Ready to print and color.
⬇️ Download Coloring PageEvery step picture with its instructions and tips, to keep beside your paper while you draw.
⬇️ Download Drawing Guide📱 On a phone? Tap a download button, then open the file and choose Share → Save to Files or Print. On a computer, the PDF opens or saves straight to your Downloads folder.
Keep the Hair Steps on Your Pinterest Board
Hair Drawing Questions I Get Asked a Lot
What is the easiest way to draw hair?
Draw it as one big shape first, then split that shape into a few clumps, and add only a couple of strand lines inside each clump. Working big to small keeps it neat.
How do you draw wavy hair?
Sketch an S-shaped flow line down each side, then make the outline, the clump curves and the tips follow that same S. Every line repeating the wave is what makes it read as wavy.
How do you make hair look shiny in a drawing?
Leave a lighter band across the roundest part of the head, made of one long almond shape per clump, and make the underside of each clump darker. The contrast between the two does the work.
How long does it take to learn to draw hair?
This lesson takes about 35 minutes. Drawing the same head with three or four different hairstyles over a week or so usually makes the method feel natural.
Next time, try the same girl with a curly puff or a high ponytail and see how far one head can go. 💇✏️
Related posts:
 How to Draw a Braid Step by Step (Easy Hair for Beginners)
 How to Draw a Car Step by Step (Easy Drawing for Beginners)
 How to Draw Godzilla Step by Step (Easy Kaiju for Beginners)
 How to Draw a Whale Step by Step (Easy for Beginners)
 How to Draw a Rat Step by Step (Easy for Beginners)
 How to Draw an Arctic Fox Step by Step (Easy for Beginners)
 How to Draw a Shark Step by Step (Easy for Beginners)
 How to Draw a Dog Step by Step (Easy Side View for Beginners)
 How to Draw a Chicken Step by Step (Easy for Beginners)
 How to Draw a Fish Step by Step (Easy Goldfish for Beginners)
 How to Draw a Snowman Step by Step (Easy for Beginners)
 How to Draw a Crow Step by Step (Easy for Beginners)

