
A heart looks like the easiest shape in the world until you try one and the left bump comes out bigger than the right. The trick is to stop drawing it as one swoop. Here you'll learn how to draw a heart step by step from two circles and a V, which keeps both halves the same size without any guessing. Once the outline is right, we'll give it a dark side and a shine so it looks puffy, then I'll show you three little hearts that use the same method.
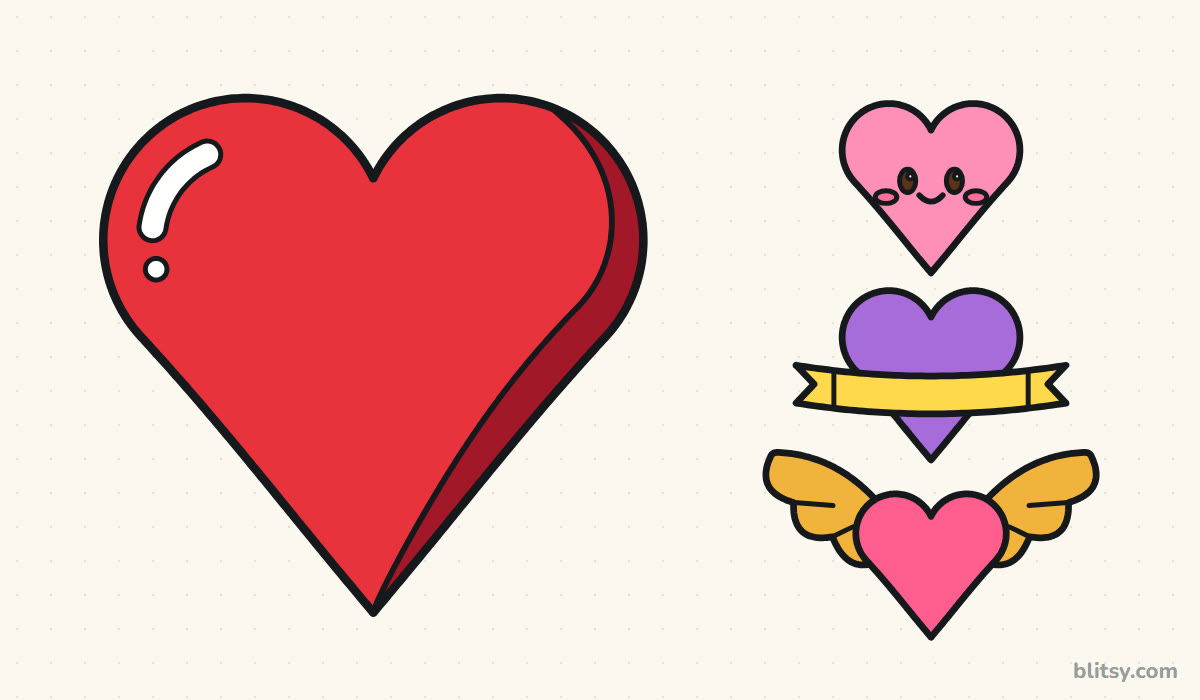
New work for every step appears in bright blue, while older lines fade to gray. The pale blue helper shapes get rubbed out in step 9.
Quick overview
⏱️ Time: 15 to 25 minutes
🎯 Level: very easy, fine for kids from about 5
✏️ Steps: 10
❤️ You'll draw: a glossy 3D heart plus a cute heart, a banner heart and a heart with wings
Tools for a Neat, Matching Heart
- A pencil you can press lightly
- A soft eraser
- Two coins or bottle caps of the same size (optional, for tracing the circles)
- A ruler for the center line and the V
- A black marker or fineliner
- Crayons, markers or colored pencils in red, dark red, pink, hot pink, purple, yellow, gold and brown
- Plain paper, turned sideways
If you only have a red crayon, press hard for the dark side and lightly for the rest; it still looks shaded.
How to Draw a Heart Step by Step
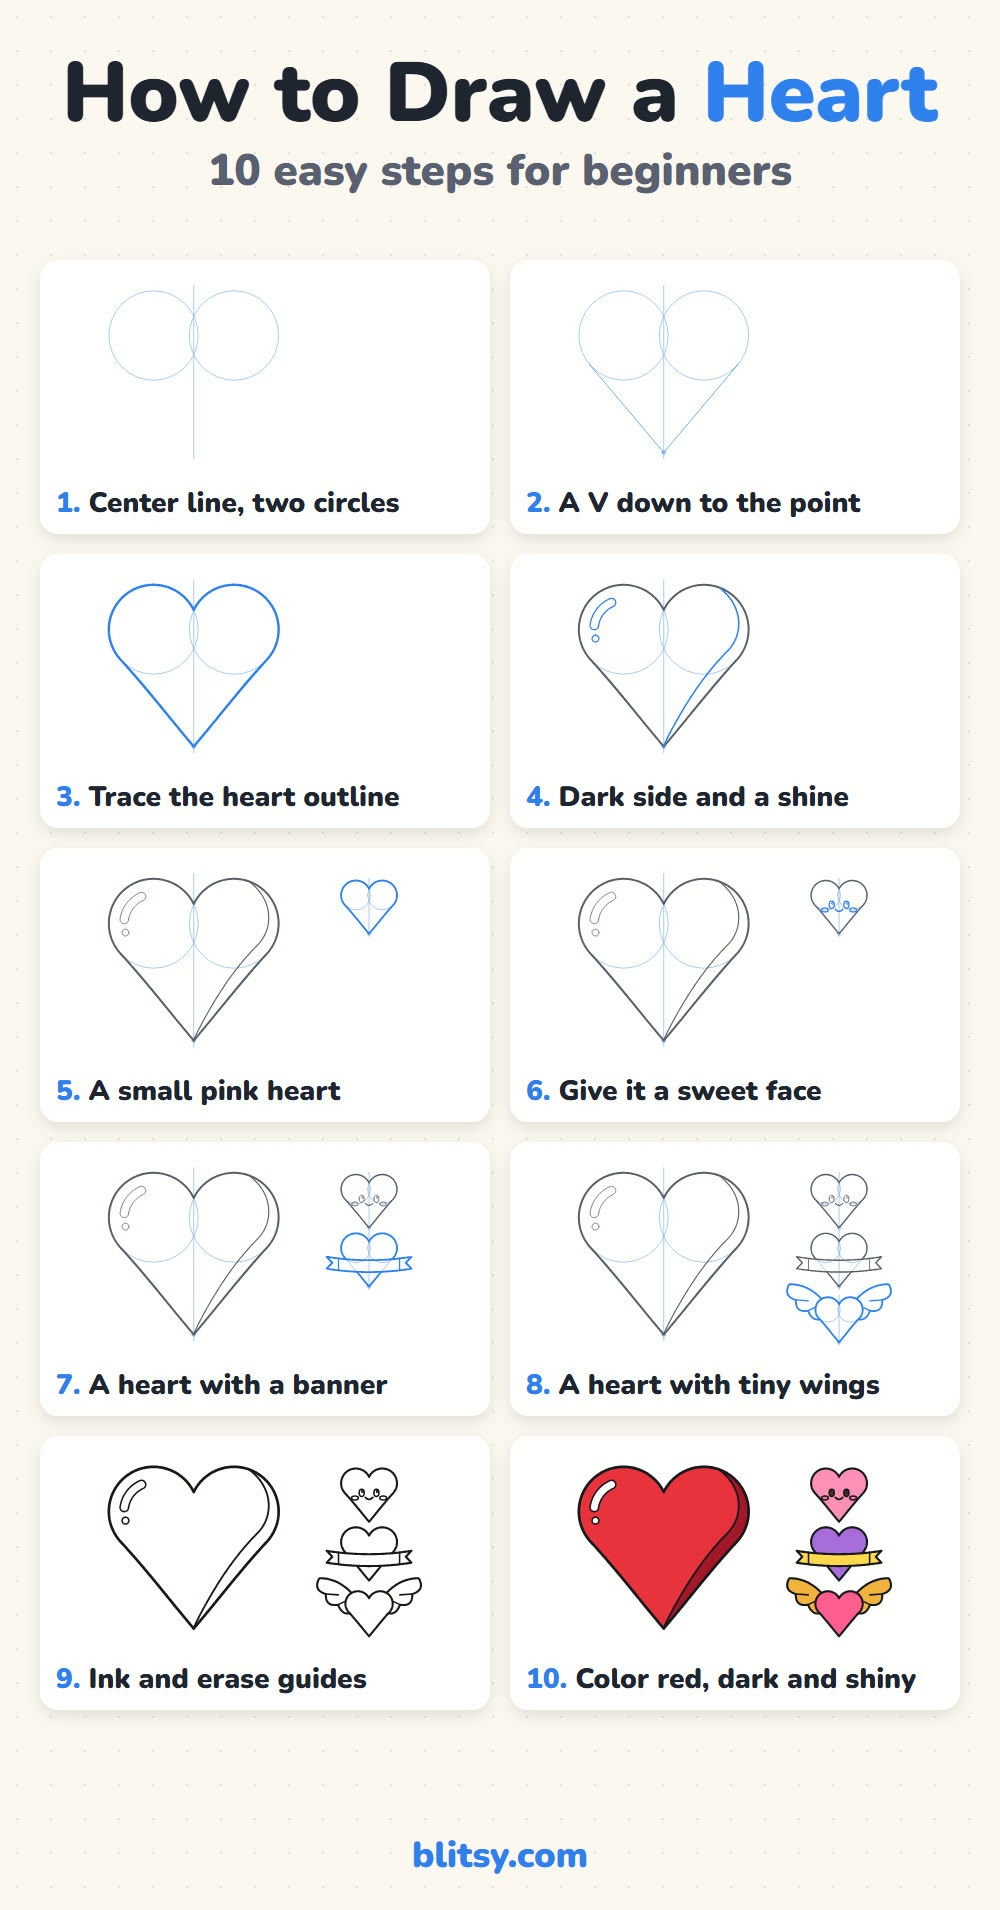
Step 1: Draw a center line and two circles
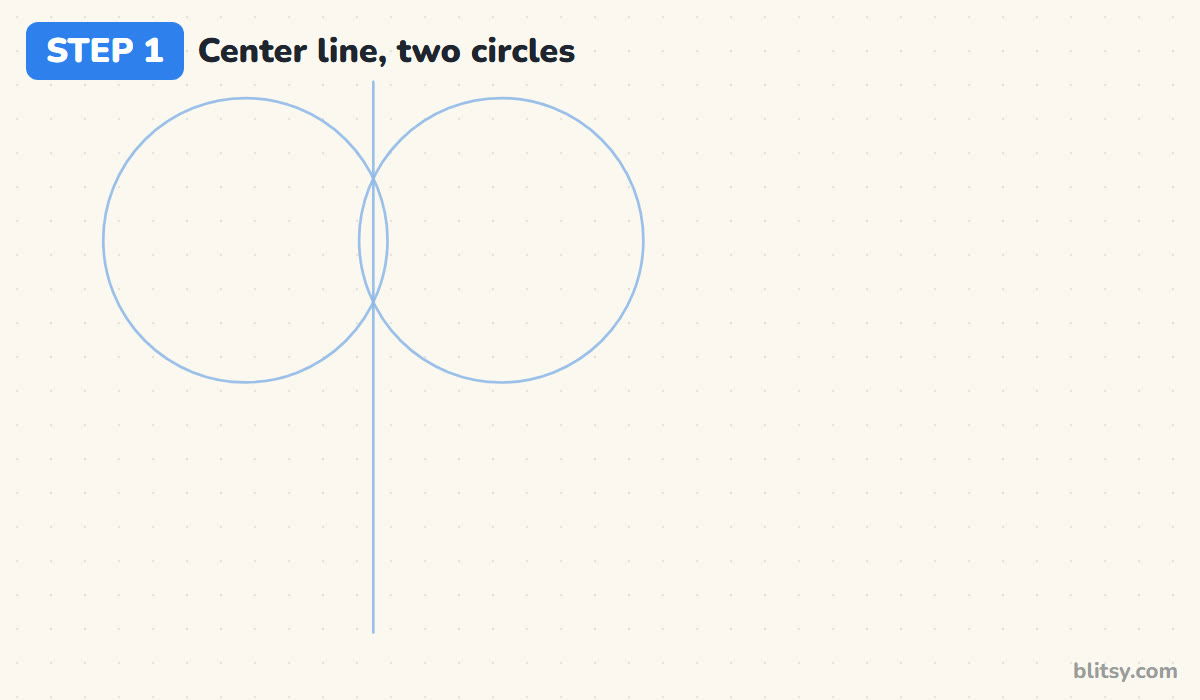
Draw a light vertical line a little left of the middle of your page; it is the fold line of your heart. Near the top of it, draw two circles of the same size, one on each side, overlapping a tiny bit across the line. I like tracing two matching coins here, because two equal circles are the whole secret of an even heart.
💡 Tip: Keep the circles at the same height; a ruler laid across their middles shows it at once.
Step 2: Add a V down to the point
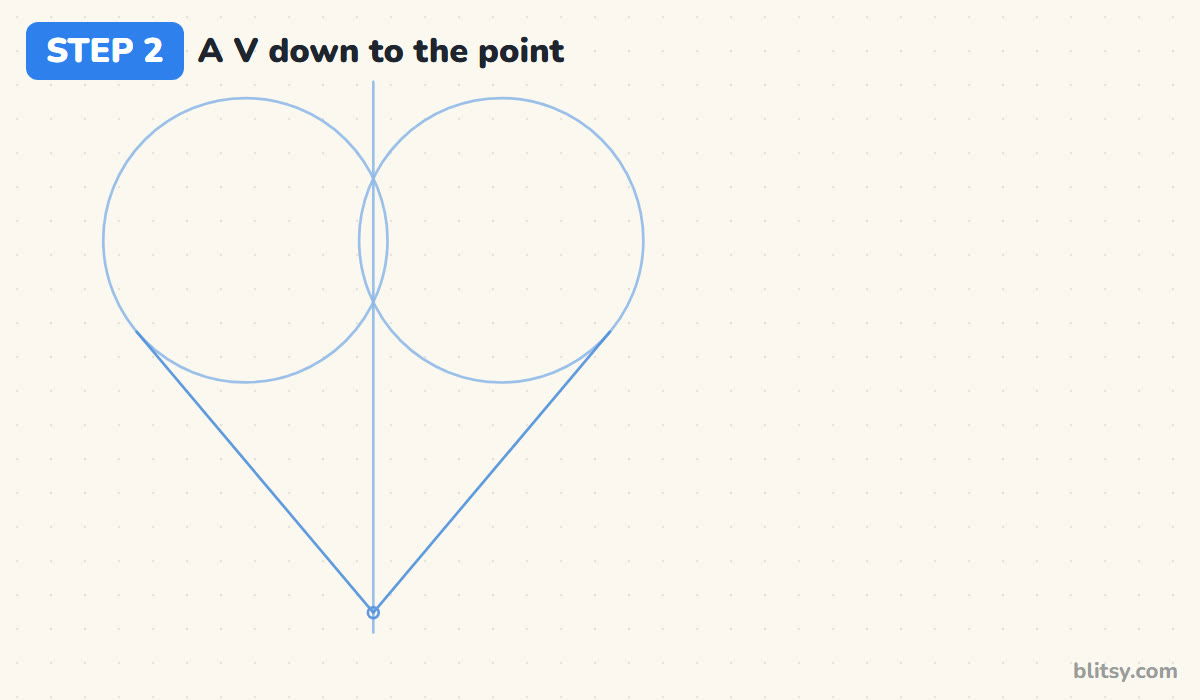
Mark a dot on the center line a little less than one circle's width below the bottom of the circles. From that dot, draw a straight line up to the outer edge of each circle so it just touches it. You now have something like an ice cream cone holding two scoops. I measure that drop with the ruler rather than guessing it.
💡 Tip: A lower dot makes a tall, slim heart; a higher one makes a short, chubby heart.
Step 3: Trace the heart outline
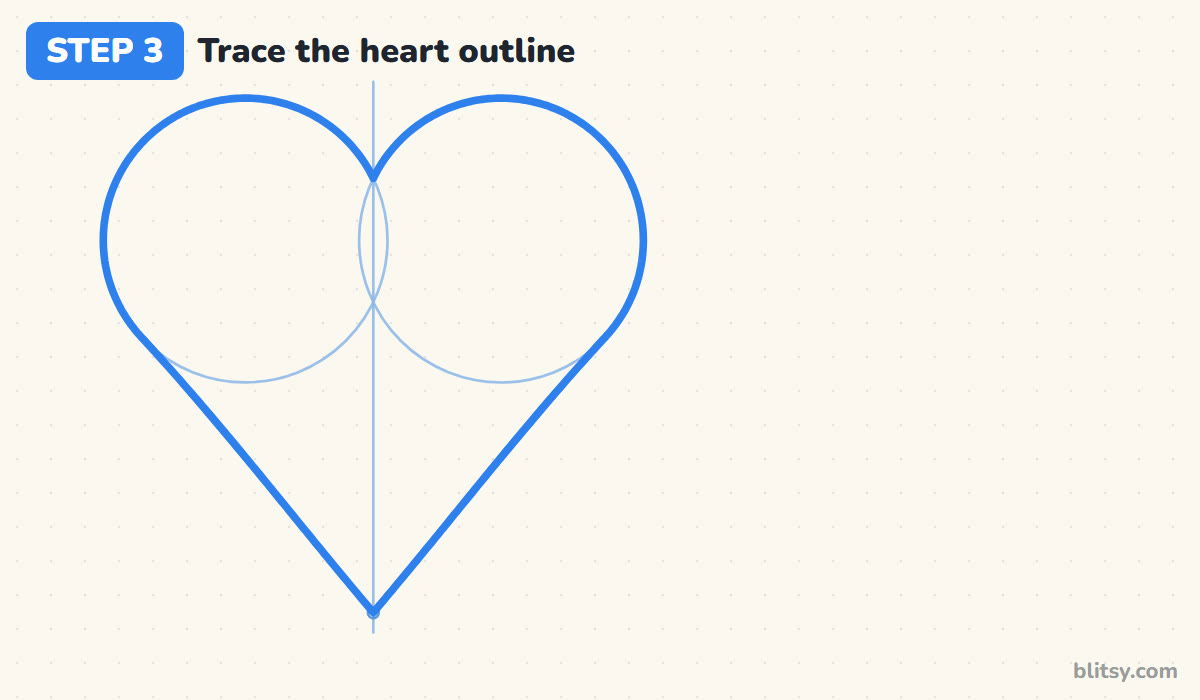
Now press a bit harder. Start at the dip where the circles cross, follow the top of the right circle around to the V, then run down the line to the point. Repeat on the left side. Skip the inner halves of the circles completely. The dip at the top and the point at the bottom should both sit exactly on the center line.




💡 Tip: Draw each side in the same direction, top to bottom, so both halves feel the same in your hand.
Step 4: Mark the dark side and the shine
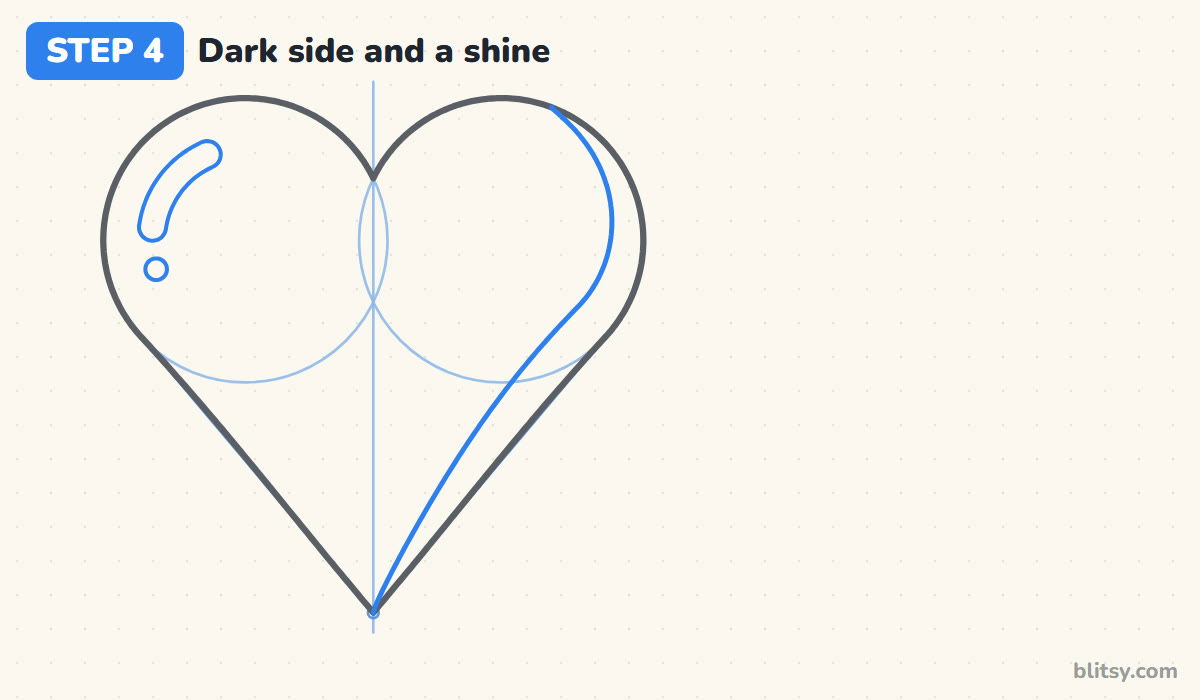
I find this is the step that changes everything. To make the heart look puffy, it needs a shadow side. Inside the right edge, draw a curve that starts at the top of the right bump, swings inward a finger's width at its fattest, then thins out until it meets the point. On the upper left bump, draw a small curved bean and a dot for the shine. Light and shadow on opposite sides is what makes it look round.
💡 Tip: Keep the shine well away from the edge so a sliver of red shows around it.
Step 5: Draw a small pink heart
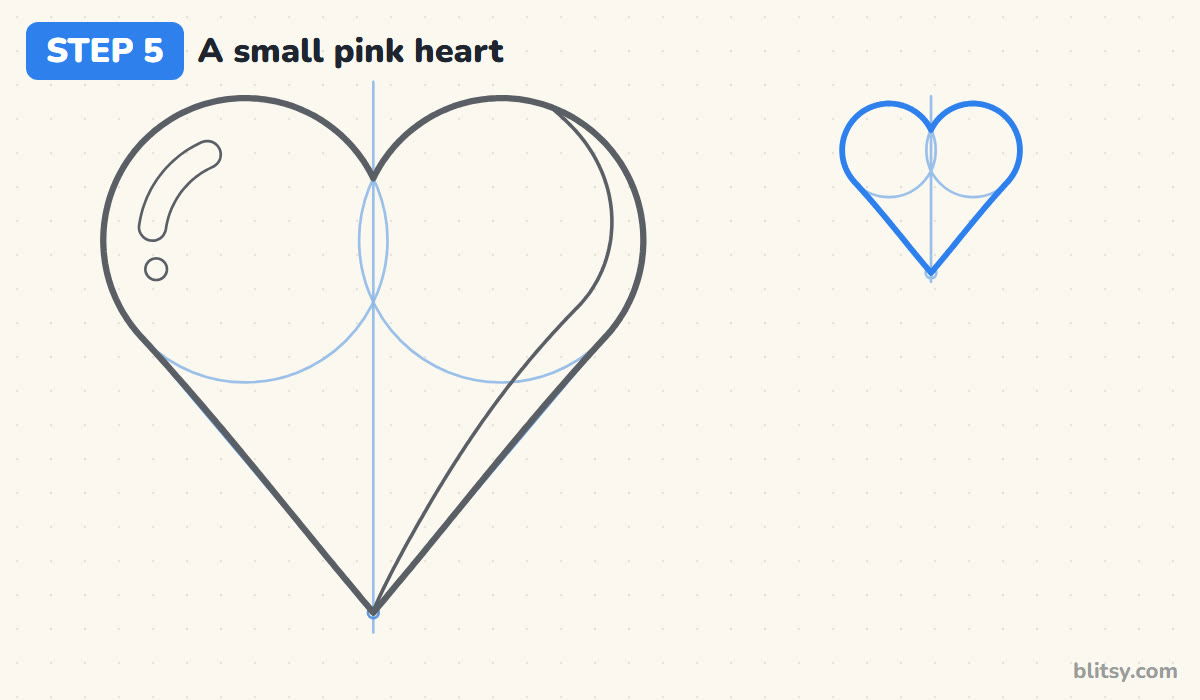
Move to the top right corner of the page. Build a smaller heart the same way: a short center line, two little circles and a V. Then trace the outline. A small one shows quickly whether the method has really stuck.
💡 Tip: Make it about a third as wide as the big heart so the page stays balanced.
Step 6: Give the little heart a sweet face
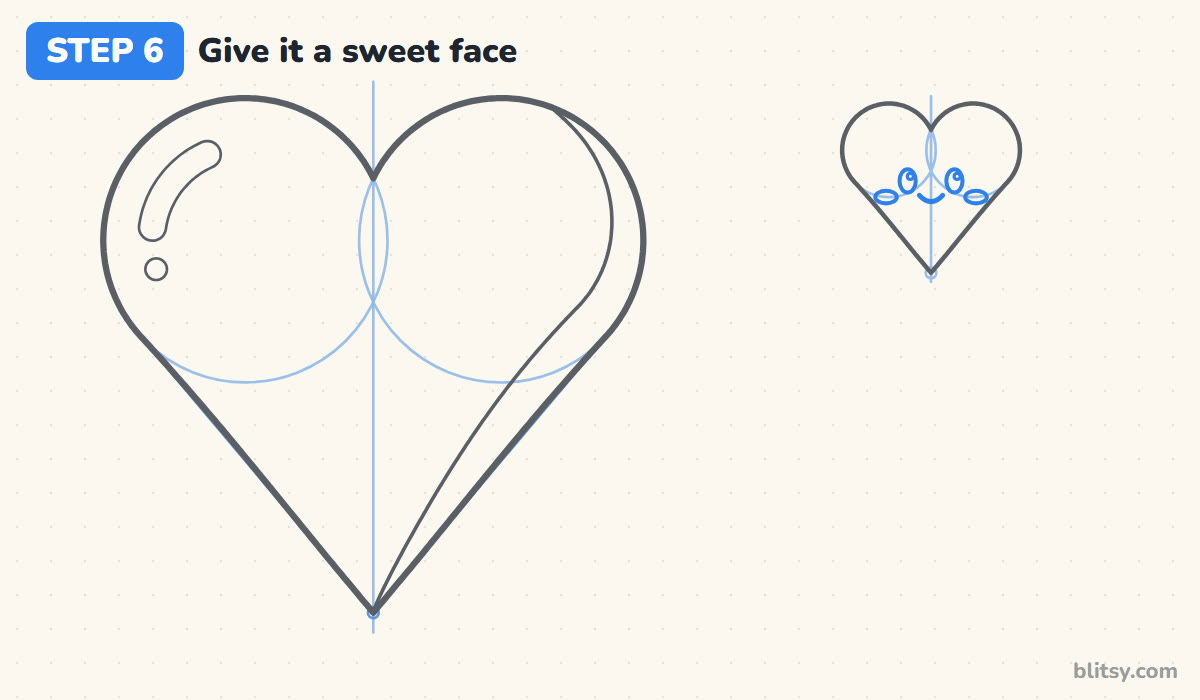
Put the face below the dip, in the widest part of the heart. Draw two tall oval eyes with a tiny circle of shine in each, a small U for the smile between them and two flat ovals for cheeks. In my experience, most beginners place the face too high, right where the bumps are, and then the heart looks squashed.
💡 Tip: Keep the eyes close together; a wide gap makes the face look sleepy.
Step 7: Wrap a banner across a second heart
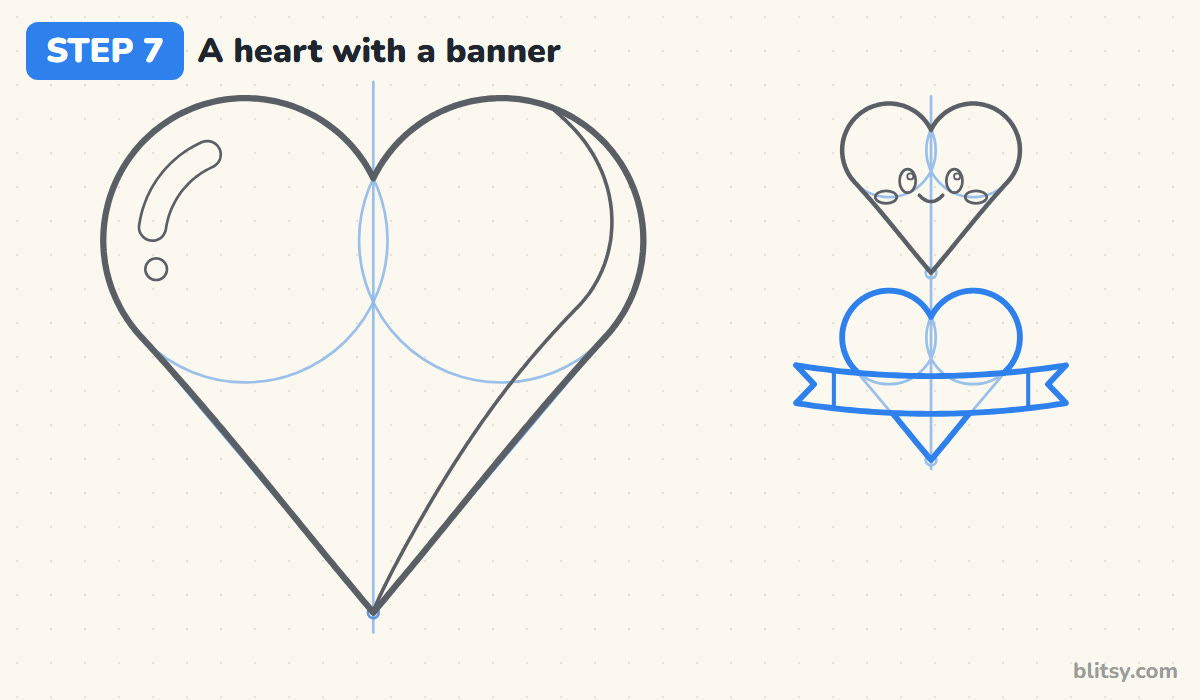
Under the cute heart, build another small heart with guides. Before you outline it, draw a long ribbon straight across its lower half, a little wider than the heart on both sides, with a gentle sag in the middle. Cut a V notch into each end. Then outline the heart only where it peeks out above and below the ribbon, and add a short line near each end to show the fold.




💡 Tip: Draw the ribbon first, so you never have to erase heart lines that it covers.
Step 8: Give the last heart tiny wings
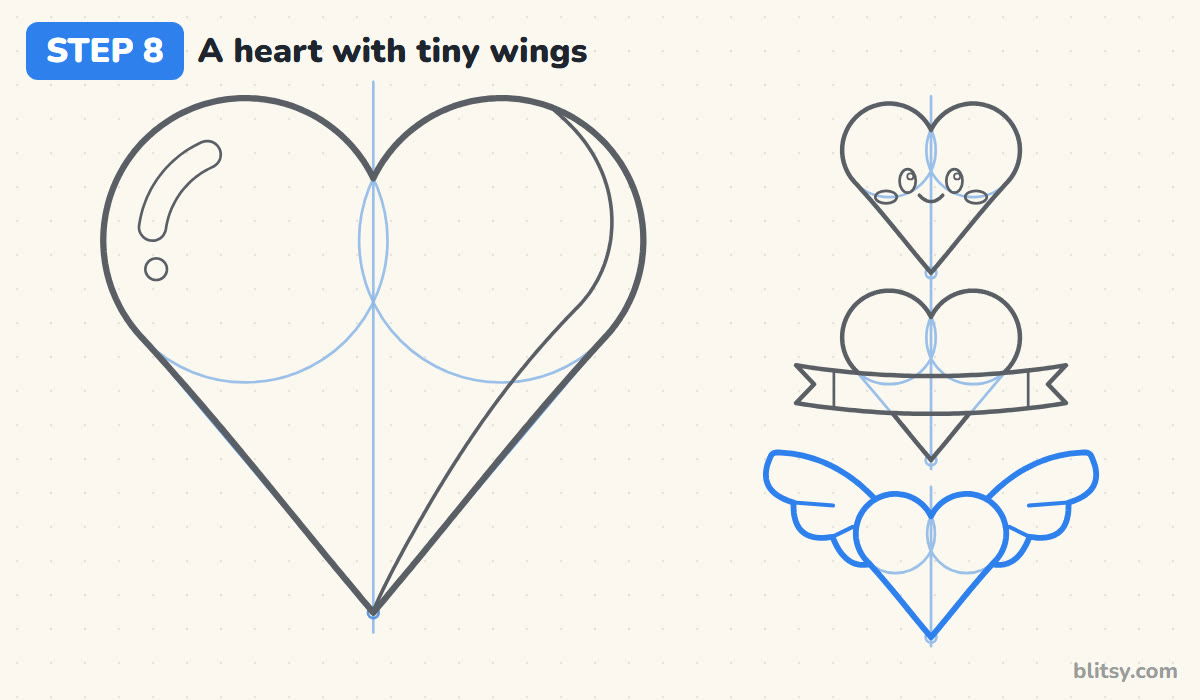
Build one more small heart at the bottom. From the side of each bump, sweep a curve up and out to a rounded tip, then come back toward the heart with three round bumps underneath, like the edge of a cloud. Add a short line between the bumps for feathers. The wings should tuck behind the heart, so stop their lines where they reach it.
💡 Tip: Draw the right wing, then copy it on the left by counting the bumps.
Step 9: Ink the lines and erase the guides
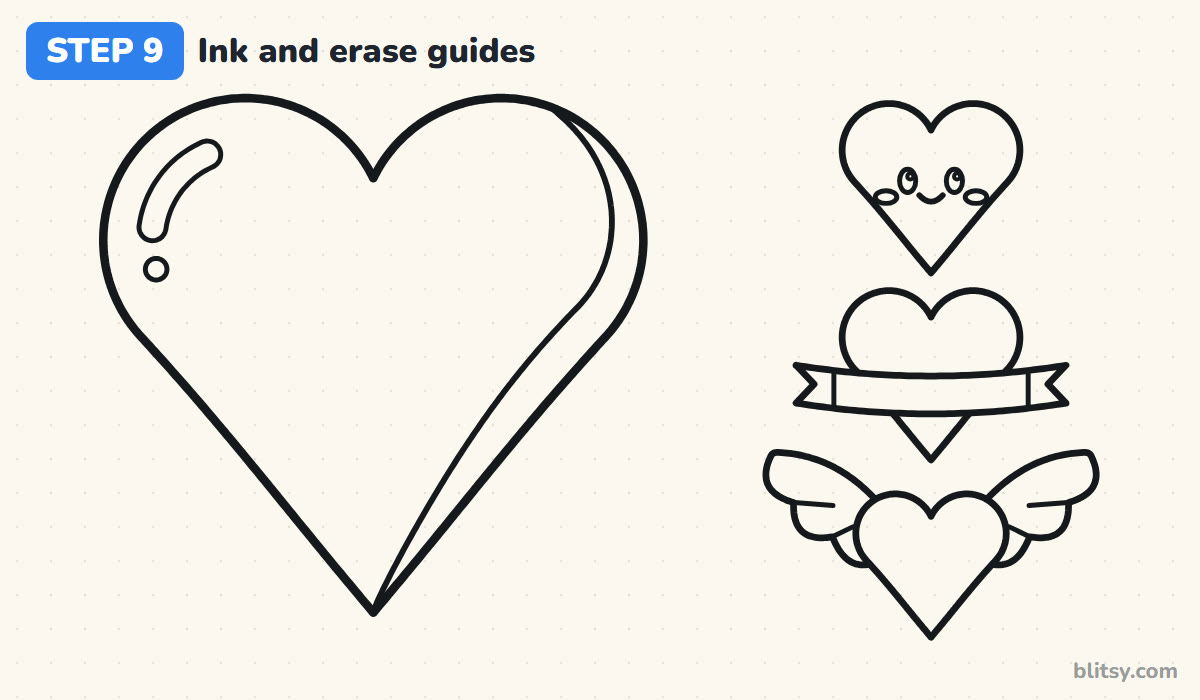
Trace every keeper line with a black marker: the big outline, the shadow curve, the shine, then the three small hearts with the face, the banner and the wings. I ink the big outline a little thicker than the details, which helps it stand out. Once the ink is dry, erase all the circles, center lines and V guides.
💡 Tip: Erase in one direction with light strokes so the paper doesn't crease.
Step 10: Color the hearts
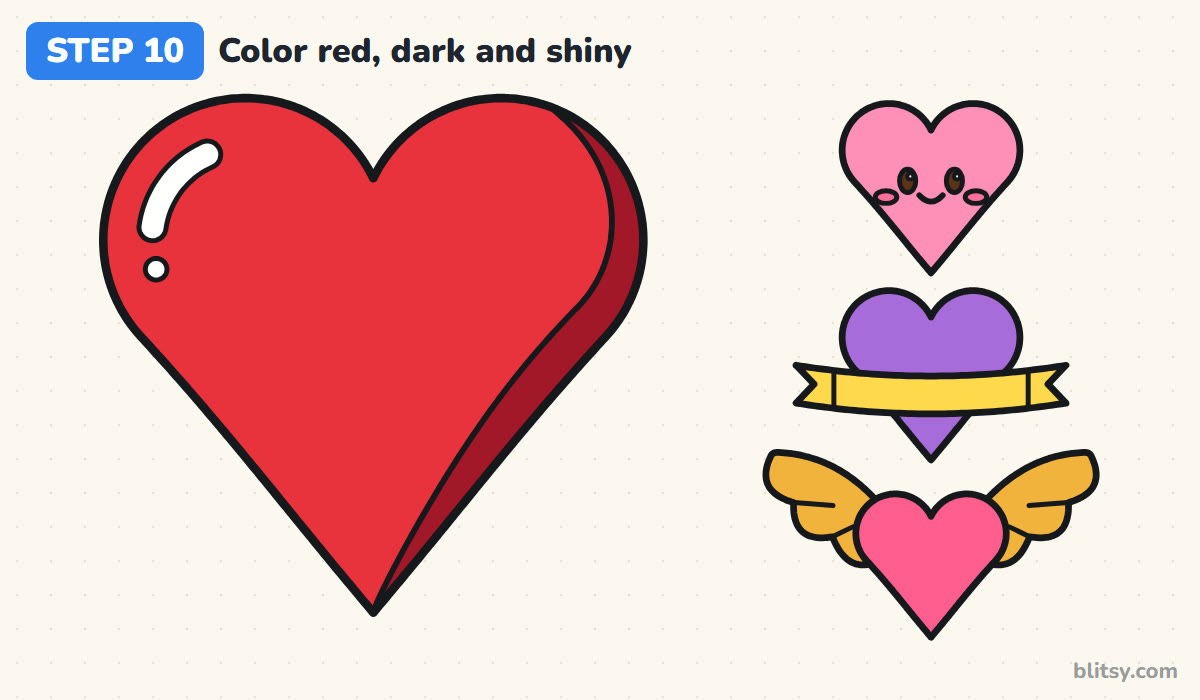
Color the big heart red and the strip along its right edge dark red, and leave the shine white. Then do the little ones: the face heart pink with brown eyes and rosy cheeks, the banner heart purple with a yellow ribbon, and the winged heart hot pink with gold wings. Leave the tiny eye shines white so the eyes sparkle.
💡 Tip: Color the dark strip first; it's easier to keep the lighter red neatly beside it.
Why One Side of the Heart Comes Out Bigger
- Two circles of different sizes. Even a small difference shows. Trace two identical coins or caps, or measure the circles with your ruler before drawing the V.
- Circles at different heights. The heart then looks like it's tilting its head. Lay a ruler across the middle of both circles to check they line up.
- A point that drifts off the center line. The heart leans to one side. Put the dot for the point right on the line before you draw the V.
- A deep, sharp notch at the top. If the circles barely overlap, the dip becomes a crack. Let them overlap a little so the dip stays soft.
- Shadow and shine on the same side. The heart looks flat again. Put the dark strip on one side and the shine on the other bump.
More Ways to Dress Up Your Heart
Once the circles and the V feel easy, try changing one thing at a time. Draw a zigzag down the middle for a broken heart, or put a second, smaller heart inside the first for an outline effect. A string hanging from the point turns any heart into a balloon. A name on the banner heart makes an instant card. If you want heart pictures that tell a little story, the love drawing tutorial is a good next stop, and the Valentine's Day drawing tutorial gives you a card to try your new hearts on.
Heart Coloring Page and Printable Drawing Steps
Want something to print? The heart coloring page shows a small colored version and the colors to use at the top, with a big bold outline below for crayons or markers. The step-by-step PDF guide holds all 10 steps and tips on a few pages. Both fit Letter and A4 paper.
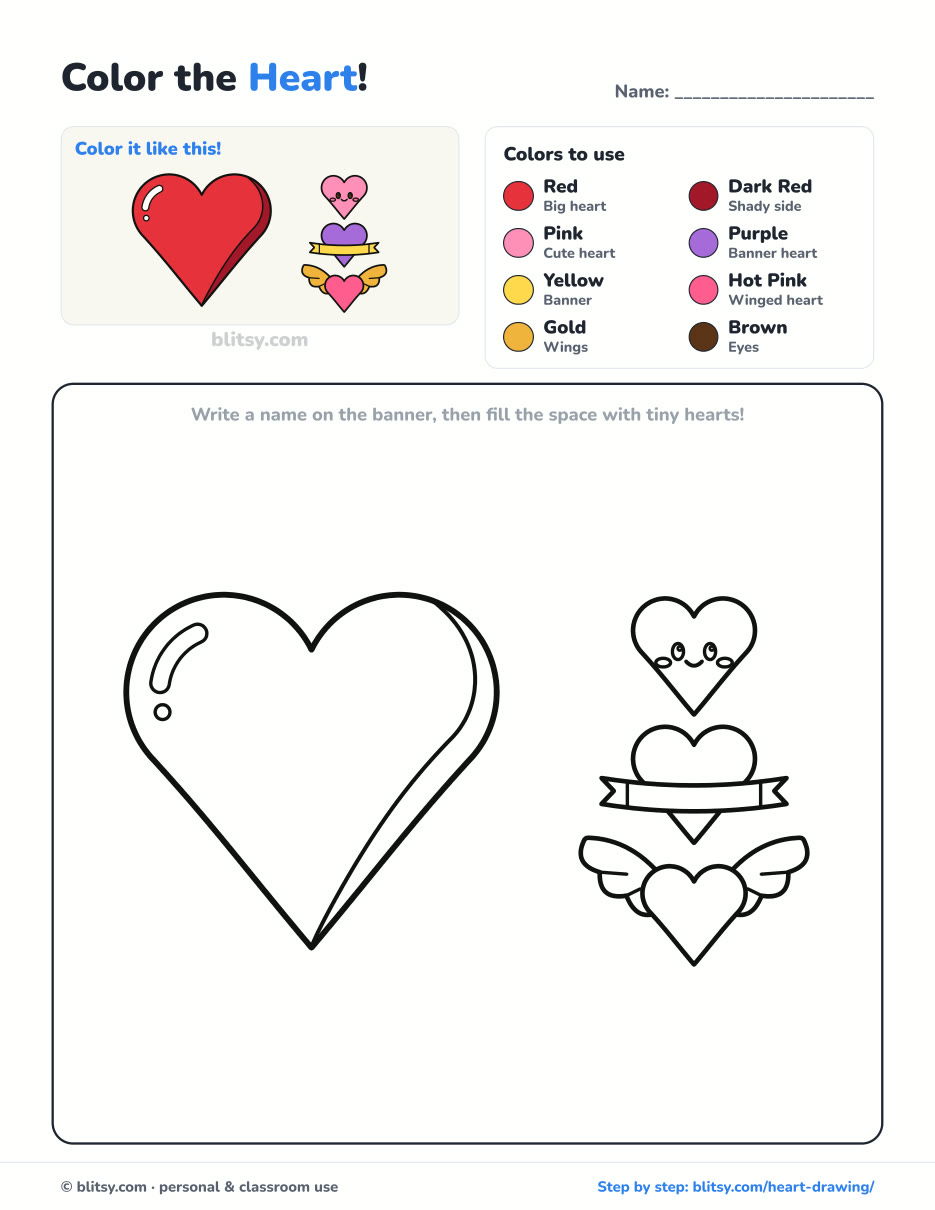
Black outlines with a colored example and the color names at the top. Ready to print and color.
⬇️ Download Coloring Page



Every step picture with its instructions and tips, to keep beside your paper while you draw.
⬇️ Download Drawing Guide📱 On a phone? Tap a download button, then open the file and choose Share → Save to Files or Print. On a computer, the PDF opens or saves straight to your Downloads folder.
Heart Steps on One Tall Pinterest Image
Heart Drawing Questions Parents and Kids Ask
What is the easiest way to draw a heart?
Draw two equal circles side by side, then a V from their outer edges down to one point below. Trace around the outside and erase the rest. The circles keep both halves the same size.
How do I make both sides of a heart the same?
Use a center line and two matching circles at the same height. For cut-out hearts, fold the paper in half, draw half a heart against the fold and cut along your line; it opens up perfectly even.
How do you make a heart drawing look 3D?
Add a darker strip along one side that is thick in the middle and thin at the ends, then put a white shine on the opposite bump. Light on one side and shadow on the other makes the shape look round.
Is this heart easy enough for young kids?
Yes. Kids around 5 can manage the big heart, especially if they trace coins for the circles. The wings and the banner take a steadier hand, so younger kids can skip them and just add the face.
Fill a whole page with hearts next time, each with its own face or wings, and see whose turns out the most even. ❤️
Related posts:
 How to Draw a Human Heart Step by Step (Easy Anatomy)
 How to Draw a Whale Step by Step (Easy for Beginners)
 How to Draw Lungs Step by Step (Easy Science Diagram)
 How to Draw a Pineapple Step by Step (Easy Crown and Slice)
 How to Draw Iron Man Step by Step (Easy Chibi for Kids)
 How to Draw a Dress Step by Step (Easy Party Dress)
 How to Draw a Chicken Step by Step (Easy for Beginners)
 How to Draw a UFO Step by Step (Cute Alien Saucer)
 How to Draw Flames Step by Step (Easy Campfire Drawing)
 How to Draw a Moon Step by Step (Sleepy Crescent + Phases)
 How to Draw a Sunflower Step by Step (Big and Bright)
 How to Draw a Fall Leaf Step by Step (Maple, Oak and Birch)

