
A ghost is one of the kindest first drawings you can try, because the whole body is basically one soft, bendy line. In this lesson I'll show you how to draw a ghost step by step, starting from a single circle and ending with a happy little spook that waves at you. There's nothing scary here: big shiny eyes, pink cheeks and an open grin keep it sweet enough for the youngest artists. A baby ghost and a small pumpkin come along at the end, so the page feels full.

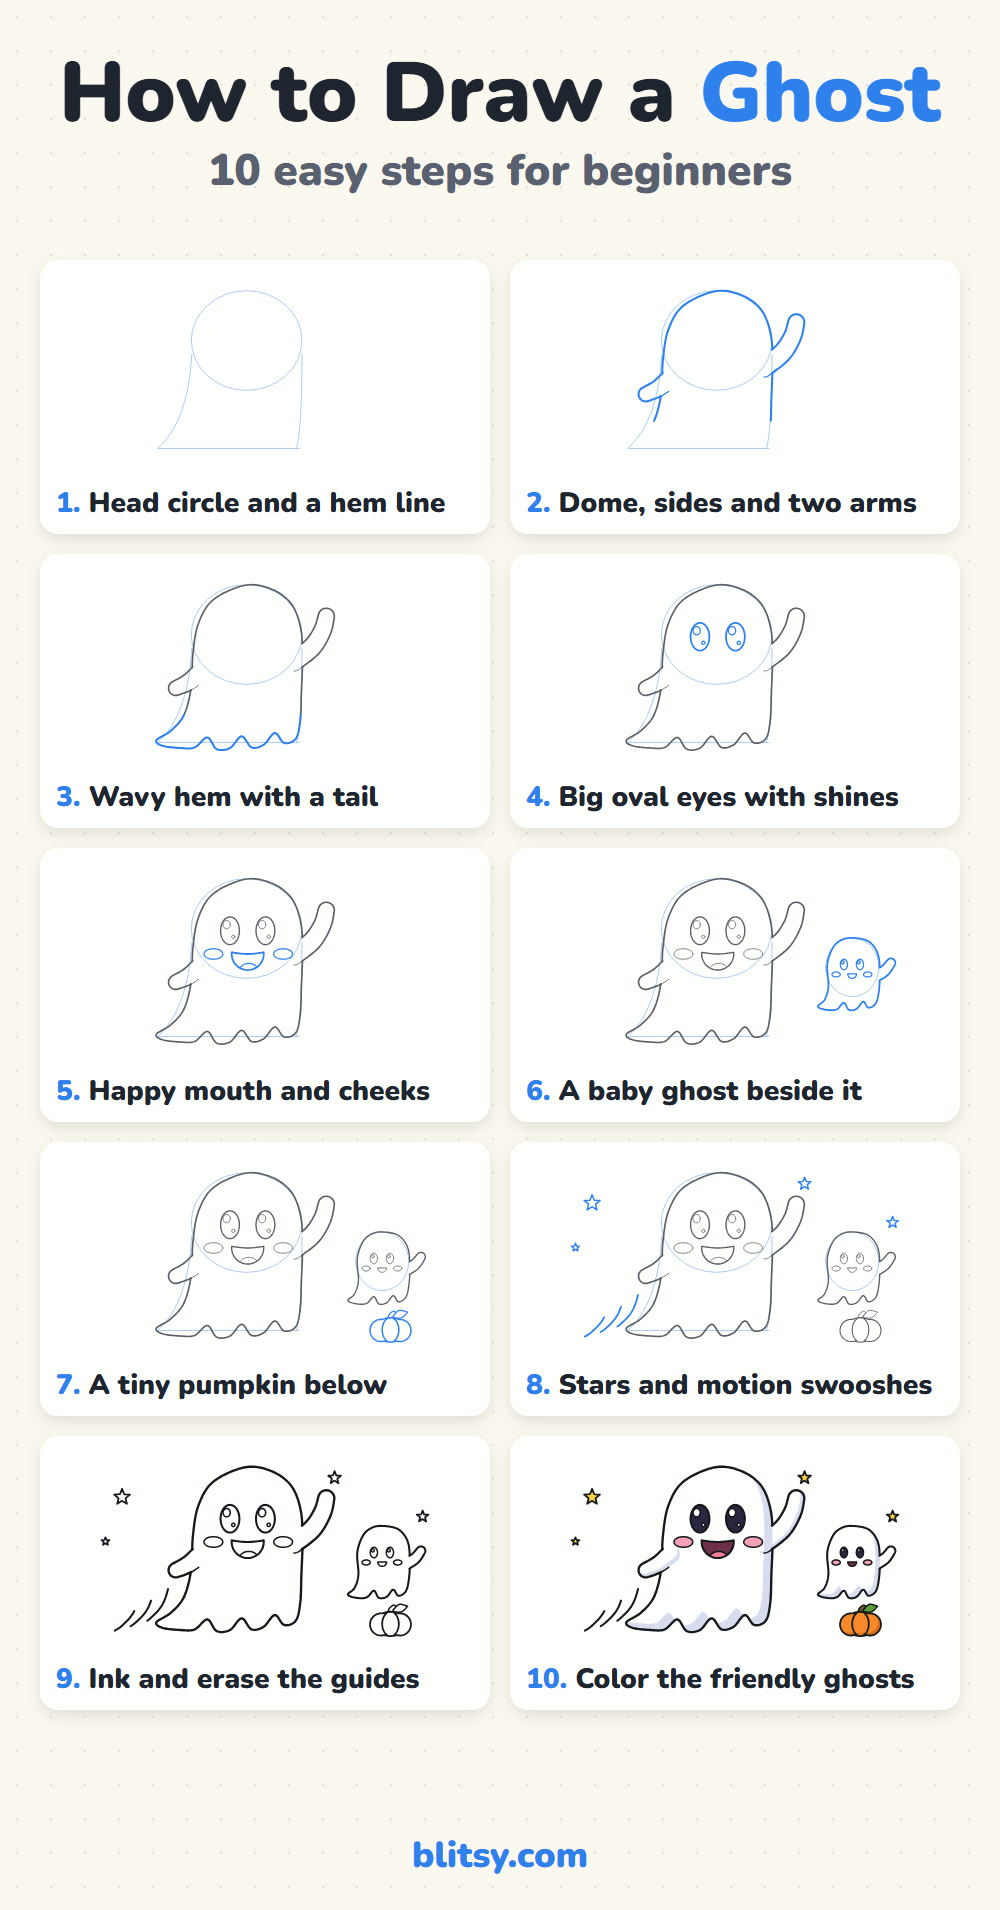
In every picture the part you're adding right now is drawn in blue. Lines from earlier steps sit in gray behind it, and the pale blue helper shapes stay faint until we rub them out in step 9.
Quick overview
⏱️ Time: about 15 to 25 minutes with coloring
🎯 Level: very easy, fine for kids from about 5
✏️ Steps: 10
👻 You'll draw: a waving ghost with a wavy tail, a baby ghost, a small pumpkin and a few stars
Ghostly Gear for Your Drawing Table
- A pencil you can press lightly (HB works well)
- A clean eraser for the helper lines
- A black marker or felt-tip pen for the outline
- Colored pencils in light purple or pale gray, pink, dark red, black, orange, green and yellow
- White paper, turned sideways so both ghosts fit
No light purple? A very soft touch of gray or pale blue gives the same gentle shadow on white.
How to Draw a Ghost Step by Step
Step 1: Sketch a head circle and a hem line
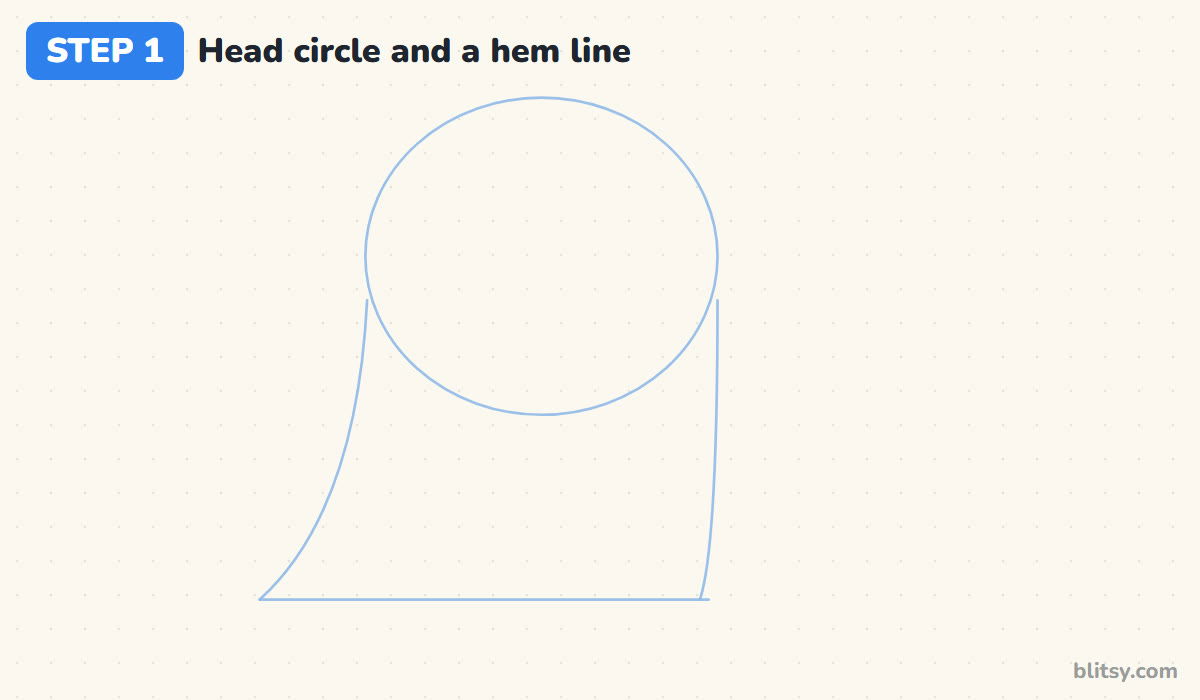
Start with a large circle a little left of the page's center, roughly a third of the page tall. From its sides, drop two lines down: the right one almost straight, the left one sweeping out to the lower left. Join their ends with a flat line. This rough bell shape sets the size of the ghost and shows where its tail will drift.
💡 Tip: Press so softly you can barely see the lines. They're only scaffolding.
Step 2: Draw the dome, the sides and two arms
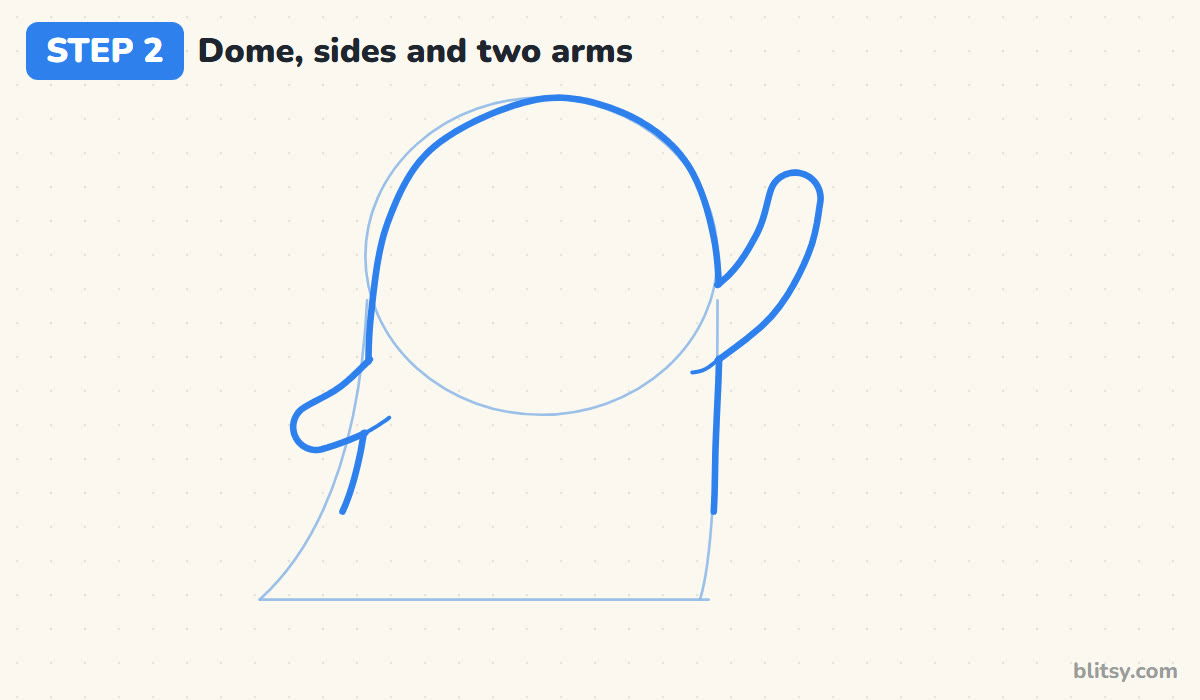
Trace over the top of the circle to make a smooth dome, then let it flow down both sides. On the right, pull a long arm up and outward, as if the ghost is saying hi. The left arm is a short rounded nub pointing down. I draw a tiny curve under each arm where it meets the body, so the arm looks like it's in front instead of glued on.
💡 Tip: Make the waving arm longer than the other one. Unequal arms read as movement.
Step 3: Add a wavy hem with a trailing tail
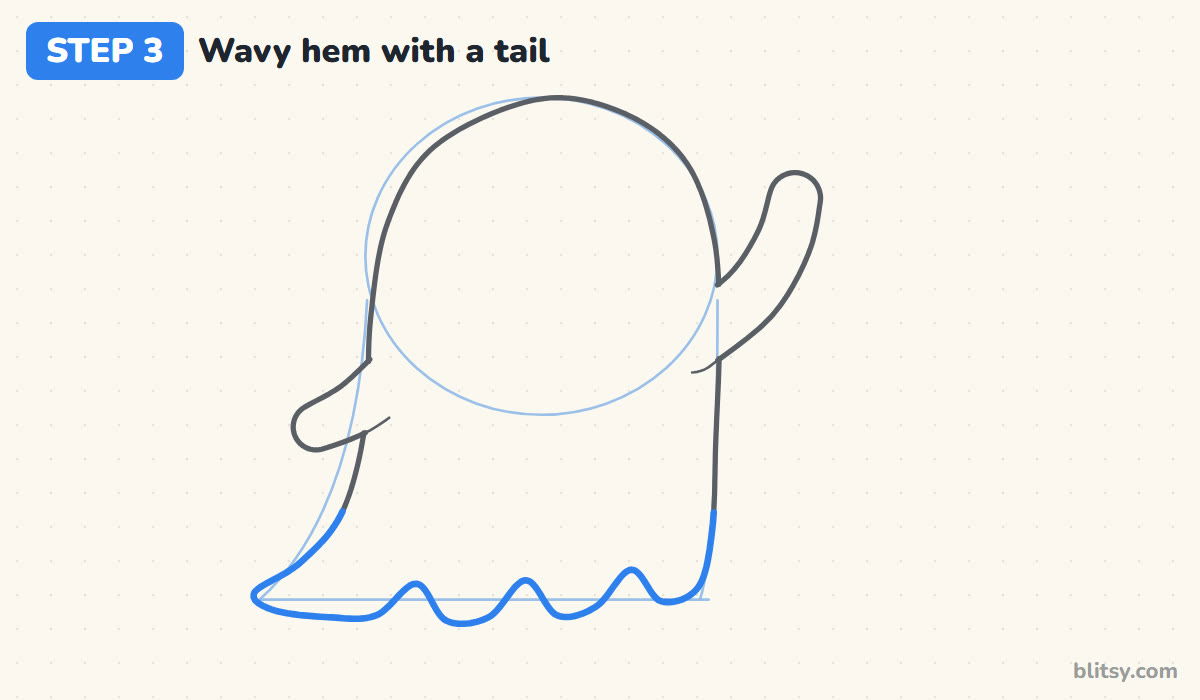
Now close the bottom. Starting on the right, draw a row of soft bumps along the hem line, four or five of them, each hanging down like a scallop. As you reach the left, stretch the last part into a long, thin tail that tapers to a point. That tail is what makes the ghost look like it's drifting rather than standing.



💡 Tip: Keep the bumps round, not pointy. Points make a ghost look ragged and spooky.
Step 4: Draw big oval eyes with shines
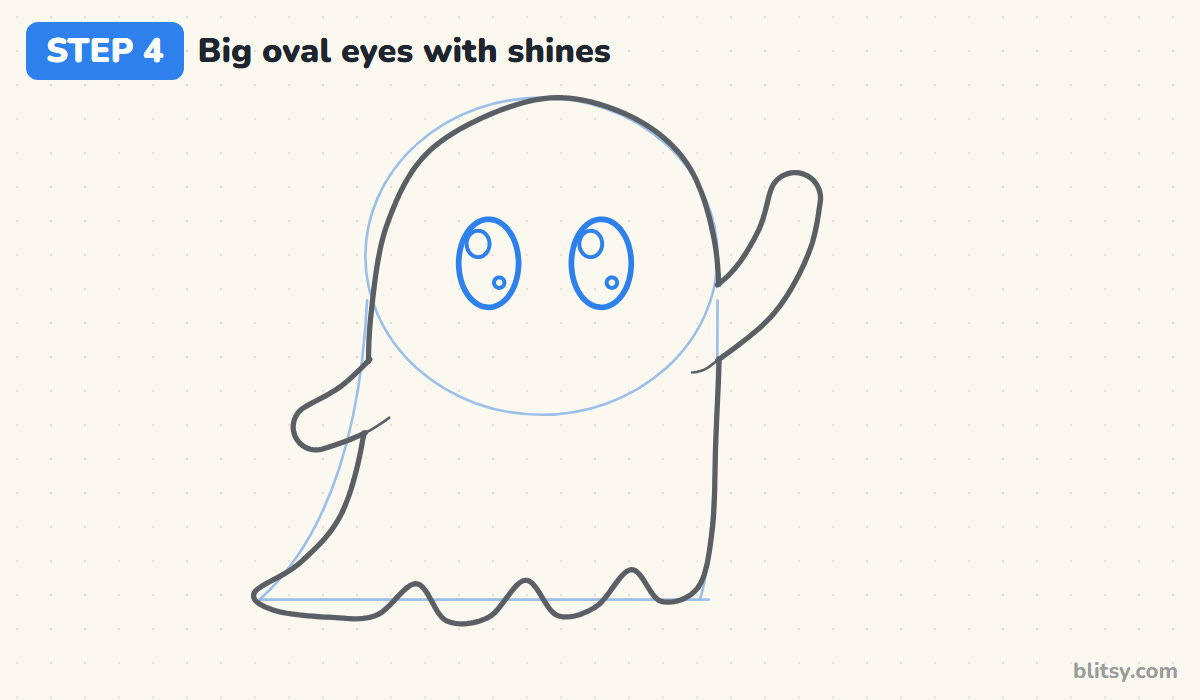
Two tall ovals go just below the middle of the head, spaced about one eye-width apart. In my experience, big eyes are the secret to a cute ghost; if they're small and far apart, the face turns blank and a bit eerie. Inside each oval, draw a round shine near the top left and a tiny dot near the bottom right.
💡 Tip: Put both shines on the same side of each eye, or the ghost looks cross-eyed.
Step 5: Add a happy mouth and rosy cheeks
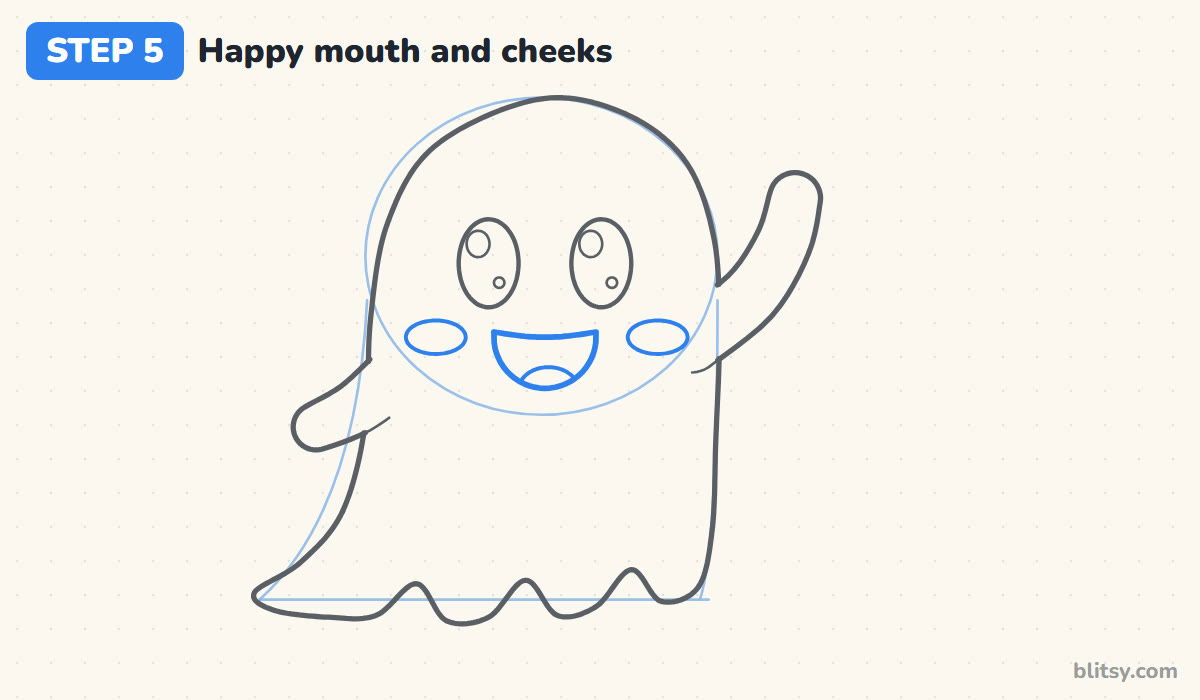
Under the eyes, draw a wide mouth with an almost flat top and a deep rounded bottom, like a slice of melon. Add a small curved line inside the bottom for the tongue. Then place a flat oval cheek under each eye, a little outside it. Cheeks sitting low and wide make the face look even happier.
💡 Tip: Keep the mouth between the eyes' outer edges. Wider than that starts to look wild.
Step 6: Draw a baby ghost beside it
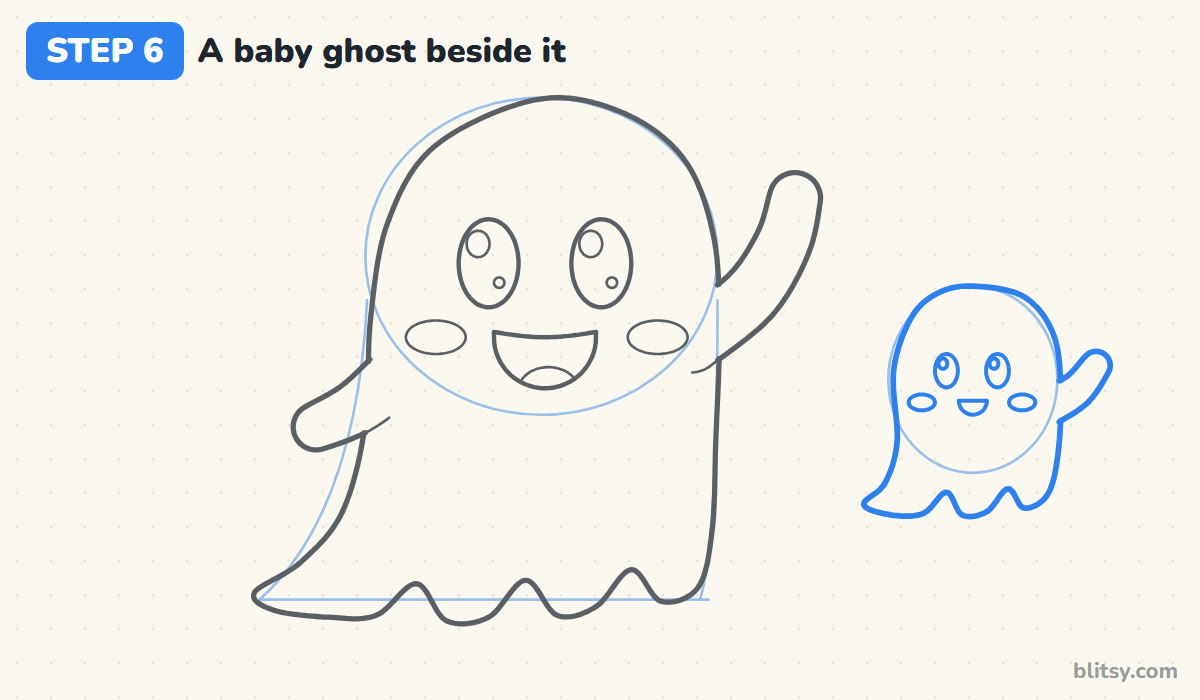
To the right, sketch a light circle about half the size of the big head. Build the baby the same way: a dome, two sides, a small waving arm and a short wavy hem with a little tail to the left. Its face is simpler, with two small eyes, cheeks and a tiny smile. Most beginners draw the baby too big; keep it clearly smaller, so the pair reads as parent and child.
💡 Tip: Copy the big ghost's tail direction. Both drifting the same way looks like they float together.
Step 7: Add a tiny pumpkin below
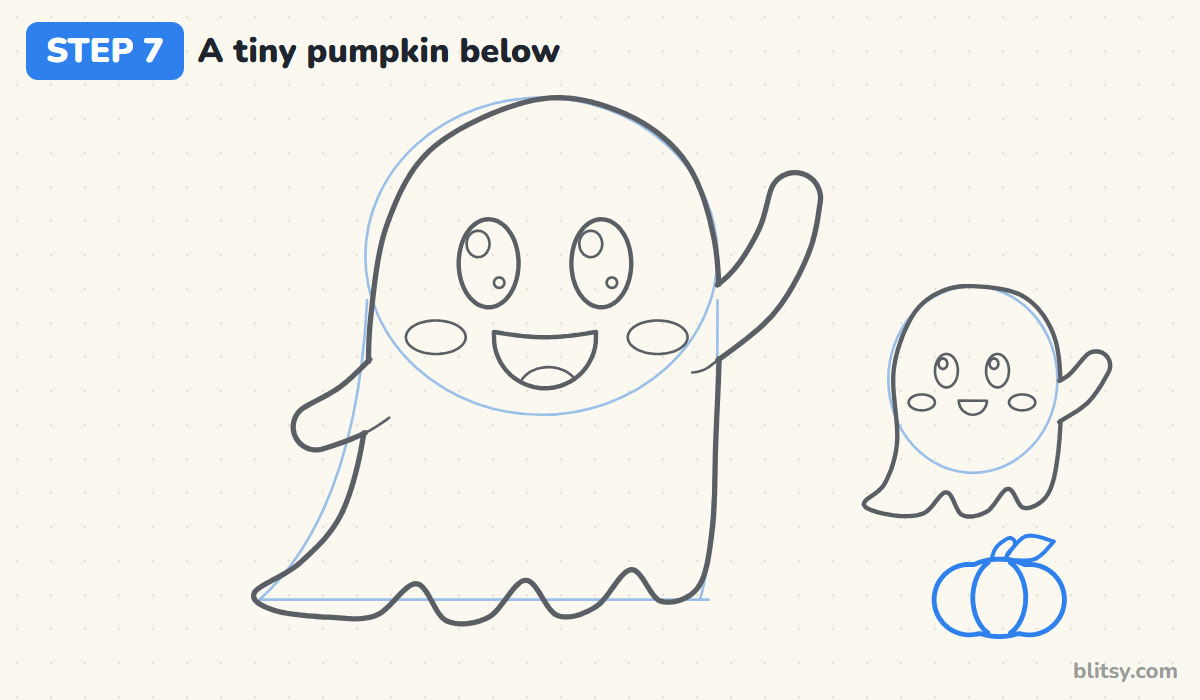
Below the baby ghost, draw a wide, squashed oval for a pumpkin, then a narrower oval in the middle of it for the front rib. Top it with a short bent stem and a small pointed leaf. It's a little detail, yet it tells everyone this is a Halloween scene and fills the empty corner of the page.


💡 Tip: Keep the pumpkin smaller than the baby's head so it stays a background detail.
Step 8: Sprinkle stars and motion swooshes
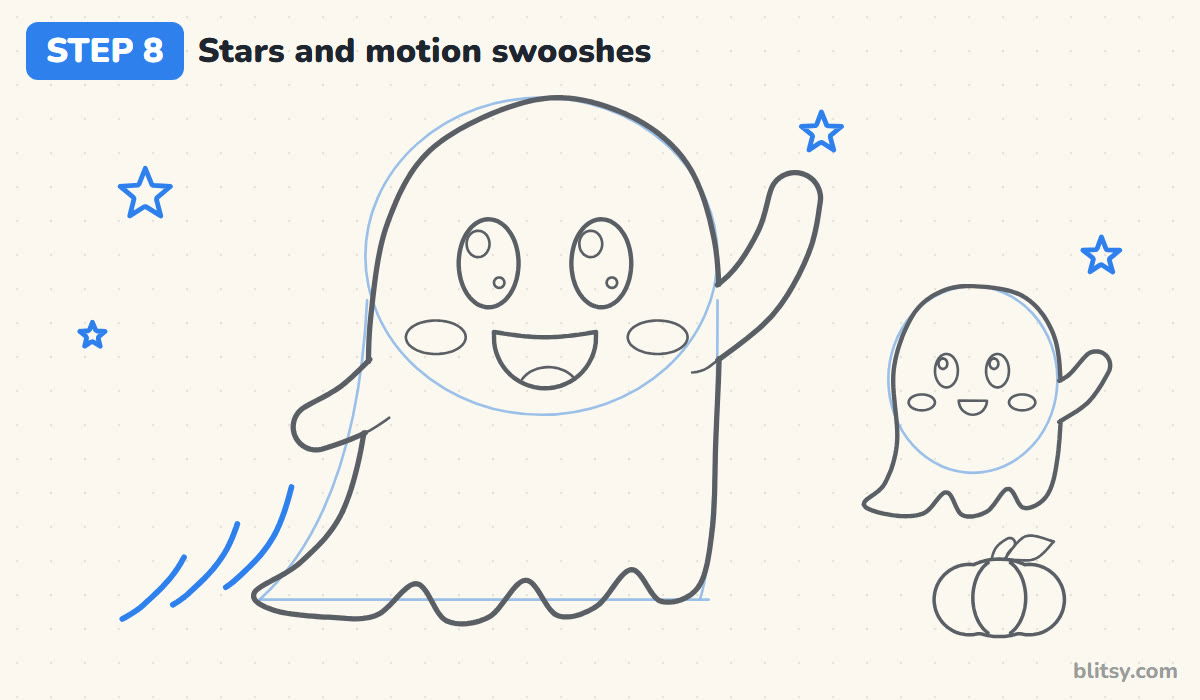
Scatter three or four five-pointed stars in the empty sky: one large, a couple of medium ones and a tiny one. Then, close to the big ghost's tail, draw three short curved lines that follow the shape of its left edge. They work like speed lines in a comic and show which way it's floating.
💡 Tip: Leave a small gap between the swooshes and the body, so they don't merge into the outline.
Step 9: Ink the lines and erase the guides
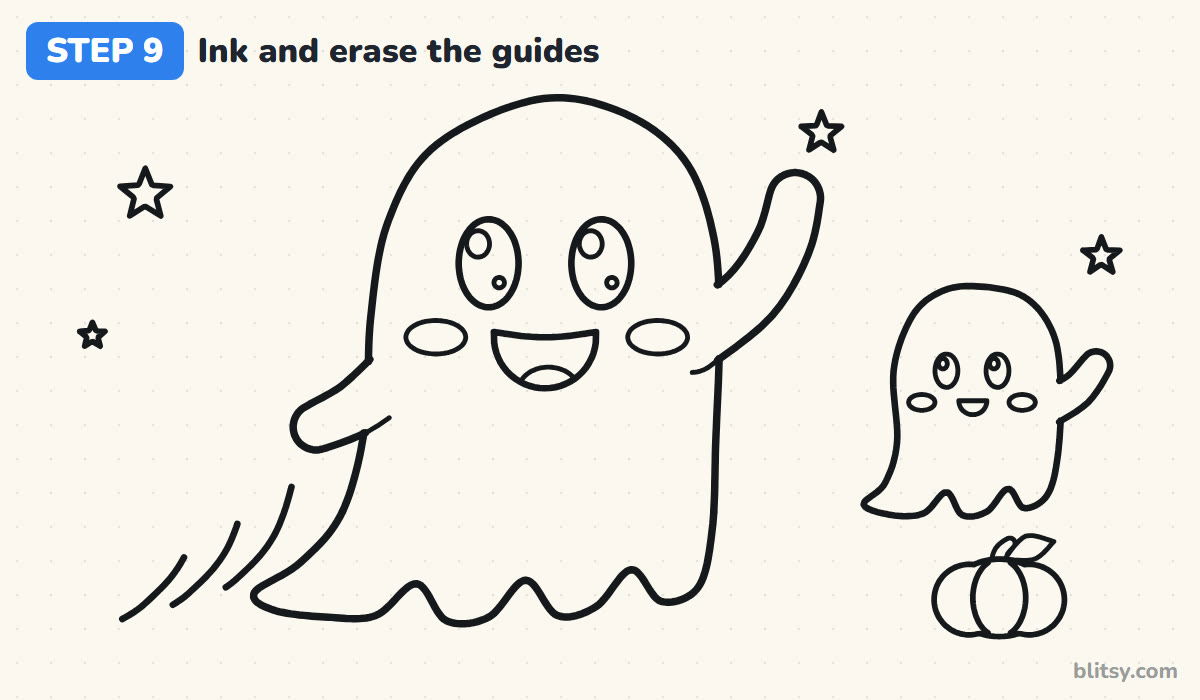
Go over every keeper line with the black marker: both ghosts, the faces, the pumpkin, the stars and the swooshes. Let the ink dry for a minute, then erase the circles and helper lines from steps 1 and 6. If a gray smudge stays behind inside the ghost, erase gently in one direction, since white areas show every mark.
💡 Tip: Trace the thick outer edge in one slow pass. Stopping halfway leaves blobs.
Step 10: Color the friendly ghosts
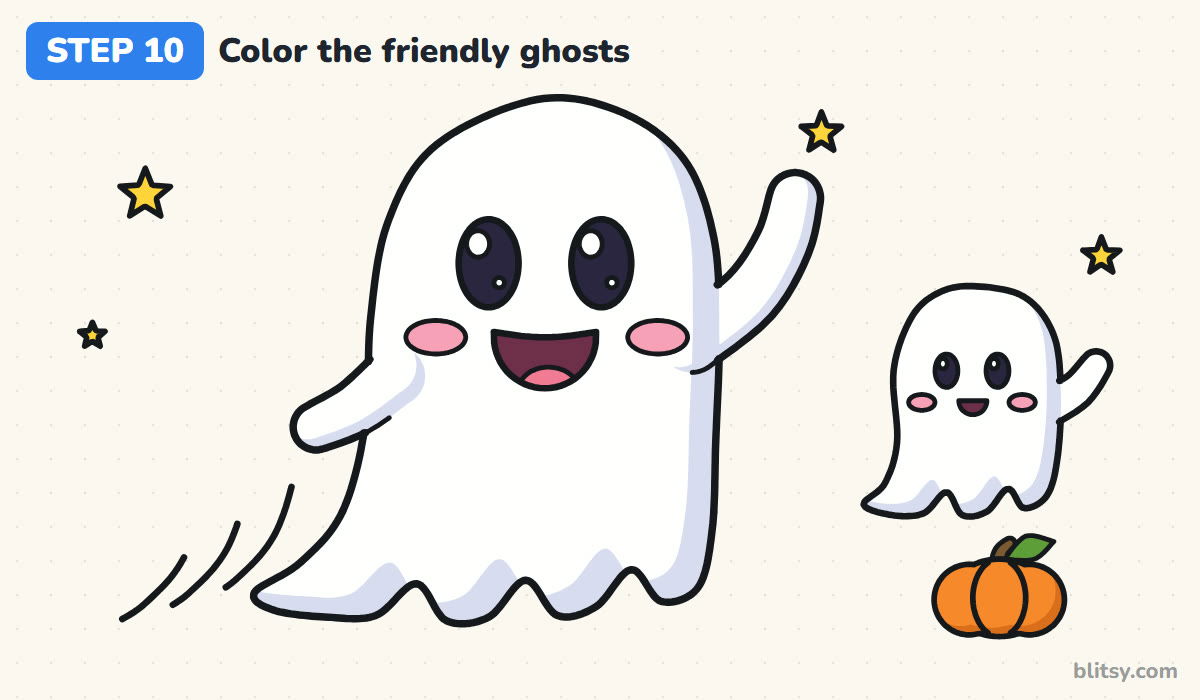
Leave the ghosts white, but shade a thin band of light purple along the right side and the bottom bumps, plus under the left arm. I never skip this, because that soft shadow is what makes a white ghost show up on white paper. Fill the eyes black and keep the shines white. Color the cheeks pink, the mouth dark red with a pink tongue, the pumpkin orange with a green leaf, and the stars yellow.
💡 Tip: Shade with the side of the pencil tip. Light pressure keeps the shadow soft.
Why a Cute Ghost Can Turn Spooky
- Tiny, far-apart eyes. The face looks empty and a bit creepy. Make the eyes tall ovals, close together, with a bright shine in each.
- A straight-sided body like a sheet on a box. Let the left side curve out into a tail, and the ghost starts to float.
- Sharp, jagged points along the bottom. They look torn and scary. Round, even bumps keep it soft and friendly.
- Leaving the ghost completely uncolored. It disappears into the paper. A thin edge of light purple or gray gives it shape.
- Pressing hard on the first circle. The guide won't erase cleanly and shows through the white body. Keep step 1 faint.
Ghost Costumes, Hats and Silly Faces to Try
Once your ghost floats nicely, give it something to wear: a witch hat, a tiny bow, sunglasses or a scarf all change the character in seconds. You can also swap the face for sleepy half-closed eyes, a tongue sticking out or a surprised little O. I like drawing a whole family in a row, from a big one down to a tiny one, each with a different expression. If you want a fuller night scene, add a haunted house from the Halloween drawing tutorial, or give your ghost a bigger pumpkin friend with the pumpkin drawing tutorial.
Free Ghost Coloring Page and a Printable Step Guide
Want something ready for a classroom or a Halloween party? The ghost coloring page shows a small colored example at the top with a named color key, then a big thick outline to color below. The step-by-step guide PDF has all 10 steps with their tips, two to a page. Both fit Letter and A4 paper.
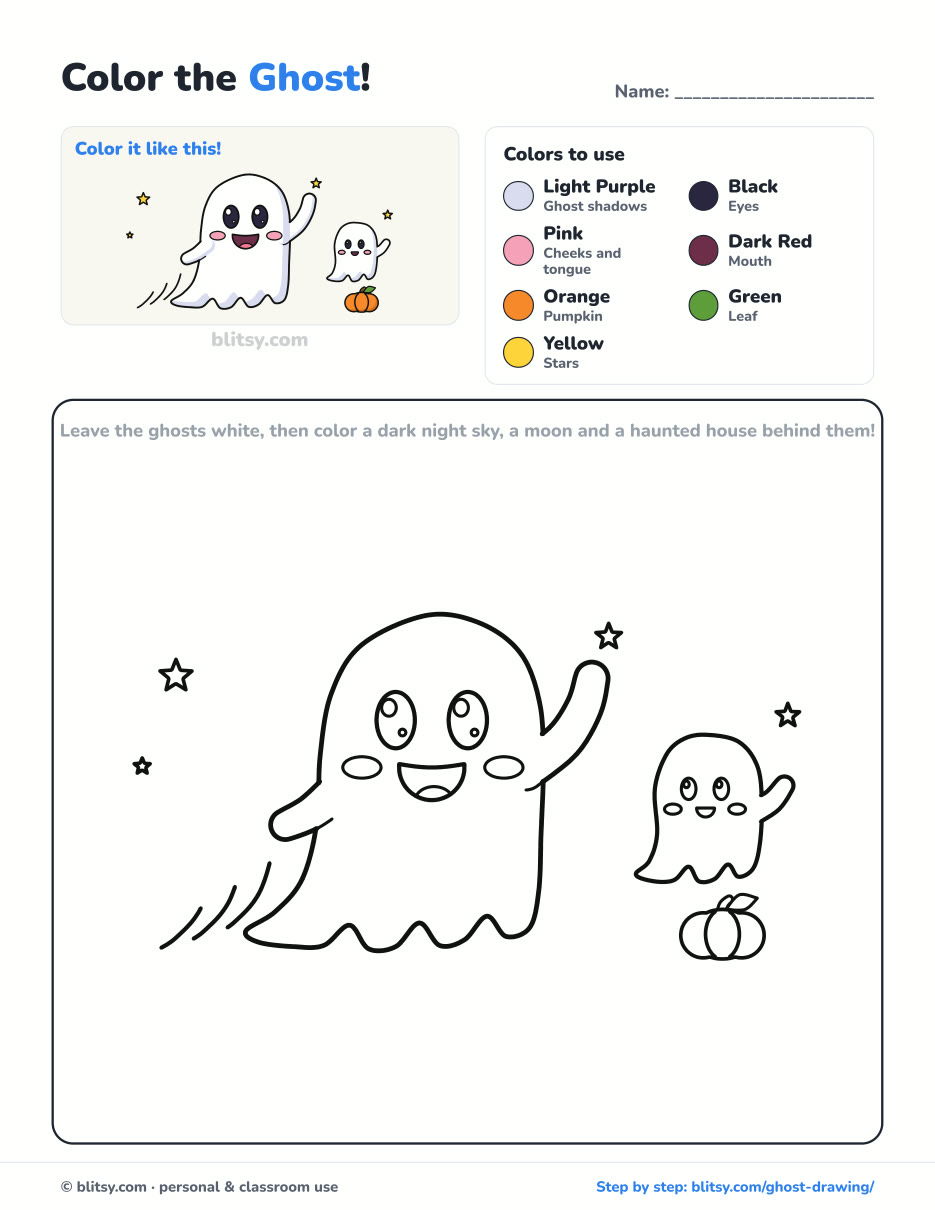
Black outlines with a colored example and the color names at the top. Ready to print and color.
⬇️ Download Coloring PageEvery step picture with its instructions and tips, to keep beside your paper while you draw.
⬇️ Download Drawing Guide📱 On a phone? Tap a download button, then open the file and choose Share → Save to Files or Print. On a computer, the PDF opens or saves straight to your Downloads folder.
Keep the Floating Ghost Steps Handy
Little Ghost Drawing Questions, Answered
What is the easiest way to draw a ghost?
Draw a circle, then let two lines drop from its sides and finish with a wavy bottom edge. Add two oval eyes and a smile, and you have a ghost.
How do you make a ghost drawing cute instead of scary?
Use big eyes with shines, pink cheeks and a round open smile. Keep the bottom bumps soft and avoid sharp teeth or slanted brows.
How do you color a white ghost so it shows up?
Leave most of it white and shade a thin edge in light purple, pale gray or soft blue. A dark sky colored around it also helps it glow.
How long does it take to draw a ghost?
About 10 minutes for the pencil and ink, plus 10 to 15 for coloring. Younger kids can skip the baby ghost and the pumpkin.
Draw your ghost once more with a new face and let the two of them float across the page together. 👻
Related posts:
 How to Draw a Tooth Step by Step (Cute and Easy for Kids)
 How to Draw a UFO Step by Step (Cute Alien Saucer)
 How to Draw an Astronaut Step by Step (Cute and Easy)
 How to Draw an Owl Step by Step (Cute Night Owl)
 How to Draw an Axolotl Step by Step (Cute and Easy)
 How to Draw Cute Animals Step by Step (Cat, Bear & Bunny)
 How to Draw an Octopus Step by Step (Cute and Easy)
 How to Draw a Frog Step by Step (Cute Frog on a Log)
 How to Draw a Jellyfish Step by Step (Cute, Easy Guide)
 How to Draw a Care Bear Step by Step (Cute Fan Art for Kids)
 How to Draw Cerberus Step by Step (Cute and Easy)
 How to Draw a Monster Step by Step (Cute and Easy)

