
Axolotls look like they were invented by a cartoonist: a huge grin, tiny dot eyes and a crown of frilly gills sticking out of the head. That friendly face is exactly why kids keep asking for them. Below I'll walk you through how to draw an axolotl step by step, starting from one oval and one curved line and ending with a pink axolotl paddling past aquarium plants. You only need a pencil and a bit of patience for the gills.
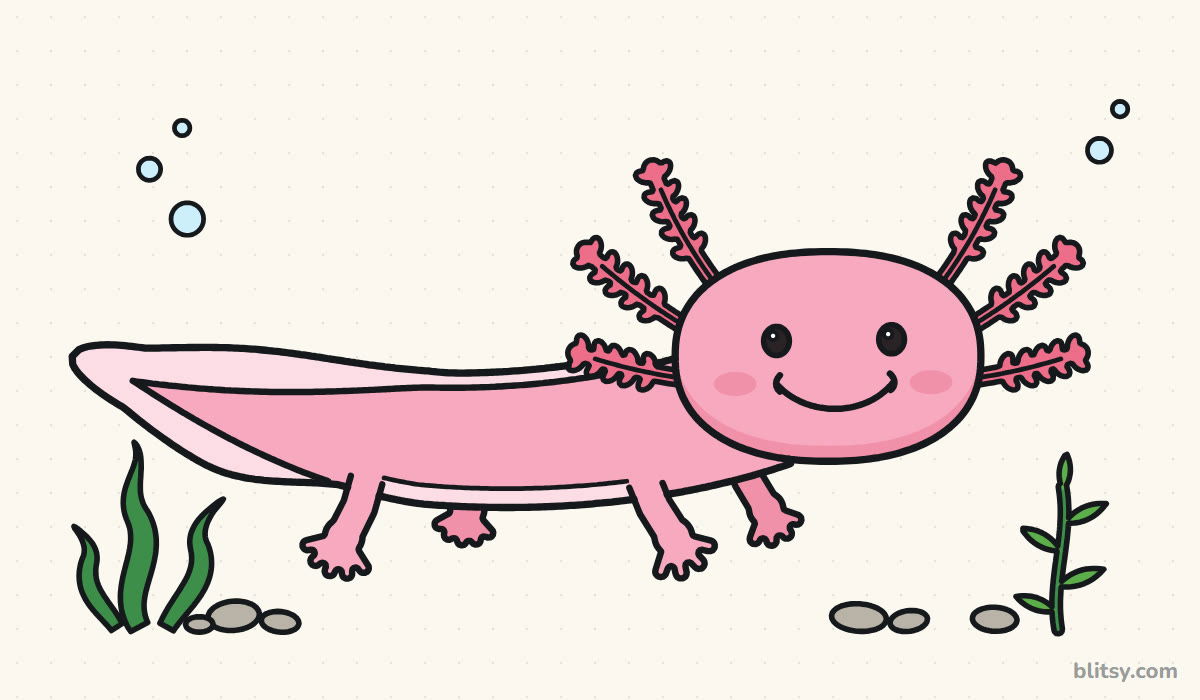
Watch for the color change: whatever you add next shows up in blue, while the work from earlier steps fades to gray. Thin pale blue lines are the guides; you'll erase them after inking in step 10.
Quick overview
⏱️ Time: about 30 minutes, a little longer if you color slowly
🎯 Level: easy; the gill frills need a steady hand
✏️ Steps: 11
🦎 You'll draw: a smiling pink axolotl swimming to the right through a small aquarium scene
Pencils and Pinks for an Axolotl Sketch
- A soft pencil (HB or 2B) for light guide lines
- An eraser that won't smudge
- A black fineliner or thin marker for inking
- Colored pencils or markers: two pinks and a coral for the axolotl, plus green and gray for the scene and light blue for bubbles
- A sheet of paper turned sideways
Two pinks make the biggest difference here, one strong and one pale, so dig through your box for both before you start.
How to Draw an Axolotl Step by Step
Step 1: Sketch a head oval and a body curve
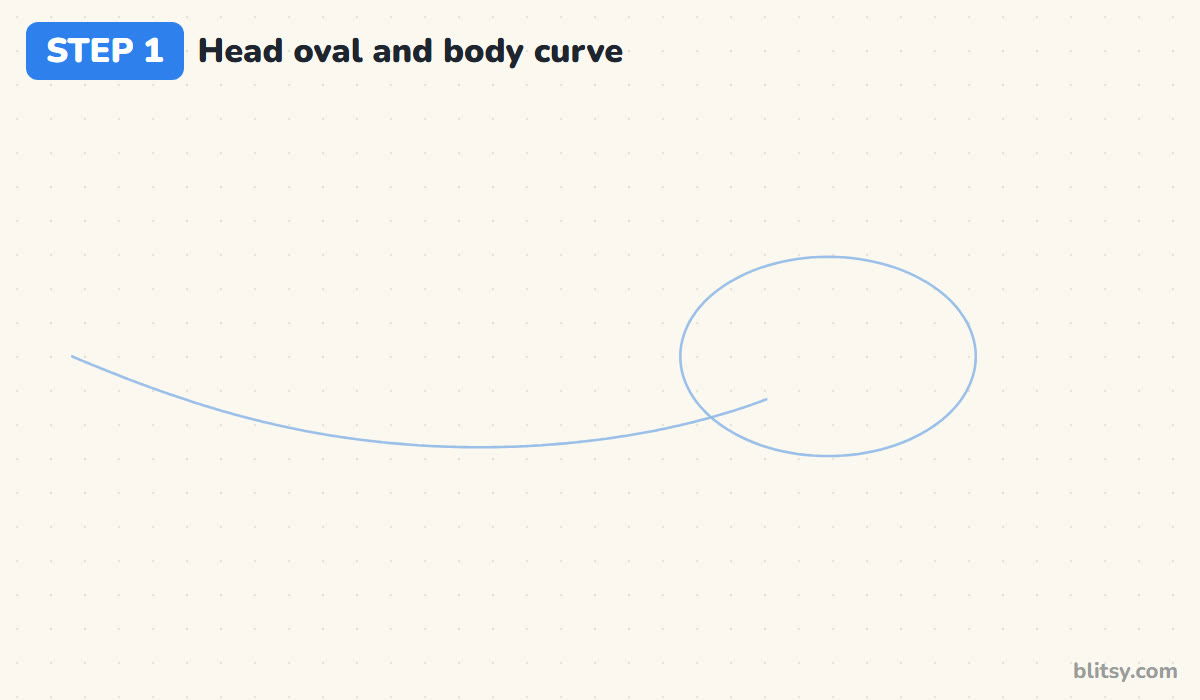
Draw a wide oval on the right side of your paper, about a quarter of the page wide. Then pull a long, gently sagging curve out of its lower left side, all the way toward the left edge, rising a little at the end. That curve is the spine. Axolotls are long animals, so I make this line roughly three times as long as the oval is wide.
💡 Tip: Hold the pencil far back from the tip so your guide lines stay faint.
Step 2: Add gill lines and leg lines
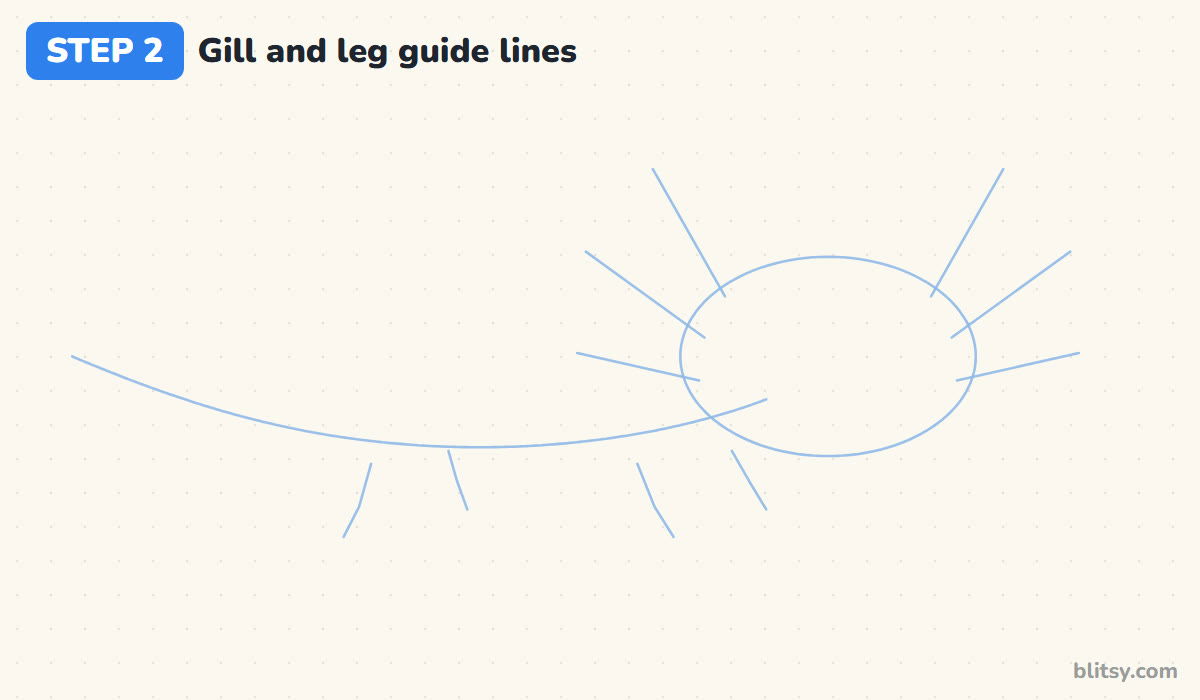
Now place three short straight lines on each side of the head oval, fanning outward like the spokes of a half wheel. The top pair points up and out, the bottom pair almost sideways. Under the spine, draw four short lines for legs: two near the head and two about halfway along. I bend each leg line once, like a little elbow.
💡 Tip: Keep the gill lines on both sides at the same angles so the face looks balanced.
Step 3: Draw a wide flat head
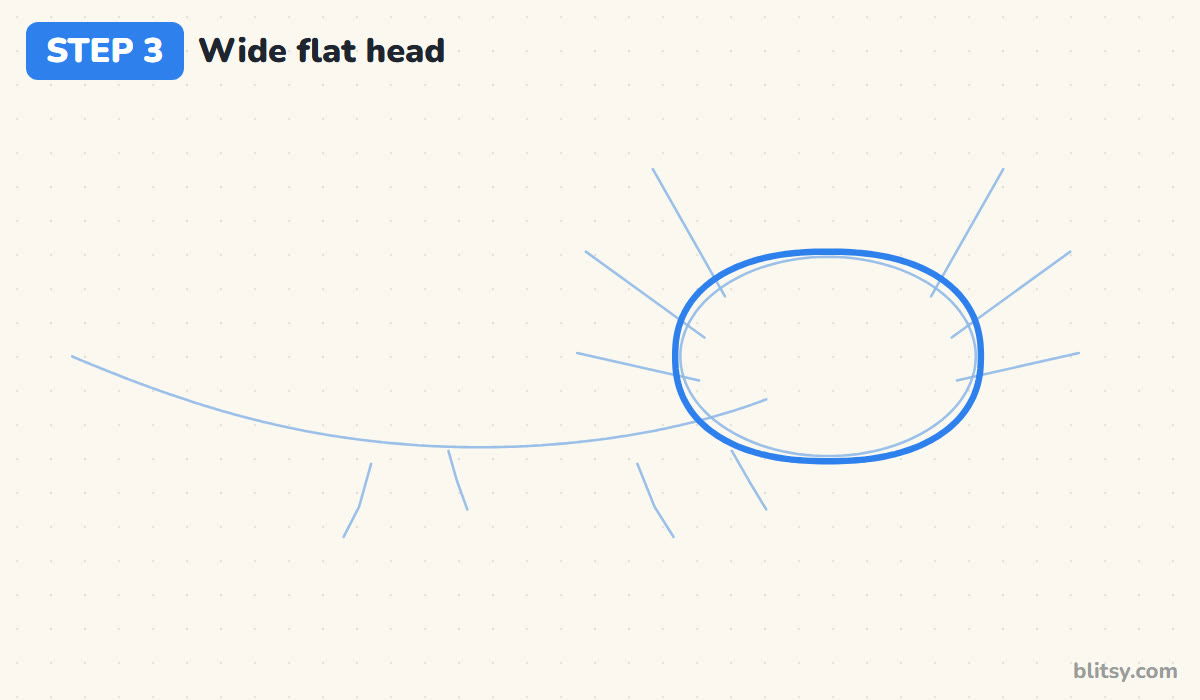
Trace around the oval with a firm line, but square it off slightly so the top and bottom look flatter and the sides fuller. Real axolotls have broad, flat heads, and that flattened shape is what keeps your drawing from looking like a generic cartoon blob. Let the outline sit just outside the guide.



💡 Tip: Draw the head in four quarter curves instead of one big loop.
Step 4: Outline the long body and tail
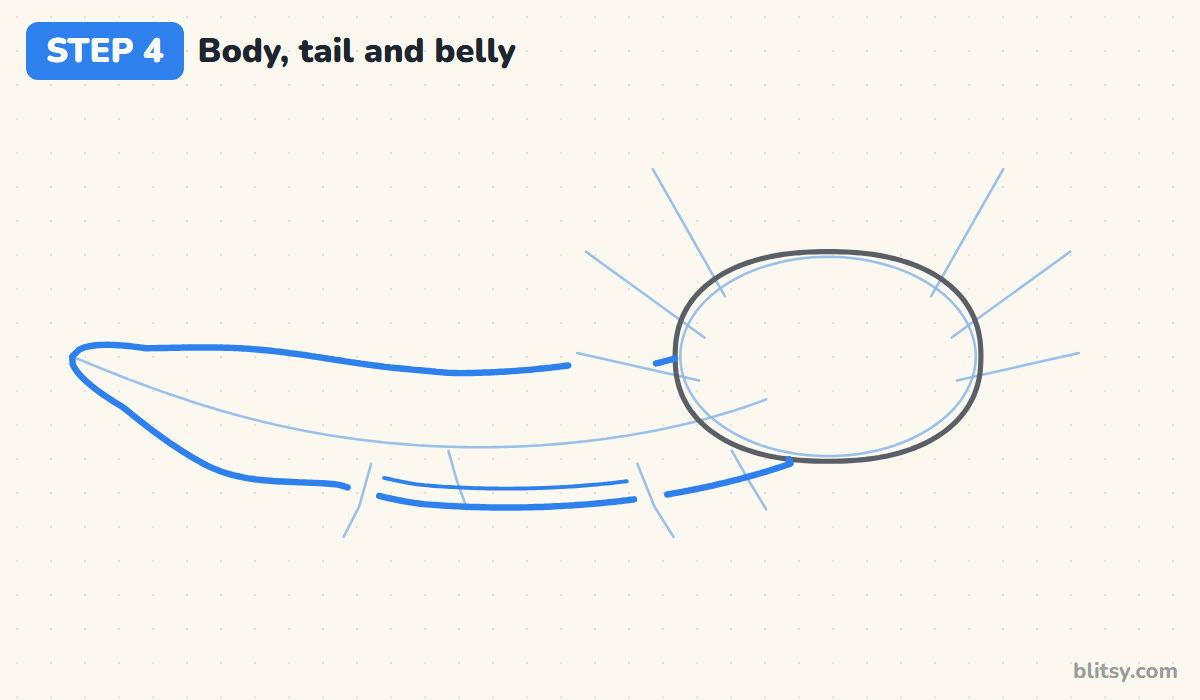
Follow the spine with two lines, one above and one below, starting thick behind the head and slowly getting slimmer. Near the end, swing both lines outward into a long rounded paddle, then join them at the tip. I leave small gaps where the legs and the lowest gill will cross, which saves erasing later. Add one thin line inside the body between the legs to mark the pale belly.
💡 Tip: Check the tail paddle: it should be taller than the body is thick.
Step 5: Mark the fin ridge and tail paddle
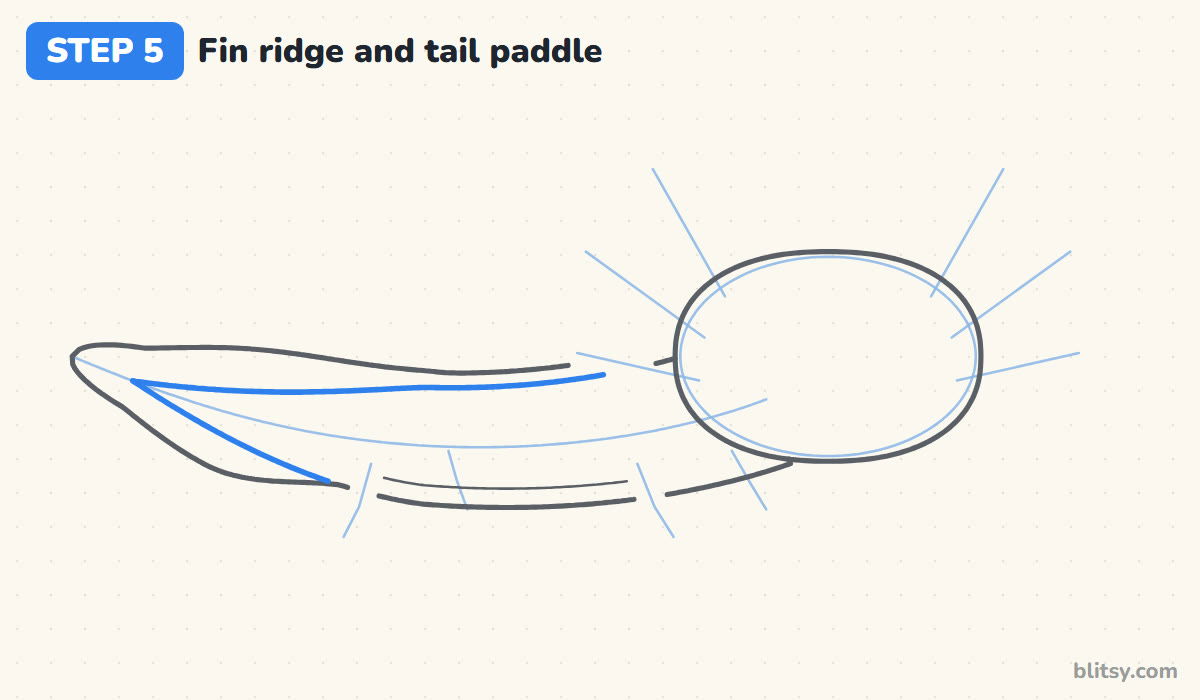
Most of the tail is fin, not muscle. Draw a line just under the top edge, starting behind the head and running along the back, then curving down to a point inside the paddle. Add a matching line along the lower part of the tail. The thin strip above these lines is the soft fin that axolotls use to push through water.
💡 Tip: Stay close to the edge near the head and let the gap grow toward the tail.
Step 6: Shape four little legs with fingers
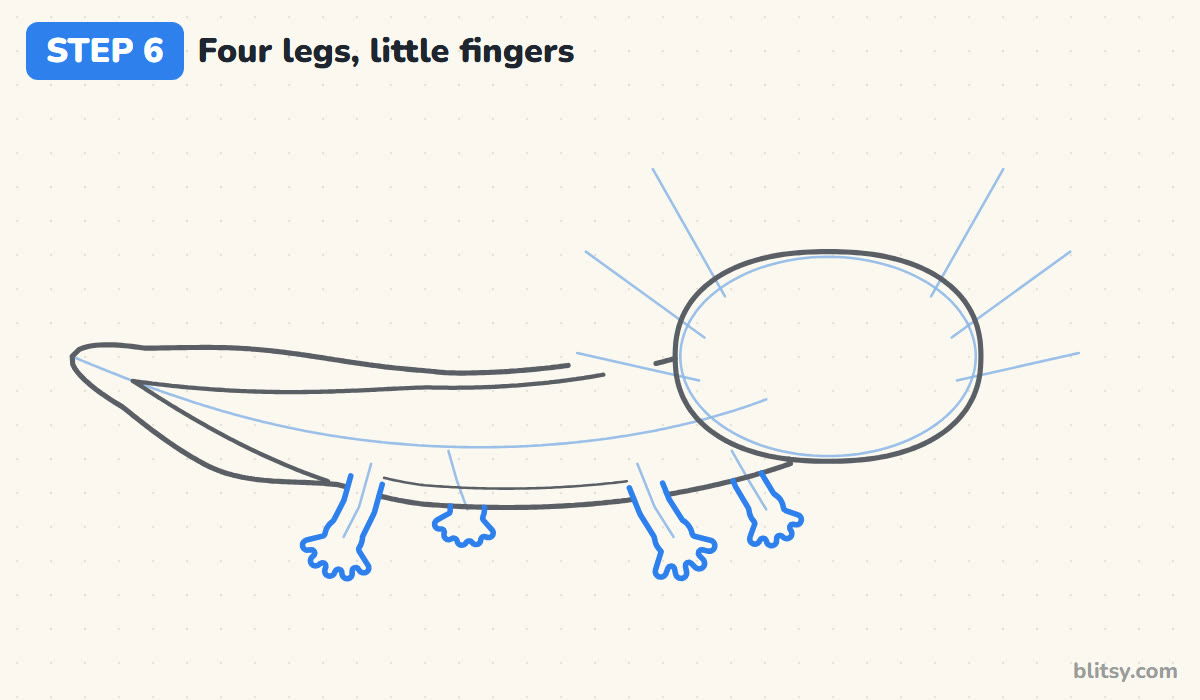
Around each leg guide, draw a short, slim leg with a rounded foot. Give the front feet four tiny fingers and the back feet five toes, the same count a real axolotl has. The two legs on the far side only peek out from under the body, so draw just their lower halves. Keep every finger short and rounded, almost like little beans.
💡 Tip: Spread the fingers like a small fan, never in a straight row.
Step 7: Draw three feathery gills on each side
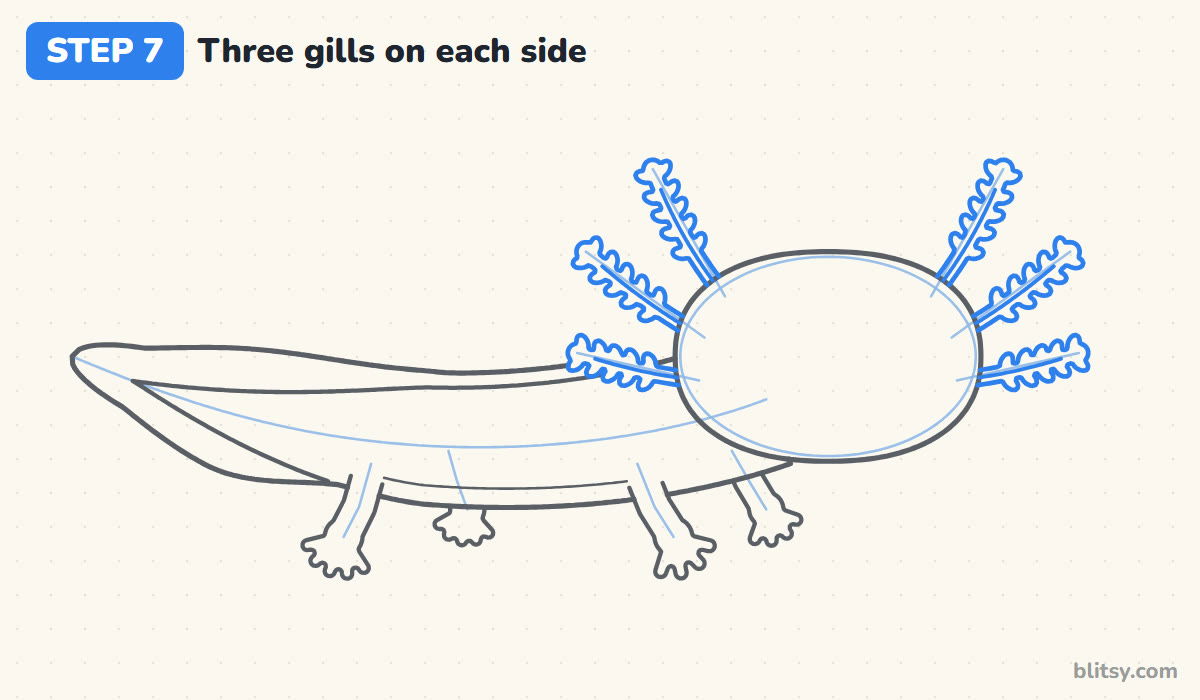
This step is the one that makes it an axolotl. Turn each gill guide into a thin stalk, then add small wavy bumps along both sides of it, like a feather or a fern leaf. Finish with a single line down the middle of the stalk. In real life these frills are how the animal breathes underwater, so they stay big and fluffy.

💡 Tip: Draw the bumps in a rhythm: out, in, out, in, without lifting your pencil.
Step 8: Give it dot eyes and a big smile
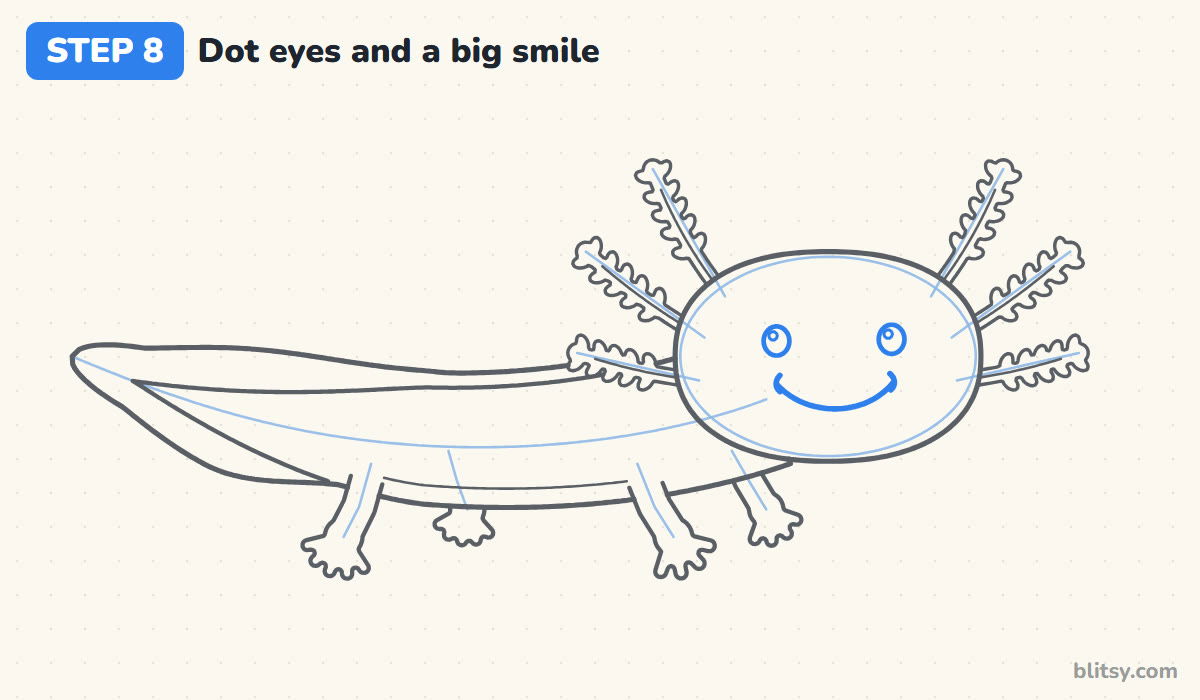
Set two small round eyes on the upper half of the face, far apart, with a tiny shine circle inside each. Then draw a wide U-shaped smile between and slightly below them, with short hooks at both ends. Axolotls have small eyes and a very wide mouth, and I find that keeping the eyes tiny is exactly what makes the grin look so sweet.
💡 Tip: Space the eyes about as far apart as the smile is wide.
Step 9: Build a small aquarium scene
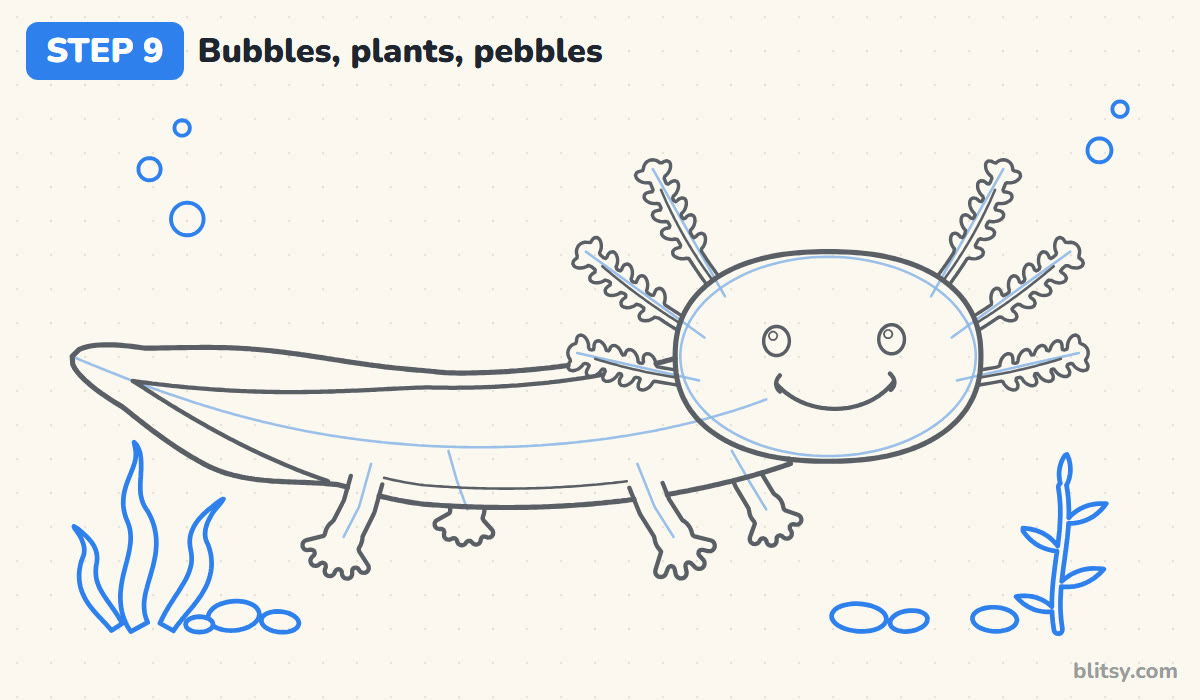
Your axolotl needs a home. Draw a few round bubbles in the upper corners, big ones at the bottom of each group. On the left, sketch three wavy plant blades growing from the bottom; on the right, a thin stem with pointed leaves. Scatter some flat oval pebbles along the bottom of the page, keeping them clear of the feet.
💡 Tip: Overlap two pebbles here and there so they look piled, not lined up.
Step 10: Ink the lines and erase the guides
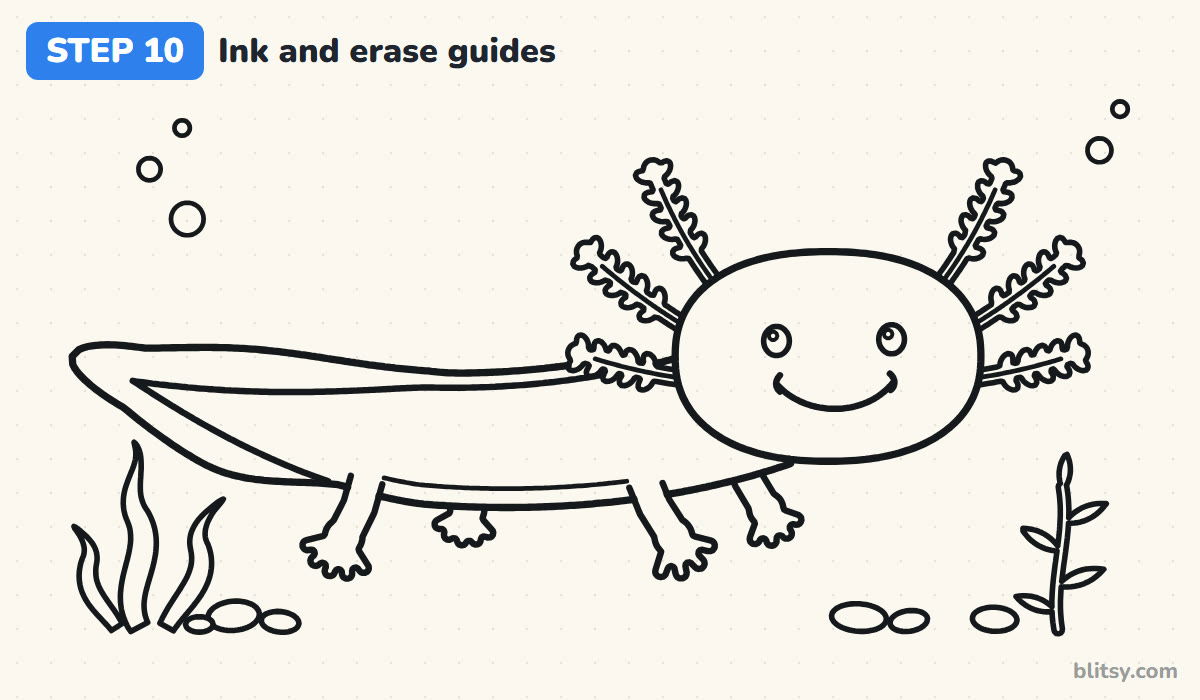
Go over every keeper line with your black pen, from the head all the way to the last pebble. I take the gill frills slowly, since they have the most turns. Once the ink is completely dry, erase the oval, the spine curve and all the short guide lines. You should be left with a clean outline.
💡 Tip: Wait a full minute before erasing so the ink can't smear across the page.
Step 11: Color your axolotl
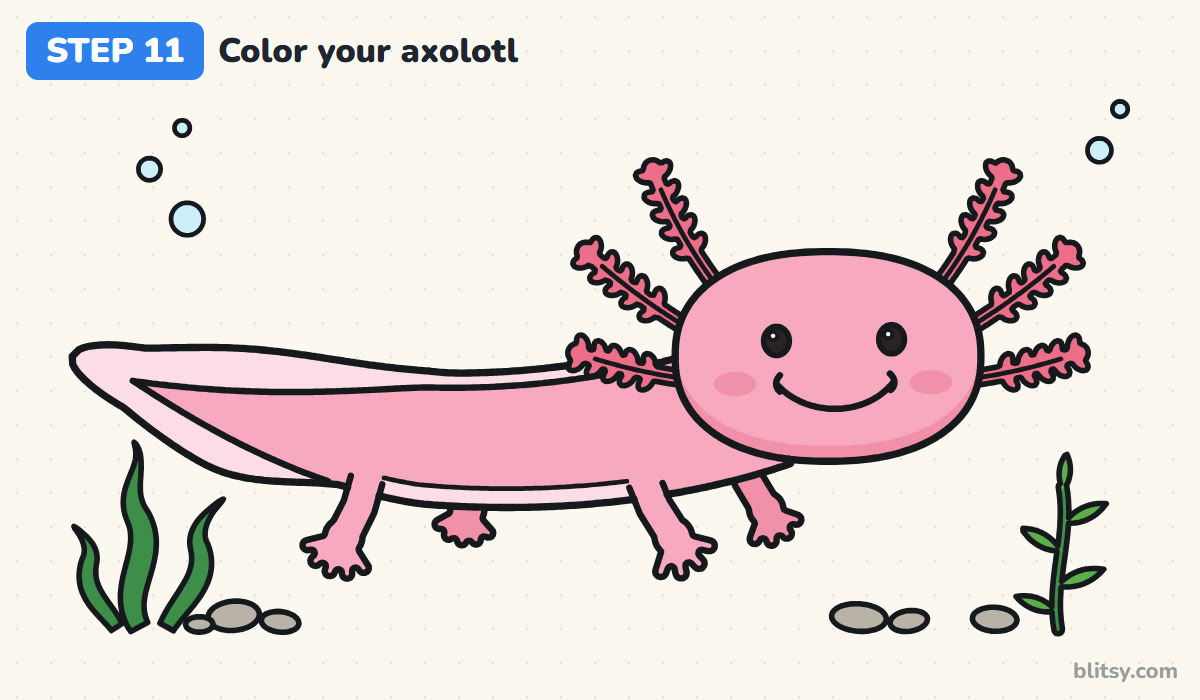
Fill the head and body with pink, plus the two near legs. Color the belly strip and the fin pale pink, so the tail looks soft and see-through. The gills get a deeper coral, and the cheeks plus the far legs a rose pink that's a step darker than the body. Leave the eye shines white, then finish with green plants, gray pebbles and light blue bubbles.

💡 Tip: Press harder along the bottom of the head for a gentle shadow.
Where Axolotl Sketches Tend to Slip
- Gills drawn as plain sticks. Without the frilly bumps they look like antennae. Add wavy edges on both sides of every stalk.
- Big round cartoon eyes. In my experience, large eyes turn the face into a frog. Keep them small and far apart, and let the smile do the work.
- A narrow, pointy head. An axolotl's head is wider than its body. Flatten the top and bottom of the oval a little.
- A thin, pointed tail. The tail is a tall paddle with a fin around it. Widen it near the end before you round it off.
- One flat pink everywhere. The drawing loses its shape. Use a pale pink for the belly and fin, and save the strongest color for the gills.
Recolor and Repose Your Axolotl
Axolotls come in more colors than pink. Try a gold one with yellow gills, a dark olive wild-type with tiny freckles, or a black one with deep purple gills. You can also turn the head straight toward the viewer and draw the body curling behind it, or give your axolotl a tiny party hat. Axolotls are amphibians, so a pond cousin from the frog drawing tutorial makes good company, and the sea turtle in the turtle drawing tutorial fits right into the same tank.
Free Axolotl Coloring Page and PDF Steps
Rather draw away from the screen? The axolotl coloring page shows a colored example next to a key that names each color and the part it belongs to, with a big outline underneath. The step-by-step PDF guide holds all 11 steps with pictures and tips. Both print on Letter or A4 paper.
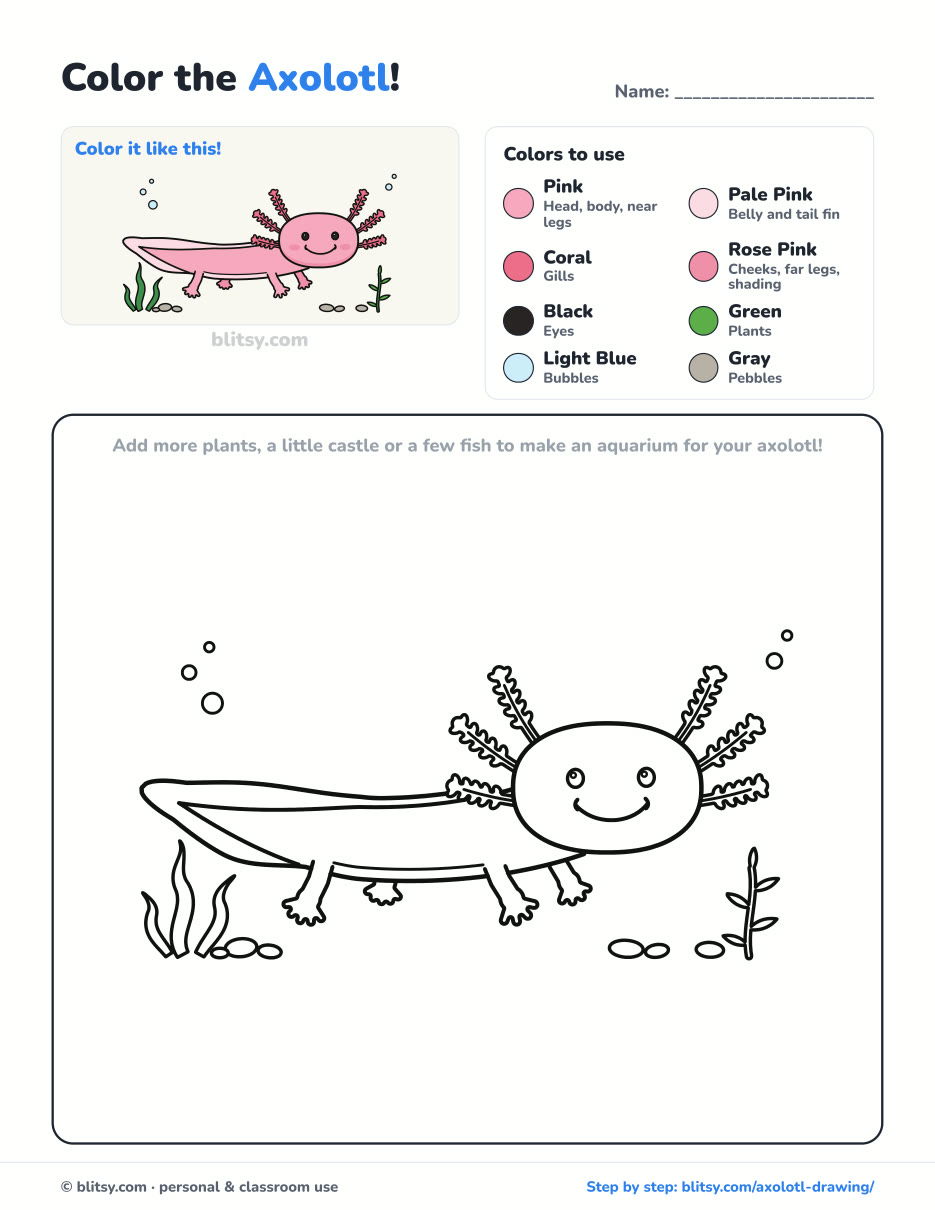
Black outlines with a colored example and the color names at the top. Ready to print and color.
⬇️ Download Coloring PageEvery step picture with its instructions and tips, to keep beside your paper while you draw.
⬇️ Download Drawing Guide📱 On a phone? Tap a download button, then open the file and choose Share → Save to Files or Print. On a computer, the PDF opens or saves straight to your Downloads folder.
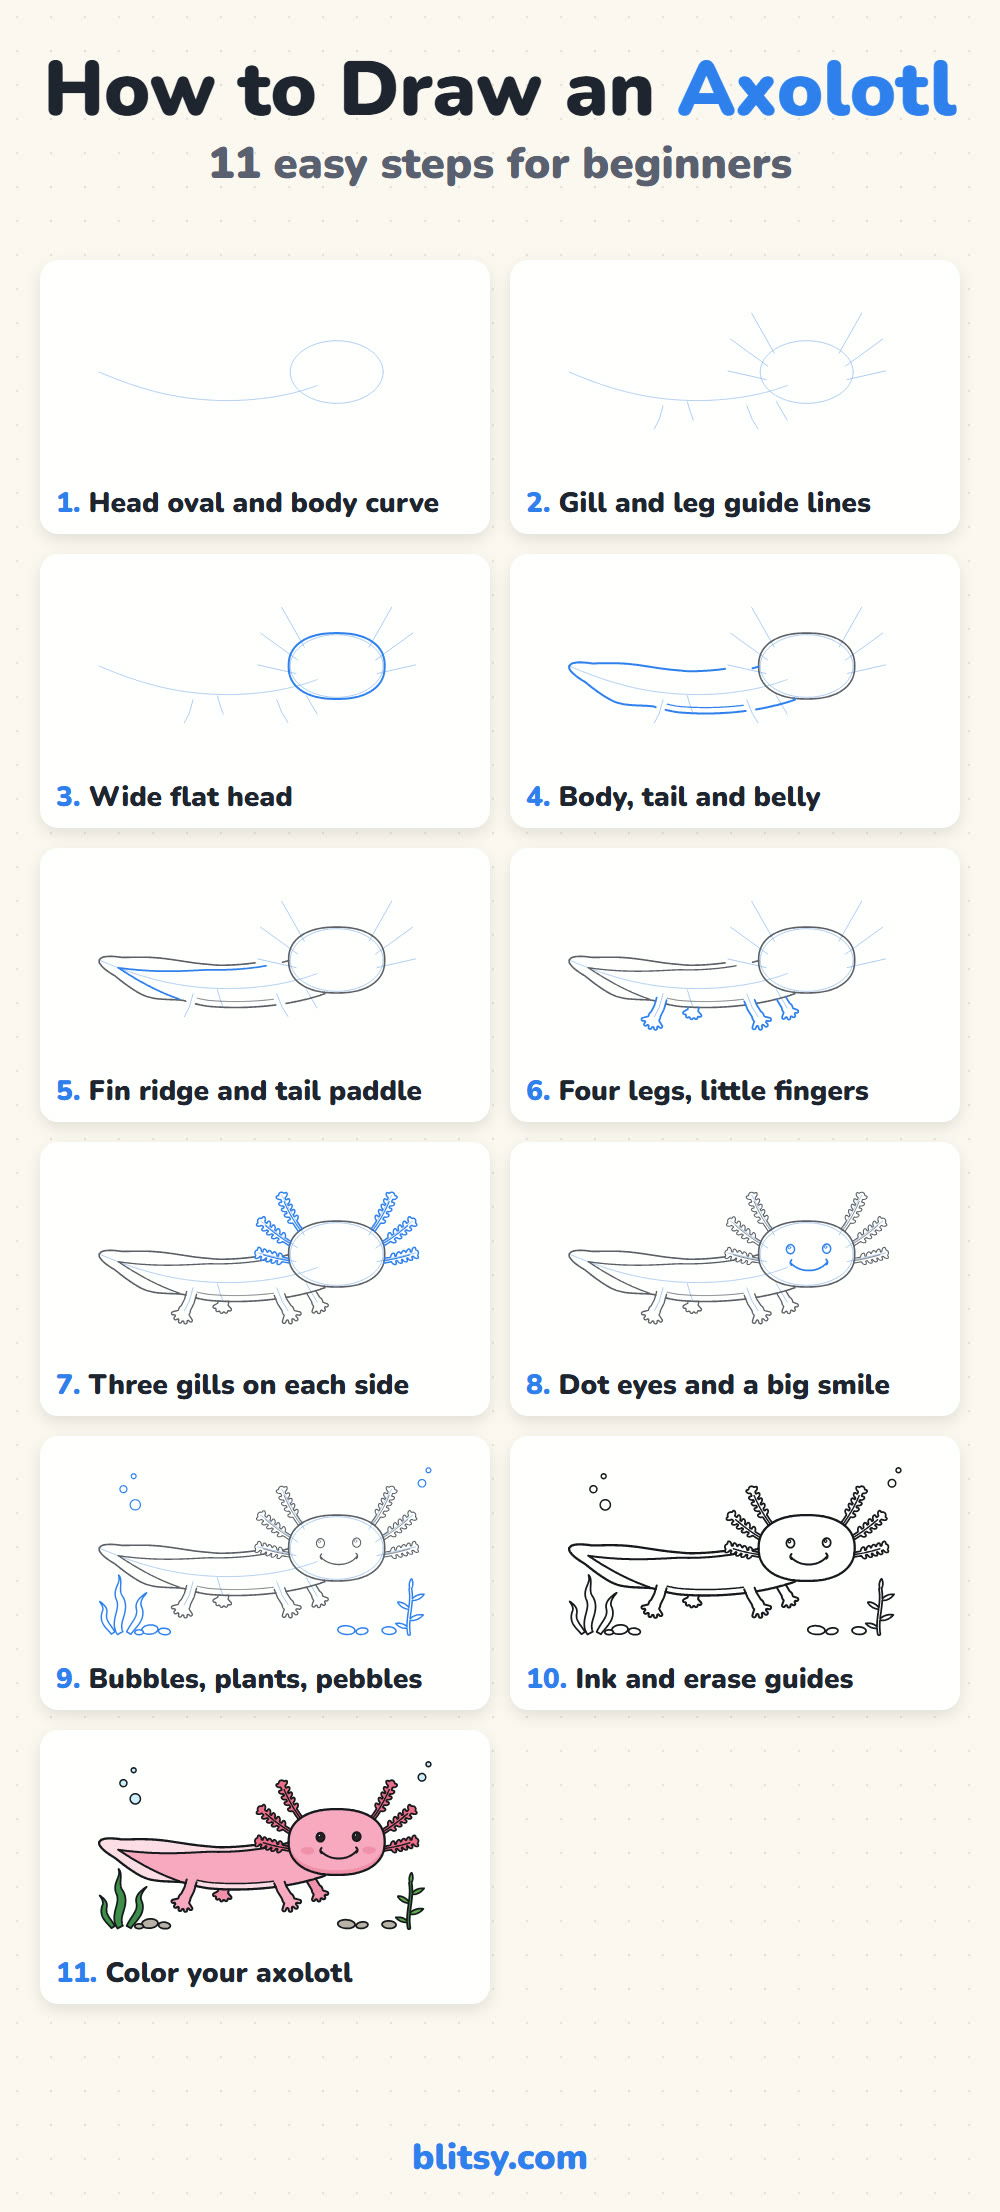
Axolotl Steps on One Pinnable Image
Axolotl Drawing Questions Kids Ask Me
What is the easiest way to draw an axolotl?
Start with a wide oval for the head and one curved line for the body. Add three gill lines on each side of the head, then build the body and legs around those guides before adding the gills.
What are the things on an axolotl's head?
Those feathery stalks are gills. Axolotls are amphibians from Mexico, and they use the gills to breathe underwater. Most have three on each side of the head.
Can young kids draw this axolotl?
Yes. Children around 6 and up can follow it. If the frilly gills are too fiddly, draw them as smooth leaf shapes instead, and leave out the plants and pebbles.
How long does it take to draw an axolotl?
Around 30 minutes with coloring. The gills in step 7 take the longest, so give yourself extra time there.
Fun fact to share while you color: a real axolotl can regrow a lost leg. Yours just needs a name and maybe a few more bubbles. 🫧
Related posts:
 How to Draw a Tooth Step by Step (Cute and Easy for Kids)
 How to Draw a UFO Step by Step (Cute Alien Saucer)
 How to Draw an Astronaut Step by Step (Cute and Easy)
 How to Draw an Owl Step by Step (Cute Night Owl)
 How to Draw Cute Animals Step by Step (Cat, Bear & Bunny)
 How to Draw an Octopus Step by Step (Cute and Easy)
 How to Draw a Frog Step by Step (Cute Frog on a Log)
 How to Draw a Jellyfish Step by Step (Cute, Easy Guide)
 How to Draw a Grim Reaper Step by Step (Cute Halloween)
 How to Draw a Care Bear Step by Step (Cute Fan Art for Kids)
 How to Draw Cerberus Step by Step (Cute and Easy)
 How to Draw a Monster Step by Step (Cute and Easy)

