
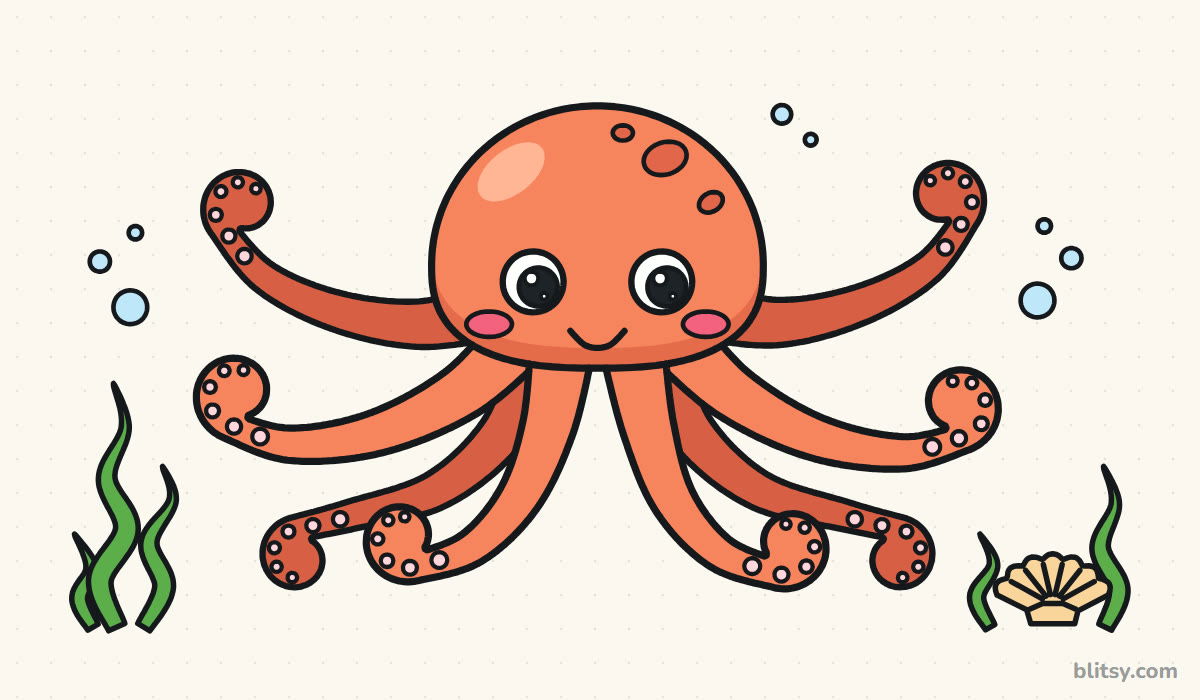
Eight wiggly arms scare off a lot of beginners before they even pick up a pencil. The trick I use is simple: every arm starts as one thin curved line, and only later does it get its thickness. Here's how to draw an octopus step by step, from a dome-shaped head to curled arm tips dotted with suckers, finished off with bubbles and a little seashell. Kids around six can follow along, and older artists can slow down on the curls.
Lines drawn in the current step show up bright blue, and everything from earlier steps turns gray, so you always know what to copy next. The thin pale blue lines are guides. They disappear in step 10.
Quick overview
⏱️ Time: 30 to 40 minutes with coloring
🎯 Level: easy; the curled tips take a little patience
✏️ Steps: 11
🐙 You'll draw: a smiling octopus with eight curly arms, bubbles, a shell and seaweed
Octopus Supplies Worth Grabbing First
- A pencil (HB or 2B) for soft guide lines
- A clean eraser
- A black fineliner or felt-tip pen for the final lines
- Colored pencils or markers in coral orange, a darker orange, light pink, pink, light blue, peach and green
- A sheet of paper turned sideways, since the arms spread wide
If you only own one orange, that's fine: press lightly for the front arms and much harder for the back ones.
How to Draw an Octopus Step by Step
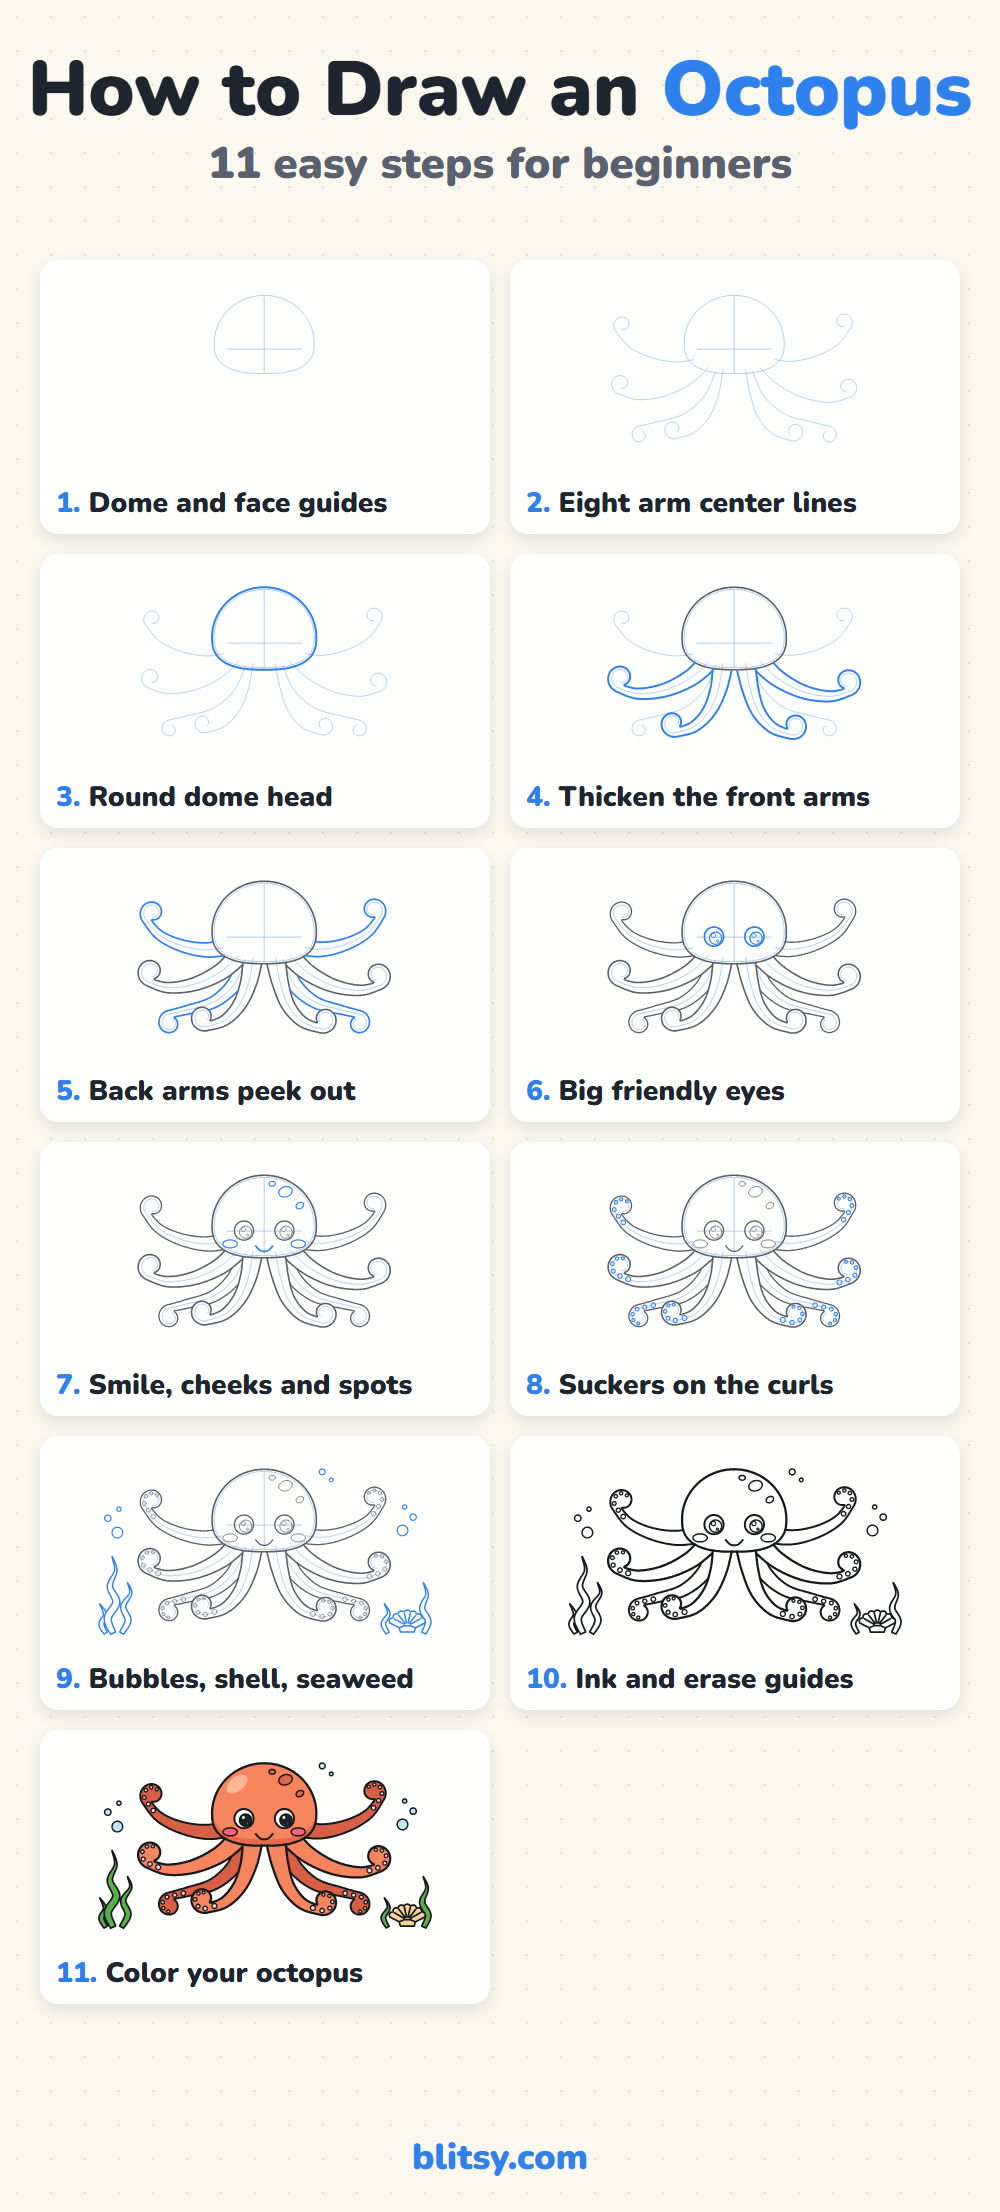
Step 1: Sketch the dome and face guides
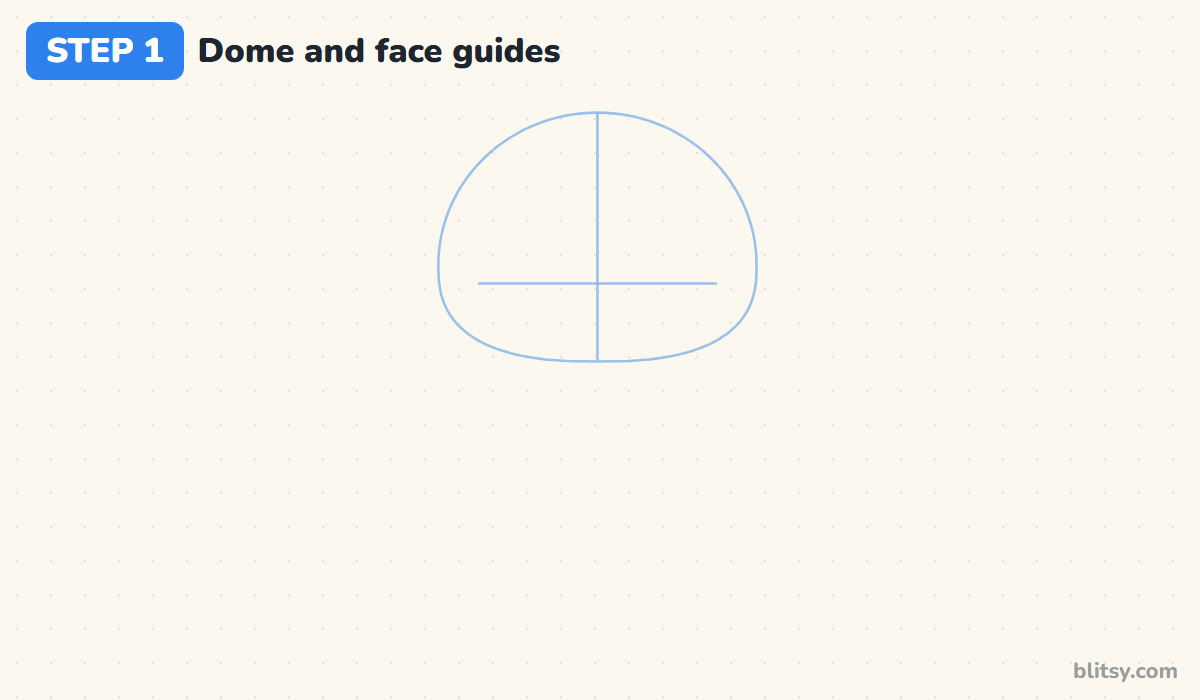
Start near the top middle of your page with a shape like an upside-down bowl: round on top, a bit flatter underneath. Make it roughly a third as wide as the page. Draw a light vertical line down its middle, then a short level line a little below halfway. Those two lines decide where the eyes sit later.
💡 Tip: Press so lightly that you could erase the line with one swipe.
Step 2: Draw eight arm center lines
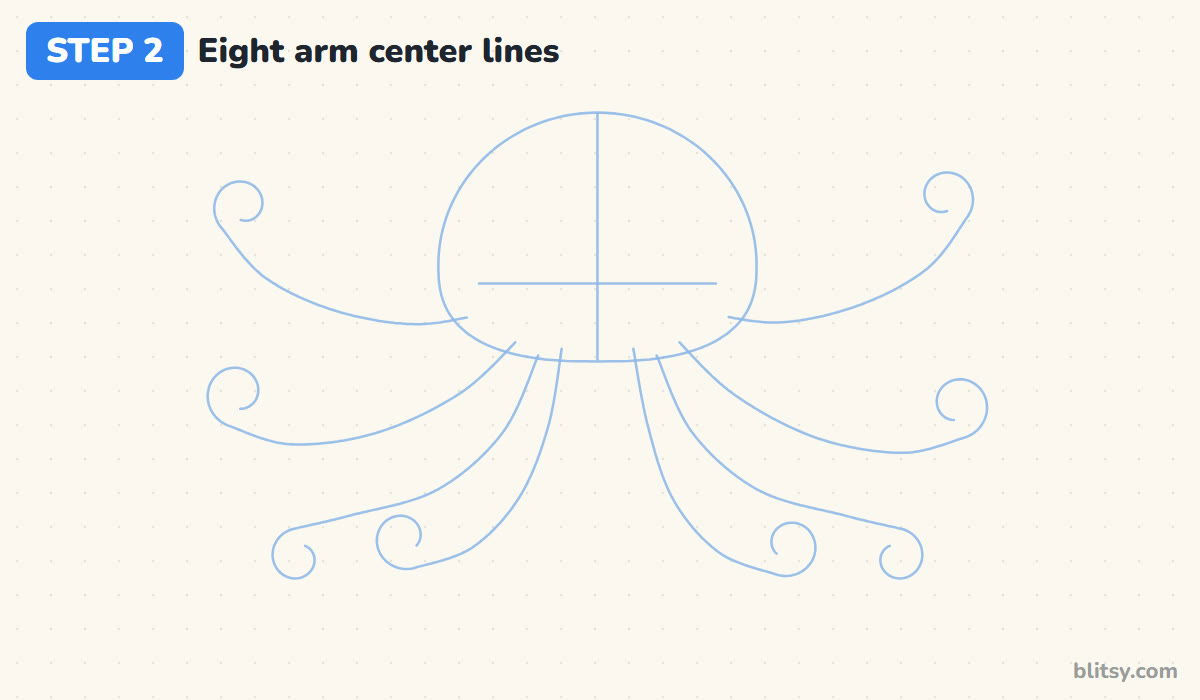
This is the step I care most about. Draw one thin curve for each arm, starting at the bottom edge of the dome. Two sweep up beside the head, two reach straight out to the sides, two stretch low toward the bottom corners, and two run down near the middle. Finish every curve with a small spiral at the end. Count them before you move on: four on the left, four on the right.
💡 Tip: Swing each curve from your elbow, not your fingers, so it stays smooth.
Step 3: Outline the round dome head
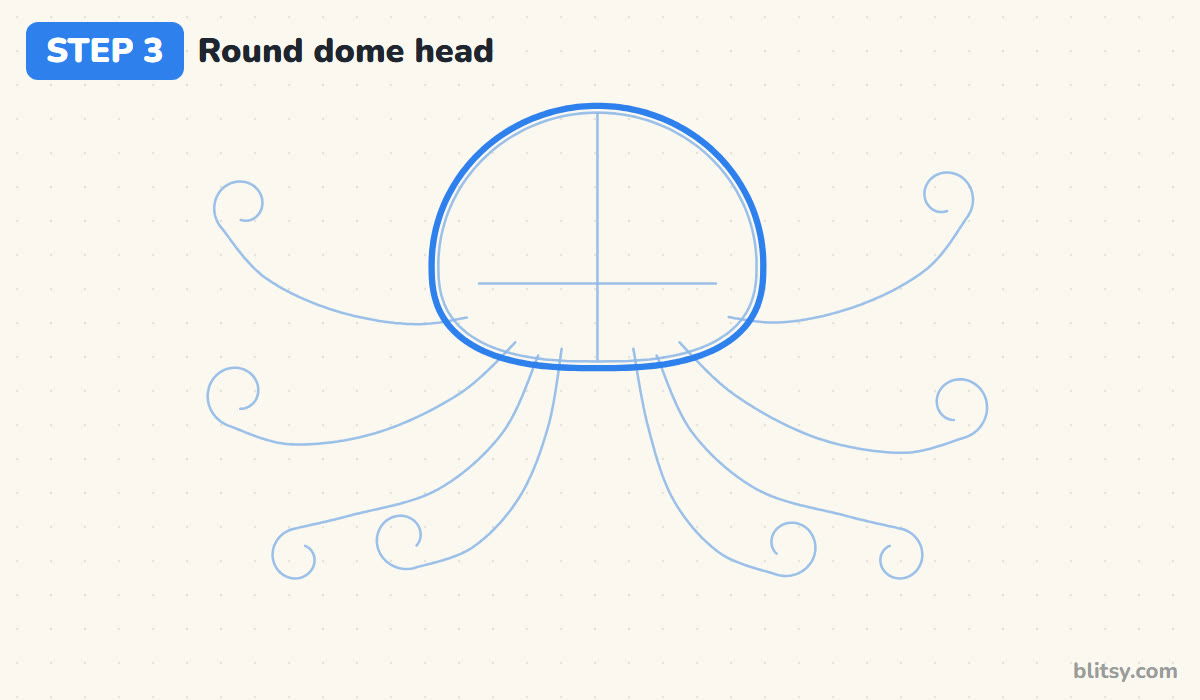
Trace around the dome guide with a confident line, sitting just outside it. Keep the top tall and round and let the bottom edge flatten a little, because the arms tuck under it. I like the head big compared to the arms; a large head is what makes a cartoon octopus look friendly instead of creepy.




💡 Tip: Turn your paper as you go so your hand always pulls the line toward you.
Step 4: Thicken the four front arms
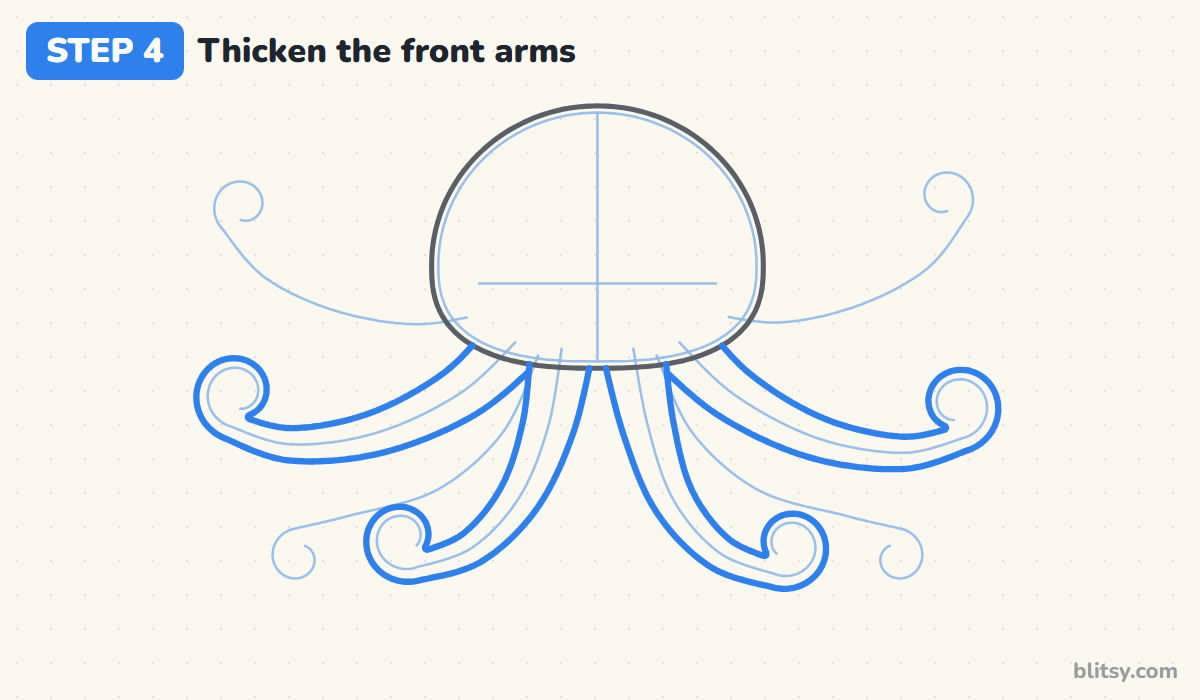
Pick the four arms closest to you: the pair reaching straight out to the sides and the pair running down the middle. Draw a line on each side of their center lines, wide at the head and narrowing toward the tip, then follow the spiral around and close it with a rounded end. Where an inner arm crosses an outer one, finish the inner arm first and stop the outer line where it meets it.
💡 Tip: Keep the gap between both sides shrinking evenly, like a carrot.
Step 5: Let the back arms peek out
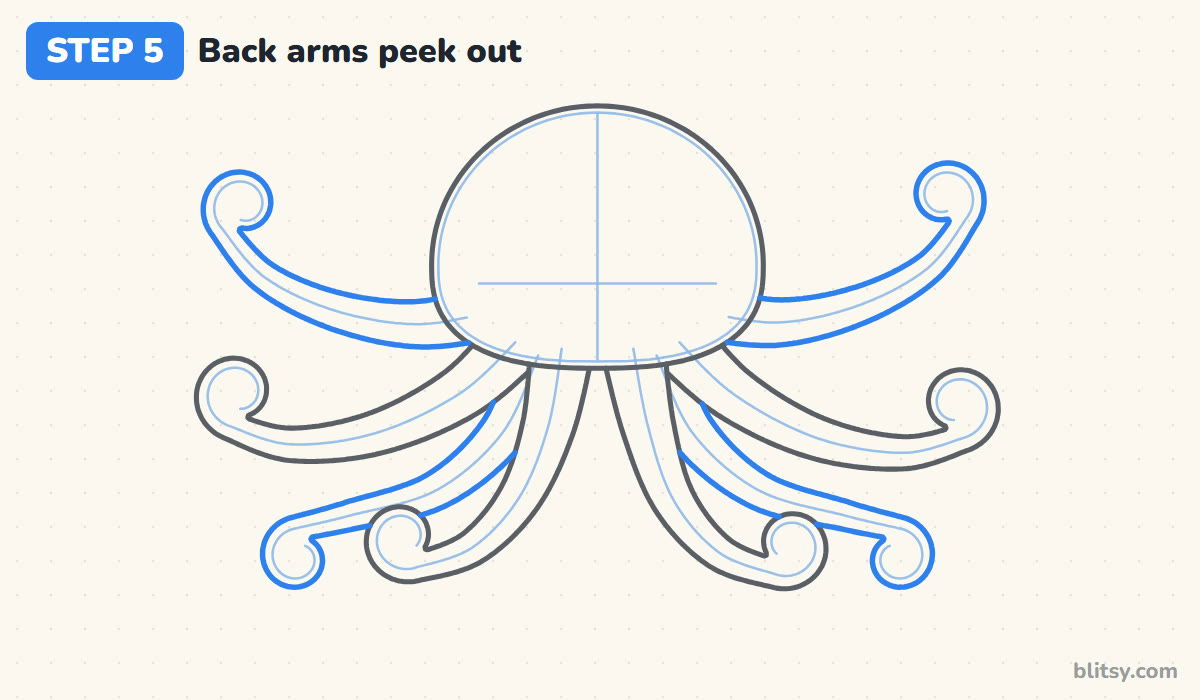
The remaining four arms sit behind. Thicken them the same way, but stop every line the moment it touches a front arm or the head. That small habit is what makes them look farther away. Two back arms rise up beside the head, and the other two slip out between the front arms before curling at the bottom corners.
💡 Tip: If a back line crosses a front arm, erase that bit right away.
Step 6: Add big friendly eyes
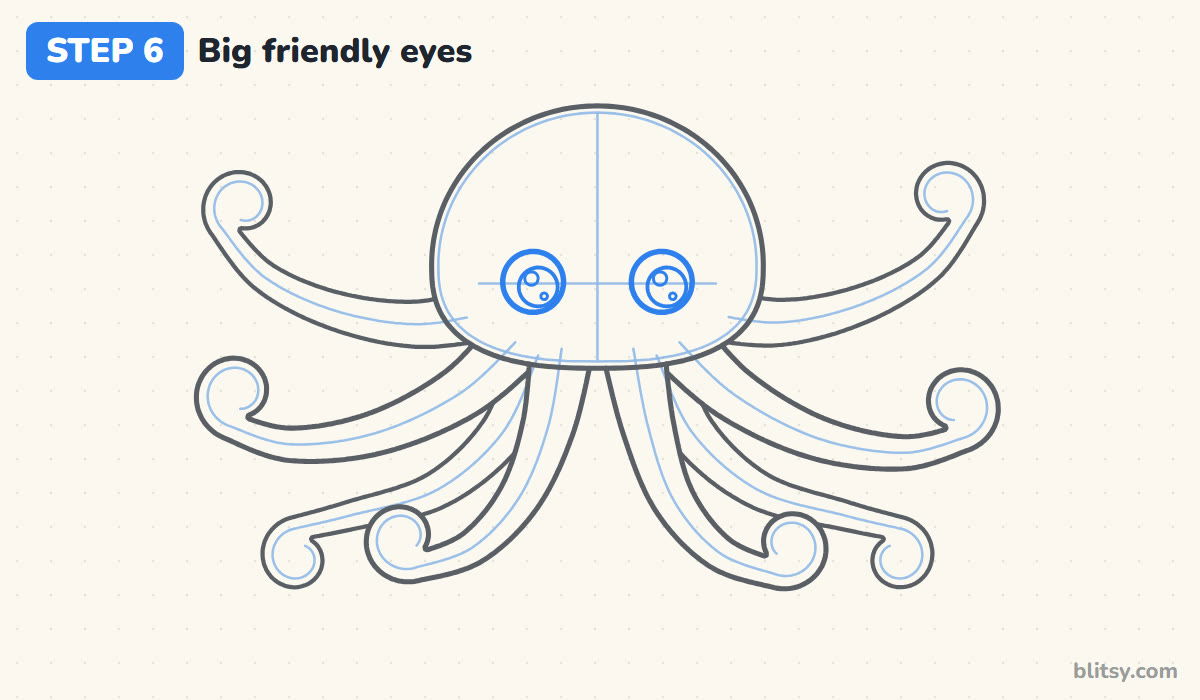
Place two large circles on the level guide, one on each side of the center line, leaving about one eye width between them. Inside each, draw a big round pupil shifted slightly toward the middle and down. Then add one small shine circle at the top left and a tiny one lower down. Leave both shines empty.
💡 Tip: Put the shines on the same side in both eyes, or the gaze looks crossed.
Step 7: Draw a smile, cheeks and spots
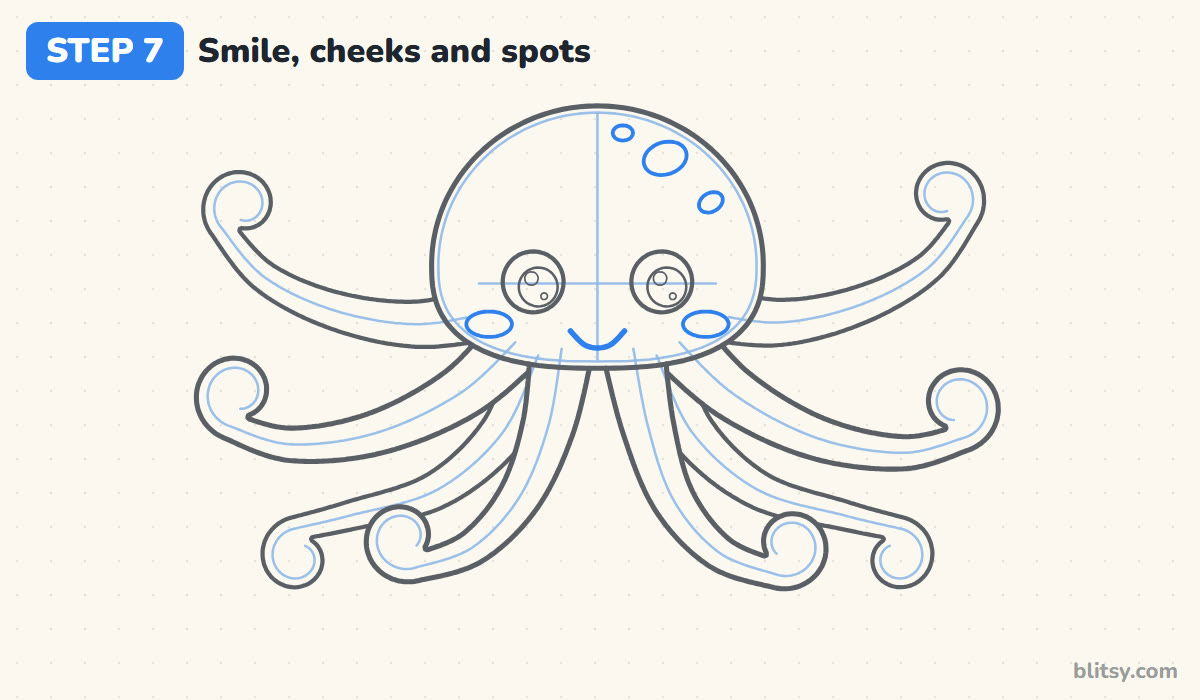
Under the eyes, right on the center line, draw a short curved smile. Mine is barely wider than one eye, which keeps the face shy and sweet. Set a flat oval cheek under each eye, close to the edge of the head but fully inside it. Finish with three spots of different sizes on the upper right of the dome.

💡 Tip: Odd numbers of spots look more natural than even ones.
Step 8: Add suckers on the curls
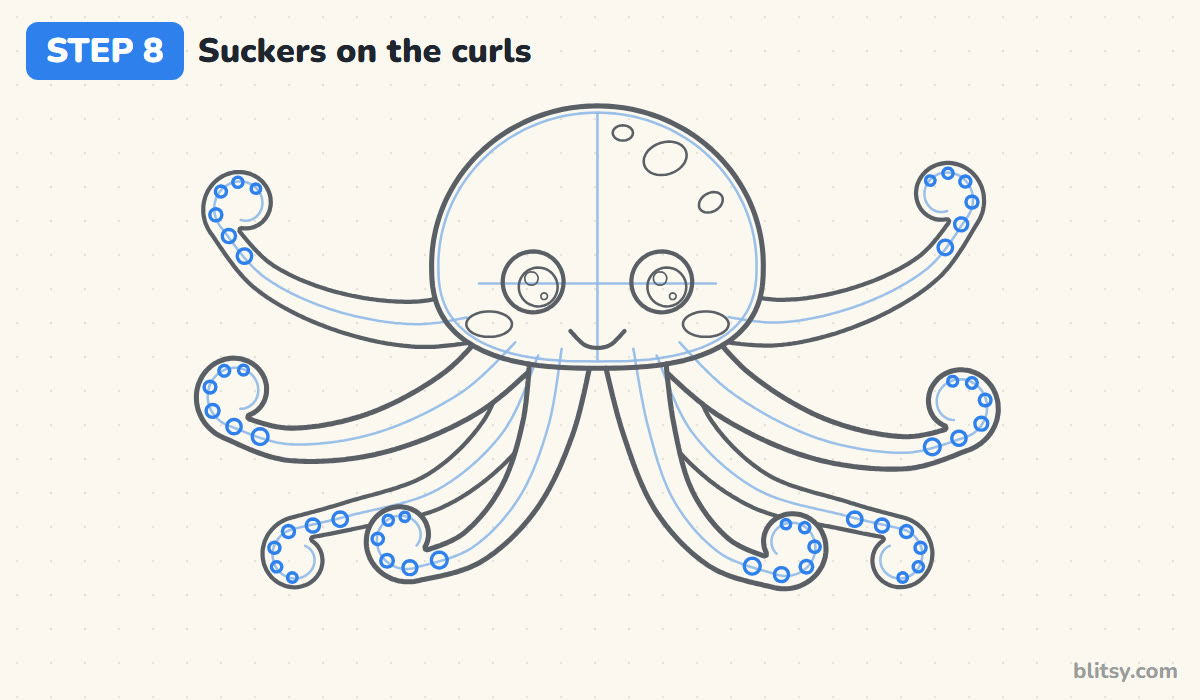
Real octopuses carry hundreds of suckers on the underside of their arms, and the curled tips are where we get to see them. Draw a row of small circles following each spiral, biggest near the start of the curl and getting smaller toward the tip. Give the back arms a row too, but skip any spot hidden by a front arm.
💡 Tip: Space the circles about one circle apart so the row reads clearly.
Step 9: Add bubbles, a shell and seaweed
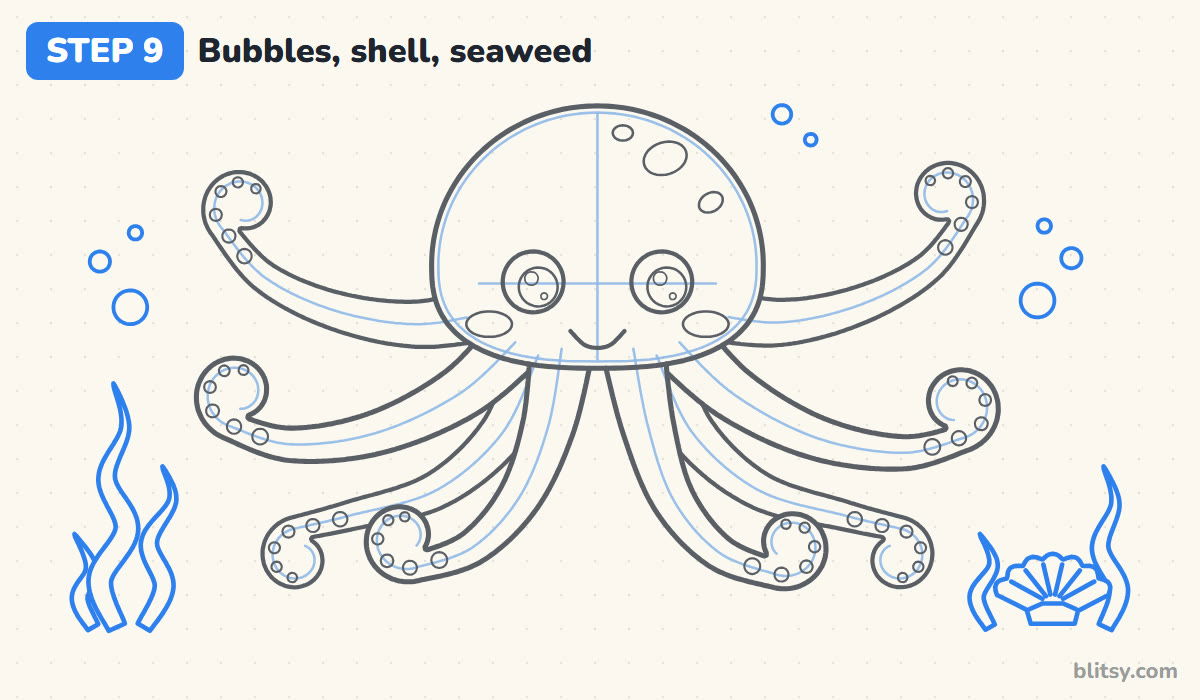
Now give your octopus somewhere to live. Scatter a few bubbles in small groups on both sides, mixing big and tiny ones. In the bottom right corner, draw a fan-shaped scallop shell with a little base and lines spreading from it. Then grow some tall wavy seaweed blades from the bottom edge on the left, plus two on the right beside the shell.
💡 Tip: Keep the scene away from the arms so the octopus stays the star.
Step 10: Ink the lines and erase the guides
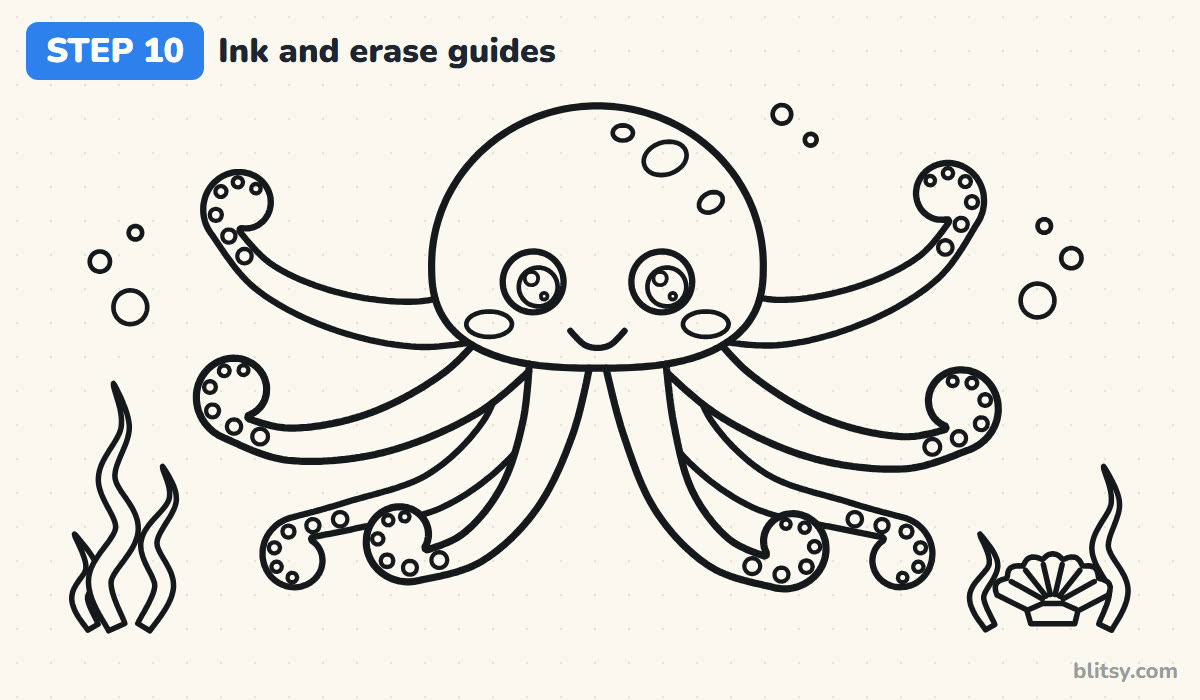
Go over every keeper line with your black pen: the head, all eight arms, the face, the suckers and the scene. I take the spirals slowly and turn the page around them. When the ink has fully dried, erase the dome guide, the face cross and all the arm center lines. What's left should be a clean outline.
💡 Tip: Test the ink with a fingertip in a corner before you start erasing.
Step 11: Color your octopus
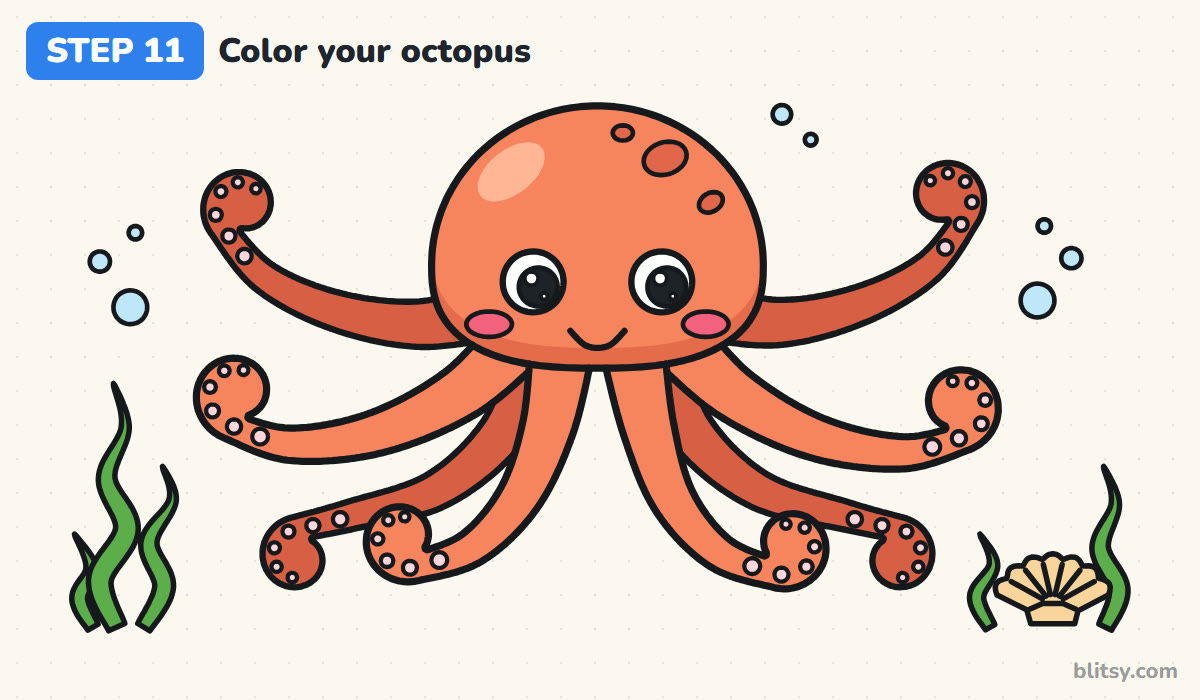
Color the head and front arms coral orange, then use a darker orange on the back arms and spots so they sink behind. Add a strip of that darker shade along the bottom of the head and leave a pale patch near the top left for shine. Suckers get light pink, cheeks a stronger pink, bubbles light blue, the shell peach and the seaweed green.

💡 Tip: Color each arm from the head toward the tip, following its curve.
Where Eight Arms Tend to Tangle
- Drawing the arm outlines straight away. Without a center line, the two sides drift apart and the arm gets lumpy. Lay down all eight thin curves first.
- Ending up with seven or nine arms. It happens more often than you'd think. Count your center lines in step 2, before anything is inked.
- Arms that stay the same width. They end up looking like sausages. Start wide under the head and taper all the way to the curl.
- Curls that are too tight. A tiny spiral fills in once you thicken it. Leave a curl roughly as wide as the arm is thick at the head.
- Back arms drawn over the front ones. The octopus flattens out and looks tangled. Stop each back line where it meets a front arm.
Octopus Twists: New Colors and Poses
Octopuses can change their skin color in a blink, so you have every excuse to experiment. Try a purple octopus with lilac suckers, a red one covered in tiny white freckles, or a pale blue one floating in a dark sea. You can also curl one arm around a treasure chest, give your octopus a tiny sailor hat, or turn the eyes to look sideways at a passing fish. A floaty neighbor from the jellyfish drawing tutorial fits right into the same scene, and the easy mermaid drawing tutorial makes a fun underwater companion.
Free Octopus Coloring Page and Printable Steps
Prefer paper over a screen? The octopus coloring page puts a colored example and a color key at the top, with a big outline underneath ready for crayons. The step-by-step PDF guide has all 11 steps with pictures and tips. Both fit Letter or A4 paper.
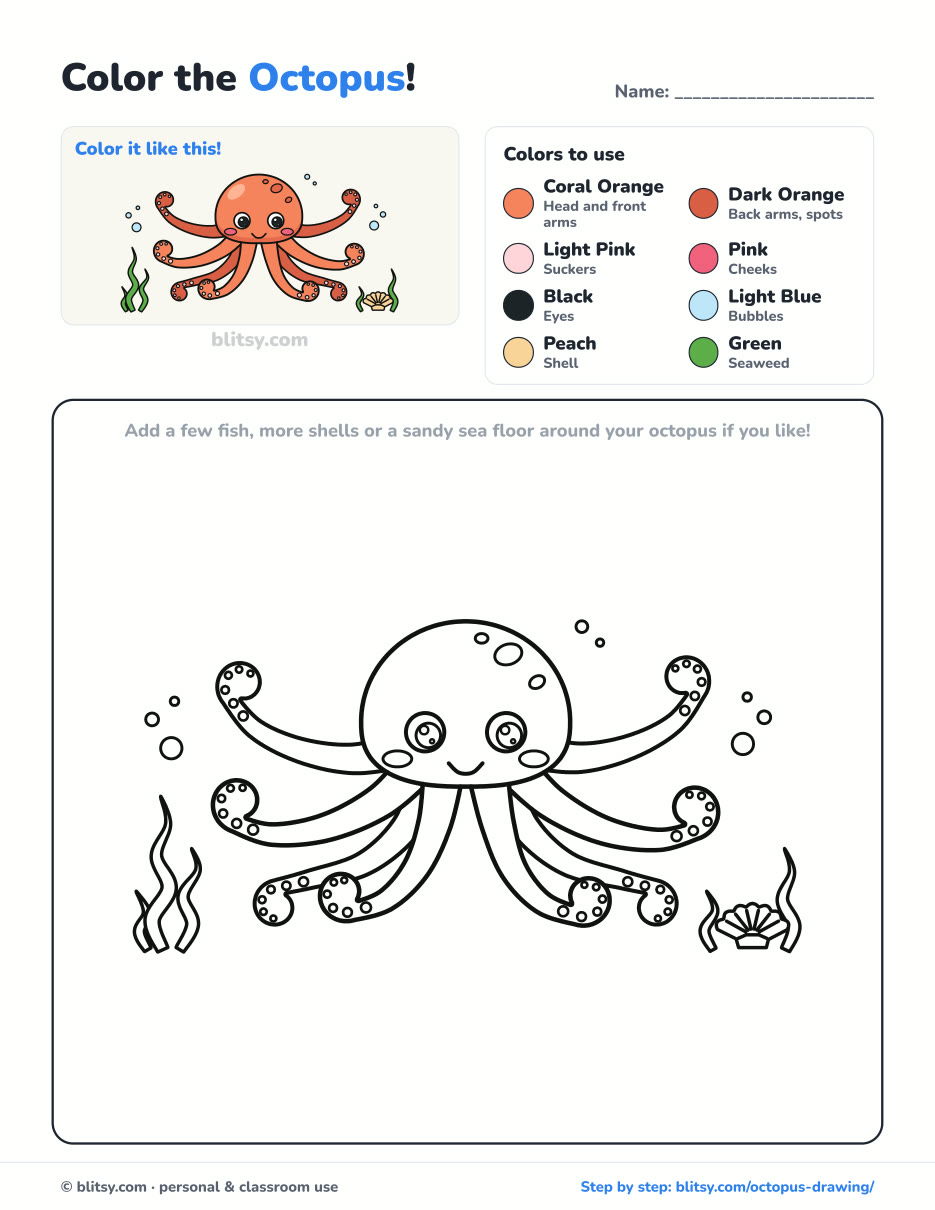
Black outlines with a colored example and the color names at the top. Ready to print and color.
⬇️ Download Coloring PageEvery step picture with its instructions and tips, to keep beside your paper while you draw.
⬇️ Download Drawing Guide📱 On a phone? Tap a download button, then open the file and choose Share → Save to Files or Print. On a computer, the PDF opens or saves straight to your Downloads folder.
Every Octopus Step on One Tall Pin
Octopus Drawing Questions, Answered Simply
What is the easiest way to draw an octopus?
Draw a dome for the head, then one curved line for each arm with a small spiral at the end. Thicken the lines afterward, wide at the head and thin at the tip. Working from center lines keeps all eight arms smooth.
How many arms does an octopus have?
Eight. They're called arms, not tentacles, and each one is lined with suckers underneath. A real octopus also has three hearts and blue blood, which kids love to hear while they draw.
Is this octopus drawing good for kids?
Yes. Most children from about six can manage it. Younger kids can skip the suckers and draw all eight arms as simple curly shapes without worrying about which one sits in front.
How long does it take to draw an octopus?
Plan on 30 to 40 minutes including color. The arm outlines in steps 4 and 5 take the longest, so don't rush them.
Count those arms one last time, give your octopus a name, and maybe add a ninth bubble just for fun. 🐙
Related posts:
 How to Draw a Tooth Step by Step (Cute and Easy for Kids)
 How to Draw a UFO Step by Step (Cute Alien Saucer)
 How to Draw an Astronaut Step by Step (Cute and Easy)
 How to Draw an Owl Step by Step (Cute Night Owl)
 How to Draw an Axolotl Step by Step (Cute and Easy)
 How to Draw Cute Animals Step by Step (Cat, Bear & Bunny)
 How to Draw a Frog Step by Step (Cute Frog on a Log)
 How to Draw a Jellyfish Step by Step (Cute, Easy Guide)
 How to Draw a Grim Reaper Step by Step (Cute Halloween)
 How to Draw a Care Bear Step by Step (Cute Fan Art for Kids)
 How to Draw Cerberus Step by Step (Cute and Easy)
 How to Draw a Monster Step by Step (Cute and Easy)

