
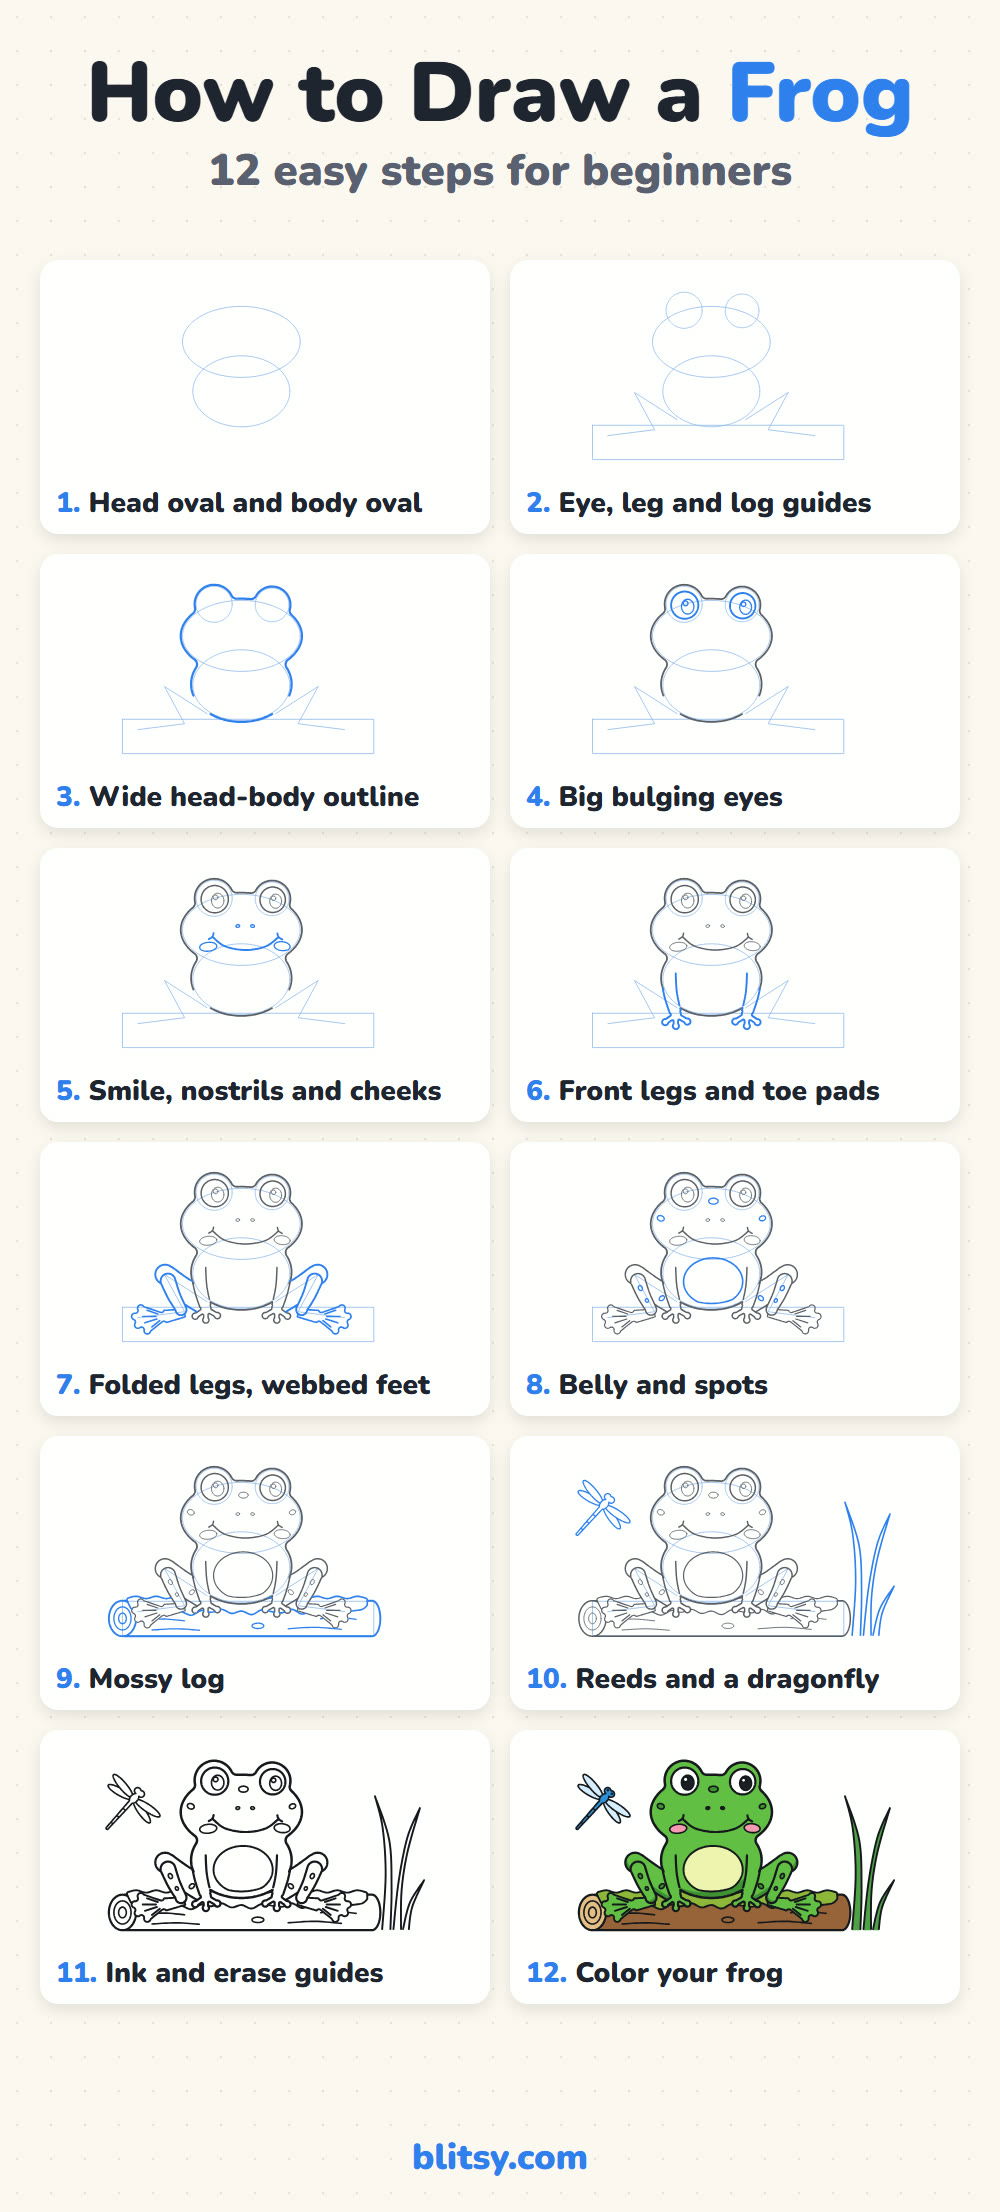
Frogs are a gift for beginners, because a frog has no neck at all. The head and body melt into one wide shape, so most of the work is in the eyes and the legs. In this lesson I'll show you how to draw a frog step by step, starting with two loose ovals and ending with a smiling green frog sitting on a mossy log. The folded back legs look tricky at first, but they follow one simple zigzag.
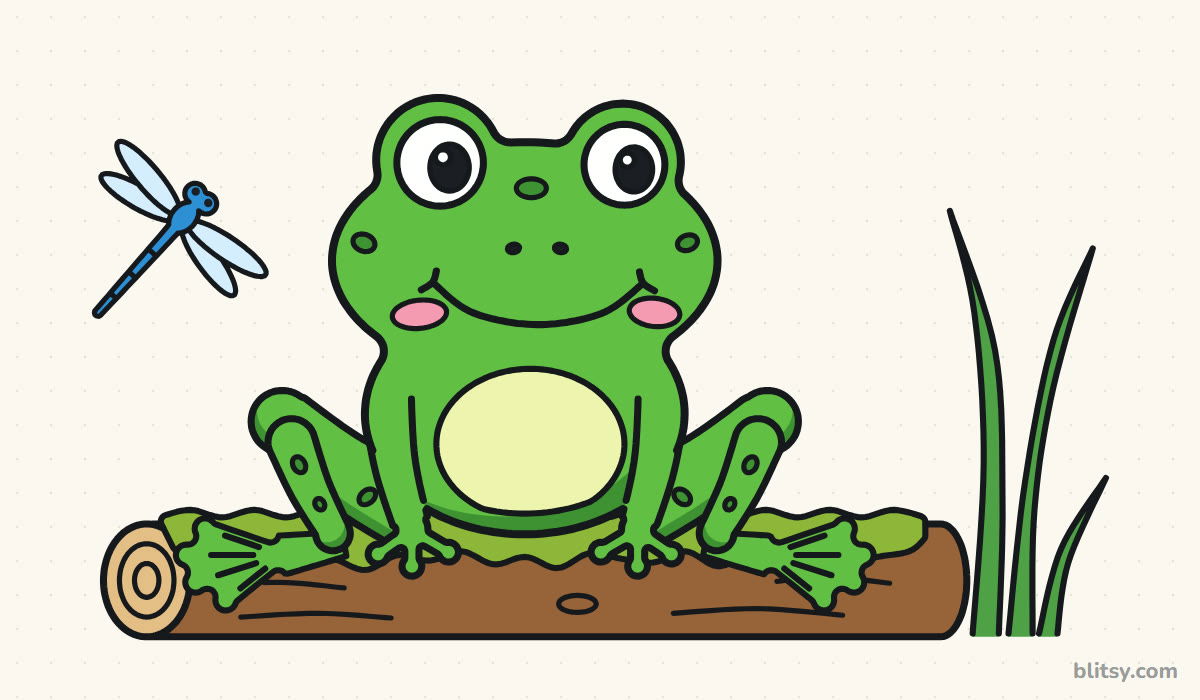
Every frog picture below uses bright blue for the lines you add in that step. Dark gray shows the work you already did, and the pale blue shapes are soft guides that get erased later on.
Quick overview
⏱️ Time: about 35 to 45 minutes, coloring included
🎯 Level: easy, fine for kids around 6 and up
✏️ Steps: 12
🐸 You'll draw: a cartoon frog with folded legs and webbed feet, sitting on a mossy log beside some reeds, with a dragonfly nearby
Supplies for a Frog on a Log
- A regular pencil (HB is ideal) for light sketching
- A clean eraser that doesn't smear
- A black fineliner or thin marker for the final lines
- Colored pencils or markers: green, dark green, pale yellow, pink, brown, tan, yellow-green and blue
- A sheet of plain paper turned sideways, so the log fits
If you only own one green, press lightly for the body and harder for the spots and shading.
How to Draw a Frog Step by Step
Step 1: Sketch a head oval and a body oval
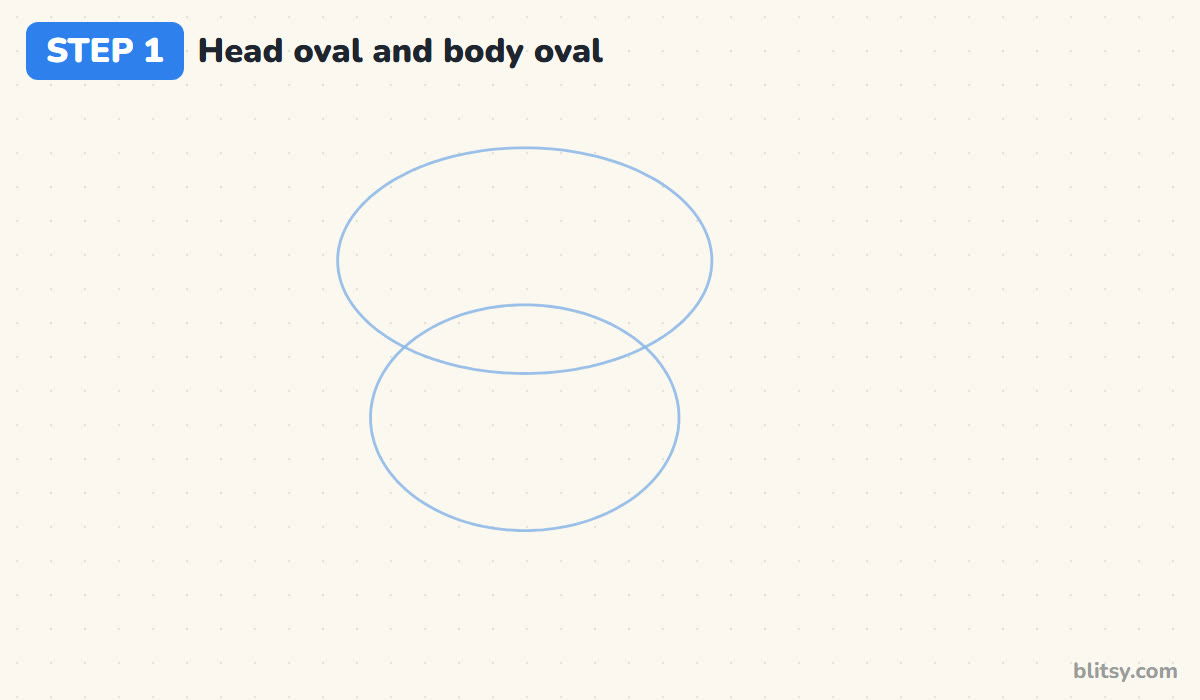
Draw a wide oval near the middle of the page for the head. Below it, draw a second oval that is a little narrower and overlaps the bottom of the head. Leave plenty of room on both sides, because the back legs will stick out wide later.
💡 Tip: Keep your pencil pressure feather light. You will erase both ovals.
Step 2: Add eye circles, leg zigzags and a log box
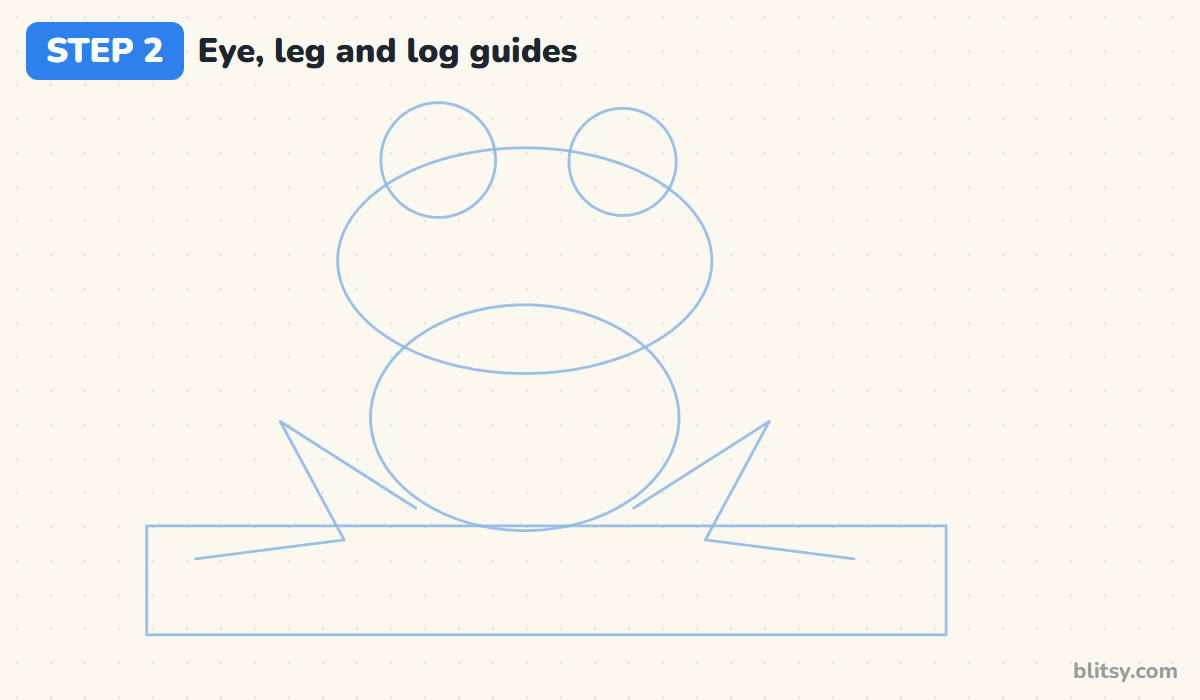
Sit two circles on top of the head oval, about halfway out of it, for the eyes. On each side, draw a zigzag: up and out from the bottom of the body to the knee, back down toward the body, then out to the side for the foot. Finish with a long box under the frog for the log.
💡 Tip: The zigzags are the secret to the legs. If they look like a Z, you're on track.
Step 3: Draw the wide head and round body outline
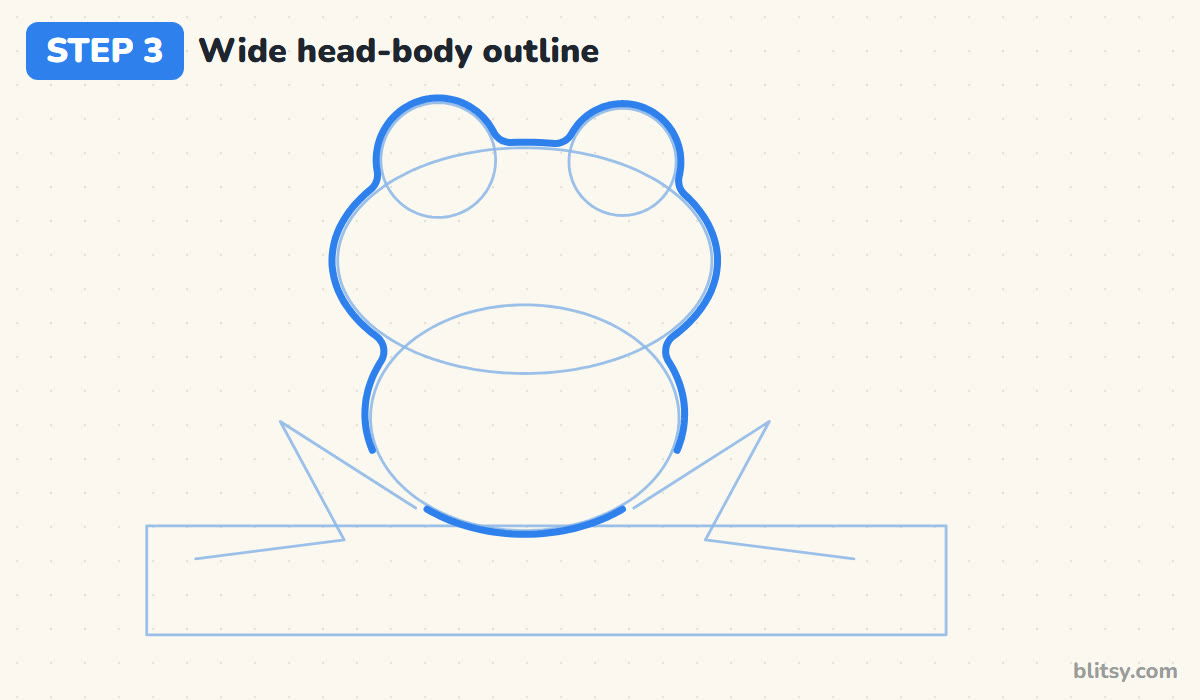
Now trace one smooth line around both ovals and over the eye circles, so the eyes become bumps on top of the head. Between the eyes, let the line dip into a shallow valley. Where the head meets the body, pull it in just a little. I stop the line on the lower sides, where the front legs will go.




💡 Tip: Don't draw a neck. A frog's head flows straight into its body.
Step 4: Add the big bulging eyes
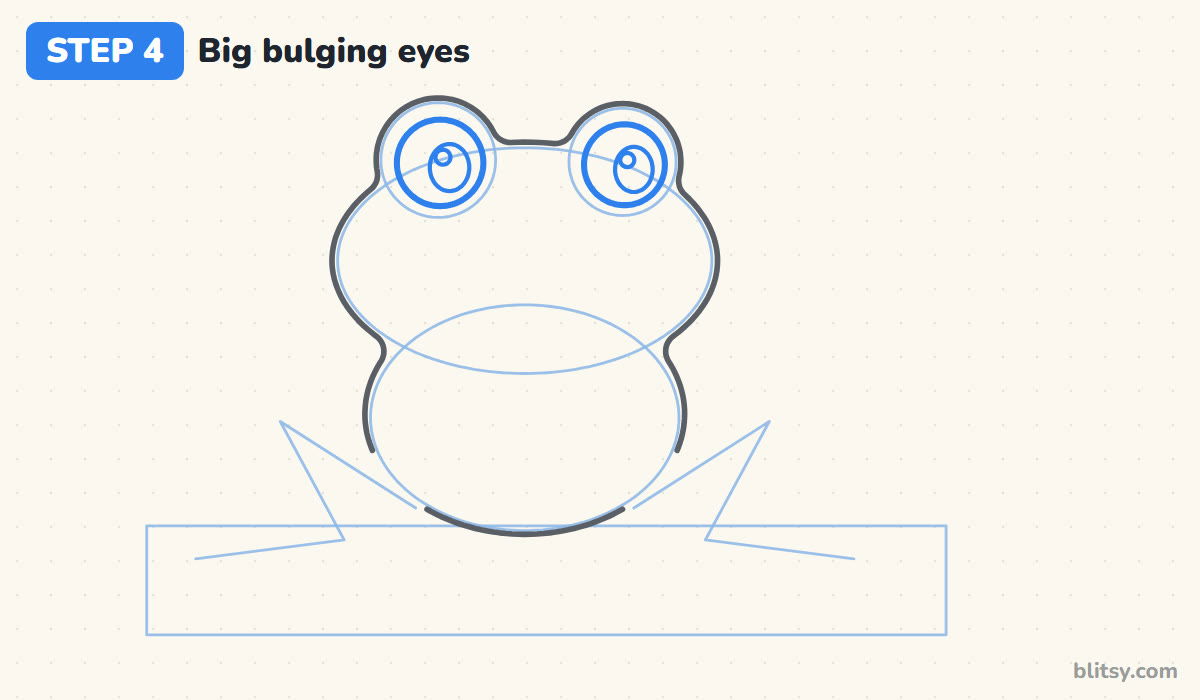
Inside each eye bump, draw a circle for the white of the eye, leaving a thin green rim around it. Add a tall oval pupil in each one, nudged a little toward the right, plus a small circle near the top for the shine.
💡 Tip: Make the shine circles the same size and in the same spot in both eyes.
Step 5: Draw the smile, then the nostrils and cheeks
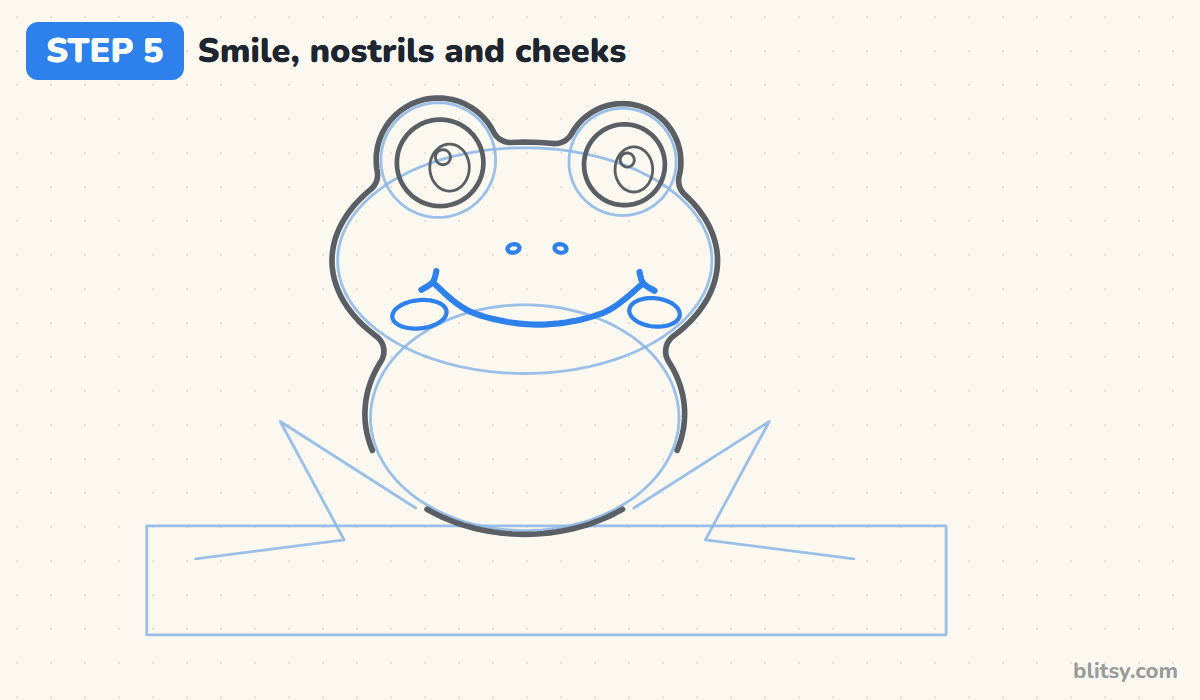
A frog's mouth is very wide, so let the smile run almost from one side of the head to the other, dipping in a gentle curve. Tick a tiny line at each end like a dimple. Place two small dots for nostrils halfway between the eyes and the mouth, and two flat ovals under the smile corners for cheeks.
💡 Tip: I keep the nostrils tiny. Big holes turn the face into a pig.
Step 6: Draw the front legs and toe pads
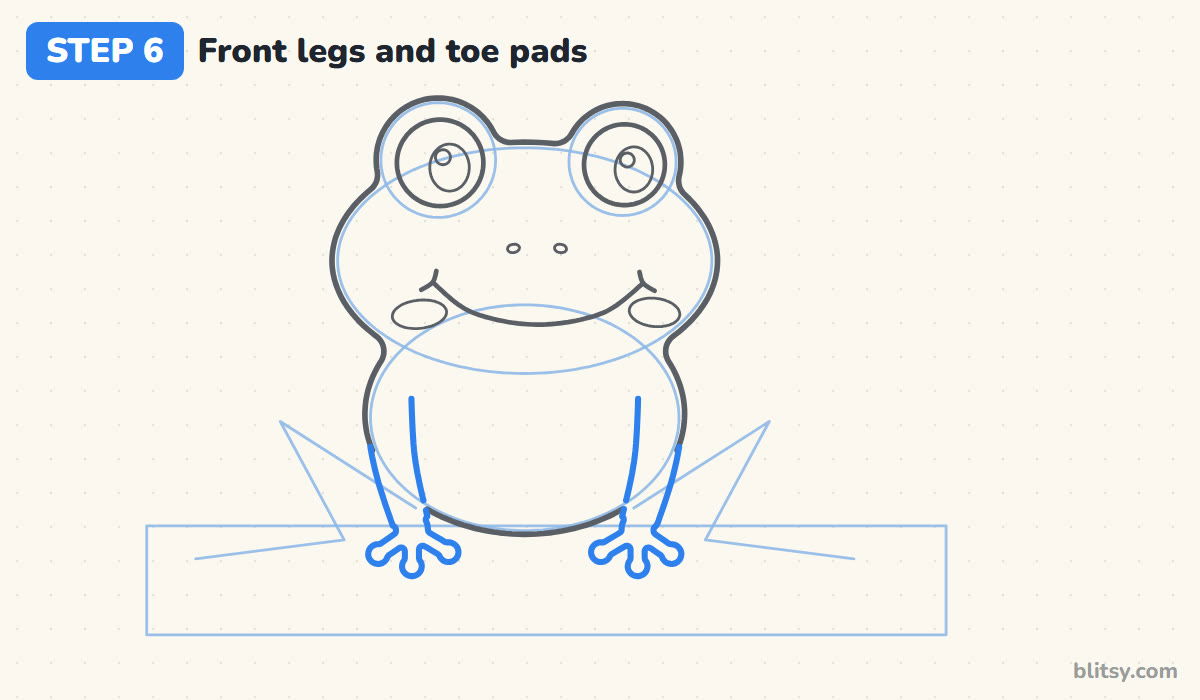
Each front leg drops nearly straight down from the side of the body, getting slimmer toward the bottom. At the end, split it into three short fingers that spread out like a fan. Put a round pad on the tip of every finger. Those pads are what tree frogs use to grip leaves.
💡 Tip: Let the outer edge of each leg become part of the body outline.
Step 7: Fold the back legs and add webbed feet
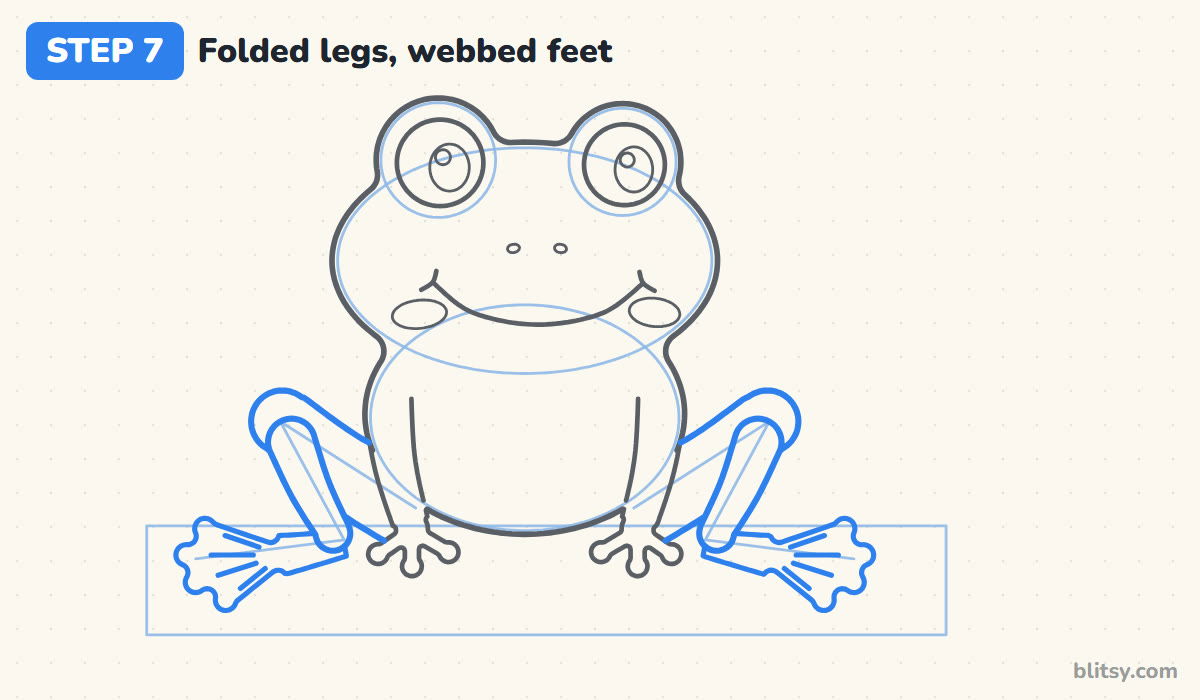
Follow your zigzag guides. Draw the big thigh first, rising from the bottom of the body to a rounded knee. Then draw the shin in front of it, coming back down from the knee to the ankle. From the ankle, a long foot reaches outward and ends in four toes with round pads, joined by curved webbing. Add a few short lines on the foot for the toe bones.

💡 Tip: Curve the webbing inward between toes, like the scalloped edge of a shell.
Step 8: Add the belly and the spots
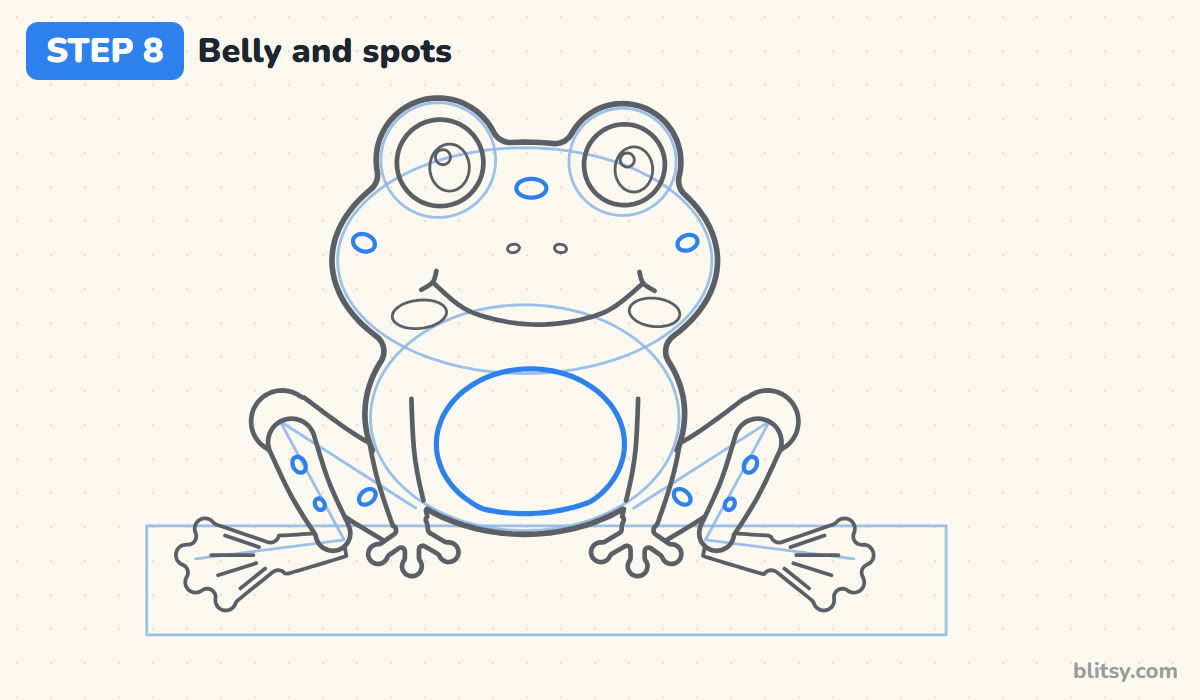
Draw a big oval on the front of the body for the pale belly, between the two front legs. Then sprinkle a few small ovals around for spots: one between the eyes, one on each side of the head, and two or three on every back leg.
💡 Tip: I keep spots away from the outline, so they don't look like holes.
Step 9: Draw the mossy log
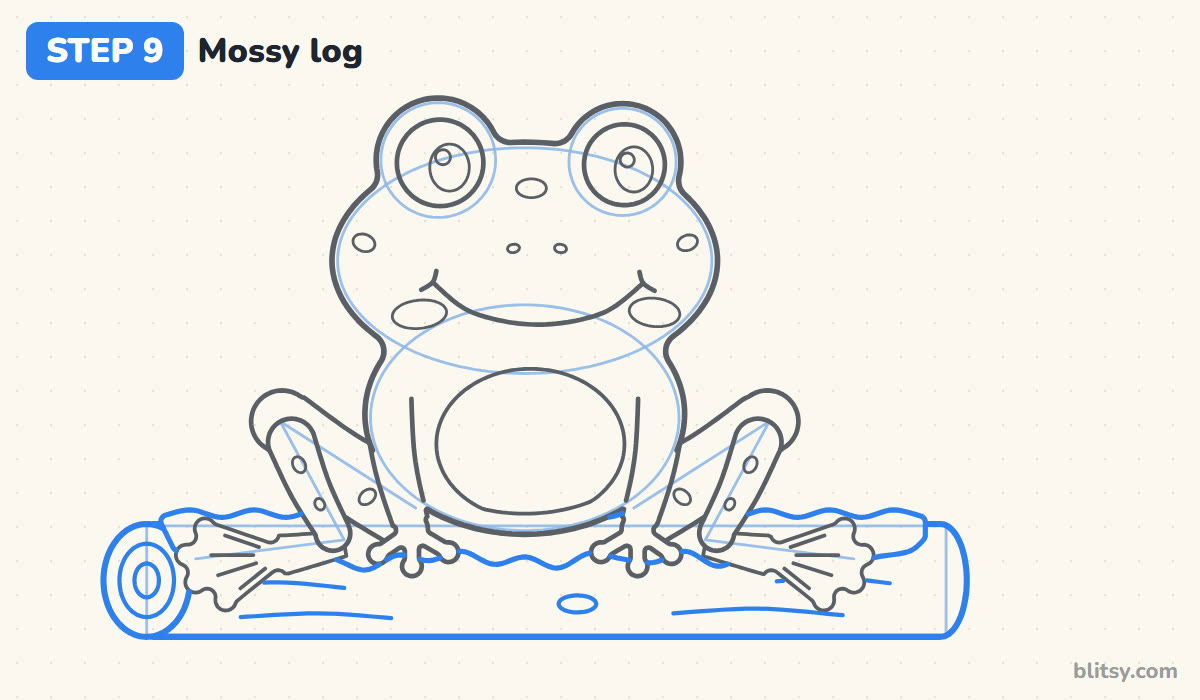
Use the box guide to draw a long log under the frog. On the left end, draw an upright oval for the cut end and add two rings inside it. The right end just gets a rounded edge. Along the top, sketch a bumpy strip of moss with a wavy, dripping lower edge, and add a few bark lines plus a small knot.
💡 Tip: Stop every log line where it meets the frog's feet. The frog sits in front.
Step 10: Add reeds and a dragonfly
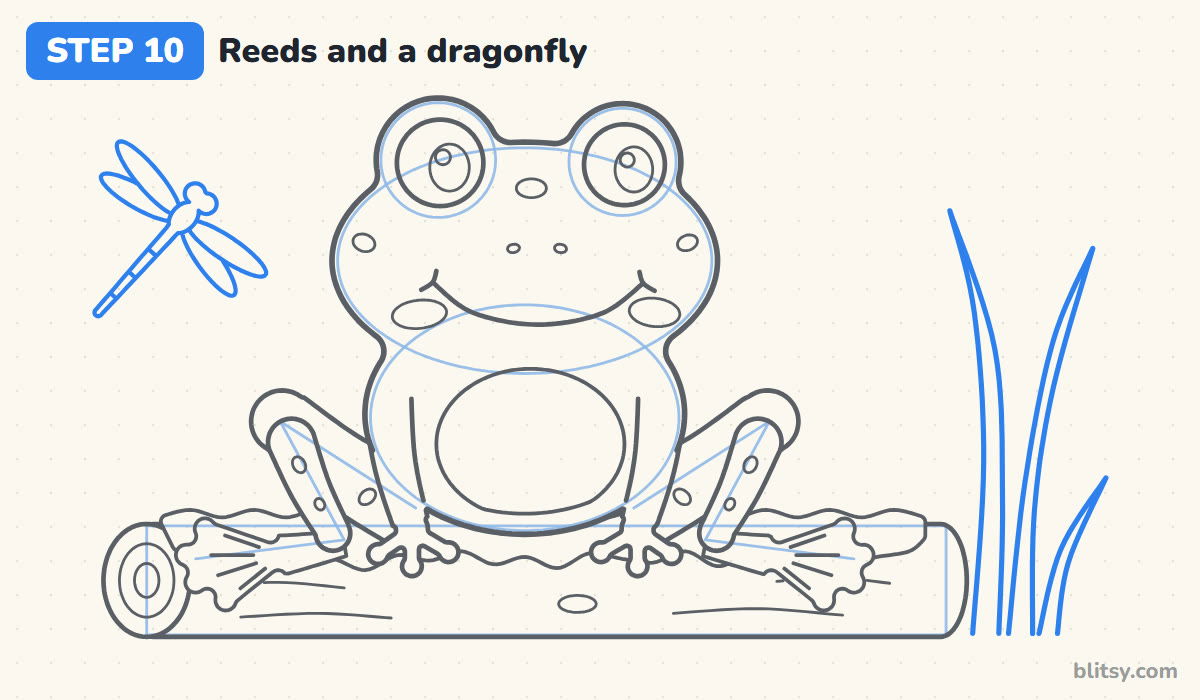
On the right, draw three tall, pointed blades that lean in different directions; they peek out from behind the log. Up on the left, draw a dragonfly: two little eye circles, a short body, a long thin tail with a few stripes, and two pairs of slim wings.
💡 Tip: Draw the back wings a bit shorter than the front ones. It makes the dragonfly look real.
Step 11: Ink your lines and erase the guides
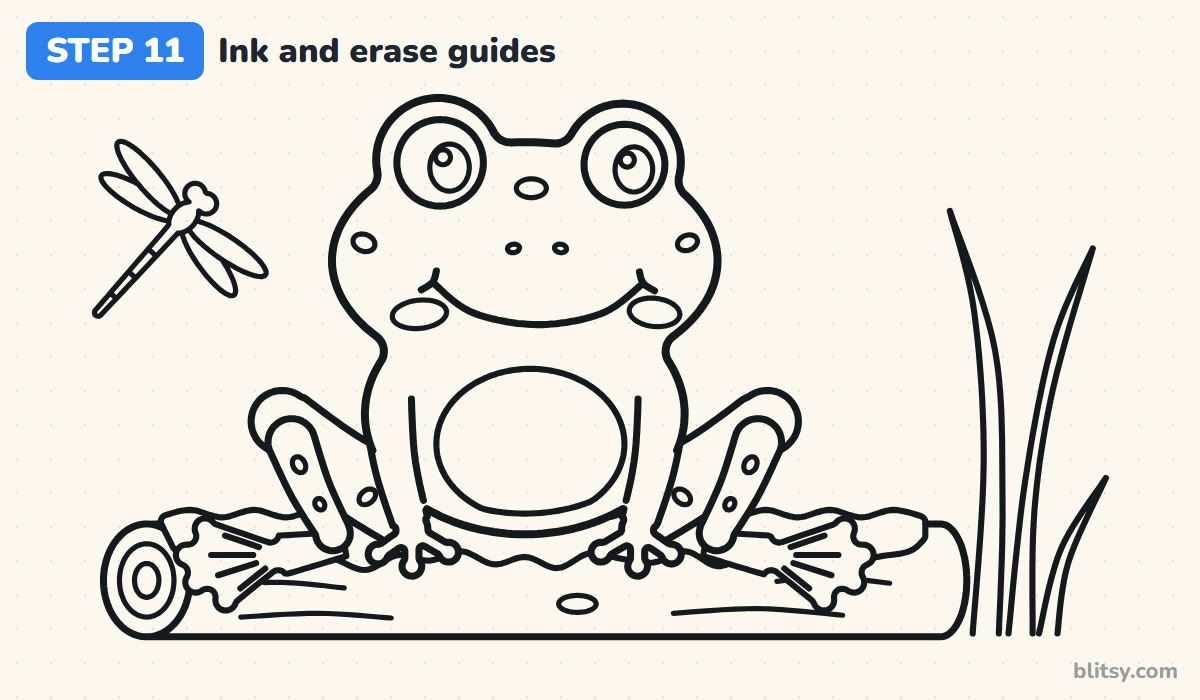
Go over every line you want to keep with the black pen, slowly. I like to ink the face first, then the legs, the log and the extras last. Wait until the ink is completely dry, then erase all the guide shapes.

💡 Tip: Rest the side of your hand on a scrap of paper so the ink doesn't smudge.
Step 12: Color your frog
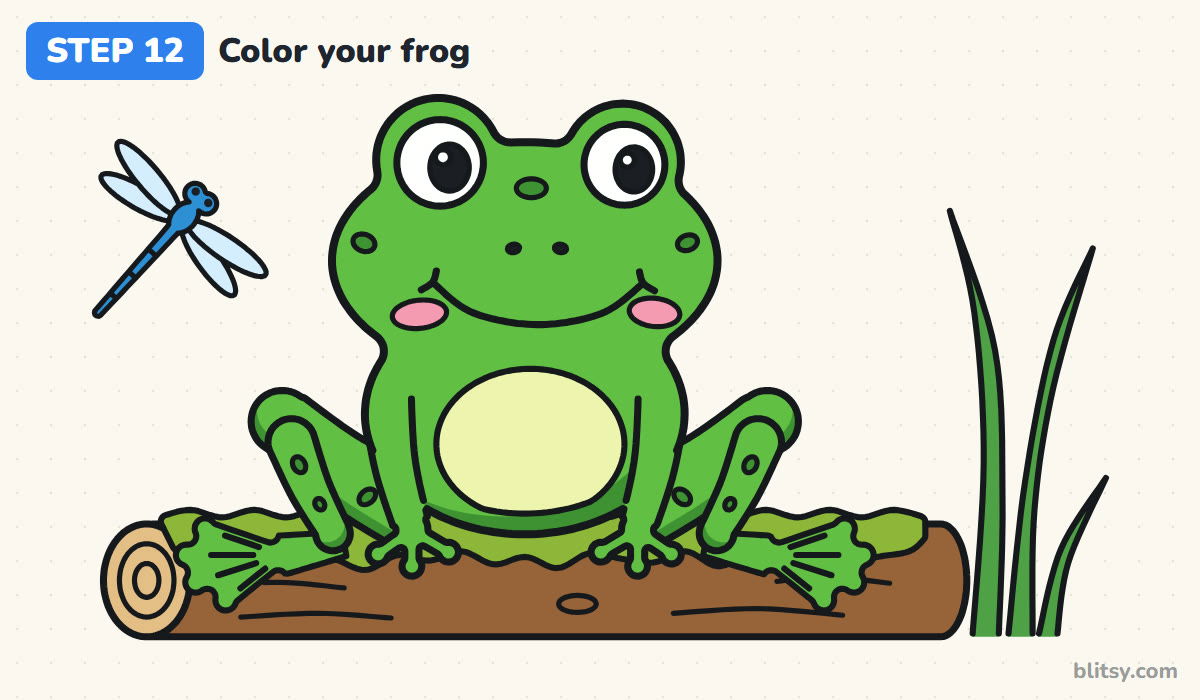
Color the frog bright green and the belly pale yellow, and give the cheeks a soft pink. Use dark green for the spots and for a little shading under the belly and along the bottom of each leg. The log is brown with a tan cut end, the moss is yellow-green, and the dragonfly is blue with very light wings.
💡 Tip: Leave the eye shines white. They make the frog look friendly.
Frog Drawing Slip-Ups and Quick Fixes
- Adding a neck. Frogs don't have one. Join the head and body in one outline with only a slight dip at the sides.
- Back legs drawn as straight sticks. A sitting frog folds its long back legs. Draw the thigh going up to the knee, the shin coming back down, and the foot pointing out.
- Eyes drawn inside the face. Frog eyes bulge on top of the head. Let them pop above the outline so they look like two bumps.
- Feet without webbing. Without it, the back feet look like hands. Connect the toes with curved skin that dips between each pair.
- A tiny mouth. A small smile looks more like a cat. Stretch it wide, nearly across the whole head.
Turn It Into a Tree Frog or a Toad
Want a rainforest look? Color the frog lime green with orange toes and red eyes, and you have a tree frog. Swap the smooth skin for lots of bumps and a brown color, and it turns into a toad. Little kids can leave out the dragonfly. If you enjoy drawing animals that live near water, try the turtle drawing tutorial next, or the smiling one in the how to draw an axolotl step by step lesson.
Printable Frog Coloring Page and Step Sheet
Prefer to color on paper? Download the free frog coloring page. It has a small colored example at the top so you can copy the colors, and a big clean outline below with room to add a pond or a few more bugs. The PDF drawing guide puts all 12 steps and tips on a few pages, and it fits Letter or A4 paper.
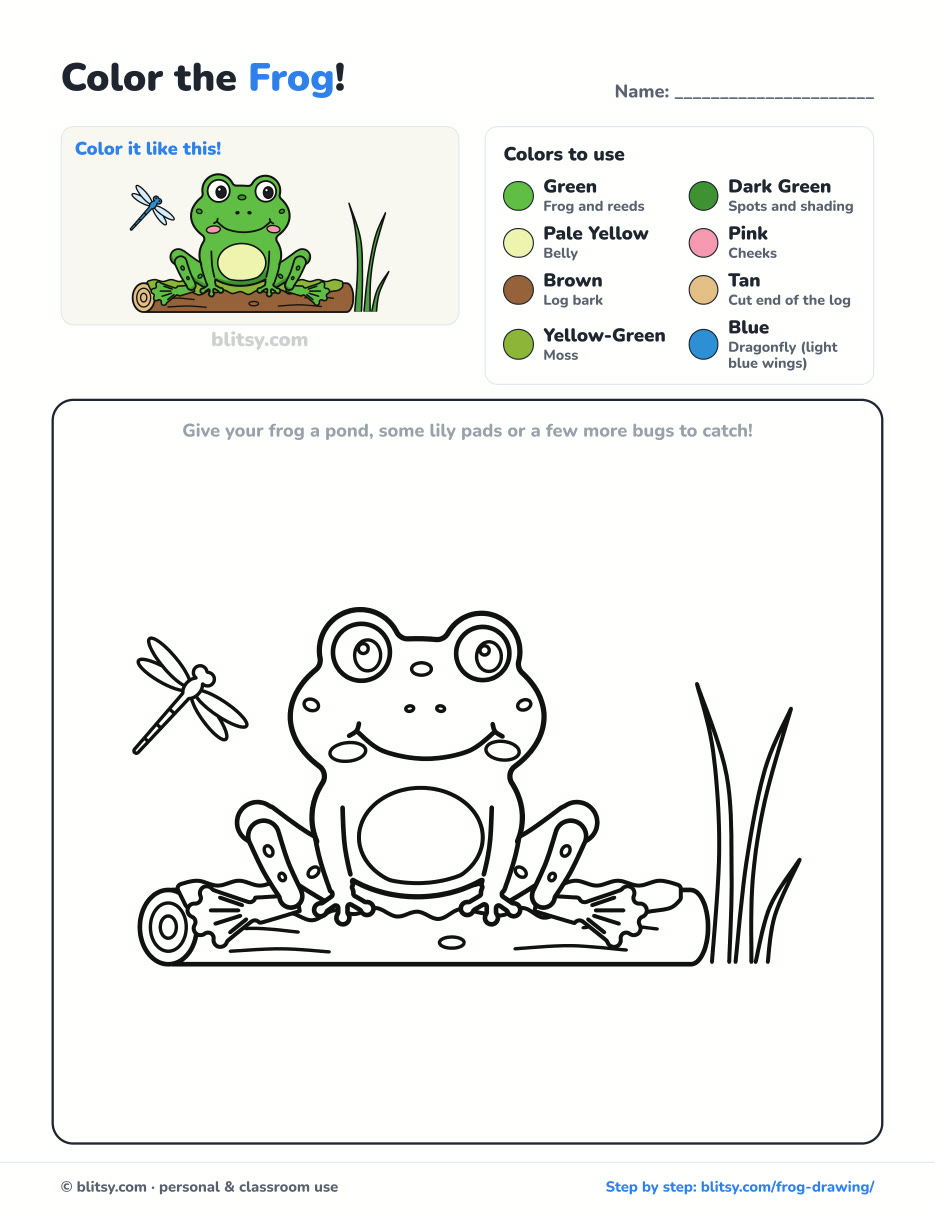
Black outlines with a colored example and the color names at the top. Ready to print and color.
⬇️ Download Coloring PageEvery step picture with its instructions and tips, to keep beside your paper while you draw.
⬇️ Download Drawing Guide📱 On a phone? Tap a download button, then open the file and choose Share → Save to Files or Print. On a computer, the PDF opens or saves straight to your Downloads folder.
Keep the Frog Steps Handy on Pinterest
Frog Questions Kids Often Ask Me
What is the easiest way to draw a frog?
Start with a wide oval for the head and a slightly smaller oval for the body, then put two circles on top for the eyes. One outline around all of them gives you the whole frog shape. Add a big smile and the legs come next.
Do frogs drink water?
Not like we do. Most frogs absorb water through their skin, often through a thin patch on the belly. That's why frogs stay near ponds, wet logs and damp leaves.
Why do frogs blink when they swallow?
Frogs use their eyes to help swallow. When a frog gulps a bug, its eyeballs sink down into its head and help push the food toward its throat.
How long does it take to draw this frog?
About half an hour to sketch and ink, plus ten to fifteen minutes of coloring. Skip the dragonfly and the reeds for a faster version.
Your frog is ready to hop off the page. What color did you give yours? 🐸
Related posts:
 How to Draw a Tooth Step by Step (Cute and Easy for Kids)
 How to Draw a UFO Step by Step (Cute Alien Saucer)
 How to Draw an Astronaut Step by Step (Cute and Easy)
 How to Draw an Owl Step by Step (Cute Night Owl)
 How to Draw an Axolotl Step by Step (Cute and Easy)
 How to Draw an Octopus Step by Step (Cute and Easy)
 How to Draw Freddy Krueger Step by Step (Cute Chibi Version)
 How to Draw a Jellyfish Step by Step (Cute, Easy Guide)
 How to Draw a Grim Reaper Step by Step (Cute Halloween)
 How to Draw a Care Bear Step by Step (Cute Fan Art for Kids)
 How to Draw Cerberus Step by Step (Cute and Easy)
 How to Draw a Monster Step by Step (Cute and Easy)

